DIY - Tail Light Bulb Socket Replacements
 09-22-2011, 10:21 PM
#1
Drifting
Thread Starter

Used replacement wiring harnesses are hard to find. You can buy new from Porsche, but the cost may be prohibited. Here's an inexpensive solution using low cost sockets for a Nissan Quest that you can still purchase new and easily modify yourself. This works for later model 928's (1987-1995), but should also work for some other P-cars of the same vintages as well.


The tail light sockets are for:
1993-1995 Mercury Villager, or
1993=1995 Nissan Quest
Any automotive parts store should sell them, however NapaOnline may have the best price (part number 6803296, online price of $11.69). here:
https://www.napaonline.com/Catalog/C...296_0328210865
Napa price is for a package of two harness, which is four sockets. That's enough to do two tail lights.
Here's how to modify them to fit the S4/GT/GTS tail light assembly:
Remove the tubing and connector housing as shown.

With a sharp razor knife like shown, trim the straight tab. The trick is to cut the plastic like cutting slices of bread. Thin slices, not big cuts, working your way along.
Note: The following photos show the before and after plugs side by side.

Now start trimming the tabs that will hold the socket in the lamp assembly. Trim from the side shown, until you get to the dimension shown on the caliper.

Keep going, do the same for the other side. Then, trim them down some more to the width shown here.

Finally, you need to carefully cut the inside edge to achieve this clearance:

Now for the gasket. I'm using 2 mil thick closed-cell foam. They sell this stuff at crafts stores in 8-1/2x11 sheets in various colors. About $1 sheet.
I used a socket to draw the inside diameter. Using scissors, cut the inside, place the gasket on the prepared socket, and cut the outside diameter.

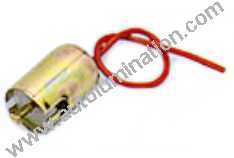
The sockets from come with dual filiment sockets, but you can easily convert them to single by purchasing an appropriate can. The cans simply press in place and can easily be removed with a pair of pliers.
I purchased the BA15s socket can from autolumination.com (part number 62-29, $2.49USD each). These just fit the plastic plastic housing without any modification.
Here's the back sides showing the dual and single filiment sockets. Notice how both versions have three wires. The single filiment socket has two ground wires (brown).

This diagram for the later 928's shows how factory wiring harness routes the ground wires to each bulb socket. Notice how the single filiment sockets require two ground wires.

So, the single filiment wiring with two ground wires can be added with a single length of 18 gauge stranded wire, with the insulation cover removed on the length (3/4").

The wire is routed through the two holes, while the bare wire is wedged between the plastic housing and the metal can. Make sure you grease (dielectric) the red wire where it slips through the black rubber seal in order to accomodate good movement of the center contact with the bulb.

The tail light sockets are for:
1993-1995 Mercury Villager, or
1993=1995 Nissan Quest
Any automotive parts store should sell them, however NapaOnline may have the best price (part number 6803296, online price of $11.69). here:
https://www.napaonline.com/Catalog/C...296_0328210865
Napa price is for a package of two harness, which is four sockets. That's enough to do two tail lights.
Here's how to modify them to fit the S4/GT/GTS tail light assembly:
Remove the tubing and connector housing as shown.
With a sharp razor knife like shown, trim the straight tab. The trick is to cut the plastic like cutting slices of bread. Thin slices, not big cuts, working your way along.
Note: The following photos show the before and after plugs side by side.
Now start trimming the tabs that will hold the socket in the lamp assembly. Trim from the side shown, until you get to the dimension shown on the caliper.
Keep going, do the same for the other side. Then, trim them down some more to the width shown here.
Finally, you need to carefully cut the inside edge to achieve this clearance:
Now for the gasket. I'm using 2 mil thick closed-cell foam. They sell this stuff at crafts stores in 8-1/2x11 sheets in various colors. About $1 sheet.
I used a socket to draw the inside diameter. Using scissors, cut the inside, place the gasket on the prepared socket, and cut the outside diameter.
The sockets from come with dual filiment sockets, but you can easily convert them to single by purchasing an appropriate can. The cans simply press in place and can easily be removed with a pair of pliers.
I purchased the BA15s socket can from autolumination.com (part number 62-29, $2.49USD each). These just fit the plastic plastic housing without any modification.
Here's the back sides showing the dual and single filiment sockets. Notice how both versions have three wires. The single filiment socket has two ground wires (brown).
This diagram for the later 928's shows how factory wiring harness routes the ground wires to each bulb socket. Notice how the single filiment sockets require two ground wires.
So, the single filiment wiring with two ground wires can be added with a single length of 18 gauge stranded wire, with the insulation cover removed on the length (3/4").
The wire is routed through the two holes, while the bare wire is wedged between the plastic housing and the metal can. Make sure you grease (dielectric) the red wire where it slips through the black rubber seal in order to accomodate good movement of the center contact with the bulb.
 10-14-2011, 12:38 AM
#2
Drifting
Thread Starter
I found a nice matching pair of supple leather seats in Silk Grey, so my project plan for this pair of seats, is to make a ‘like new’ driver seat, by swapping passenger and driver side’s leather. If I’m lucky, I will be able to swap the completed driver’s seat with the one installed in my 90’ S4.
These seats were advertised as ‘from a low mileage 89’. They are the common 8-way seats, so they don’t have the lumbar adjustments or seat heating elements. The driver’s bolster has some typical wear, but the passenger seat looks almost new.
This project presents some challenges, as a few problems:
- Seat wiring is significantly different between driver and passenger side. Driver side seat has seat position memory circuitry while the passenger seat lack it. Even the seat backrests have different wiring harnesses and the passenger side lacks the backrest potentiometer required for driver side seat memory).
Here's the driver side seat...

and the much simpler wiring on the passenger side seat....

I started with the leather backrest swap, so what follows, is how I removed the backrest from the seat bottom for the driver's side.
First thing is to disconnect the backrest harness from the seat wiring. There are some connectors to disconnect and some nylon stay ties to cut. But the harness is looped under some seat bottom leather that needs to be undone by cutting a few hog rings (red arrows show were removed in photo below).

There are several hog rings that need to be cut off to allow for the disassembly. I purchased a small bolt cutter at HFT. You could might be able to use a pair of diagonal cutters, but the bolt cutters make it much easier. For the leather reassembly, I purchased hog ring pliers and hog rings from eBay (more on those later).

Now with those rings removed, you can see how to remove the backrest harness from the base. But under that leather flap, there’s another hog ring to remove and a wire strap to unwrap just below.

You can now see the harness free and the leather undone with the strap wire hanging down.

---------
With the wiring harness free, its just a matter of removing hardware from the side mounts to allow removing the backrest from the seat bottom. As you can see in the photo below, just two bolts on each side and a cable to unhook. But, because the backrest motor is located inside the headrest, there’s also at drive shaft or pin that allows this motor to drive the gears that adjust the position of the backrest on both sides.
You’ll also see white factory alignment paint. If your swapping just the backs and rewiring the backrest motors, it would be a good idea to run the backrest motor to the factory alignment position. I used a fresh 9V battery to do this alignment by applying electrical power to the harness (yellow and green/yellow stripe wires).

To remove the drive shaft or pin, with a 2.5mm hex tool (Allen wrench), remove the small screw (arrow in photo).

You’ll need to find another longer screw with the same threads to use as a tool to extract the drive shaft or pin. The photo below shows the drive shaft or pin partially removed using the longer screw as an extractor tool. There’s also a rubber washer that will pull out with the drive shaft or pin. Same case for both sides of the backrest.

-----
Remove the drive shaft or pin on both sides of the backrest. Loosen the four bolts and unhook the cables. Not shown in the photo (hidden by the leather, just below the upper bolt) are cable guides that the cable need to released before removing the bolts and backrest.

Here’s photo showing the seat ready for removing the side bolts and pulling off the backrest.

And with the backrest removed, you can see the hex slot where the drive shaft or pin fits in.

Here’s a photo of the hardware that was removed.

And the backrest separated from the seat bottom.

These seats were advertised as ‘from a low mileage 89’. They are the common 8-way seats, so they don’t have the lumbar adjustments or seat heating elements. The driver’s bolster has some typical wear, but the passenger seat looks almost new.
This project presents some challenges, as a few problems:
- Seat wiring is significantly different between driver and passenger side. Driver side seat has seat position memory circuitry while the passenger seat lack it. Even the seat backrests have different wiring harnesses and the passenger side lacks the backrest potentiometer required for driver side seat memory).
Here's the driver side seat...
and the much simpler wiring on the passenger side seat....
I started with the leather backrest swap, so what follows, is how I removed the backrest from the seat bottom for the driver's side.
First thing is to disconnect the backrest harness from the seat wiring. There are some connectors to disconnect and some nylon stay ties to cut. But the harness is looped under some seat bottom leather that needs to be undone by cutting a few hog rings (red arrows show were removed in photo below).
There are several hog rings that need to be cut off to allow for the disassembly. I purchased a small bolt cutter at HFT. You could might be able to use a pair of diagonal cutters, but the bolt cutters make it much easier. For the leather reassembly, I purchased hog ring pliers and hog rings from eBay (more on those later).
Now with those rings removed, you can see how to remove the backrest harness from the base. But under that leather flap, there’s another hog ring to remove and a wire strap to unwrap just below.
You can now see the harness free and the leather undone with the strap wire hanging down.
---------
With the wiring harness free, its just a matter of removing hardware from the side mounts to allow removing the backrest from the seat bottom. As you can see in the photo below, just two bolts on each side and a cable to unhook. But, because the backrest motor is located inside the headrest, there’s also at drive shaft or pin that allows this motor to drive the gears that adjust the position of the backrest on both sides.
You’ll also see white factory alignment paint. If your swapping just the backs and rewiring the backrest motors, it would be a good idea to run the backrest motor to the factory alignment position. I used a fresh 9V battery to do this alignment by applying electrical power to the harness (yellow and green/yellow stripe wires).
To remove the drive shaft or pin, with a 2.5mm hex tool (Allen wrench), remove the small screw (arrow in photo).
You’ll need to find another longer screw with the same threads to use as a tool to extract the drive shaft or pin. The photo below shows the drive shaft or pin partially removed using the longer screw as an extractor tool. There’s also a rubber washer that will pull out with the drive shaft or pin. Same case for both sides of the backrest.
-----
Remove the drive shaft or pin on both sides of the backrest. Loosen the four bolts and unhook the cables. Not shown in the photo (hidden by the leather, just below the upper bolt) are cable guides that the cable need to released before removing the bolts and backrest.
Here’s photo showing the seat ready for removing the side bolts and pulling off the backrest.
And with the backrest removed, you can see the hex slot where the drive shaft or pin fits in.
Here’s a photo of the hardware that was removed.
And the backrest separated from the seat bottom.
10-14-2011, 12:39 AM
#3
Drifting
Thread Starter
Backrest Disassembly...
Now for the next major step…. removing the leather from the backrests.
I first removed the backrest leather from the headrest and side bolster leather.
Start at the bottom of the backrest. With a pair of needle nose pliers, straighten the tabs to allow pulling free the bottom flap of the backside. Then working from one side, release the leather from the tabs, one at a time.

After releasing the backside leather flap from all the tabs, fold back the leather to uncover another flap (for the front backrest leather). You’ll see a couple hog rings that need to be cut off.

Flip over the backrest to work on the front side now. The backrest leather is held in place by a few hog rings between the leather and the horizontal wires of the backrest frame. Clip these off, and work your way from the bottom toward the top on both sides.

----
Here’s a photo showing the backrest leather with all of the bottom hog rings removed. Only thing holding it on now are two hog rings at the top. Clip these hog rings off from the top front.

This photo show marks with red arrows, the location of the two top hog rings.

And with the backrest leather removed.

This is as far as I got. So, more later…. Next update will be the backrest bolster leather removal.
Now for the next major step…. removing the leather from the backrests.
I first removed the backrest leather from the headrest and side bolster leather.
Start at the bottom of the backrest. With a pair of needle nose pliers, straighten the tabs to allow pulling free the bottom flap of the backside. Then working from one side, release the leather from the tabs, one at a time.
After releasing the backside leather flap from all the tabs, fold back the leather to uncover another flap (for the front backrest leather). You’ll see a couple hog rings that need to be cut off.
Flip over the backrest to work on the front side now. The backrest leather is held in place by a few hog rings between the leather and the horizontal wires of the backrest frame. Clip these off, and work your way from the bottom toward the top on both sides.
----
Here’s a photo showing the backrest leather with all of the bottom hog rings removed. Only thing holding it on now are two hog rings at the top. Clip these hog rings off from the top front.
This photo show marks with red arrows, the location of the two top hog rings.
And with the backrest leather removed.
This is as far as I got. So, more later…. Next update will be the backrest bolster leather removal.
10-15-2011, 04:58 PM
#4
Drifting
Thread Starter
To remove the backrest release *****/levers, I used a length of cord looped around the backside, then pulled the **** free. On the pull side of the cord, I wrapped the end around a stick to act as a handle and made the job easier on the hands. There's a metal clip between the lever and the **** which helps keep the **** from working free, and also makes removing it a little harder.

Here's a shot of plastic pieces and clip...

After that, its just a matter of removing the leather from the frame. Start at the bottom and release the bottom leather from the bent up frame clips. On these bottom leather flaps, there are some hog rings to cut ...

again...another hog ring to cut..

and finally the bottom leather is free ...

I then cut the hog rings on the front, being careful not to cut the springs. There are four springs on each side. The springs are painted white, but they look similar to hog rings, so be careful.
Here's showing the the leather free from any hog rings...

To completely remove the leather, you'll need to reach inside and free the leather from the frame and foam, as the leather has been on for so long, it's not going to just slip off. So after you find and release the stuck leather parts, nothing glued, then it should just lift off.

Everything you see here (foam & padding) is glued to the frame. Here's the backside of the backrest. Notice the springs I mentioned.

And again with the thin foam piece back in place. It came free with removing some of the hog rings.

This thin paper backed foam piece fit as shown behind the lower back flap.

And again with the foam aside, you can see the impression of the foam in the leather..

That's it, backrest leather is removed on the driver side seat. Next is doing the same for the passenger side backrest.
Next update to this thread, I'll be doing the driver/passenger leather swap and reinstallation.
Here's a shot of plastic pieces and clip...
After that, its just a matter of removing the leather from the frame. Start at the bottom and release the bottom leather from the bent up frame clips. On these bottom leather flaps, there are some hog rings to cut ...
again...another hog ring to cut..
and finally the bottom leather is free ...
I then cut the hog rings on the front, being careful not to cut the springs. There are four springs on each side. The springs are painted white, but they look similar to hog rings, so be careful.
Here's showing the the leather free from any hog rings...
To completely remove the leather, you'll need to reach inside and free the leather from the frame and foam, as the leather has been on for so long, it's not going to just slip off. So after you find and release the stuck leather parts, nothing glued, then it should just lift off.
Everything you see here (foam & padding) is glued to the frame. Here's the backside of the backrest. Notice the springs I mentioned.
And again with the thin foam piece back in place. It came free with removing some of the hog rings.
This thin paper backed foam piece fit as shown behind the lower back flap.
And again with the foam aside, you can see the impression of the foam in the leather..
That's it, backrest leather is removed on the driver side seat. Next is doing the same for the passenger side backrest.
Next update to this thread, I'll be doing the driver/passenger leather swap and reinstallation.
Last edited by borland; 10-15-2011 at 05:44 PM.
10-16-2011, 08:37 PM
#5
Drifting
Thread Starter
Here�s the final update..
Reassembly Tools/Supplies used:
- Hog Ring Pliers: I purchased a used pair of 45 degree angle nose hog ring pliers on eBay for about $25 delivered. They are Republic, model XXL


- Hog Rings: I also purchased a 125 count bag of plated (anti-rust) car upholstery hog rings, �� crown,14 gauge, also on eBay for $5.50 delivered.

Here�s a couple photos showing the reassembled driver and passenger backrests. First the Driver side backrest with the passenger side leather cover installed...

and the passenger side backrest with the driver side leather cover installed...

Sorry no detailed assembly photos, as the assembly is pretty straight forward. Just do everything in reverse order of disassembly, matching hog ring locations that the factory used. Here�s some assembly notes:
- Start by inspecting the leather cover. The side bolsters have a polyester fiber backing sewn into the cover. I found this backing to be matted on the driver�s bolster, so that needed to be smoothed out to eliminate any bulging of the leather one back in place on the seat. That turned out to be easy, just needed to pull on the fibers with my fingers to loosen them up.
- Placing the cover back over the seat foam. It will take some massaging of the leather to work it back in place. Once the fit is correctly, secure the bottom leather flaps in place using hog rings. Then start as the front top and work your way around the bolster, refastening the hog rings. The center leather piece first clamps at the top with two hog rings, clamped with the pliers from the front (these two rings need to be tight in order to eliminate any gap where it meets with the headrest).
- With all the hog rings, use your fingers to make sure the ring grabs the wire sewn into the leather cover before squeezing the pliers. Take your time with the hog rings. I clamped a few that I didn�t like. It is easy to cut them out with the bolt cutters and replace it with another. No harm done.
- The hardest part is securing the backside bottom flap to the frame hooks. I used a hook fashioned from short length of bailing wire and a pair of vice grips. I used the wire hook to stretch the leather flap enough to fit it over the frame hooks. A pair of long nose pliers and a tack hammer was use to bend the frame hooks back in place.
Reassembly Tools/Supplies used:
- Hog Ring Pliers: I purchased a used pair of 45 degree angle nose hog ring pliers on eBay for about $25 delivered. They are Republic, model XXL
- Hog Rings: I also purchased a 125 count bag of plated (anti-rust) car upholstery hog rings, �� crown,14 gauge, also on eBay for $5.50 delivered.
Here�s a couple photos showing the reassembled driver and passenger backrests. First the Driver side backrest with the passenger side leather cover installed...
and the passenger side backrest with the driver side leather cover installed...
Sorry no detailed assembly photos, as the assembly is pretty straight forward. Just do everything in reverse order of disassembly, matching hog ring locations that the factory used. Here�s some assembly notes:
- Start by inspecting the leather cover. The side bolsters have a polyester fiber backing sewn into the cover. I found this backing to be matted on the driver�s bolster, so that needed to be smoothed out to eliminate any bulging of the leather one back in place on the seat. That turned out to be easy, just needed to pull on the fibers with my fingers to loosen them up.
- Placing the cover back over the seat foam. It will take some massaging of the leather to work it back in place. Once the fit is correctly, secure the bottom leather flaps in place using hog rings. Then start as the front top and work your way around the bolster, refastening the hog rings. The center leather piece first clamps at the top with two hog rings, clamped with the pliers from the front (these two rings need to be tight in order to eliminate any gap where it meets with the headrest).
- With all the hog rings, use your fingers to make sure the ring grabs the wire sewn into the leather cover before squeezing the pliers. Take your time with the hog rings. I clamped a few that I didn�t like. It is easy to cut them out with the bolt cutters and replace it with another. No harm done.
- The hardest part is securing the backside bottom flap to the frame hooks. I used a hook fashioned from short length of bailing wire and a pair of vice grips. I used the wire hook to stretch the leather flap enough to fit it over the frame hooks. A pair of long nose pliers and a tack hammer was use to bend the frame hooks back in place.
Last edited by borland; 10-18-2011 at 04:51 PM.
11-30-2011, 04:01 PM
#6
Drifting
Thread Starter
Seat bottoms Leather Swap -
I also swapped the bottom leathers between the driver and passenger seats. This was significantly more involved, in that it required hand stitching the seat bottom pieces so as to reutilize the bottom skirt and vinyl piping. If it were not for the 8-way switch cutout holes in the leather, the swap would have been much easier.
Here’s some photos showing the seat bottom strip down and associated seat components.
Red arrows pointing to hog rings which need to be cut off.


After removing the hog rings from the bottom of the cushion, you simple bend up the bent over tabs (yellow arrows) along the bottom sides.

You’ll need to remove the 8-way switches and harness by snaking the wires through the frame (not real easy).

The leather cover comes free after separating the glued down leather from the cushion enough to cut off additional hog rings near the top. With the leather removed, here’s the driver’s side foam cushion.

Here you can see where the hog rings grip metal rods (red arrows ) embedded in the foam cushion.

Here’s the underside of the leather seat bottom piece

And the driver’s seat bottom frame.

For the hand stitching, I used a sewing machine needle to reattach the pieces with a machine stitch. Thread I used was a color matching commercial nylon upholstery thread ( #69 bonded nylon thread). I purchased this inexpensive thread on eBay.
After hand sewing the swapped seat bottom leathers….. here I’ve used masking tape to mask off for the adhesive spray (3M Foamfast 74).

Similar masking for the foam bottom cushion……

In order to keep the two from sticking together while fastening the hog rings, I used waxed paper between the two pieces.

The rest is just restoring the hog rings and metal tabs, reinstalling the seat switches, rails, motor assemblies, cables, and wiring harness.
Here’s the finished Passenger seat next to the Driver’s seat which I removed from my 90’ S4. The project called for these seats (the pair) to be resold (already sold).
Both seats shown here have driver seat leathers. I’ve touched up the driver’s seat bolster wear with matching leather dye. Not shown, is the installed driver seat with passenger seat leather.

Another couple views..


I also swapped the bottom leathers between the driver and passenger seats. This was significantly more involved, in that it required hand stitching the seat bottom pieces so as to reutilize the bottom skirt and vinyl piping. If it were not for the 8-way switch cutout holes in the leather, the swap would have been much easier.
Here’s some photos showing the seat bottom strip down and associated seat components.
Red arrows pointing to hog rings which need to be cut off.
After removing the hog rings from the bottom of the cushion, you simple bend up the bent over tabs (yellow arrows) along the bottom sides.
You’ll need to remove the 8-way switches and harness by snaking the wires through the frame (not real easy).
The leather cover comes free after separating the glued down leather from the cushion enough to cut off additional hog rings near the top. With the leather removed, here’s the driver’s side foam cushion.
Here you can see where the hog rings grip metal rods (red arrows ) embedded in the foam cushion.
Here’s the underside of the leather seat bottom piece
And the driver’s seat bottom frame.
For the hand stitching, I used a sewing machine needle to reattach the pieces with a machine stitch. Thread I used was a color matching commercial nylon upholstery thread ( #69 bonded nylon thread). I purchased this inexpensive thread on eBay.
After hand sewing the swapped seat bottom leathers….. here I’ve used masking tape to mask off for the adhesive spray (3M Foamfast 74).
Similar masking for the foam bottom cushion……
In order to keep the two from sticking together while fastening the hog rings, I used waxed paper between the two pieces.
The rest is just restoring the hog rings and metal tabs, reinstalling the seat switches, rails, motor assemblies, cables, and wiring harness.
Here’s the finished Passenger seat next to the Driver’s seat which I removed from my 90’ S4. The project called for these seats (the pair) to be resold (already sold).
Both seats shown here have driver seat leathers. I’ve touched up the driver’s seat bolster wear with matching leather dye. Not shown, is the installed driver seat with passenger seat leather.
Another couple views..
01-08-2017, 04:28 PM
#7
Three Wheelin'
Used replacement wiring harnesses are hard to find. You can buy new from Porsche, but the cost may be prohibited. Here's an inexpensive solution using low cost sockets for a Nissan Quest that you can still purchase new and easily modify yourself. This works for later model 928's (1987-1995), but should also work for some other P-cars of the same vintages as well.
The tail light sockets are for:
1993-1995 Mercury Villager, or
1993=1995 Nissan Quest
Any automotive parts store should sell them, however NapaOnline may have the best price (part number 6803296, online price of $11.69). here:
https://www.napaonline.com/Catalog/C...296_0328210865
Napa price is for a package of two harness, which is four sockets. That's enough to do two tail lights.
Here's how to modify them to fit the S4/GT/GTS tail light assembly:
Remove the tubing and connector housing as shown.
With a sharp razor knife like shown, trim the straight tab. The trick is to cut the plastic like cutting slices of bread. Thin slices, not big cuts, working your way along.
Note: The following photos show the before and after plugs side by side.
Now start trimming the tabs that will hold the socket in the lamp assembly. Trim from the side shown, until you get to the dimension shown on the caliper.
Keep going, do the same for the other side. Then, trim them down some more to the width shown here.
Finally, you need to carefully cut the inside edge to achieve this clearance:
Now for the gasket. I'm using 2 mil thick closed-cell foam. They sell this stuff at crafts stores in 8-1/2x11 sheets in various colors. About $1 sheet.
I used a socket to draw the inside diameter. Using scissors, cut the inside, place the gasket on the prepared socket, and cut the outside diameter.
The sockets from come with dual filiment sockets, but you can easily convert them to single by purchasing an appropriate can. The cans simply press in place and can easily be removed with a pair of pliers.
I purchased the BA15s socket can from autolumination.com (part number 62-29, $2.49USD each). These just fit the plastic plastic housing without any modification.
Here's the back sides showing the dual and single filiment sockets. Notice how both versions have three wires. The single filiment socket has two ground wires (brown).
This diagram for the later 928's shows how factory wiring harness routes the ground wires to each bulb socket. Notice how the single filiment sockets require two ground wires.
So, the single filiment wiring with two ground wires can be added with a single length of 18 gauge stranded wire, with the insulation cover removed on the length (3/4").
The wire is routed through the two holes, while the bare wire is wedged between the plastic housing and the metal can. Make sure you grease (dielectric) the red wire where it slips through the black rubber seal in order to accomodate good movement of the center contact with the bulb.
Does anyone have access to these images anymore? Or is it just me?

