DetailersDomain.com - 1st gen 3m removal nightmare - Porsche 911
 07-11-2013, 10:05 PM
#1
Addict
Rennlist
Site Sponsor
Rennlist
Site Sponsor
Thread Starter
Join Date: Jun 2005
Location: NJ
Posts: 2,040
Likes: 0
Received 0 Likes
on
0 Posts
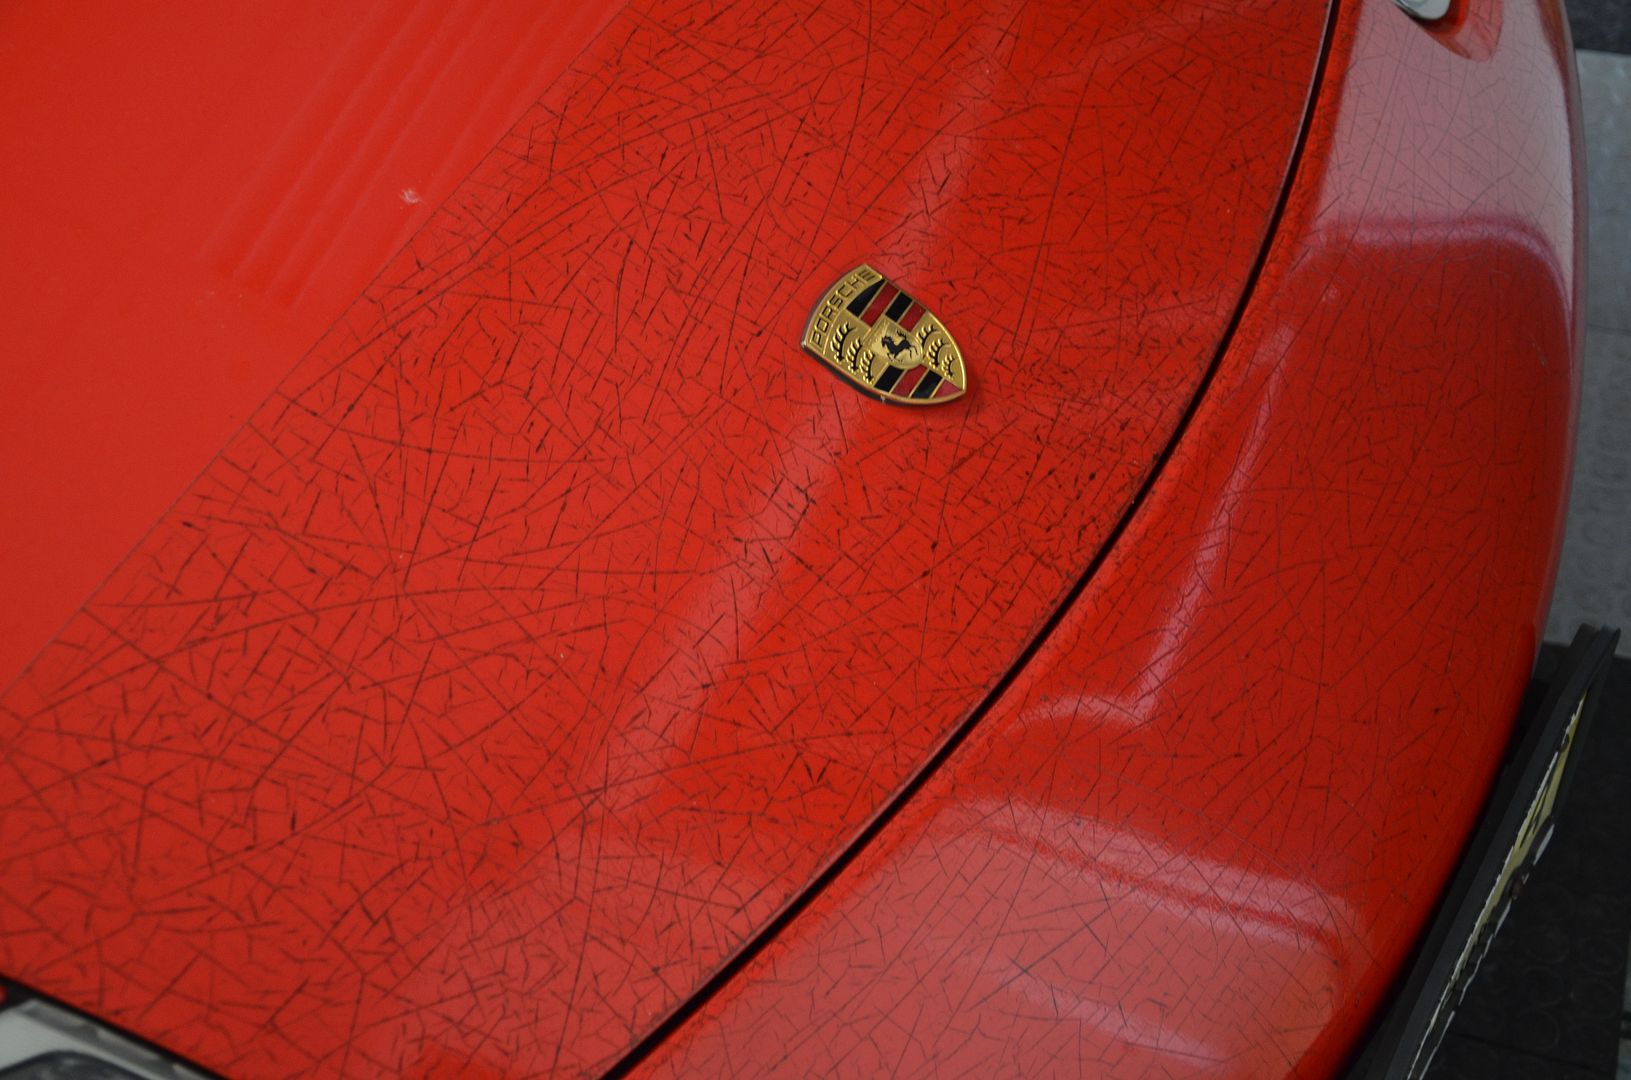
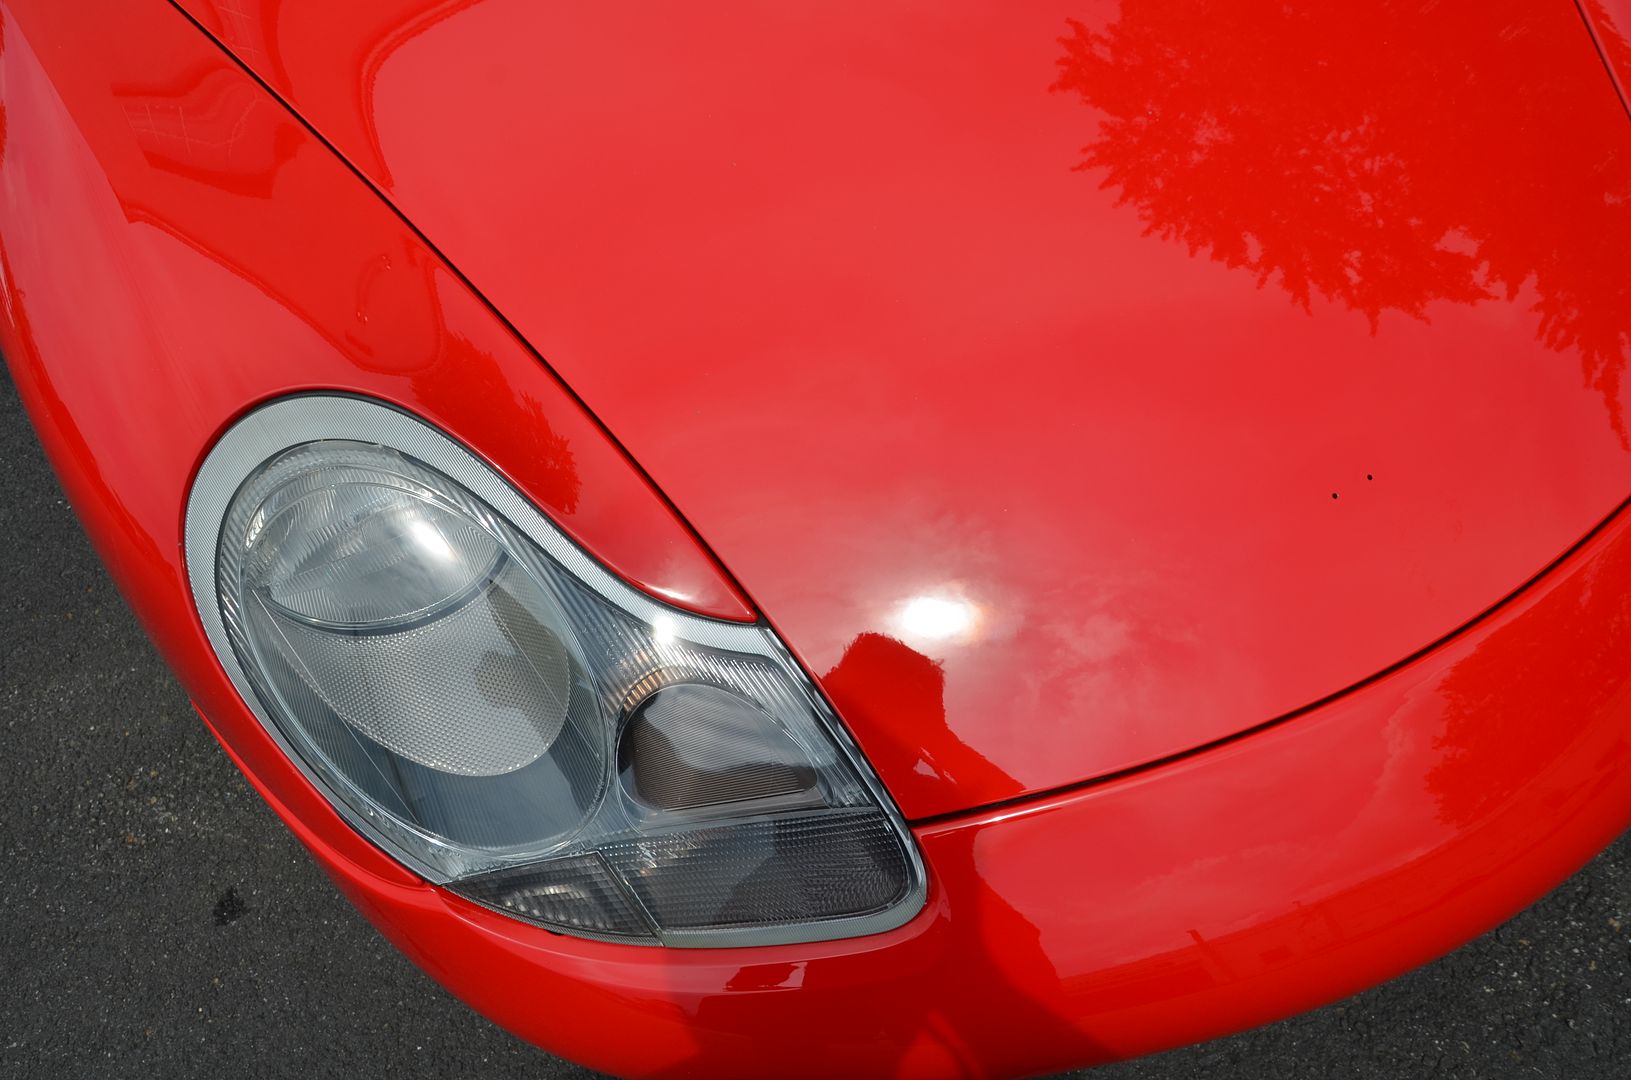
Detailer's Domain: 01 Porsche 911 - Clear Film Removal Nightmare!!!
You've seen this story play out on Facebook and Instagram, here it is in its entirety.
Subject: an 01 Porsche 911 Carrera needing some much needed love.
Requirements: Remove 1st gen 3M Paint Protection Film - wow has clear film gone a long way! - Full paint correction, Quick Engine Detail, Interior Detail.
Before
After
Click here for the complete story.
You've seen this story play out on Facebook and Instagram, here it is in its entirety.
Subject: an 01 Porsche 911 Carrera needing some much needed love.
Requirements: Remove 1st gen 3M Paint Protection Film - wow has clear film gone a long way! - Full paint correction, Quick Engine Detail, Interior Detail.
Before

After

Click here for the complete story.
__________________
Philip Yiu
Detailer's Domain
e-mail: phil@detailersdomain.com
website: www.detailersdomain.com
tel: 201-233-0003
Promo code is rennlist for 10% off anything on the site
Current Sales and Updates

Philip Yiu
Detailer's Domain
e-mail: phil@detailersdomain.com
website: www.detailersdomain.com
tel: 201-233-0003
Promo code is rennlist for 10% off anything on the site
Current Sales and Updates
 08-01-2013, 07:53 PM
#2
Three Wheelin'
Phil, What did you use for a steamer? Would a wallpaper steamer with a mf cloth wrapped around it work? Also, where did you get plastic razors? Thanks for the write up, Im about to remove my rear quarter stone gaurds.
08-02-2013, 08:47 AM
#3
Addict
Rennlist
Site Sponsor
Rennlist
Site Sponsor
Thread Starter
Join Date: Jun 2005
Location: NJ
Posts: 2,040
Likes: 0
Received 0 Likes
on
0 Posts
you can get the plastic razor blades here.
Plastic Razor Blades
You can try the steamer you have however we used one of these.
Dupray Steamer.
Plastic Razor Blades
You can try the steamer you have however we used one of these.
Dupray Steamer.
Trending Topics
08-03-2013, 03:00 PM
#8
Three Wheelin'
The removal went pretty smoothly. I did not have a steamer so I used a heat gun. Mine has a good range or temperature so I kept it around 200F. Too hot and the adhesive melted and became a gooey mess. When just right it peeled off in decent size sections. I think it may have been pliable enough that an afternoon in direct sun would have warmed it up just right.
Install of the new guard (from Pelican Parts) was not so good. I used a 3M adhesive remover and a shop towel to remove the remaining adhesive. After that denatured alcohol to remove any greasy mess left behind. Meguiars correction compund on a Meguiars micro fiber pad to remove scatches (from detailers domain) and then Menzerna SF4000 on a green Uber pad (also from dd) The finish now looked good and I was ready to start the install after a wash and rinse.
Install of the new guard. I used the no rinse wash and shine in a pressurized bottle (both from detailers domain) that worked well. I had a rough time aligning the guard where I wanted it. I wet the body surface and the sticky side of the guard. When I applied it, the guard stuck pretty fast. I didnt press down too hard, not sure why it didnt want to slide around easily. After a few tries I was able to get it where I wanted. Then I started working the bubbles out and smoothing it to the body. I wasnt happy with one section so I pulled it back a little. That left some snottiness on the film. Worked it a bit more and got it pretty well where I wanted it. Working on a few more bubbles and I stretched the film at the edge. I pierced a few remaining bubbles and decided that was enough. Ordering a new new one shortly.
08-04-2013, 09:47 AM
#9
Addict
Rennlist
Site Sponsor
Rennlist
Site Sponsor
Thread Starter
Join Date: Jun 2005
Location: NJ
Posts: 2,040
Likes: 0
Received 0 Likes
on
0 Posts
film is not an easy process. I leave it to my guys who have over 10 years under their belt. it's time consuming and patience is needed. good luck on the next try.
08-04-2013, 05:28 PM
#10
Addict
Rennlist Member
Rennlist Member
The film on my C32 wasn't that bad but it was visibly cracked due to UV and in very rough shape. It came off in small pieces and was extremely difficult to remove. I needed to use Goof Off (strong citrus) to remove the adhesive. What a pain!
It made me realize the importance of replacing clear film every 5 - 7 years.
It made me realize the importance of replacing clear film every 5 - 7 years.