When you click on links to various merchants on this site and make a purchase, this can result in this site earning a commission. Affiliate programs and affiliations include, but are not limited to, the eBay Partner Network.
955/957 Cayenne DIY: Replace turbo without dropping engine
I am writing this DIY as I couldn’t find anywhere that described how to DIY a left turbo replacement on a 2005 Porsche Cayenne Turbo, and all the mechanics I spoke to said the drivetrain must be dropped out the car to do the job. As the minimum quote was $7,000, I decided to do it myself. I will not lie and say it was easy, you will need a lot of perseverance, creativity and determination to get to some of the harder to access bolts. It may not even be easier than removing the engine, but it is just about doable by a competent and confident home mechanic who is very determined to save money. However, I did not have the facilities or ability to remove the engine by myself and there are 6,000 good reasons to undertake this at home! I would rate this as a 9/10 on the difficulty scale, with 10 being removing the engine and 1 being an oil change, but I have proved it possible. If you need to do both turbos, then it is definitely easier to remove the engine.
I am happy to modify this DIY with feedback or other advice. This work is done at your own risk, I take no responsibility for you skinning your knuckles, damaging your car or anything else by using these instructions!
Total time taken to remove and reinstall the turbo was about 25-30 hours, including some trial and error, taking lots of pics and notes. The turbo was a used one that I bought off ebay for $350 and had remanufactured. (My turbo had a cracked housing and was not able to be refurbished.)
Tools needed
Sockets
8mm
10mm
12mm
13mm
T30 Torx for undertray
T40 torx socket
E-Torx sockets
Stubby and long handled ratchets
Flex head 3/8” ratchet (essential)
Torque wrench
Lots of socket extensions, some with swivel / wobble joints
Universal / swivel joints
Wrenches
16mm offset wrench
17mm flare wrench
17mm ratchet wrench
19mm box wrench / ring spanner
5mm Allen wrench
8mm shortened Allen wrench
Other tools
Flat head screwdriver
long nose right angled pliers
long nose pliers
Borescope (essential to find all the bolts in hard to reach places)
Magnet on stick for recovering dropped bolts and tools
Hacksaw (if you decide to cut the lowest oil pipe)
Torque wrench
Prybars of varying lengths to move the turbo in the very tight spaces
Jack stands
Jack
Shop towel / rags to clean up spillages
Drain buckets
Consumables and parts
Left reman turbo part number 948-123-016-56 $750
1x o-ring 999-707-544-40. $2.64
3x seal rings 900-123-131-30 $2.64 each
1x rubber o-ring 999-707-387-40 $1.07
1x rubber o-ring 999-707-392-40 $2.64
5x seal rings 900-123-005-30 $1.07 each
1x exhaust gasket 955-111-113-20 $12.02
1x exhaust gasket 955-111-113-10 $14.29
8x hexagon nut N-908-946-02 $0.81 each
1x exhaust gasket 948-123-203-52 $13.28
1x green o-ring 955-110-720-00 $4.61
Porsche Coolant
Mobil 1 0W40 x9 quarts
Oil filter
Additional
Various plastic hoses that may break due to being old and brittle
Duolok connector or rubber oil hose & clamps to repair the cut oil line if you are unable to remove the lower oil pipe from the turbo.
Step 1
Apply parking brake firmly with the car on level ground.
Put the air suspension into 'Service Mode' by pushing the Ride Height control forward for about 5-10 seconds. You should get a message about 'Regulation Switched off'.
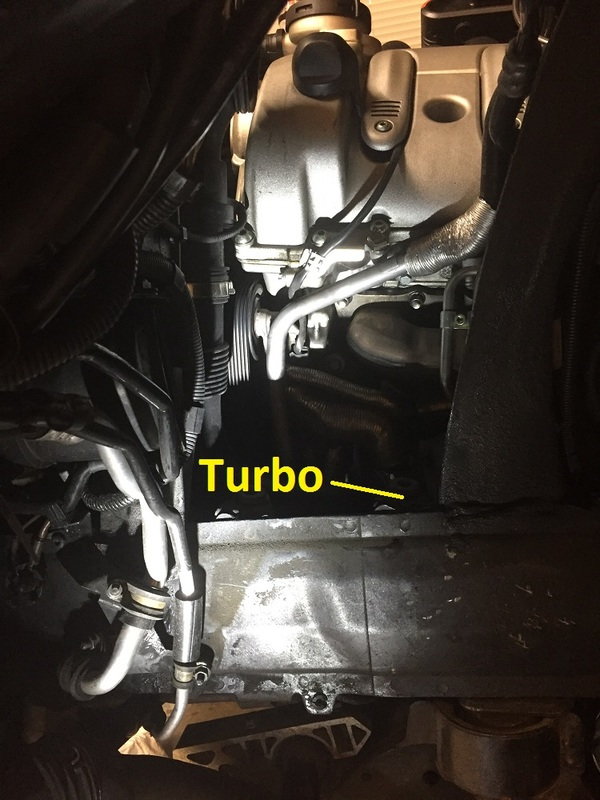
Remove the plastic engine trim on the front and side of the turbo you are replacing.
Jack up the car and place on jackstands. Remove the front wheel and wheel arch liner using T25 torx, 10mm socket and Phillips head screwdriver.
Remove the front center undertray from beneath the engine at this time, using a T30 torx.
Drain the engine oil and replace the oil filter. Access is very easy as all the panels are already off.
Step 2
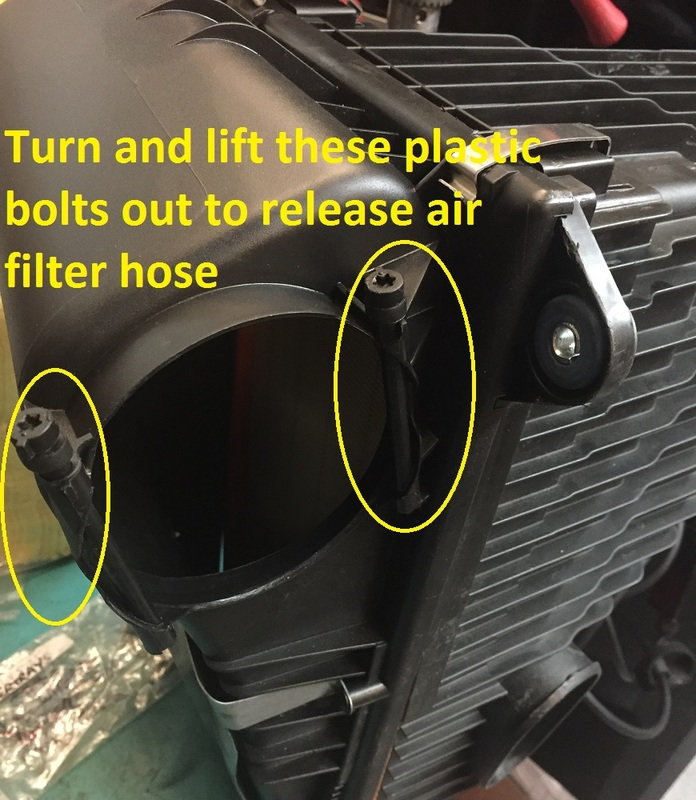
Remove the air filter cover by turning the two T30 plastic torx screws a half turn until they can be lifted up and out.
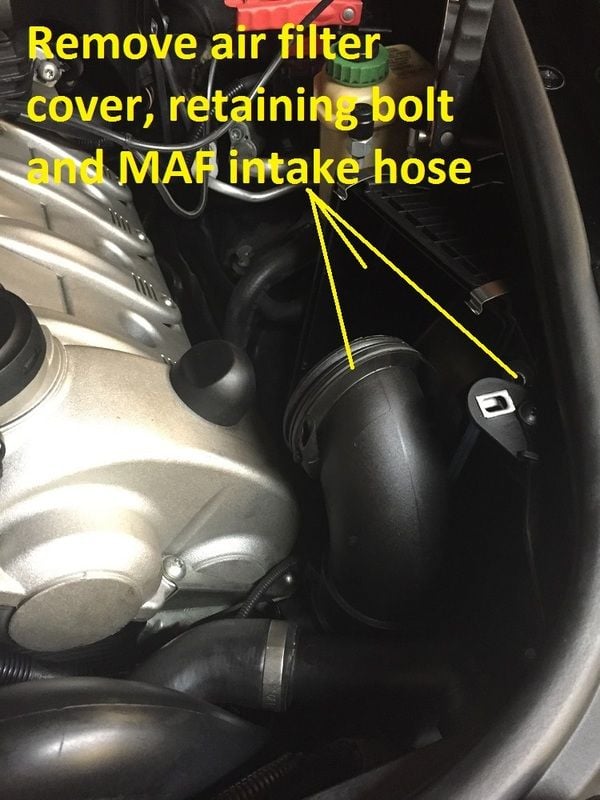
Disconnect the MAF intake hose from the air filter housing. Remove the cover and the air filter from the engine bay. Disconnect the MAF sensor harness from above and the air intake hose from the bottom of the filter housing (best access is through the wheel arch), then remove the 10mm bolt holding the air filter housing to the car.
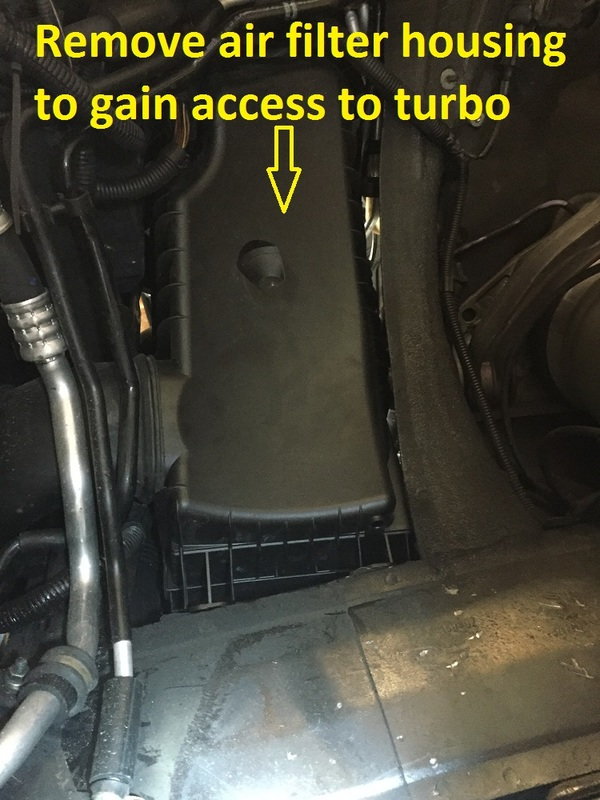
Remove the air filter housing from the top of the engine bay. It is a tight fit and you will need to move hoses aside and twist it around a bit before you can wiggle it out.
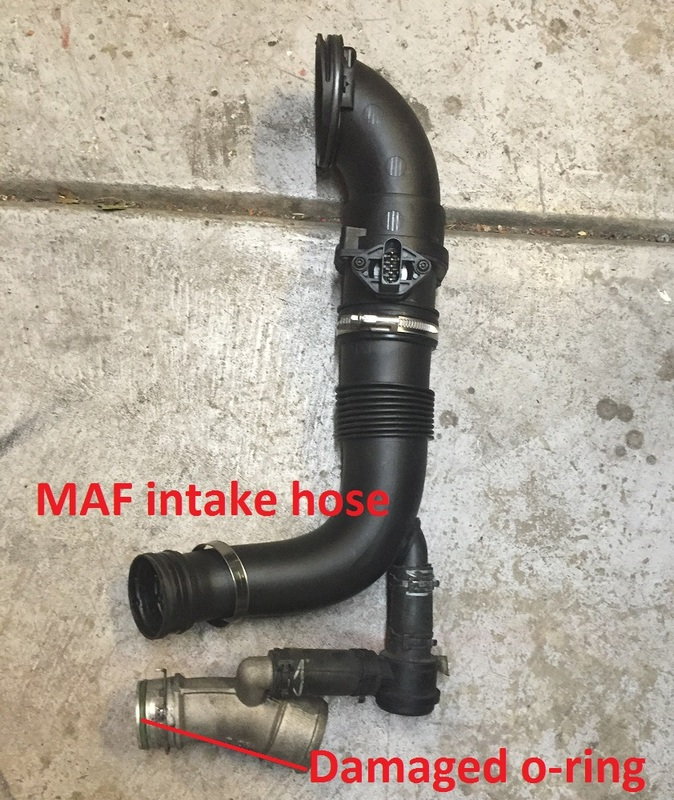
When this is done, remove the thin rubber hose from the bottom of the MAF intake pipe and pull the MAF intake pipe out of the car.
There should now be a clear view of the turbo through the hole in the wheel arch that was made by removing the air filter housing.
Step 3
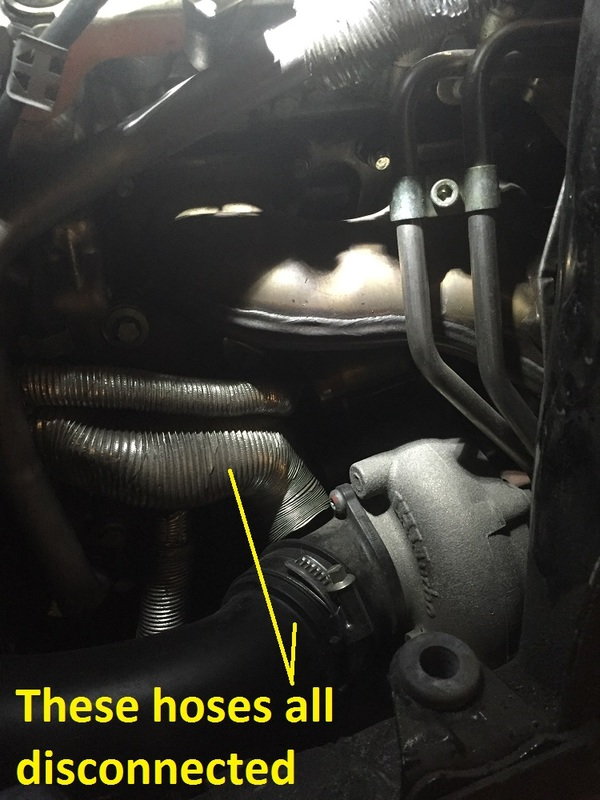
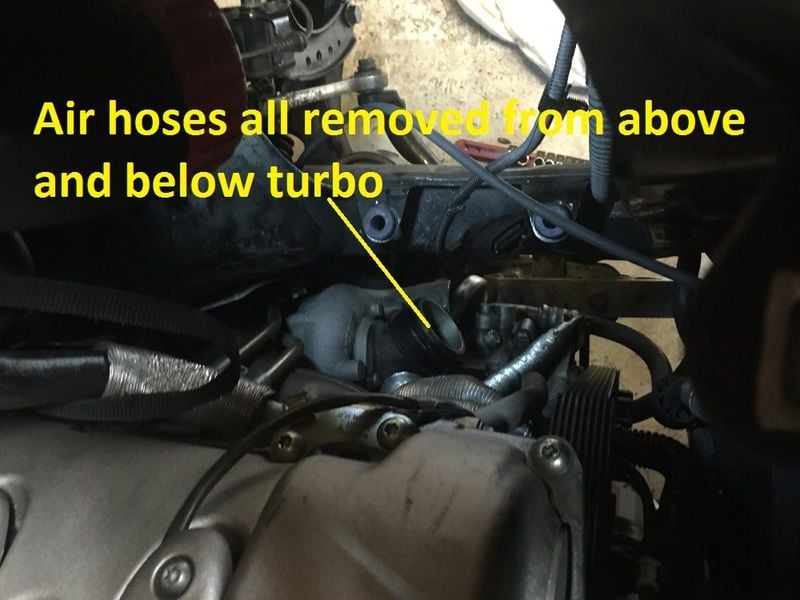
Remove the hose clamp on the upper air hose going to the turbo and pull the hose from the front of the turbo.
Pop the spring retaining clip on the lower pressure hose and remove the pressure pipe from the turbo.
Remove smaller tube and the 'quick release' hose from the top of the turbo. These were tricky for me, you need to squeeze the hose and pull it up at the same time. The clips broke on mine, and the pipe is over $200 to replace.
The smaller air hose was very tightly on and I needed pliers and a lot of twisting force. When it finally came off, I broke the plastic pipe fitting at the front of the engine, so this also needed to be replaced. There was little clearance or flexibility in the hoses to do this.
This is the view of the turbo from above.
Remove the two 17mm coolant banjo bolts from the outer side of the turbo. 1-2 liters of coolant will leak out, have a drip tray ready.
(I needed to remove the linking clamp between the 2 pipes using a 5mm Allen wrench so I could remove the rear banjo bolt. Discard the 4 aluminum sealing rings and during reassembly replace with new ones (900.123.005.30) on the 2 banjo bolts.)
Remove the oil pipe from the top of the turbo using an 8mm shortened Allen wrench. You may lose a little oil here, but not more than a quarter of a liter. Discard the sealing rings and replace with new when reassembling.
Step 4
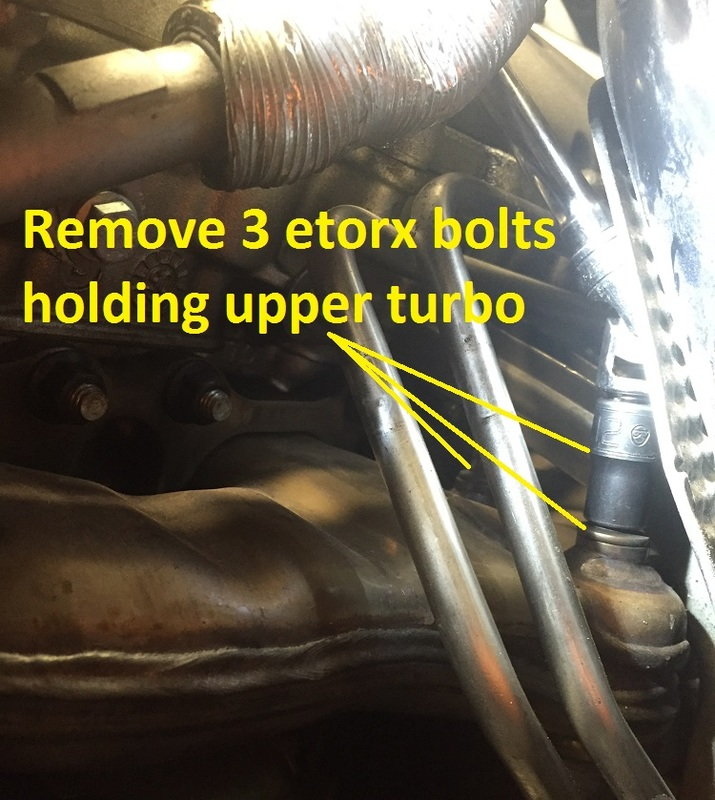
Remove the three E12 torx bolts holding the turbo to the exhaust manifold. Use extensions and universal swivels from above, as they are angled toward the suspension strut tower.
Remove the 10mm nut on the bracket to the rear of the manifold that holds the turbo coolant tubes in place in order to gain access to remove the rear E12 turbo bracket bolt.
Remove the two E12 torx bolts holding the turbo bracket to the engine block, then remove the single E12 torx holding the bracket to the turbo. (You will need long nose right angled pliers to hold the rear nut to undo this bolt.)
Step 5
From beneath the car, remove the five 12mm nuts holding the rear of the turbo to the exhaust. You will need some patience, creativity and a good selection of straight and wobble extensions, swivel joints and flex head ratchets. (I got the outer 2 off through the rear of the wheel arch and the other 3 from below.) The top nut was the toughest one to access, needing around three 12” extension bars and a flex head ratchet.
Remove the three 12mm nuts holding the catalytic converter pipe to the middle muffler exhaust pipe. Split the 2 pipes apart so you have maneuverability in the catalytic converter and turbo.
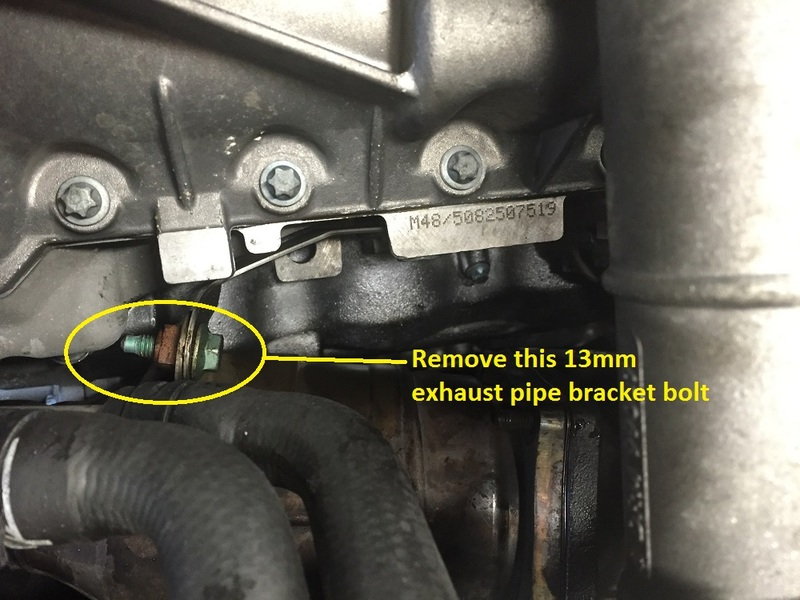
Remove the 13mm bolt on the catalytic converter bracket (near the O2 sensor) in order to have some extra clearance and flexibility to access the rear turbo nuts.
Remove the lower oil pipe from beneath the 2 coolant banjo bolts. Access is moderately tough, I used a 17mm crowsfoot flare wrench on a few long extensions and wiggled the turbo and coolant pipes around to gain clearance.
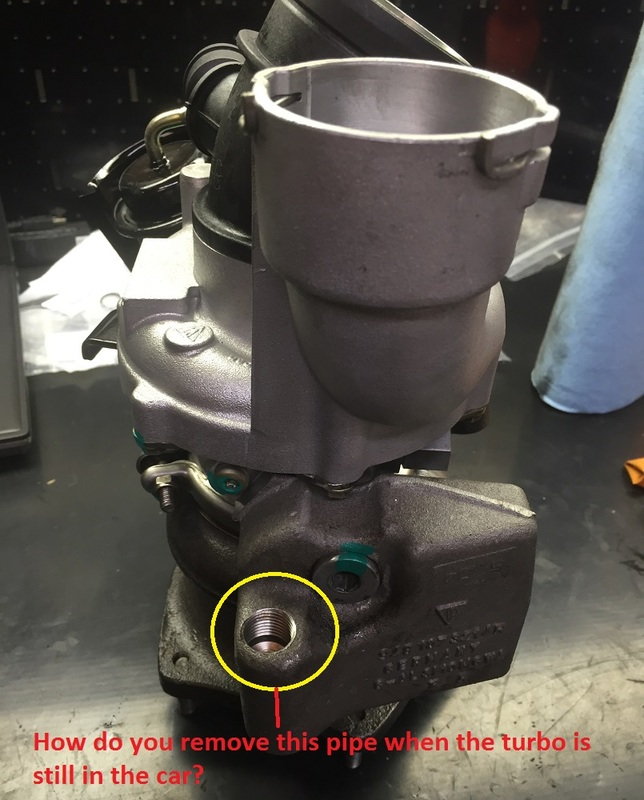
The final metal oil pipe is beneath the turbo facing forwards. Access is very tough or close to impossible. To remove this 17mm bolt you need to come in through the wheel arch with a 17mm crowsfoot flare wrench on extensions with wobble joints. You will need a lot of patience to get it off. A borescope or mirror is essential here. I ended up cutting the oil line as I could not remove the bolt with the turbo insitu. During reassembly I will reconnect the cut pipe using a short piece of oil hose and hose clamps or Duolok metric pipe fittings.
Step 6
Remove the four 16mm engine mounts bolts under the car and jack up the engine as far as you can safely take it. Unsurprisingly, one of them (right side rear is very difficult to access and a cross member interferes with getting a ratchet to the bolt head). I used an offset wrench to access it.
Remove the valve unit from the top of the turbo by removing the two 8mm bolts from the backing plate and the circlip that holds the connecting rod to the arm at the rear of the turbo. (It is not easy to get the circlip off, so I ended up hacksawing through the connecting rod to remove it.) Remove this valve unit from the engine bay. The gap is only just big enough.
I also removed the plastic hose connection port from the front of the turbo by removing the two T30 torx bolts, just to give a little extra clearance.
Pull the old turbo out through the wheel well hole where the air filter housing was removed.
Step 7
Have a beer, cup of coffee, bottle of champagne or whatever floats your boat. I also used a bacon burger at this point.
Step 8
Clean out the turbo oil supply line as best you can with any kind of cleaning fluid, eg Seafoam. Don't let any debris or sludge enter the new turbo if you can avoid it.
On the new turbo, unbolt the valve unit and remove the circlip holding the connecting rod.
Fit the new turbo into place by whatever means you can.
After wiggling the turbo into place, do not forget to reattach the valve unit removed prior to installation. The circlip is challenging to fit. I used some long nosed pliers and long screwdrivers to pop it into place. The 8mm bolt nearest the engine block is also tough to reach, I used some long socket extensions from the beneath the car, near the catalytic converter.
Step 9
Reverse order of the steps above to complete the rest of the installation.
Prior to connecting all the top hoses, put 2-3 fluid ounces (50ml) of clean engine oil in the oil supply fitting and rotate the turbo by spinning the turbine wheel to pump it through the turbo. You may need to remove the plastic pipe connector port to spin the blades if you cannot reach.
When all the hoses are tightened, double check all the bolts are torqued correctly, refill the engine oil and coolant.
Observe all the hoses for a while to check for leaks. Ideally, leave it overnight and look for leaks in the morning.
Have a helper spin the engine over while you look for leaks. If all looks good after the car has been running for a few mins, bolt all the undertrays and engine trims back on.
After a few days of use, re-check the oil and coolant levels.
You may need to get any old fault error codes cleared from your car using a code scanner or Durametric system. I have a Durametric Pro cable, so I can clear my own codes.
Excellent write up - if you have any other DIYs and would like to have your article to be considered for our site, check out the link below. If we publish your article, we'll give you 10% off your next order and a credit.
Great write up, Any indication what caused the Turbo to crack? How many miles on your rig? What were the symptoms, did you get a CEL or felt a loss in performance. I have a 958TT with 160K not sure if this is common.
Great looking California car (at least the parts look new).
The easy math is you made ~$200.00 an hour and saved the bank account.
No idea, perhaps it was a manufacturing fault or a rock flicked up and cracked it. I don't think it is a common issue.
Symptoms were a loss of power, a whistling noise from the turbo when under load and CEL with fault codes about loss of pressure.
 02-23-2016, 02:14 AM