Notices
Boxster & Boxster S (986) Forum 1996-2004
Sponsored by:
Sponsored by:

Need DIY instructions - Power Steering Pressure Line replacement

Thread Tools
 
Search this Thread
 
Old 12-28-2016, 02:37 PM
  #16  
Vidyashankara
Instructor
Thread Starter
 
Vidyashankara's Avatar
 
Join Date: Apr 2016
Posts: 192
Received 8 Likes on 3 Posts
Default

excellent. thanks.
Old 12-28-2016, 02:38 PM
  #17  
Vidyashankara
Instructor
Thread Starter
 
Vidyashankara's Avatar
 
Join Date: Apr 2016
Posts: 192
Received 8 Likes on 3 Posts
Default

Do you know if a lot of fluid comes out when you disconnect the pressure line? How do you limit the fluid spillage? just siphon it out from the reservoir?
Old 12-28-2016, 02:41 PM
  #18  
Shred
Instructor
 
Shred's Avatar
 
Join Date: May 2016
Location: Los Angeles, CA
Posts: 232
Received 19 Likes on 11 Posts
Default

Disconnect the bottom part of the pressure line first and let it all drip out into a pan, then disconnect the top part connected to the pump.
There weren't be much coming out from the PS pump when I did it that way.
Old 12-28-2016, 02:42 PM
  #19  
Vidyashankara
Instructor
Thread Starter
 
Vidyashankara's Avatar
 
Join Date: Apr 2016
Posts: 192
Received 8 Likes on 3 Posts
Default

Excellent. Thanks. I just ordered a replacement hose. Hopefully that should fix it.
Old 12-28-2016, 02:50 PM
  #20  
Shred
Instructor
 
Shred's Avatar
 
Join Date: May 2016
Location: Los Angeles, CA
Posts: 232
Received 19 Likes on 11 Posts
Default

Please be careful when you attach the pressure hose to the pump.
I had the compressor back in tight holding the pressure line down when connecting it and I ended up stripping the new return line connection back to the PS pump. I had to throw a brand new return line away!
Keep the line loose enough so when you attached the return line to the PS pump, it goes in smoothly before needing tightening.

Take a photo of the position of the return line attached to the pump and look at it before attachment.

Good luck!
Old 12-28-2016, 03:25 PM
  #21  
Vidyashankara
Instructor
Thread Starter
 
Vidyashankara's Avatar
 
Join Date: Apr 2016
Posts: 192
Received 8 Likes on 3 Posts
Default

awesome! I just remove all the covers to take a look at what the engine compartment looks like. I am clear about everything except removing the bolts on the AC compressor. are the bolts easy to access?

I don't know what the indy was talking about when he wanted $500 labor +$350 parts to do this. He was talking about 2 hrs labor to remove the compressor itself. looks like he was just trying to pinch money. man, its hard to find someone you can trust.
Old 12-28-2016, 03:32 PM
  #22  
Shred
Instructor
 
Shred's Avatar
 
Join Date: May 2016
Location: Los Angeles, CA
Posts: 232
Received 19 Likes on 11 Posts
Default

I used these below to help me plus the Bentley Boxster book.

http://986forum.com/forums/general-d...tallation.html

https://rennlist.com/forums/996-foru...999-996-a.html

For me, removing the AC compressor bolts was one of the easiest part.
Old 12-28-2016, 03:56 PM
  #23  
Vidyashankara
Instructor
Thread Starter
 
Vidyashankara's Avatar
 
Join Date: Apr 2016
Posts: 192
Received 8 Likes on 3 Posts
Default

The guy indicated removing the compressor bolts was tough, esp the rear bolt. Is it the different on the boxster than the 911?
Old 12-28-2016, 03:58 PM
  #24  
Shred
Instructor
 
Shred's Avatar
 
Join Date: May 2016
Location: Los Angeles, CA
Posts: 232
Received 19 Likes on 11 Posts
Default

It was very straight forward for me on the Boxster.
Old 12-28-2016, 04:10 PM
  #25  
Vidyashankara
Instructor
Thread Starter
 
Vidyashankara's Avatar
 
Join Date: Apr 2016
Posts: 192
Received 8 Likes on 3 Posts
Default

Thanks, I'll keep you updated!
Old 01-02-2017, 05:51 PM
  #26  
sugarwood
Pro
 
sugarwood's Avatar
 
Join Date: Nov 2014
Posts: 729
Received 31 Likes on 18 Posts
Default

Update?
Old 01-10-2017, 12:16 PM
  #27  
Vidyashankara
Instructor
Thread Starter
 
Vidyashankara's Avatar
 
Join Date: Apr 2016
Posts: 192
Received 8 Likes on 3 Posts
Default

I just got the replacement part last week. We have had a bit of snow last couple of days along with chilly days. Waiting for the warm weather. Maybe on Thursday.
Old 01-11-2017, 11:33 AM
  #28  
Vidyashankara
Instructor
Thread Starter
 
Vidyashankara's Avatar
 
Join Date: Apr 2016
Posts: 192
Received 8 Likes on 3 Posts
Default

Ok, the weather was goof enough for me to try a couple of things today. I was able to fix the leak without having to replace the entire pressure hose. No idea why my indy did not pick it up. Saved myself $850.

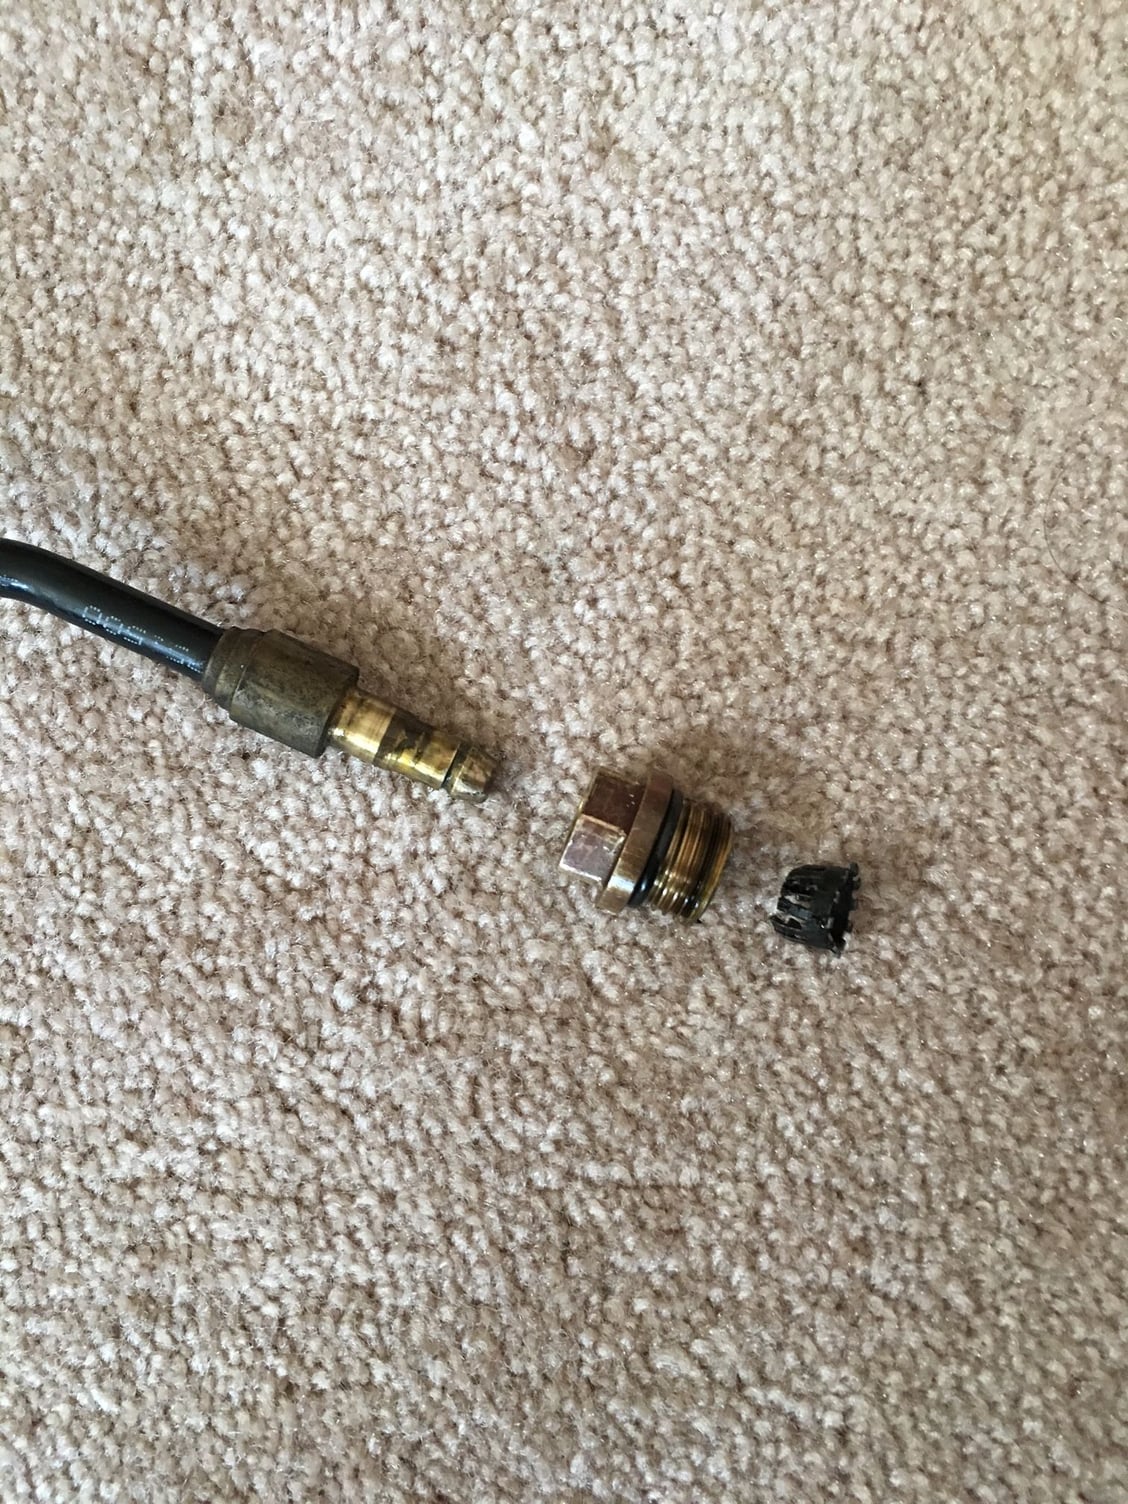
I ordered a used pressure hose from ebay for $50. Because the leak was coming from between the connectors, I just replaced the connector and no more leak. Below is a pic,


The connector in the middle is the only one that was replaced. Visually, I did not see any damage to the O-rings, but they may have been blown.

Overall, the whole process took me ~30 mins. When I broke open the connectors, about 250mL of PS fluid leaked out, which I replaced with fresh fluid.
Old 01-12-2017, 05:26 PM
  #29  
sugarwood
Pro
 
sugarwood's Avatar
 
Join Date: Nov 2014
Posts: 729
Received 31 Likes on 18 Posts
Default

Good job!
Old 01-13-2017, 01:24 PM
  #30  
Vidyashankara
Instructor
Thread Starter
 
Vidyashankara's Avatar
 
Join Date: Apr 2016
Posts: 192
Received 8 Likes on 3 Posts
Default

Does anyone know of a rebuild kit for that connector? there are 2-3 O-rings in there and the ones in the interior are dual O-rings.


Quick Reply: Need DIY instructions - Power Steering Pressure Line replacement


All times are GMT -3. The time now is 07:34 PM.