
DIY Coolant Fitting Fix with Motor In the Car
 02-19-2012, 11:49 PM
#61
Murat should have driven my car up to your garage instead of keeping it in mine.
I ended up stopping at 6 pipes because I was not certain how to proceed. I am wondering if anyone knows if the black steel line on the right side of the engine will pivot once I remove the clamps from the short rubber hose (sorry I do not have any pictures). I cannot access the bolt that is holding the flange direcly below and to the left of this pipe (picture #20). If it would rotate it away then I can access the bolt and move forward. This would be the curved pipe shown on the bottom picture (#21). Then I should be able to remove the alternator bracket and possibly get to the last two pipes. I will not be able to work on the for the next two weeks possibly someone else can let me know.
Steve
 02-20-2012, 12:34 AM
#62
Racer
Thread Starter
Guys, sorry I'm not of much help on the 6GT3s. I'm only familiar with the 7GT3s, and it looks like the 7s have a different oil filter bracket of a different design that have bolted fittings vs the glued ones of the 6s. Someone is just going to have to take a look at them and see if they can be attacked with some of the tools mentioned. If someone can figure it out, it would be great if the info and pics could be posted here and the 6GT3 forums.
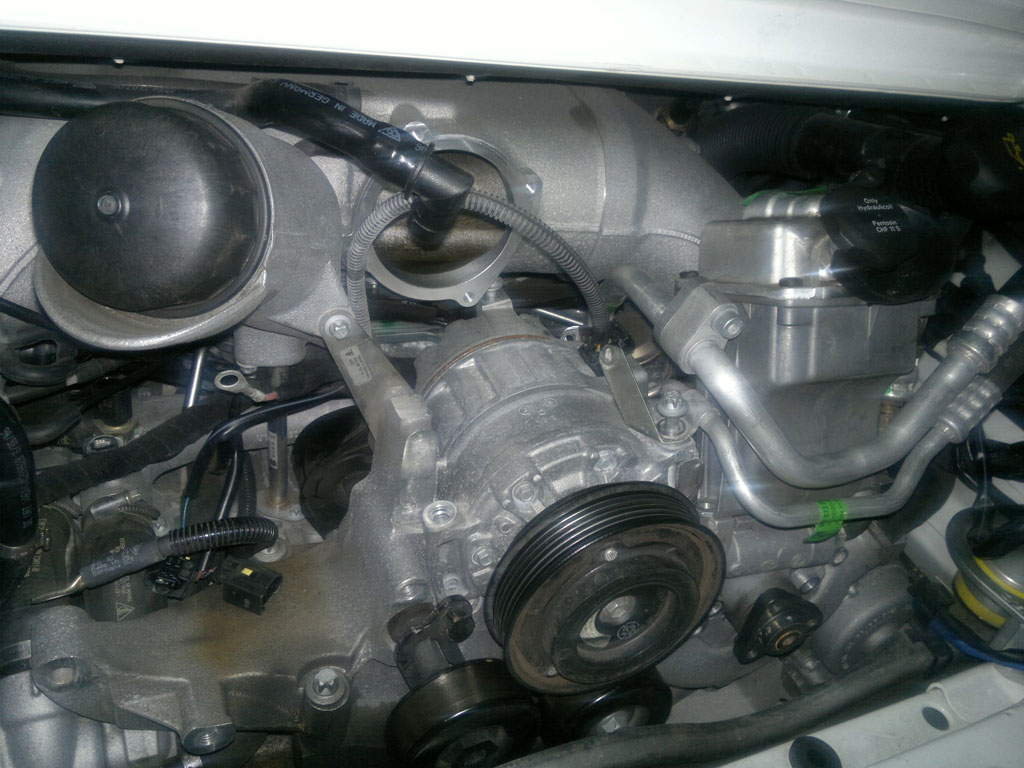
On the power steering pump, here are some photos I have that should help understand the removal of the power steering pump:
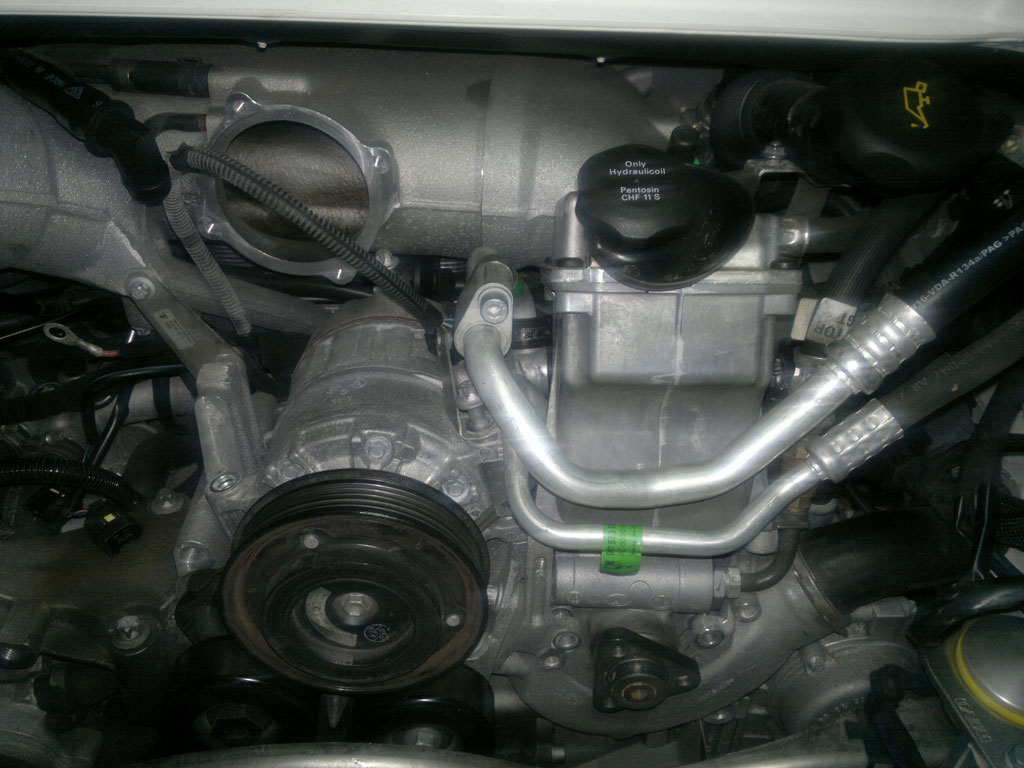
throttle body removed, AC compressor loosened from bracket, pulley removed from PS pump:
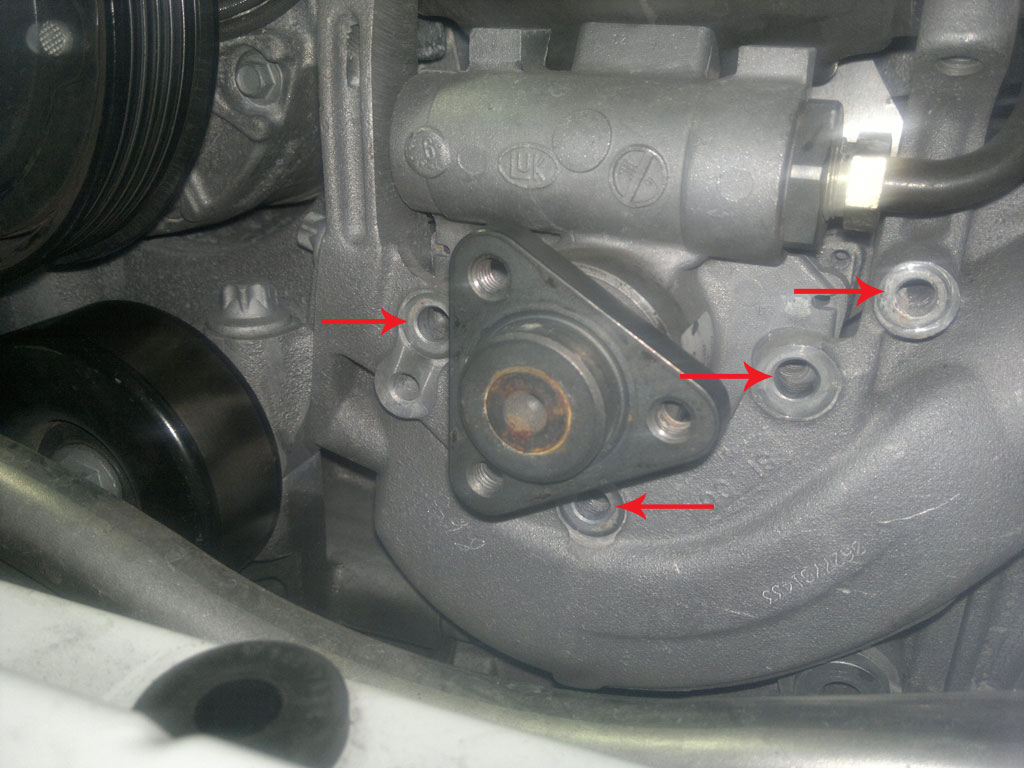
four bolts behind pulley that need to be removed to separate pump from support bracket:
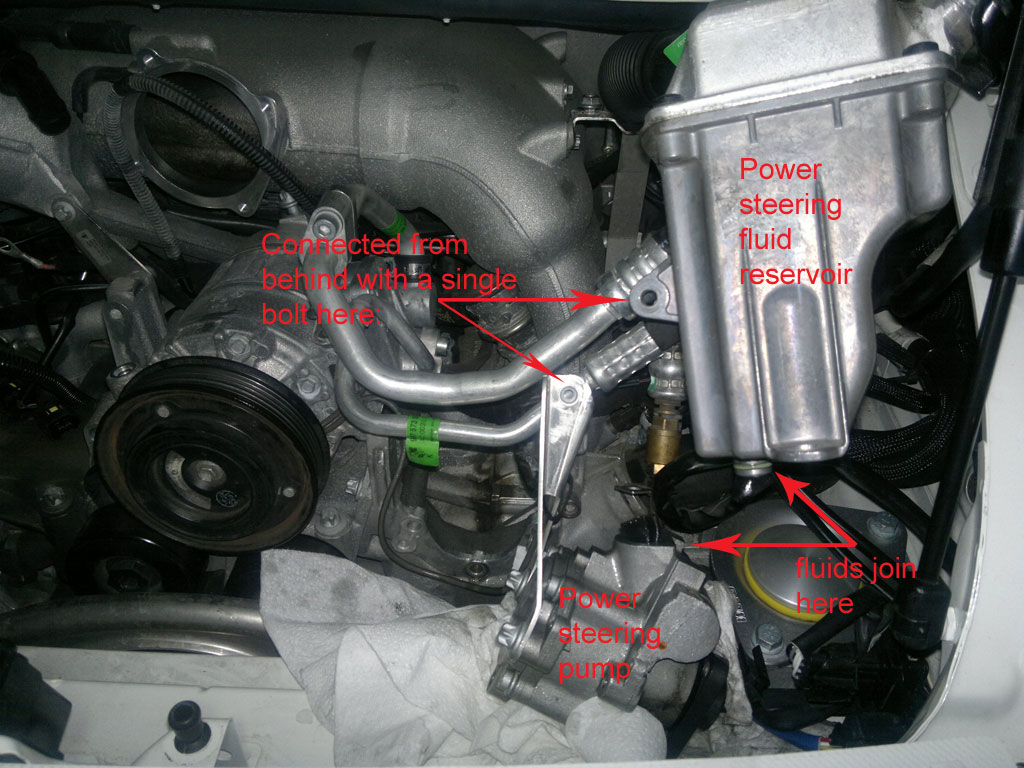
How the pump and reservoir are connected and how they separate and come out of the way. The supply and feed lines to the pump and reservoir do not need to be disconnected to move them out of the way:
On the power steering pump, here are some photos I have that should help understand the removal of the power steering pump:
throttle body removed, AC compressor loosened from bracket, pulley removed from PS pump:
four bolts behind pulley that need to be removed to separate pump from support bracket:
How the pump and reservoir are connected and how they separate and come out of the way. The supply and feed lines to the pump and reservoir do not need to be disconnected to move them out of the way:
The following users liked this post:
jayi836 (03-10-2020)
02-20-2012, 09:05 AM
#63
Race Car
Murat should have driven my car up to your garage instead of keeping it in mine.
I ended up stopping at 6 pipes because I was not certain how to proceed. I am wondering if anyone knows if the black steel line on the right side of the engine will pivot once I remove the clamps from the short rubber hose (sorry I do not have any pictures). I cannot access the bolt that is holding the flange direcly below and to the left of this pipe (picture #20). If it would rotate it away then I can access the bolt and move forward. This would be the curved pipe shown on the bottom picture (#21). Then I should be able to remove the alternator bracket and possibly get to the last two pipes. I will not be able to work on the for the next two weeks possibly someone else can let me know.
Steve
I ended up stopping at 6 pipes because I was not certain how to proceed. I am wondering if anyone knows if the black steel line on the right side of the engine will pivot once I remove the clamps from the short rubber hose (sorry I do not have any pictures). I cannot access the bolt that is holding the flange direcly below and to the left of this pipe (picture #20). If it would rotate it away then I can access the bolt and move forward. This would be the curved pipe shown on the bottom picture (#21). Then I should be able to remove the alternator bracket and possibly get to the last two pipes. I will not be able to work on the for the next two weeks possibly someone else can let me know.
Steve
As I prepare to fix my fittings I've been worried about this one too, but my thoughts were that if the PS pump and resivoir came out that I'd have enough room to work back there.
Did you remove the two and you're still having access issues? If not I think that's the route to go next.
02-20-2012, 11:23 AM
#64
Steve W. great write-up. Yes, the 996 looks different. On a 996 the only way to remove the AC compressor is to loosen the 4 band straps and rotate up the throttle body. The 997 has a shorter piece and not separate sections like the 996. Audion9s, I believe you did not have an issue with the fittings on the Oil Filter bracket because you would have had to remove the AC compressor, Power Steering Pump/Resevoir, Alternator braket (goes under all these items including the Alternator) plus the flange on the right side that this black pipe is attached to then pull apart a small cooling manifold that connects both side. I believe your problem area is attached to this black pipe that has a small rubber section below then a small aluminum fitting that is pretty easy to access without removing more that Steve W. has shown. To get to the other two fittings is the issue that I have run into. The photo I attached shows the AC compressor removed with my throttle body rotated upwards. The black steel pipe on the bottom right of the picture is going to the Oil Filter bracket (under the right side manifold). The aluminum pipe directly to the right (right side manifold) must be removed so the alternator bracket can be slide to the right separating it from the left side manifold. This is just connected/secured by the black rubber pieces. Once you remove the right side manifold piece you will then gain access to the remaining two fittings. I hope this is clear and helps.
Last edited by serickson; 02-20-2012 at 11:35 AM. Reason: added captions to picture
03-27-2012, 11:59 AM
#66
I performed the work on my 996 GT3. With the correct tools for drilling and taping, entire process should take an easy 8 hours. I spread my work over a couple days. Make sure you have a large aluminum baking pan (buy at any grocery store) to catch the coolant when you drill. #29 drill bit for 8-32 screws. A small T-handle tap wrench. I do not think you can reach some of the areas without a right angle drill or the milwaukee rachet shown in this thread. I used a hex shank adapter 9/64 (Mcmaster carr 3185A46) used to hold the round drill within the right angle rachet. I also needed a square hex insert bit, 3/8 female square drive x 1/4 hex female (mcmaster carr 7229A44 or any good hardware store should have). 9/64 allen wrench for the 8-32 socket cap screws will need various lengths (not a common size). Clean gallon container with funnel and filter media (I used coffee filters) to reuse coolant. I had 30,000 miles on my car so I replaced the two large coolant lines that run from the motor to the frame area and also the coolant hose that goes from the resevoir to bottom of the coolant pump. Good luck.
05-15-2012, 10:37 AM
#67
Advanced
Join Date: Apr 2010
Location: Overland Park, Kansas
Posts: 71
Likes: 0
Received 0 Likes
on
0 Posts
Another option for a 90-degree drill attachment. Comes with 1/8" stubby bit as well. $19.99 on Amazon.
http://tinyurl.com/Milescraft90degree
http://tinyurl.com/Milescraft90degree
Last edited by KC_Michael; 02-15-2013 at 03:22 PM.
06-07-2014, 07:41 PM
#68
Rennlist Member
A terrific thread and very helpful. I can report that the 996 TT cannot pin all of the hoses with the engine in the car. There are at least two that I have not been able to devise a good plan to reach on the driver's side.
07-12-2014, 10:15 PM
#71
Instructor
Awesome thread. Thanks to all technical contributors.
Here is a question...since it can be done like this why don't professional shops just do this instead of pulling the whole motor? Especially if you did them with regularity and had the necessary tools etc all lined up it seems they could churn these out in less than a day.
Here is a question...since it can be done like this why don't professional shops just do this instead of pulling the whole motor? Especially if you did them with regularity and had the necessary tools etc all lined up it seems they could churn these out in less than a day.
08-06-2014, 03:34 AM
#73
Rennlist Member
What a thread! My only question is why isn't it stickied?! If it wasn't for the recent bump I would've missed it!
Thanks Steve W and contributors. I'll be sure to tackle this when I have some free time and report back.
Thanks Steve W and contributors. I'll be sure to tackle this when I have some free time and report back.
