
DIY Coolant Fitting Fix with Motor In the Car
 02-13-2012, 05:36 PM
#46
Advanced
Join Date: Sep 2009
Location: Eastern PA
Posts: 68
Likes: 0
Received 0 Likes
on
0 Posts
Anyone know of a shop in the Northeast (specifically NYC-Philly area) that has undertaken at least one threaded bolt solution (engine in or engine out).
I am not capable of doing this myself, but the more I read about it, the more I want to get it done!
I am not capable of doing this myself, but the more I read about it, the more I want to get it done!
Last edited by dcottam; 02-13-2012 at 05:36 PM. Reason: more information
 02-13-2012, 05:40 PM
#47
Intermediate

Join Date: Feb 2011
Location: Boise, ID
Posts: 33
Likes: 0
Received 0 Likes
on
0 Posts
Steve, GREAT thread and information! I will be making this fix to my car over the next few days. One question, however, conderning the "one in the back" (the last one shown in your photos, with the sheet metal protective sleeve) -- is there a reason why the hole must be drilled at the top of the fitting rather than a bit on the side of the housing where it appears to be a better access drilling angle? I would appreciate your thoughts.
Again, THANKS!
Again, THANKS!
02-13-2012, 07:56 PM
#48
Racer
Thread Starter
I don't know NYC-Philly area, but some of the better shops I know of in NY are: Reiser Technik in Mendon, Advanced Automotive in New Windsor, Eksten Autoworks in Rockester, Mohr Performance Development in Farmingdale, Rudtner's Racing Group in NY, and outside of NY, Dan Jacobs in Oxford. Give them a call and show them what you want to do and see what they say. I know most of them and they can contact me if any questions.
John, thanks and you're welcome. If it helps to get it done, just do it! The top point I chose really is the best access angle, if not only. You can't get any further back because that plastic pipe above is in the way. If you're talking about the angle towards the back of the car, I suppose you could use the Dremel bit and cut in a recessed face a 45* angle, then just use a regular straight drill for the hole, but I didn't think about that and you would need to remove the coolant temp sensor to access at that angle. Since you're already going to need an angle driver for the other coupling, doing is straight from the top was easiest.
John, thanks and you're welcome. If it helps to get it done, just do it! The top point I chose really is the best access angle, if not only. You can't get any further back because that plastic pipe above is in the way. If you're talking about the angle towards the back of the car, I suppose you could use the Dremel bit and cut in a recessed face a 45* angle, then just use a regular straight drill for the hole, but I didn't think about that and you would need to remove the coolant temp sensor to access at that angle. Since you're already going to need an angle driver for the other coupling, doing is straight from the top was easiest.
02-13-2012, 08:19 PM
#49
Great project thread. Thank you for taking the time to explain this in such detail.
After reviewing this thread and thread regarding catastrophic hose fitting failures am I correct to assume that this is only happening to the GT3 and not GT3RS cars or in much less frequent numbers. Is there a design difference between them for 997.1 and 997.2?
After reviewing this thread and thread regarding catastrophic hose fitting failures am I correct to assume that this is only happening to the GT3 and not GT3RS cars or in much less frequent numbers. Is there a design difference between them for 997.1 and 997.2?
02-14-2012, 02:25 AM
#50
Intermediate
Join Date: Feb 2011
Location: Boise, ID
Posts: 33
Likes: 0
Received 0 Likes
on
0 Posts
Thanks again, Steve. Looking forward to the project...much more comforting to undertake with the benefit of your pictures and read your text. I will report on this thread when I have finished.
02-15-2012, 10:50 AM
#51
I have a question. Any reason you used a 1/8 drill bit (0.125) instead of a #29 (0.136) that is recommended for an 8-32 tap? Was this to make the threads tighter? (FYI: I see that the Milwaukee offset tool uses a 1/4 hex drive adapter that does not come in #29 drill but you could use a hex shaft adapter to make a standard drill bit fit). Looking to tackle this job this weekend. Any help would be appreciated.
Steve
Steve
02-15-2012, 02:19 PM
#52
After receiving a variety of IM's on this, let me mention my personal thoughts in public -
1. If you own a .2 you might consider doing nothing. I do not know of any .2 car that has popped an engine fitting yet? I suspect it takes time and heat cycles to degrade the epoxy. You should be fine? Heck Porsche may have already been using a better epoxy and the .2 won't see failures.
2. If you own a .1 or must do something to your .2, then I would urge you not to consider a threaded solution. The machine work is very challenging to do right and very expensive, I would say $1500-2000 for the machine work alone!
Here on the west coast I know Sharkwerks has a very good reputation, and if I had it to do again, I would take the car to them and have them pin/screw the connections. Orbit is well respected on the east coast and I am sure there a many great shops out there.
02-15-2012, 04:54 PM
#54
Racer
Thread Starter
I have a question. Any reason you used a 1/8 drill bit (0.125) instead of a #29 (0.136) that is recommended for an 8-32 tap? Was this to make the threads tighter? (FYI: I see that the Milwaukee offset tool uses a 1/4 hex drive adapter that does not come in #29 drill but you could use a hex shaft adapter to make a standard drill bit fit). Looking to tackle this job this weekend. Any help would be appreciated.
Steve
Steve

http://www.milwaukeetool.com/tools/cordless-tools/m12-cordless-system/m12-cordless-3-8-inch-ratchet-kit/2457-21
Since you'll be tackling this here's some tips with respect to removing the alternator and power steering pump to get you along:
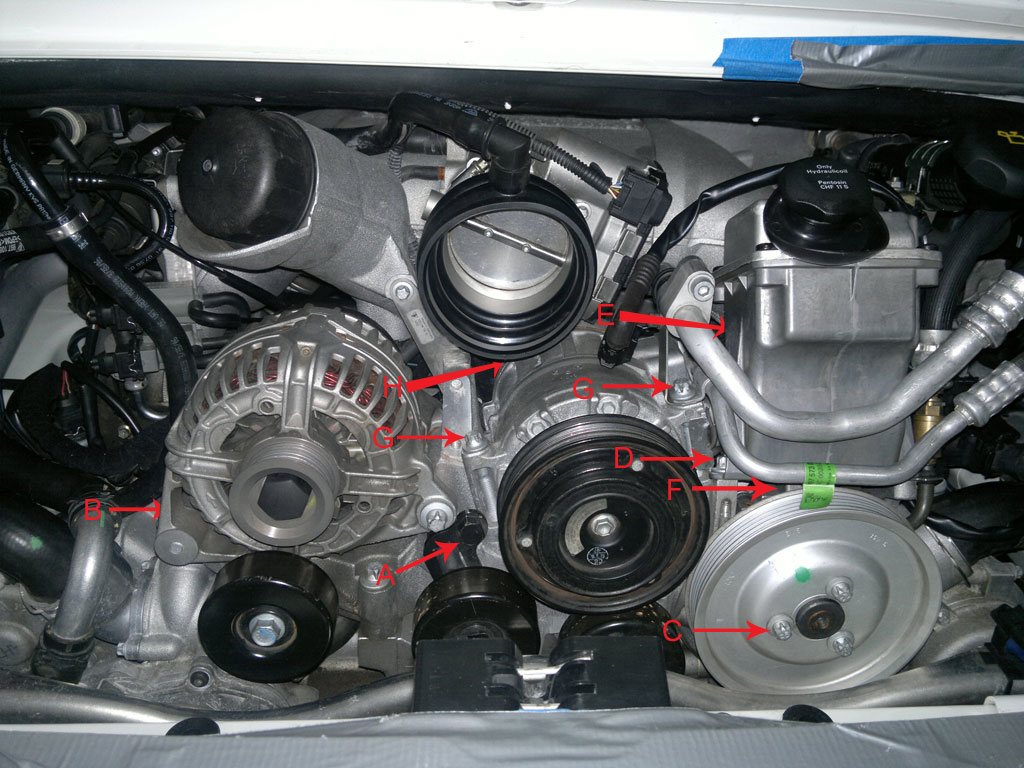
1. disconnect battery before beginning
2. remove airbox/filter assembly
3. 15mm hex bolt (A in pic) releases tension on serpentine belt pulley to remove
4. two torx bolts hold on the alternator. The one on the left side in back (B) can be accessed with a 11mm box wrench
5. to remove power steering pump, remove the three pulley bolts (C) and the pulley. Using a 10mm wrench to leverage two of the bolts against each other, allows you to hold the pulley from turning still while loosening the third bolt. Behind the pulley, you will find three more torx bolts fastening the pump to the bracket that will also need to be removed.
6. to access the torx bolt at (D) you can use an offset 10mm wrench, or to properly get a socket on it, you will need to remove the throttle body from the intake manifold (4 torx bolts). Then you will need to loosen the three torx bolts holding down the AC compressor (G & H). Remove bolts (G) and loosen (H) which will allow you to lift the compressor off its bracket and tilt it to the side accessing (D) with a torx socket. You will only be able to loosen and not remove bolt (H) because the intake manifold is in the way. I think I used a 10mm box wrench for that.
7. The power steering pump is composed of the pump and a reservoir. The pump is the one with the pulley, The reservoir is the canister above with the cap. To remove you will need to separate the two. There is another bolt (E) on a sheet metal bracket behind the reservoir that holds the two that you remove to separate them. The pump and reservoir are joined by a finger sized slip fit connection at (F). When you pull the reservoir up, have a foam or rubber plug or plastic cap ready to plug up the nipple on the bottom from spilling out all it's power steering fluid, and have something under your car to catch any that spills.
The following users liked this post:
Williamsf1 (07-02-2020)
02-15-2012, 05:28 PM
#55
 02-16-2012, 02:41 AM
#56
Intermediate
Join Date: Feb 2011
Location: Boise, ID
Posts: 33
Likes: 0
Received 0 Likes
on
0 Posts
Steve, thanks to you, I have completed 5 of the 6 fittings...all but the one under the power steering pump.
Can't find any threads or articles on how to remove it, and can't seem to get a grasp on it visually. Can you give me your thoughts and procedure for removing it for the final filling fix? MUCH APPRECIATED.
John
Can't find any threads or articles on how to remove it, and can't seem to get a grasp on it visually. Can you give me your thoughts and procedure for removing it for the final filling fix? MUCH APPRECIATED.
John
02-19-2012, 12:10 PM
#59
Just completed pinning 6 fittings. The two that are located under the heat exchanger (aka oil filter bracket) are very far back. From the workshop manual you still have to remove the alternator bracket then coolant flange to the right side head. To remove the A/C compressor you must loosen and turn the throttle body flange only needed if going for the next two fittings. Not sure once all that is removed if you can get proper clearance. Getting nervous.
02-19-2012, 02:08 PM
#60
Instructor
Join Date: Oct 2009
Location: Motown
Posts: 144
Likes: 0
Received 0 Likes
on
0 Posts
Steve, I've started the same thing this weekend - but I'm dropping engine and installing lwfw at the same time. I'm reading here that this is a must upgrade on the 6 - might as well do it while engine is out - something to think about