
LSD buster
 12-18-2009, 05:00 PM
#1
Addict
Rennlist Member
Rennlist Member
Thread Starter
I did a LSD rebuild post last month on 6speed and got couple request to share it on rennlist. Here it go ....
Porsche makes great cars but there are couple flaws that get pass down from generation to generation much like a bad gene. We all know about rear main seal leak which remain an issue from 996 to 997. Then there is the limited slip differential (LSD) which I consider to be a major performance component that has failed to deliver for 5+ years!? I had no idea what LSD do until I came across a bad one in my RS. The rear of my car is super nervous under hard braking and I seem to have problem power out of turns - I am doing slow in and slow out instead of slow in fast out.
I did a simple LSD test by lifting one of my rear wheel off the ground with e-brake off and tranny in neutral and the other wheel on the ground. I could spin the lifted wheel without much resistance as in an open differential!? This is REALLY BAD! In an open differential, if one wheel has no contact with the ground (like my test above) the contacting wheel will remain stationary, and the non-contacting wheel will rotate freely. The torque transmitted in an open differential vehicle will be equal at both wheels, but will not exceed the threshold of torque needed to move the car. This means the car will remain stationary if one wheel is off the ground or slipping such as in a turn or wet situation. In everyday use on flat roads, an open differential can do the job by taking you from point A to B. For more demanding use, such as driving off road or on a race circuit, an open differential is a cruel and unusual punishment!
Ironically, LSD came about when in 1932, Ferdinand Porsche designed a Grand Prix racing car for the Auto Union company. The high power of the design caused one of the rear wheels to experience excessive wheel spin at any speed up to 100 mph. So, in 1935, Porsche commissioned the engineering firm ZF Friedrichshafen AG to design a limited slip differential that would perform better which is the father of modern day LSD. I know what Ferdinand Porsche would say if he finds out his modern sports car deploy defective LSD .... "Welcher Idiot hat diese Schei�e entwickelt?"
OK, LSD class is over. I do need to give credit to wikipedia for some of the above info. Time to roll up the sleeves and do Ferdinand Porsche right by fixing the LSD. First off, there are couple ways of doing this. there are several after market LSD to replace the OEM unit but this means you need to have the transmission removed and have a highly trained professional properly shim and set the pre-load on each side of the LSD as not to destroy the LSD or tranny with use. This means $$$$ as far as labor goes. The cheapest way is to remove the OEM unit and have it professionally rebuild to your spec. After it's rebuild, all you need to do is put it back since the pre-load on both ends of the LSD are already done at factory.
After much research, I decided to go with Matt at GUARD transmission because they make one mean GT2 LSD and super helpful with all my questions and concerns which is totally reassuring. The cost? $1600 (add $75 if you left the ring gear on) which is totally reasonable considering friction plates and ramps are replaced with beefy GUARD GT parts. You can contact Matt for more information or if you have other questions. He is the real expert when it comes to LSD.
Matt Monson
Guard Transmission LLC
303-530-1094
gtgears@yahoo.com
Here is a video of the LSD test and also driving impression after LSD rebuild
LSD buster
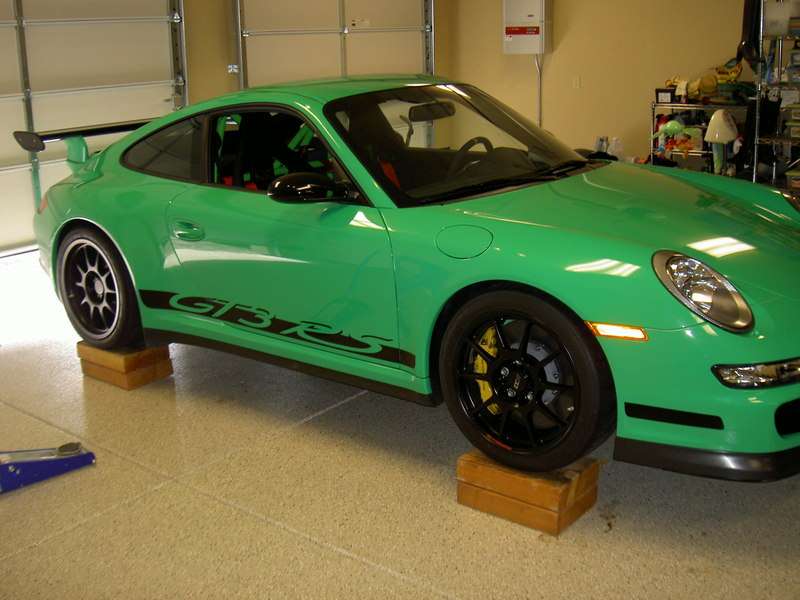
Now the fun part! Let's get that defective LSD off the car. First, raise the car up with your build in lift - or blue collar lift by putting couple wood blocks under the wheels lol. Take great care to make sure the car is secure when you work underneath as not to hurt yourself.
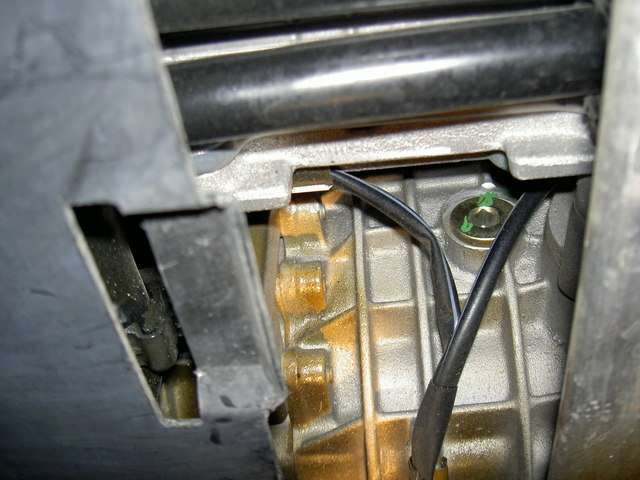
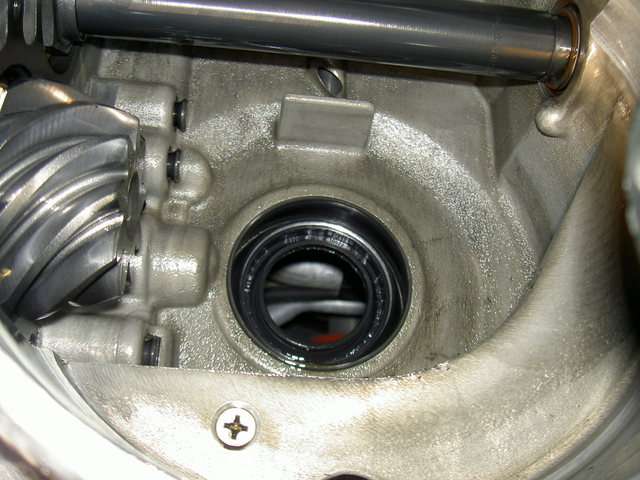
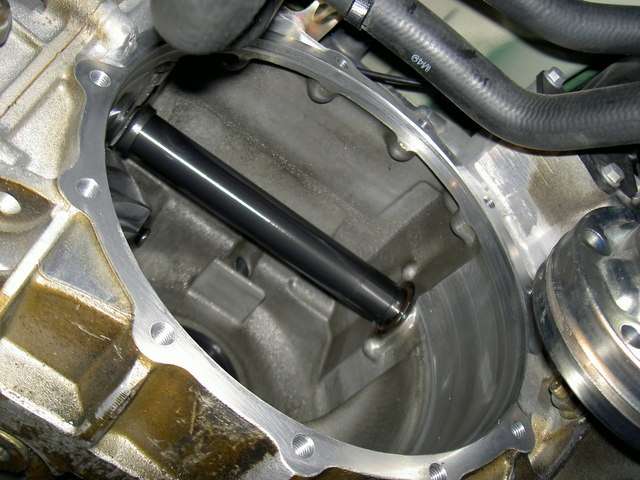
Remove 4 screws securing the transmission cover then you can see the LSD cover on the driver side which is secured by 10+ bolts
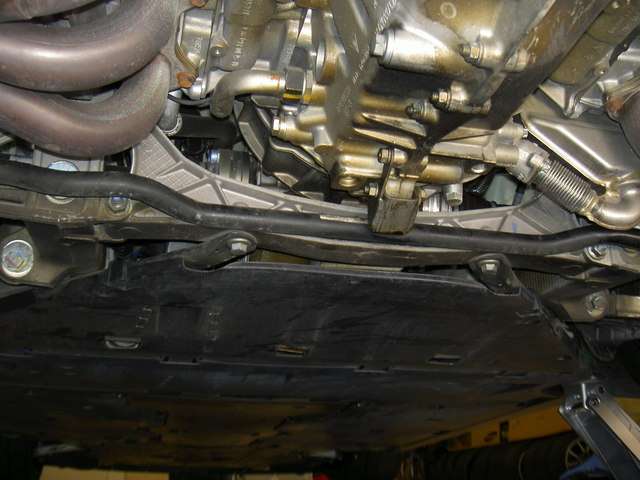
LSD cover plate on driver side
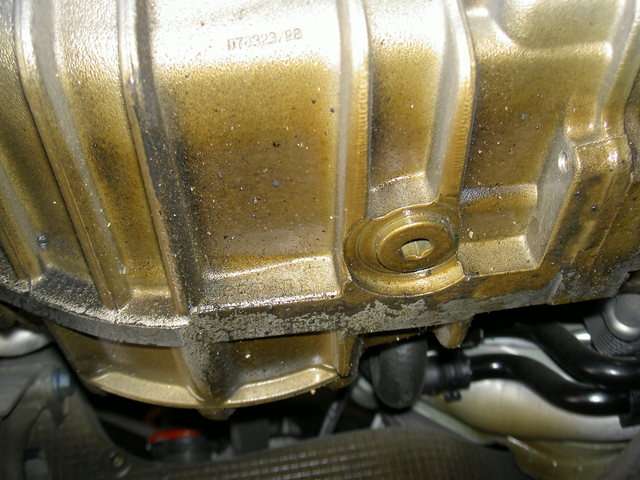
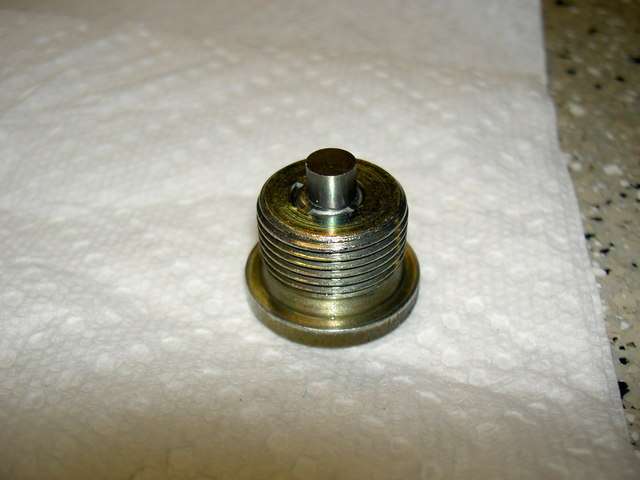
Next drain the transmission oil by locating the drain plug which is under the transmission base and the fill plug which is on the driver side kind of hidden toward the front of the transmission. One thing about the transmission fluid - they really smell bad!! lol
Drain plug
filler plug on driver side
Both drain and filler plug uses 10 mm Allen. The space at the filler plug is very limited so it's hard to fit a socket/wrench. I used a long 10 mm Allen wrench and fit the end of the Allen wrench with a 10 mm socket and socket extension to provide enough leverage to break it loose. None of the plugs have washers

The drain plug has a magnetic tip which help collect all the metal shavings. It's a good idea to clean it really well before putting it back. it's also a good idea to change the transmission fluid at least once a year if you track

After it's all cleaned
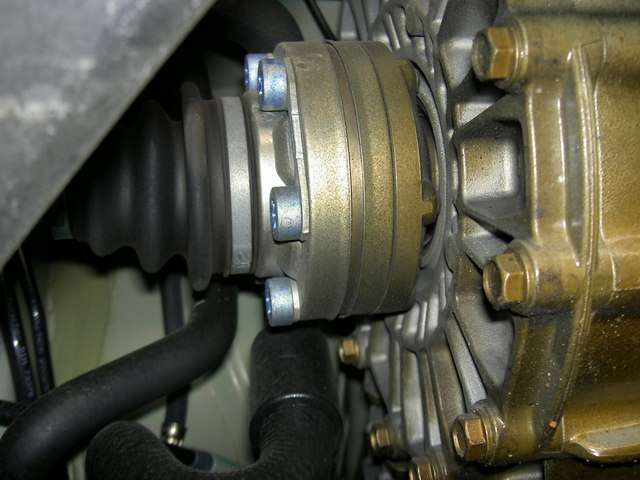
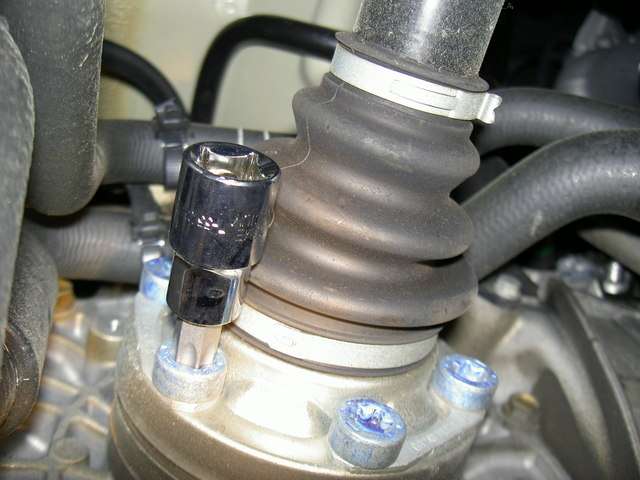
Now let's separate the drive axle from the drive shaft flange. It is secured by six T-55 bolts.
You need to remove the drive shaft and flange first on both sides to remove the LSD. I protect the drive shaft with pipe insulation foam and zip tie the driver side shaft against the lower body frame for ease of access
Now you can see the center bolt securing the drive shaft flange

I used two of the T-55 bolts to help give leverage to loosen the center bolt. I was told not to use impact wrench to break the center bolt loose to prevent damaging the bolt or the "bell" that it's attach to
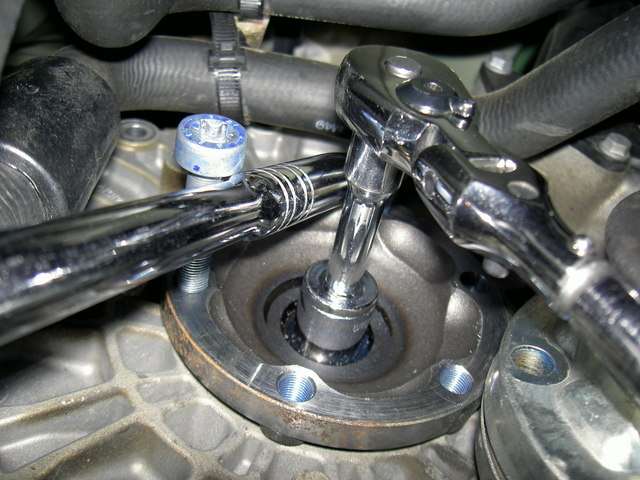
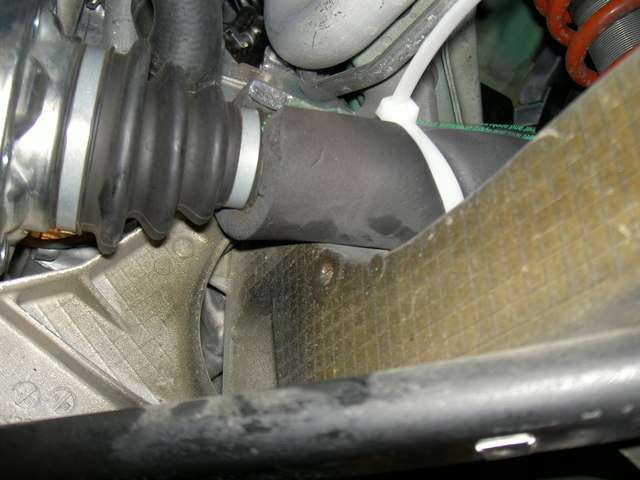
The "bell" holding the center bolt of the drive shaft flange are pretty lame. There may be extra play where you can rock it in and out couple mm even before you loosen the center bolt. Also you may need to pull the drive shaft flange out as you loosen the center bolt or the bolt just spin without catching the thread. Matt at GUARD transmission told me this is very common on all OEM LSD and does not affect performance. He will try to heat the "bell" up to make it fit better during rebuild.
Now gently slide out the drive shaft flange on both side and remove the 10+ bolts on the LSD plate located on the drive side
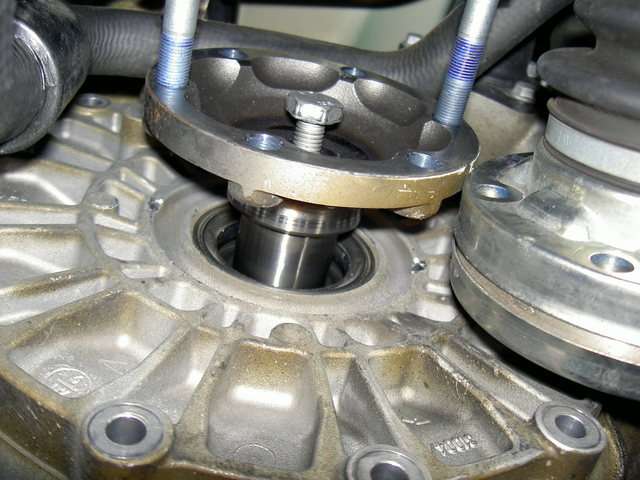
Don't remove the LSD cover if you have not remove the passenger side drive shaft flange. This will lead to excessive movement of the flange on the passenger side when you try to remove the bolts which can damage the rubber seal around the flange. Once both flanges are removed, gently tap on the bottom "lips" of the LSD plate with the back end of a hammer. Don't tap on the LSD cover with metal - it will damage the cover. I used the hard plastic back end of a hammer. Be patient, the LSD cover will slowly come loose and be ready to catch some residual transmission fluid

Take care in handling the LSD cover as not to damage the inside or the contacting surface
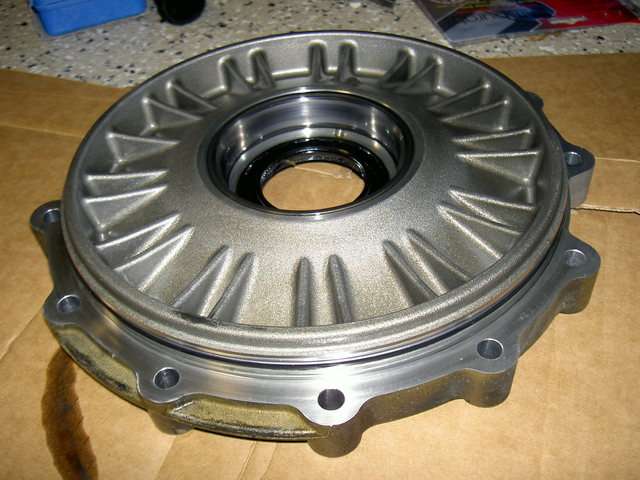
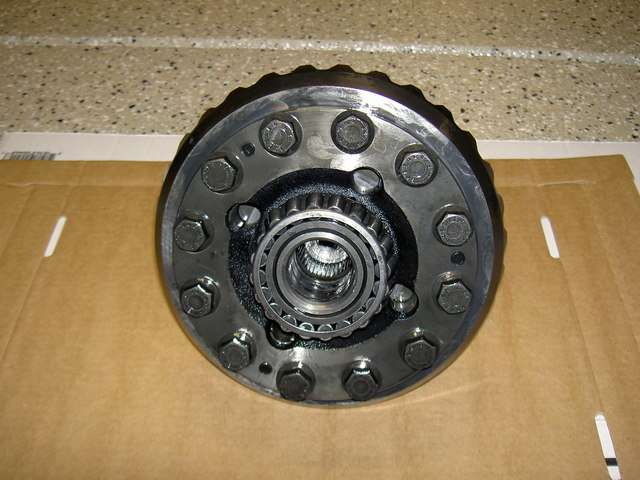
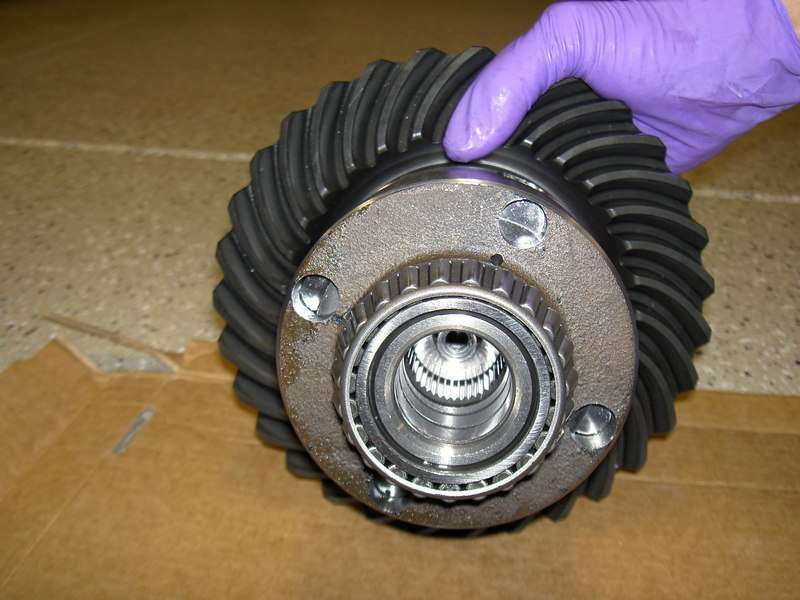
Now you can see that ugly defective LSD for the first time! it sure reminded me of Alien's head lol. It is super heavy and weigh 30+ lbs. Take great care not to bang it around while removing it. You need to work it around the rubber hoses and the drive shaft but it will come out. it reminded me of delivering a 12 lbs breech baby lol
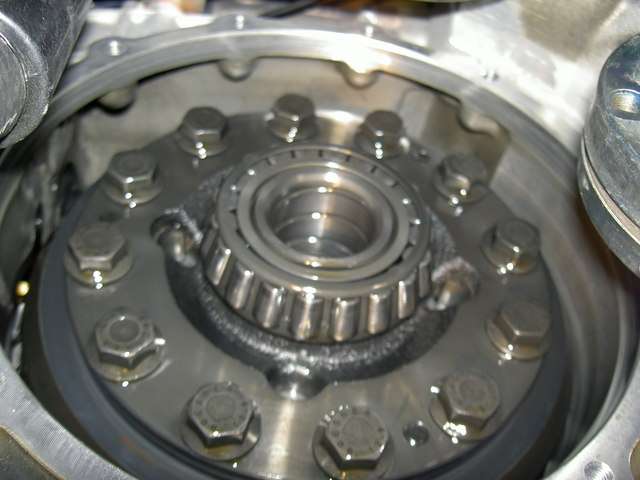
This is what the LSD case look like inside
Porsche makes great cars but there are couple flaws that get pass down from generation to generation much like a bad gene. We all know about rear main seal leak which remain an issue from 996 to 997. Then there is the limited slip differential (LSD) which I consider to be a major performance component that has failed to deliver for 5+ years!? I had no idea what LSD do until I came across a bad one in my RS. The rear of my car is super nervous under hard braking and I seem to have problem power out of turns - I am doing slow in and slow out instead of slow in fast out.
I did a simple LSD test by lifting one of my rear wheel off the ground with e-brake off and tranny in neutral and the other wheel on the ground. I could spin the lifted wheel without much resistance as in an open differential!? This is REALLY BAD! In an open differential, if one wheel has no contact with the ground (like my test above) the contacting wheel will remain stationary, and the non-contacting wheel will rotate freely. The torque transmitted in an open differential vehicle will be equal at both wheels, but will not exceed the threshold of torque needed to move the car. This means the car will remain stationary if one wheel is off the ground or slipping such as in a turn or wet situation. In everyday use on flat roads, an open differential can do the job by taking you from point A to B. For more demanding use, such as driving off road or on a race circuit, an open differential is a cruel and unusual punishment!
Ironically, LSD came about when in 1932, Ferdinand Porsche designed a Grand Prix racing car for the Auto Union company. The high power of the design caused one of the rear wheels to experience excessive wheel spin at any speed up to 100 mph. So, in 1935, Porsche commissioned the engineering firm ZF Friedrichshafen AG to design a limited slip differential that would perform better which is the father of modern day LSD. I know what Ferdinand Porsche would say if he finds out his modern sports car deploy defective LSD .... "Welcher Idiot hat diese Schei�e entwickelt?"
OK, LSD class is over. I do need to give credit to wikipedia for some of the above info. Time to roll up the sleeves and do Ferdinand Porsche right by fixing the LSD. First off, there are couple ways of doing this. there are several after market LSD to replace the OEM unit but this means you need to have the transmission removed and have a highly trained professional properly shim and set the pre-load on each side of the LSD as not to destroy the LSD or tranny with use. This means $$$$ as far as labor goes. The cheapest way is to remove the OEM unit and have it professionally rebuild to your spec. After it's rebuild, all you need to do is put it back since the pre-load on both ends of the LSD are already done at factory.
After much research, I decided to go with Matt at GUARD transmission because they make one mean GT2 LSD and super helpful with all my questions and concerns which is totally reassuring. The cost? $1600 (add $75 if you left the ring gear on) which is totally reasonable considering friction plates and ramps are replaced with beefy GUARD GT parts. You can contact Matt for more information or if you have other questions. He is the real expert when it comes to LSD.
Matt Monson
Guard Transmission LLC
303-530-1094
gtgears@yahoo.com
Here is a video of the LSD test and also driving impression after LSD rebuild
LSD buster
Now the fun part! Let's get that defective LSD off the car. First, raise the car up with your build in lift - or blue collar lift by putting couple wood blocks under the wheels lol. Take great care to make sure the car is secure when you work underneath as not to hurt yourself.
Remove 4 screws securing the transmission cover then you can see the LSD cover on the driver side which is secured by 10+ bolts
LSD cover plate on driver side
Next drain the transmission oil by locating the drain plug which is under the transmission base and the fill plug which is on the driver side kind of hidden toward the front of the transmission. One thing about the transmission fluid - they really smell bad!! lol
Drain plug
filler plug on driver side
Both drain and filler plug uses 10 mm Allen. The space at the filler plug is very limited so it's hard to fit a socket/wrench. I used a long 10 mm Allen wrench and fit the end of the Allen wrench with a 10 mm socket and socket extension to provide enough leverage to break it loose. None of the plugs have washers
The drain plug has a magnetic tip which help collect all the metal shavings. It's a good idea to clean it really well before putting it back. it's also a good idea to change the transmission fluid at least once a year if you track
After it's all cleaned
Now let's separate the drive axle from the drive shaft flange. It is secured by six T-55 bolts.
You need to remove the drive shaft and flange first on both sides to remove the LSD. I protect the drive shaft with pipe insulation foam and zip tie the driver side shaft against the lower body frame for ease of access
Now you can see the center bolt securing the drive shaft flange
I used two of the T-55 bolts to help give leverage to loosen the center bolt. I was told not to use impact wrench to break the center bolt loose to prevent damaging the bolt or the "bell" that it's attach to
The "bell" holding the center bolt of the drive shaft flange are pretty lame. There may be extra play where you can rock it in and out couple mm even before you loosen the center bolt. Also you may need to pull the drive shaft flange out as you loosen the center bolt or the bolt just spin without catching the thread. Matt at GUARD transmission told me this is very common on all OEM LSD and does not affect performance. He will try to heat the "bell" up to make it fit better during rebuild.
Now gently slide out the drive shaft flange on both side and remove the 10+ bolts on the LSD plate located on the drive side
Don't remove the LSD cover if you have not remove the passenger side drive shaft flange. This will lead to excessive movement of the flange on the passenger side when you try to remove the bolts which can damage the rubber seal around the flange. Once both flanges are removed, gently tap on the bottom "lips" of the LSD plate with the back end of a hammer. Don't tap on the LSD cover with metal - it will damage the cover. I used the hard plastic back end of a hammer. Be patient, the LSD cover will slowly come loose and be ready to catch some residual transmission fluid
Take care in handling the LSD cover as not to damage the inside or the contacting surface
Now you can see that ugly defective LSD for the first time! it sure reminded me of Alien's head lol. It is super heavy and weigh 30+ lbs. Take great care not to bang it around while removing it. You need to work it around the rubber hoses and the drive shaft but it will come out. it reminded me of delivering a 12 lbs breech baby lol
This is what the LSD case look like inside
Last edited by mikymu; 12-19-2009 at 04:30 AM.
 12-18-2009, 05:00 PM
#2
Addict
Rennlist Member
Rennlist Member
Thread Starter
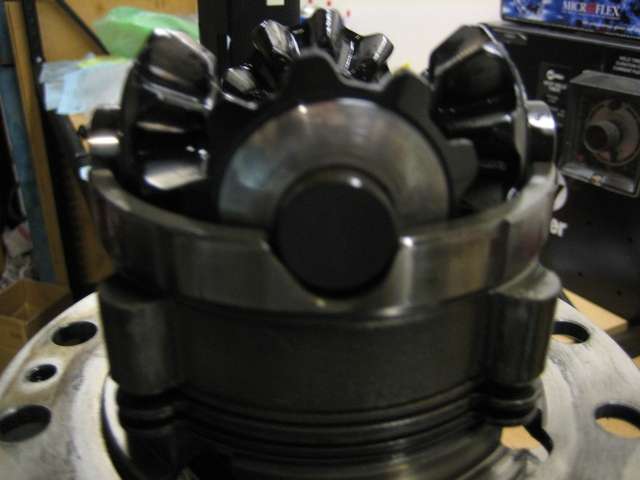
OK, take a good look at the OEM LSD and get it ready to ship to GUARD for rebuild.
Side view

It really weigh 30 lbs! lol
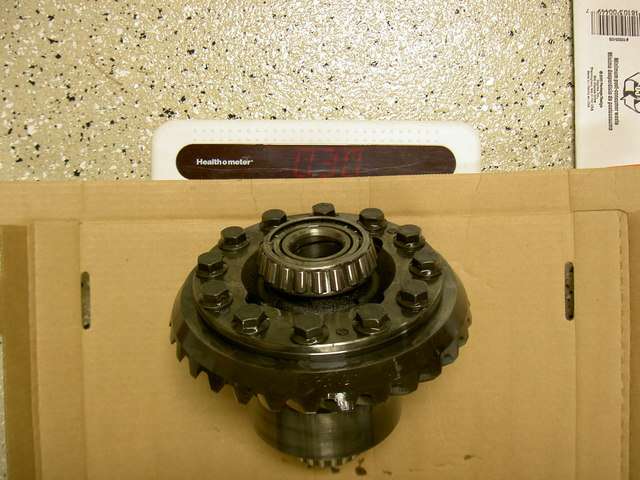
Factory etching indicated 13.14 Nm for the LSD which is only 9.6 lb/ft when new!? - It turns out I only had 2 lb/ft left at time of rebuild. It's practically an open differential!!!

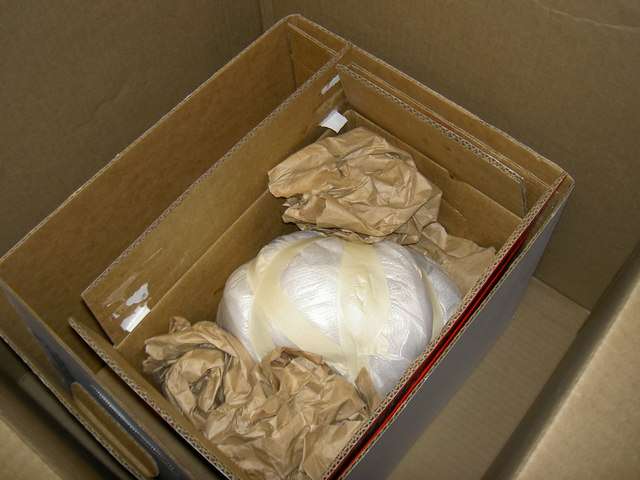
I send the LSD to GUARD with ring gear intact because I did not want to mess it up. make sure you pack the crap out of the LSD and use box in box method to prevent damage to the LSD/ring gear. It's $4K + if you have to replace the ring gear or LSD
My OEM LSD was rebuild to 50/80 spec which is the same as GUARD GT2 LSD.
Here are some footnote from Matt when he rebuild my LSD along with pictures of the replacement parts:
"As for your differential I didn't see anything unusual other than the fact that there was practically no wear on your parts. I have to say that this is the best condition I have seen one of these that was being reported to us as failing and worn out. You can see for yourself in the pictures that the brass friction discs appear like new. However, this really points out the mistake Porsche made in going with those discs. They replaced the previous carbon based discs with brass in an attempt to reduce particulate in the gearbox that could potentially cause harm. The problem is the result of two things. Number one is that the brass friction discs just don't have a high enough coefficient of friction. They just don't lock the way they are supposed to.
Problem number two is their attempt to use an LSD with a low preload setting on it. Even with a very small gap of 1.35mm in there, they don't use an aggressive enough belleville washer to set the preload and don't get the differential to actuate and lock the way it really should. again, you can see a side by side picture of the Porsche belleville (spring) washer and ours. The Porsche one is 1.2mm thick. The one I replaced it with is 1.8mm.
In addition to the preload and our higher friction discs, the other thing that will make this differential more aggressive than the stock configuration is the addition of our ramps. It you look at the pictures, you see ours versus the factory. It's actually a little counter-intuitive, but a more aggressive ramp has a lower angle on it. What this does is it allows the cross-shaft to exert more outward force on the bodies of the ramps, locking the friction discs. And with a strong pre-load, once there is no longer wheel spin, the cross-shafts are pushed back to the passive position in the center of the ramp and the differential returns to an open configuration.
I reviewed my notes, and we actually increased the gap on your LSD by .2mm, so the gap is now 1.55mm instead of 1.35mm. Even with that increase, your LSD now has a bench breakaway torque of 50 lb/ft versus the 2 lb.ft it had when it came to us. One other interesting note is that regardless of what the factory manual says, this LSD has etched on it's body 13.14Nm as it's original preload. That's only 9.6 lb/ft when new!!!"
OEM plain plate

OEM friction disc

OEM vs GT disc
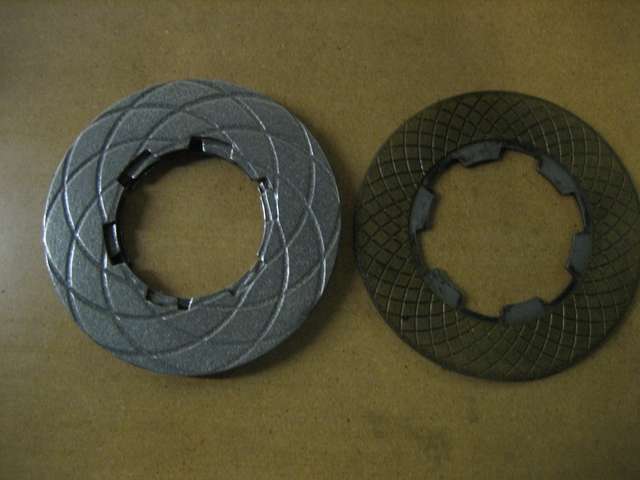
GT disc

GT2 replacement parts

OEM ramps
GT2 ramps

Finished product
Side view
It really weigh 30 lbs! lol
Factory etching indicated 13.14 Nm for the LSD which is only 9.6 lb/ft when new!? - It turns out I only had 2 lb/ft left at time of rebuild. It's practically an open differential!!!
I send the LSD to GUARD with ring gear intact because I did not want to mess it up. make sure you pack the crap out of the LSD and use box in box method to prevent damage to the LSD/ring gear. It's $4K + if you have to replace the ring gear or LSD
My OEM LSD was rebuild to 50/80 spec which is the same as GUARD GT2 LSD.
Here are some footnote from Matt when he rebuild my LSD along with pictures of the replacement parts:
"As for your differential I didn't see anything unusual other than the fact that there was practically no wear on your parts. I have to say that this is the best condition I have seen one of these that was being reported to us as failing and worn out. You can see for yourself in the pictures that the brass friction discs appear like new. However, this really points out the mistake Porsche made in going with those discs. They replaced the previous carbon based discs with brass in an attempt to reduce particulate in the gearbox that could potentially cause harm. The problem is the result of two things. Number one is that the brass friction discs just don't have a high enough coefficient of friction. They just don't lock the way they are supposed to.
Problem number two is their attempt to use an LSD with a low preload setting on it. Even with a very small gap of 1.35mm in there, they don't use an aggressive enough belleville washer to set the preload and don't get the differential to actuate and lock the way it really should. again, you can see a side by side picture of the Porsche belleville (spring) washer and ours. The Porsche one is 1.2mm thick. The one I replaced it with is 1.8mm.
In addition to the preload and our higher friction discs, the other thing that will make this differential more aggressive than the stock configuration is the addition of our ramps. It you look at the pictures, you see ours versus the factory. It's actually a little counter-intuitive, but a more aggressive ramp has a lower angle on it. What this does is it allows the cross-shaft to exert more outward force on the bodies of the ramps, locking the friction discs. And with a strong pre-load, once there is no longer wheel spin, the cross-shafts are pushed back to the passive position in the center of the ramp and the differential returns to an open configuration.
I reviewed my notes, and we actually increased the gap on your LSD by .2mm, so the gap is now 1.55mm instead of 1.35mm. Even with that increase, your LSD now has a bench breakaway torque of 50 lb/ft versus the 2 lb.ft it had when it came to us. One other interesting note is that regardless of what the factory manual says, this LSD has etched on it's body 13.14Nm as it's original preload. That's only 9.6 lb/ft when new!!!"
OEM plain plate
OEM friction disc
OEM vs GT disc
GT disc
GT2 replacement parts
OEM ramps
GT2 ramps
Finished product
12-18-2009, 05:01 PM
#3
Addict
Rennlist Member
Rennlist Member
Thread Starter
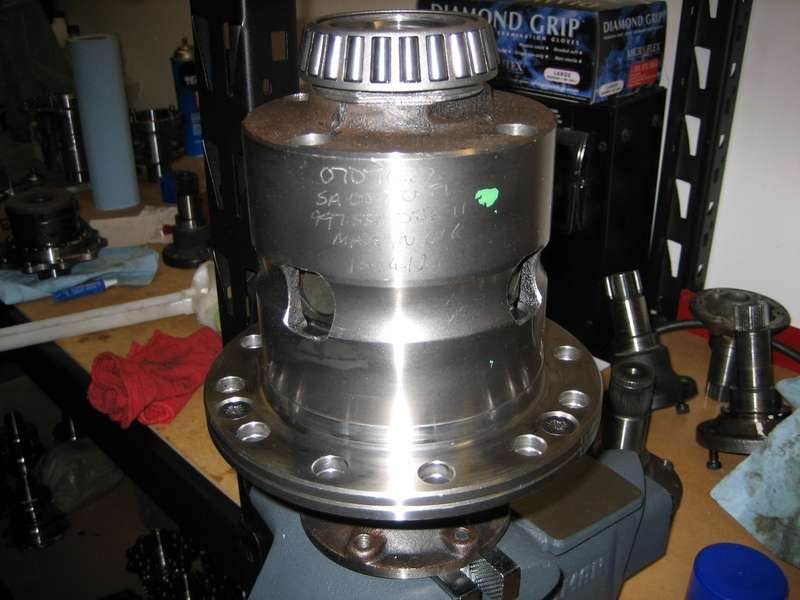
After a quick couple days of turn around I got my rebuild LSD back. I like the blue dots on the ring gear bolts which indicated 140 lb/ft of torque applied to each of these bolts!
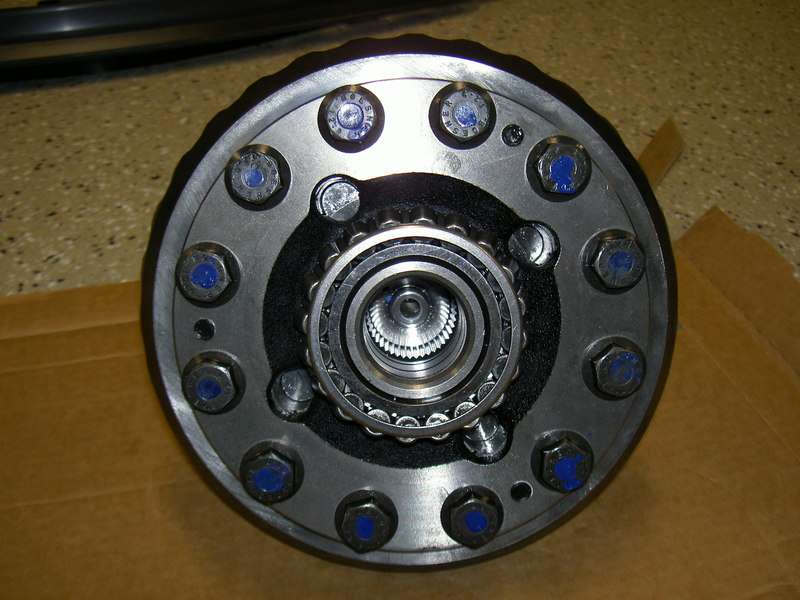
The back side is all clean up - thanks Matt
Let's clear the LSD housing and get everything out of the way because we have to push this 30 lbs LSD baby back up the birth canal lol. make sure you had your Wheaties for the morning. This thing is freaking heavy. Carefully clean the surface of the LSD opening and cover and lightly oil the O-ring on the LSD cover before putting it back. Gently work the LSD back in the housing
Once you work the LSD in, the ring gear should easily mesh with the final drive shaft from the transmission. You will be able to easily turn the LSD by hand with the transmission in neutral. I held on to the LSD on the passenger side through the drive shaft flange opening to do this test.
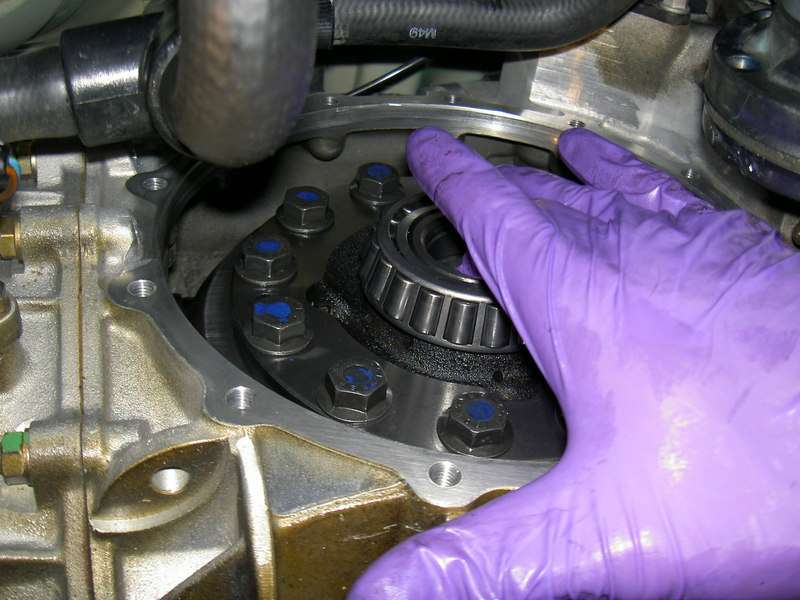
Once the LSD is in and ring gear mesh with the final drive shaft from the transmission. carefully place the LSD cover back on. I gently tap the cover from all sides with a rubber mallet then install all the bolts. Gradually tighten the bolts by going back and fourth from opposite ends to make sure the LSD plate slowly seal evenly with the transmission case. Tighten the LSD plate bolts to 19 ft/lb or 25 Nm

Place the drive shaft flange back on each side and tighten the center bolt to 33 ft/lb or 44 Nm. You may need to work the flange back in if it's a bit tight. Again no impact wrench
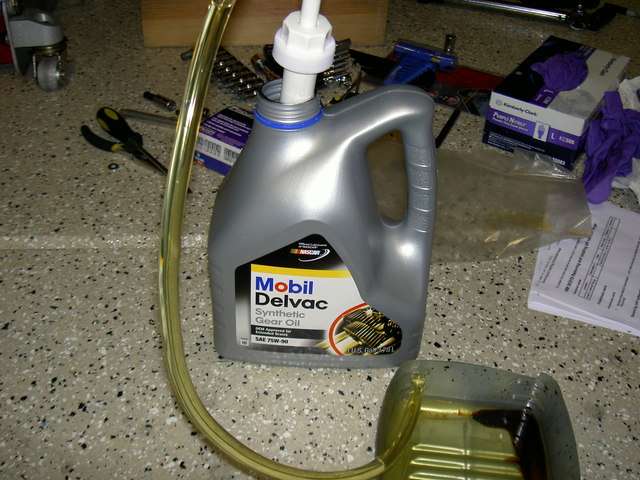
Fill up the transmission fluid with Mobil Delvac 75W-90 until the fluid flow out of the fill plug opening. I got my transmission fluid from lufteknic. here is the link:
http://www.lufteknic.com/Merchant2/m...ode=lubricants
It takes about the whole gallon to fill the transmission - it was a major PITA with a hand pump lol. Install the filler plug and count yourself lucky that you don't have to smell this crap for another year
Install the drive shaft back on the flange and tighten each bolt to 67 ft/lb. You will need to rotate the wheel to get to all the bolts.
It's a good idea to replace these bolts. They can be had from Suncoast Porsche
Bolts - 12 total both sides and $1.20 each: 999-073-449-01
washers - 6 total both sides and $ 2.90 each: 996-332-191-00
Start the car up and enjoy your newly rebuild LSD!!!
I had no issue in rain and it does not make any noise on tight turn. The car was rock sold under hard braking on the track and my tail does not do the wiggle anymore - which is confidence inspiring. I can rocket out of turn and throttle steer through turn much like my M3. I was able to best my time at Thunderhill by 3 seconds. I am sure I will get faster with better brakes (replacing my PCCB with steel rotors and aggressive pads will be my next project).
I can not be happier with the result and I would recommend fixing defective stock LSD to anyone especially if you plan on tracking your GT3/RS on a regular basis.
Hope this write up is informative and give some insight on the defect and repair process of our stock LSD.
Here is another video at Thunderhill doing a fun chase with Donovan's Lotus Exige
RS Lotus
. I like the blue dots on the ring gear bolts which indicated 140 lb/ft of torque applied to each of these bolts!The back side is all clean up - thanks Matt
Let's clear the LSD housing and get everything out of the way because we have to push this 30 lbs LSD baby back up the birth canal lol. make sure you had your Wheaties for the morning. This thing is freaking heavy. Carefully clean the surface of the LSD opening and cover and lightly oil the O-ring on the LSD cover before putting it back. Gently work the LSD back in the housing
Once you work the LSD in, the ring gear should easily mesh with the final drive shaft from the transmission. You will be able to easily turn the LSD by hand with the transmission in neutral. I held on to the LSD on the passenger side through the drive shaft flange opening to do this test.
Once the LSD is in and ring gear mesh with the final drive shaft from the transmission. carefully place the LSD cover back on. I gently tap the cover from all sides with a rubber mallet then install all the bolts. Gradually tighten the bolts by going back and fourth from opposite ends to make sure the LSD plate slowly seal evenly with the transmission case. Tighten the LSD plate bolts to 19 ft/lb or 25 Nm
Place the drive shaft flange back on each side and tighten the center bolt to 33 ft/lb or 44 Nm. You may need to work the flange back in if it's a bit tight. Again no impact wrench
Fill up the transmission fluid with Mobil Delvac 75W-90 until the fluid flow out of the fill plug opening. I got my transmission fluid from lufteknic. here is the link:
http://www.lufteknic.com/Merchant2/m...ode=lubricants
It takes about the whole gallon to fill the transmission - it was a major PITA with a hand pump lol. Install the filler plug and count yourself lucky that you don't have to smell this crap for another year
Install the drive shaft back on the flange and tighten each bolt to 67 ft/lb. You will need to rotate the wheel to get to all the bolts.
It's a good idea to replace these bolts. They can be had from Suncoast Porsche
Bolts - 12 total both sides and $1.20 each: 999-073-449-01
washers - 6 total both sides and $ 2.90 each: 996-332-191-00
Start the car up and enjoy your newly rebuild LSD!!!
I had no issue in rain and it does not make any noise on tight turn. The car was rock sold under hard braking on the track and my tail does not do the wiggle anymore - which is confidence inspiring. I can rocket out of turn and throttle steer through turn much like my M3. I was able to best my time at Thunderhill by 3 seconds. I am sure I will get faster with better brakes (replacing my PCCB with steel rotors and aggressive pads will be my next project).
I can not be happier with the result and I would recommend fixing defective stock LSD to anyone especially if you plan on tracking your GT3/RS on a regular basis.
Hope this write up is informative and give some insight on the defect and repair process of our stock LSD.
Here is another video at Thunderhill doing a fun chase with Donovan's Lotus Exige
RS Lotus
Last edited by mikymu; 12-19-2009 at 01:52 AM.
The following users liked this post:
Jeffery Chen (05-24-2020)
12-18-2009, 06:11 PM
#5
Rennlist Member
Excellent photos and documentation.
Thanks for posting this!
Thanks for posting this!

Trending Topics
12-18-2009, 09:04 PM
#9
Addict
Rennlist Member
Rennlist Member
Thread Starter
Glad you guys find the post helpful. I was told the factory LSD is pretty much dead after one track event. My RS's miles are 50% track and 50% hwy
Looks like Matt at GT gear is having a year end sale on GT LSD and OEM rebuild - couple hundreds off is nice. Here is the link if you guys are interested - I am not affiliated with GT gear but Matt is super helpful when it comes to technical info GT LSD sale
Looks like Matt at GT gear is having a year end sale on GT LSD and OEM rebuild - couple hundreds off is nice. Here is the link if you guys are interested - I am not affiliated with GT gear but Matt is super helpful when it comes to technical info
GT LSD sale
12-19-2009, 10:30 AM
#10
Instructor
With Mikymu's great detailed post I was able to get my differential out in a little over 1 hour. (no wood blocks though, I have a low rise lift). Off it went to Matt who turned it around in 2 days. I went with a 6 plate configuration with a preload of about 90 pounds. The ramps are 50/80.
The fact that he can rebuild the stock diff with greatly improved parts is fantastic. When I put a Guard LSD in my previous 993, I had to have the ring to pinion spacing set by my local shop. They removed the transmission to do that and it cost well over $1k along with the cost of the LSD itself. By rebuilding the stock unit and reusing the factory cage, no spacing changed so I was able to do all the work myself at no cost other than the LSD rebuild. This is one very easy and relatively low cost improvement.
The fact that he can rebuild the stock diff with greatly improved parts is fantastic. When I put a Guard LSD in my previous 993, I had to have the ring to pinion spacing set by my local shop. They removed the transmission to do that and it cost well over $1k along with the cost of the LSD itself. By rebuilding the stock unit and reusing the factory cage, no spacing changed so I was able to do all the work myself at no cost other than the LSD rebuild. This is one very easy and relatively low cost improvement.
Last edited by Tom Trew; 12-19-2009 at 02:16 PM.
The following users liked this post:
Jeffery Chen (05-24-2020)
12-19-2009, 02:38 PM
#12
Addict
Rennlist Member
Rennlist Member
Thread Starter
With Mikymu's great detailed post I was able to get my differential out in a little over 1 hour. (no wood blocks though, I have a low rise lift). Off it went to Matt who turned it around in 2 days. I went with a 6 plate configuration with a preload of about 90 pounds. The ramps are 50/80.
The fact that he can rebuild the stock diff with greatly improved parts is fantastic. When I put a Guard LSD in my previous 993, I had to have the ring to pinion spacing set by my local shop. They removed the transmission to do that and it cost well over $1k along with the cost of the LSD itself. By rebuilding the stock unit and reusing the factory cage, no spacing changed so I was able to do all the work myself at no cost other than the LSD rebuild. This is one very easy and relatively low cost improvement.
The fact that he can rebuild the stock diff with greatly improved parts is fantastic. When I put a Guard LSD in my previous 993, I had to have the ring to pinion spacing set by my local shop. They removed the transmission to do that and it cost well over $1k along with the cost of the LSD itself. By rebuilding the stock unit and reusing the factory cage, no spacing changed so I was able to do all the work myself at no cost other than the LSD rebuild. This is one very easy and relatively low cost improvement.
Happy to hear you were able to get the LSD out in an hour. That is amazing fast! Wow, 90 lbs of preload ... you must drive pretty aggressively on the track. Good for you. Like you said, OEM LSD rebuild does not require removal of tranny to set the LSD spacing. I was quoted >$3K just to remove the tranny and not including parts for an after market LSD. Now that is expensive
Cool, glad you like it
12-19-2009, 07:02 PM
#14
Instructor
$3k for tranny removal and LSD install sounds high to me, but then again you are in CA The diff removal was actually easier than I expected. Your writeup was a big help, you did all the thinking and problem solving, all I had to do was turn the wrench. It is a mighty tight fit getting the diff out of the transmission case with the drive shaft still in place. I wondered for a few minutes if it was possible and then found just the right place to position the drive shaft to clear the ring gear.
Matt tells me his standard build is a 4 plate, 60 lb preload, and the cup cars run 8 plates and about 120 lbs. Going with 6 plates and a 90 lb preload is a nice compromise for me. The car sees very little street time and saw about 5000 track miles last year. Both my wife and I drive it on track, so an 800 mile weekend is not unusual.
Thanks again for taking the time to post your procedure and the detailed pictures. I am sure it will prompt more GT3 owners to tackle a pretty simple but major performance upgrade.
The diff removal was actually easier than I expected. Your writeup was a big help, you did all the thinking and problem solving, all I had to do was turn the wrench. It is a mighty tight fit getting the diff out of the transmission case with the drive shaft still in place. I wondered for a few minutes if it was possible and then found just the right place to position the drive shaft to clear the ring gear.Matt tells me his standard build is a 4 plate, 60 lb preload, and the cup cars run 8 plates and about 120 lbs. Going with 6 plates and a 90 lb preload is a nice compromise for me. The car sees very little street time and saw about 5000 track miles last year. Both my wife and I drive it on track, so an 800 mile weekend is not unusual.
Thanks again for taking the time to post your procedure and the detailed pictures. I am sure it will prompt more GT3 owners to tackle a pretty simple but major performance upgrade.
12-20-2009, 02:30 AM
#15
Addict
Rennlist Member
Rennlist Member
Thread Starter
$3k for tranny removal and LSD install sounds high to me, but then again you are in CA The diff removal was actually easier than I expected. Your writeup was a big help, you did all the thinking and problem solving, all I had to do was turn the wrench. It is a mighty tight fit getting the diff out of the transmission case with the drive shaft still in place. I wondered for a few minutes if it was possible and then found just the right place to position the drive shaft to clear the ring gear.
Matt tells me his standard build is a 4 plate, 60 lb preload, and the cup cars run 8 plates and about 120 lbs. Going with 6 plates and a 90 lb preload is a nice compromise for me. The car sees very little street time and saw about 5000 track miles last year. Both my wife and I drive it on track, so an 800 mile weekend is not unusual.
Thanks again for taking the time to post your procedure and the detailed pictures. I am sure it will prompt more GT3 owners to tackle a pretty simple but major performance upgrade.
The diff removal was actually easier than I expected. Your writeup was a big help, you did all the thinking and problem solving, all I had to do was turn the wrench. It is a mighty tight fit getting the diff out of the transmission case with the drive shaft still in place. I wondered for a few minutes if it was possible and then found just the right place to position the drive shaft to clear the ring gear.Matt tells me his standard build is a 4 plate, 60 lb preload, and the cup cars run 8 plates and about 120 lbs. Going with 6 plates and a 90 lb preload is a nice compromise for me. The car sees very little street time and saw about 5000 track miles last year. Both my wife and I drive it on track, so an 800 mile weekend is not unusual.
Thanks again for taking the time to post your procedure and the detailed pictures. I am sure it will prompt more GT3 owners to tackle a pretty simple but major performance upgrade.
I almost pass out when I got the labor estimate for LSD rebuild. I am not kidding when I say $3K - not including the cost of LSD. I know what you mean by a tight fit. You are luckily that you had a real lift. I had to work under the car with those wood blocks. I am glad the garage door was close so my family can't hear me swearing
It's nice to hear both you and your wife drive on the track. My wife drive my RS on the track couple times a year. It is great fun to share track experience with your spouse .. until she scrap the crap out of my front cup splitter lol
90 lbs preload is a nice setup. I can feel the car push pretty well in turns even with 60 lbs. Being able to throttle steer and blast out of a turn is great fun with the rebuild LSD