

997 Mod Part 1: Deviated Chrono Face Gauge
 07-16-2013, 11:08 PM
#1
Drifting
Thread Starter
Background and Goals
My '08 C2S currently has 59.5K miles and 4.5+ yrs on the clock. So I wanted to refresh the interior with a few aesthetic mods. This is another guards red oriented mod for the interior which should match nicely my recently installed deviated g-red belts. The write-up will focus on the steps required to replace the stock white chrono face gauge with a deviated guards red gauge.
Note: my next mod will be the matching guards red instrumentation panels.
DIY Level
I consider this DIY project a level 4-5 out of 10. It starts out as a fairly simple project to undertake, however, mounting the needle like arms back on and then positioning/calibrating them to rest at center mast has it's own particular challenges... especially if you don't have lilliputian hands and elvish like dexterity. Here are some instructions and pics which may help others.
Time
1.5 -2 hrs... disassembly was easy and took 20-30 minutes but then I spent about 45mins to mount those tiny needle arms. Getting the arms to align at 12:00 took another 30 minutes to get right.
Caution/ Achtung!
Care should be taken to avoid loosing or breaking those miniture arms… Make sure you have a clean workbench/surface to work on.
When connecting or disconnecting the chrono stop watch from the car ensure that power is off and that the car key is removed to avoid any potential damage from electrical discharges. If you have difficulty keeping track of this then it's safest to just disconnect the car battery.
Tools Required:
- T6 and T10 torx bit
- torx bit driver
- very small flat head screw driver
- interior panel/trim removal tool set
- needle nose piler
Optional Tools
- masking tape
- micro cloth
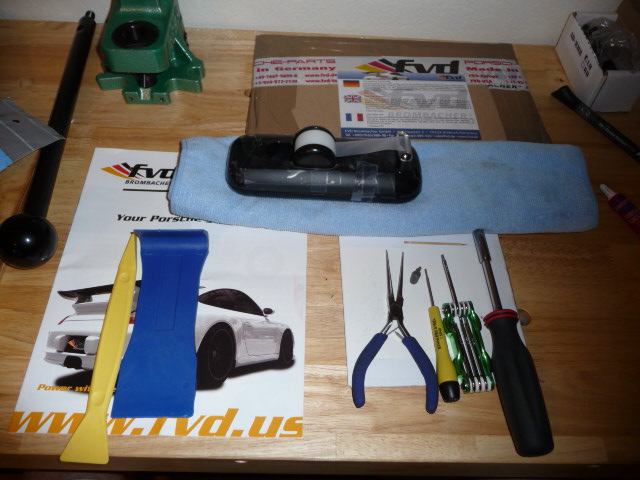
Parts:
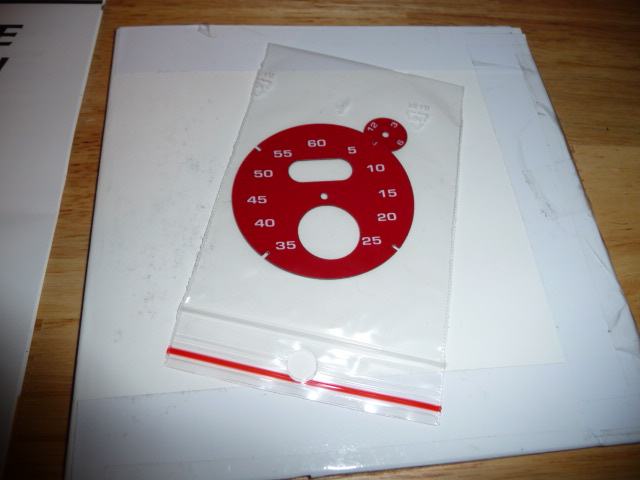
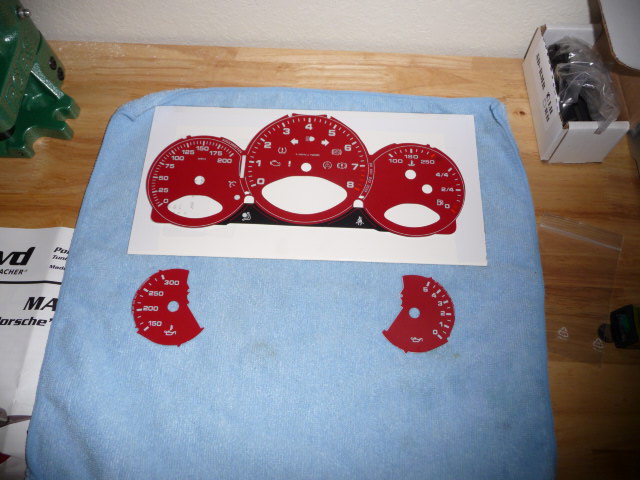
- a set of deviated chrono gauge faces.
http://www.fvd.us/us/en/Porsche-0/99...uards_Red.html
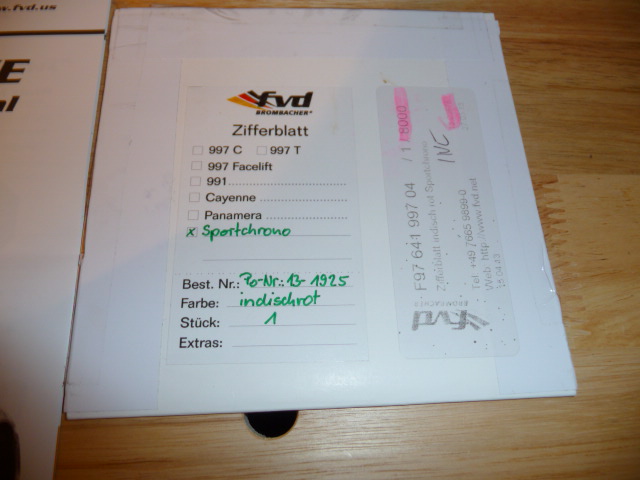
Note of Interest: Indischrot means Indian Red in German or per Porsche it's Guards Red.
Specifications:
- be gentle as most of these parts are plastic and will strip if the screws are over tightened or forced.
Instructions:
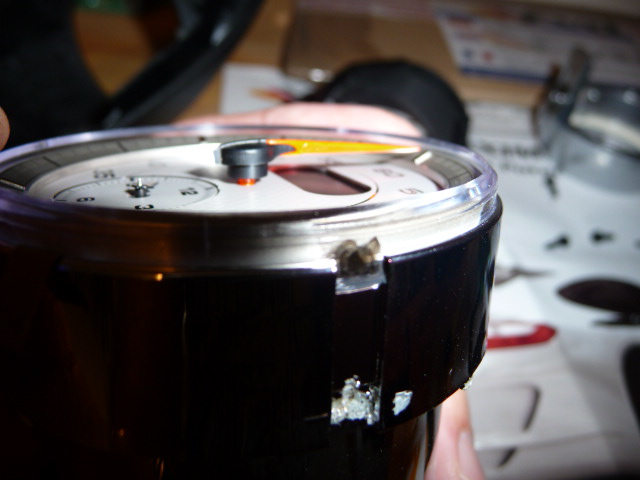
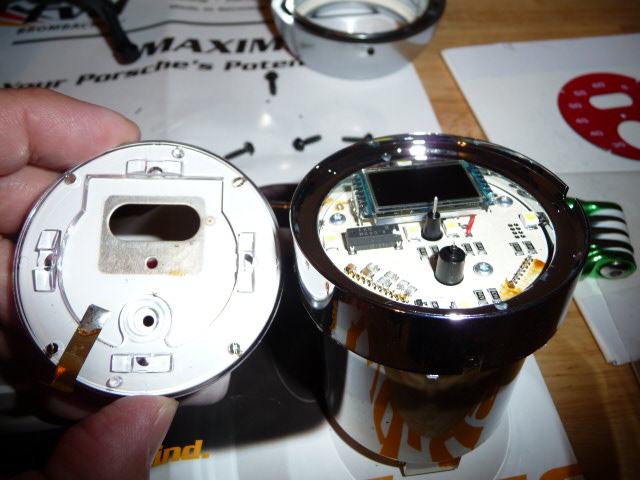
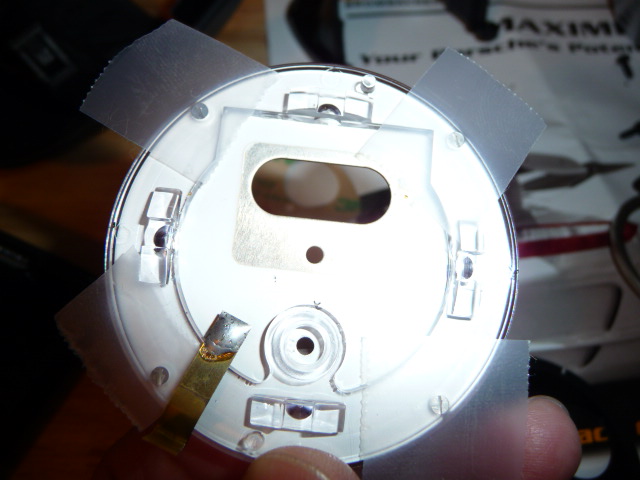
Remove the chrono stop watch using interior panel removal tools. Lift from the bottom up and start at the rear facing part of the chrono stop watch and work your way forward. It's held in place by 4 tabs.
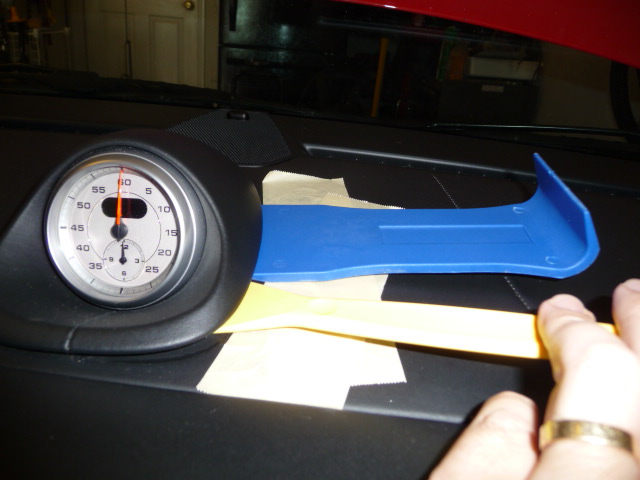
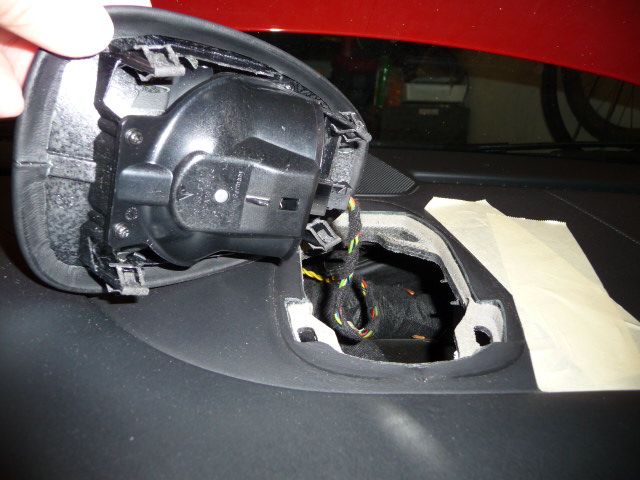
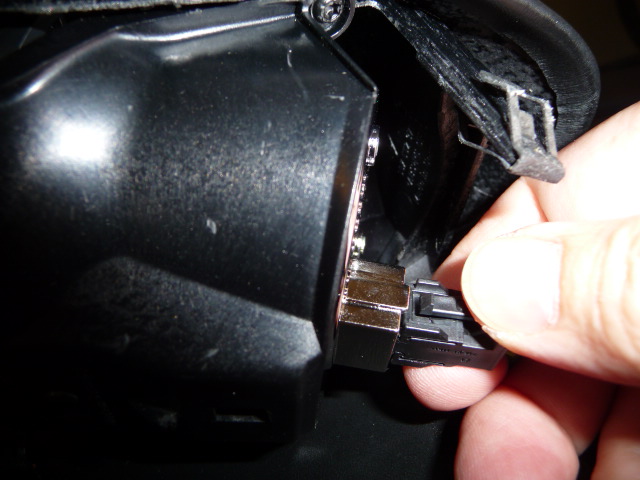
Disconnect the electrical connector by pulling it straight out.
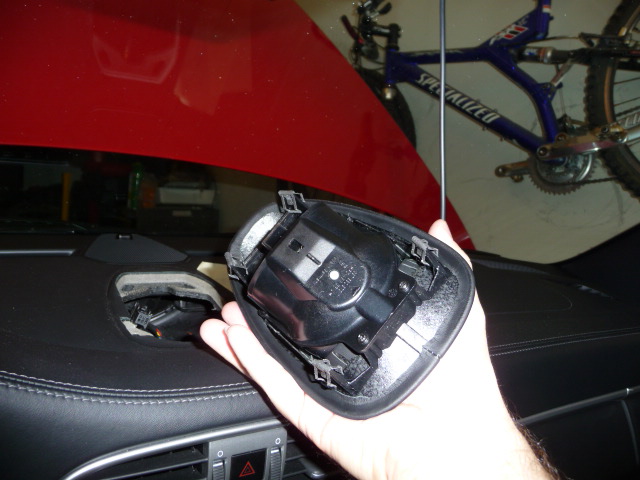
Time to go inside with the wart and work on a clean workbench.
Remove the four fastening screws from the base using the T10 torx bit.
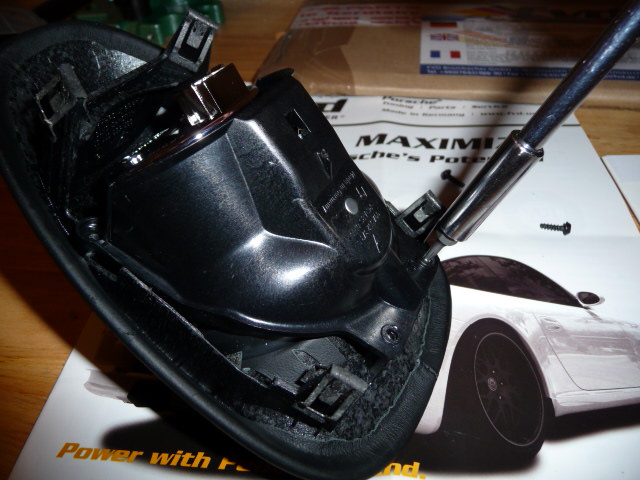
Note the four holes at each corner of the silver face of the chrono. There are torx screws within each of the four holes which need to be unscrewed using the T6 torx bit or driver.

Look for part 2 of write-up.
My '08 C2S currently has 59.5K miles and 4.5+ yrs on the clock. So I wanted to refresh the interior with a few aesthetic mods. This is another guards red oriented mod for the interior which should match nicely my recently installed deviated g-red belts. The write-up will focus on the steps required to replace the stock white chrono face gauge with a deviated guards red gauge.
Note: my next mod will be the matching guards red instrumentation panels.
DIY Level
I consider this DIY project a level 4-5 out of 10. It starts out as a fairly simple project to undertake, however, mounting the needle like arms back on and then positioning/calibrating them to rest at center mast has it's own particular challenges... especially if you don't have lilliputian hands and elvish like dexterity. Here are some instructions and pics which may help others.
Time
1.5 -2 hrs... disassembly was easy and took 20-30 minutes but then I spent about 45mins to mount those tiny needle arms. Getting the arms to align at 12:00 took another 30 minutes to get right.
Caution/ Achtung!
Care should be taken to avoid loosing or breaking those miniture arms… Make sure you have a clean workbench/surface to work on.
When connecting or disconnecting the chrono stop watch from the car ensure that power is off and that the car key is removed to avoid any potential damage from electrical discharges. If you have difficulty keeping track of this then it's safest to just disconnect the car battery.
Tools Required:
- T6 and T10 torx bit
- torx bit driver
- very small flat head screw driver
- interior panel/trim removal tool set
- needle nose piler
Optional Tools
- masking tape
- micro cloth
Parts:
- a set of deviated chrono gauge faces.
http://www.fvd.us/us/en/Porsche-0/99...uards_Red.html
Note of Interest: Indischrot means Indian Red in German or per Porsche it's Guards Red.
Specifications:
- be gentle as most of these parts are plastic and will strip if the screws are over tightened or forced.
Instructions:
Remove the chrono stop watch using interior panel removal tools. Lift from the bottom up and start at the rear facing part of the chrono stop watch and work your way forward. It's held in place by 4 tabs.
Disconnect the electrical connector by pulling it straight out.
Time to go inside with the wart and work on a clean workbench.
Remove the four fastening screws from the base using the T10 torx bit.
Note the four holes at each corner of the silver face of the chrono. There are torx screws within each of the four holes which need to be unscrewed using the T6 torx bit or driver.
Look for part 2 of write-up.
Last edited by USMC_DS1; 07-17-2013 at 12:32 PM.
 07-16-2013, 11:12 PM
#2
Drifting
Thread Starter
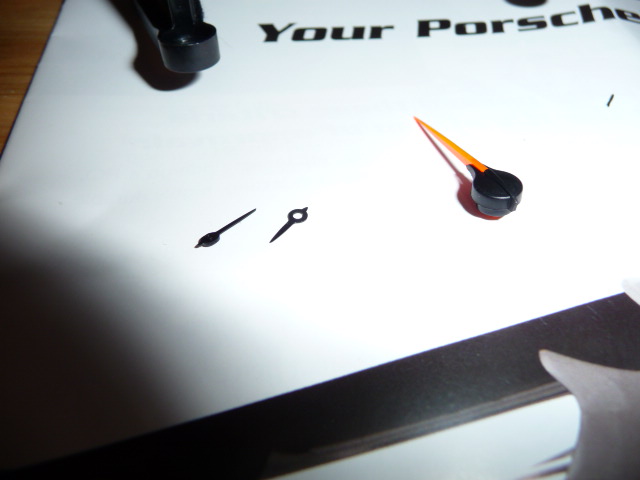
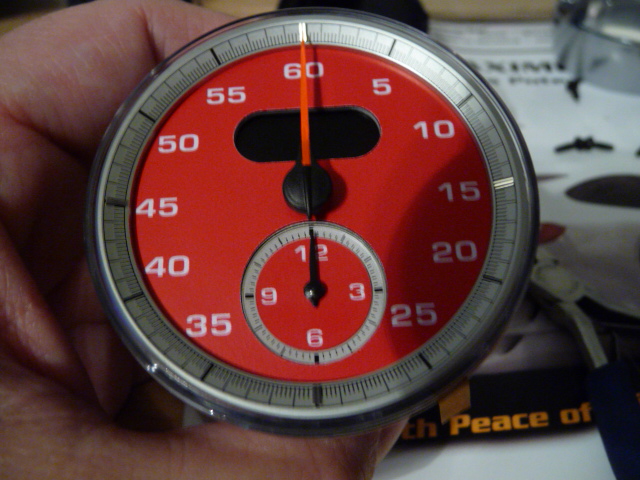
Remove needle arms starting with the smallest to the largest. I removed the two black needles on the bottom then the large needle at the top. The needle at the top required the most pulling force. Be careful not to bend or break these needles.
07-16-2013, 11:49 PM
#3
Drifting
Thread Starter
Sorry for these multiple parts... I seem to be having issues editing prior postings with additional pics.
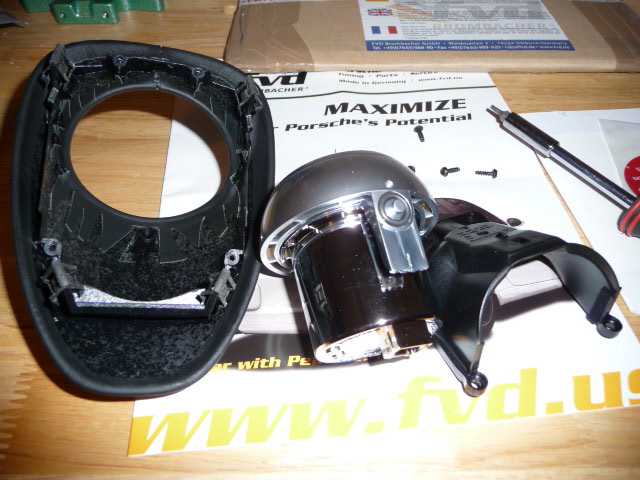
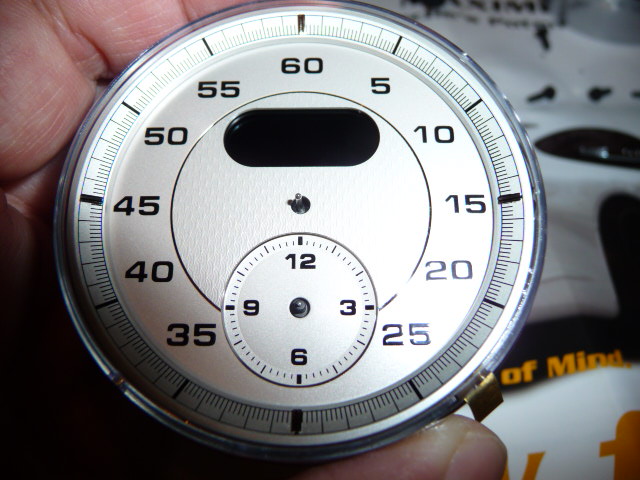
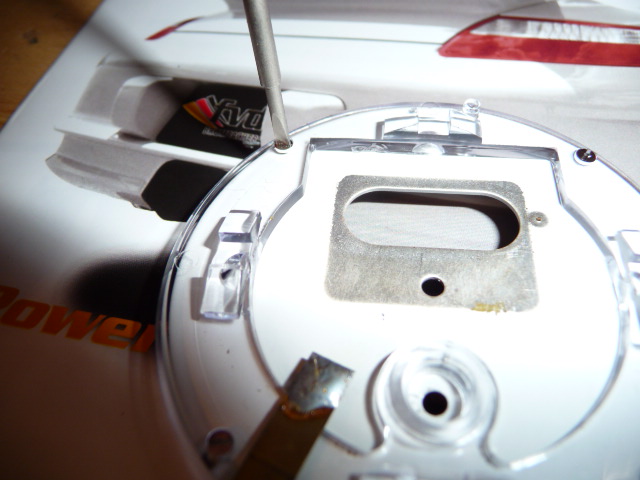
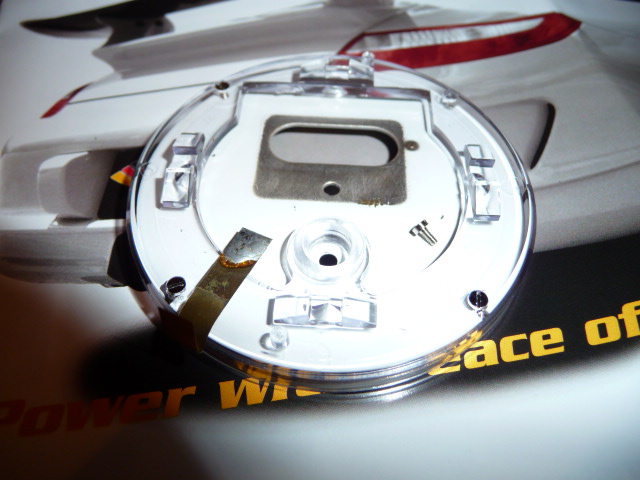
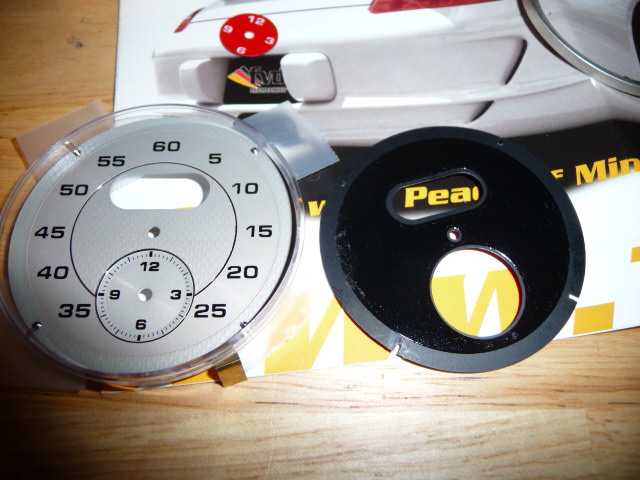
Pop off the face using a flat head screw driver.
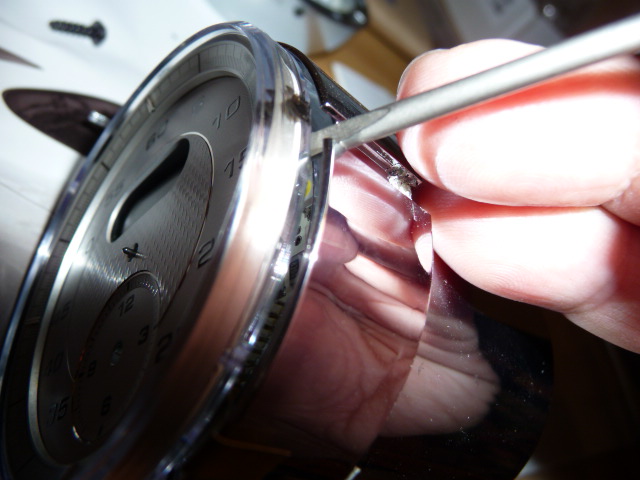
Remove the four screw holding the bezel to the chrono face using a small flat head screw driver.
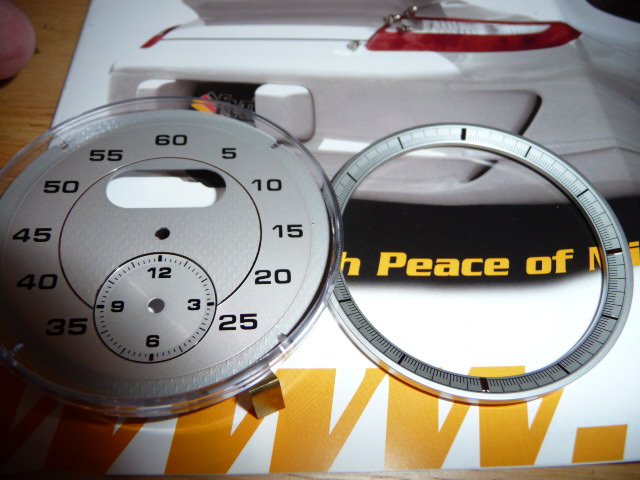
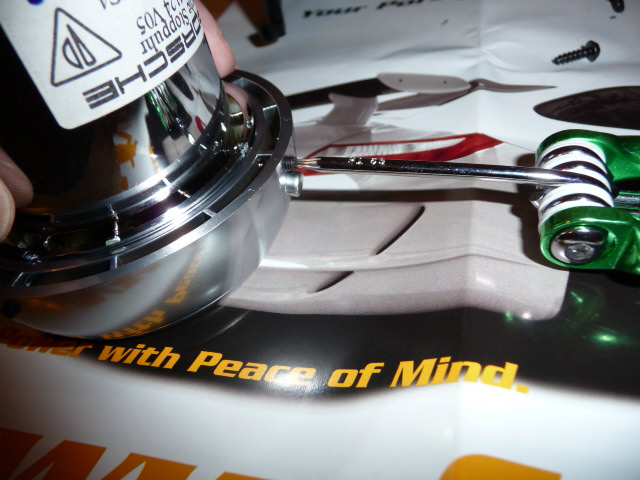
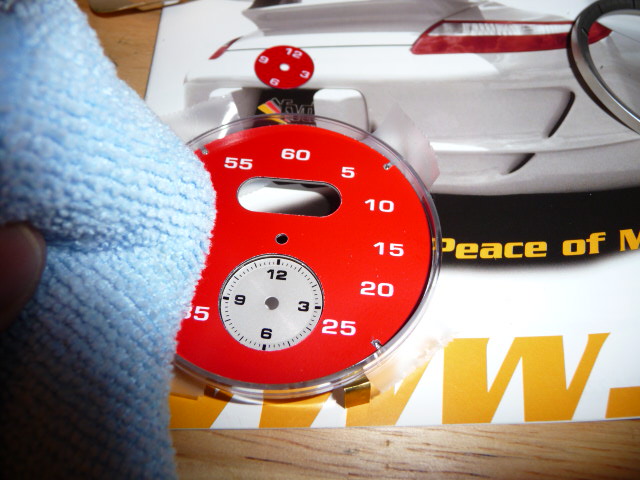
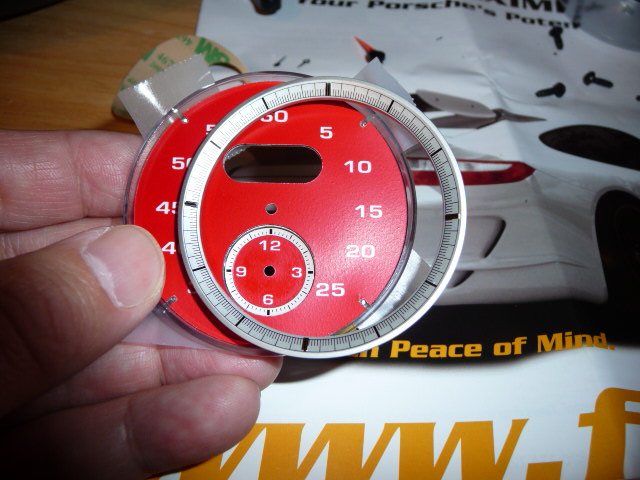
Now peal off the 3M backing on the back of the FVD gauge face and apply the face on top of the existing Porsche face. Note that the FVD face is keyed and has four slots. To align the slots in place I taped the four screws to the back of the bezel to help orient the FVD face properly.
Try to keep any figure prints/oils off the face itself... I used a micro cloth to seat the face down. Then apply a similar method to seat the smaller face as well. I used a toothpick to help align the smaller gauge face. Take your time to align the two gauge faces properly. You only get one shot at it.
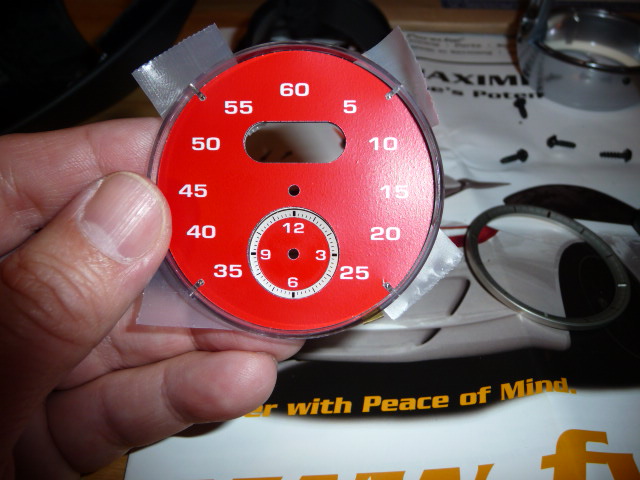
Now reassemble the bezel to the face by tighten the four screw in the back.
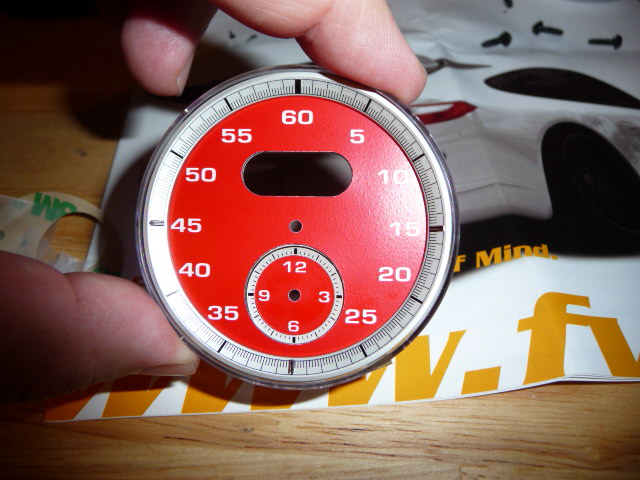
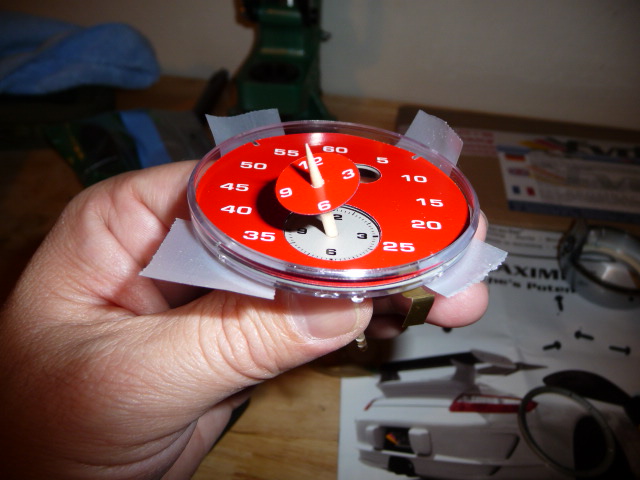
Place the arms back onto their posts. I found it helpful to wrap my index figure with some tape... sticky side out to pick up those tiny arms.

Pop off the face using a flat head screw driver.
Remove the four screw holding the bezel to the chrono face using a small flat head screw driver.
Now peal off the 3M backing on the back of the FVD gauge face and apply the face on top of the existing Porsche face. Note that the FVD face is keyed and has four slots. To align the slots in place I taped the four screws to the back of the bezel to help orient the FVD face properly.
Try to keep any figure prints/oils off the face itself... I used a micro cloth to seat the face down. Then apply a similar method to seat the smaller face as well. I used a toothpick to help align the smaller gauge face. Take your time to align the two gauge faces properly. You only get one shot at it.
Now reassemble the bezel to the face by tighten the four screw in the back.
Place the arms back onto their posts. I found it helpful to wrap my index figure with some tape... sticky side out to pick up those tiny arms.
The following users liked this post:
frederickcook87 (09-29-2023)
07-17-2013, 12:50 AM
#4
Drifting
Thread Starter
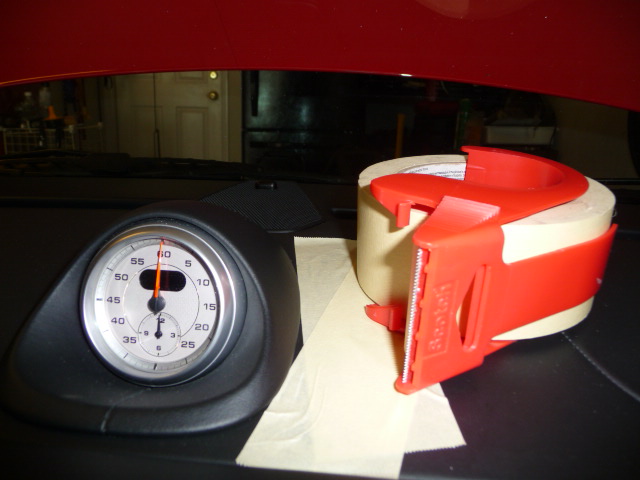
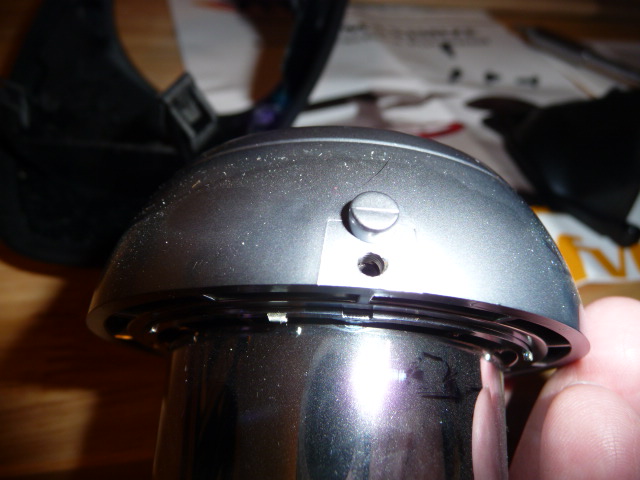
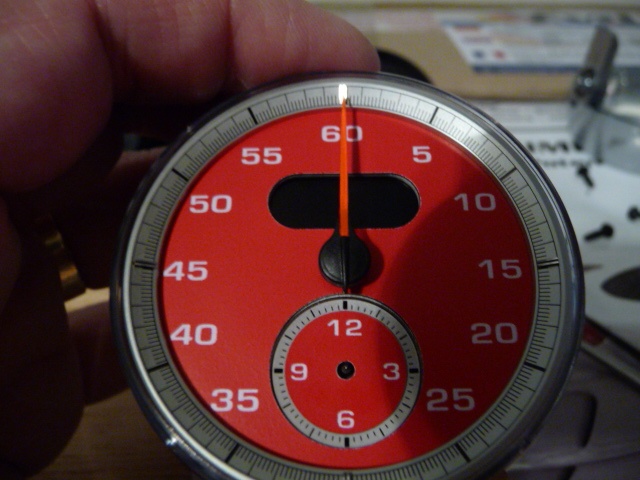
Insure that all the arms are aligned towards the 12 o'clock mark or center mast. Note: do not press the large arm all the way in yet... leave it barely attached but align all arms at this point.
Now take the unit as is back to the car to calibrate the center position of the large arm. Connect it back to the electrical connection point. The connector is keyed and will simply slide in.
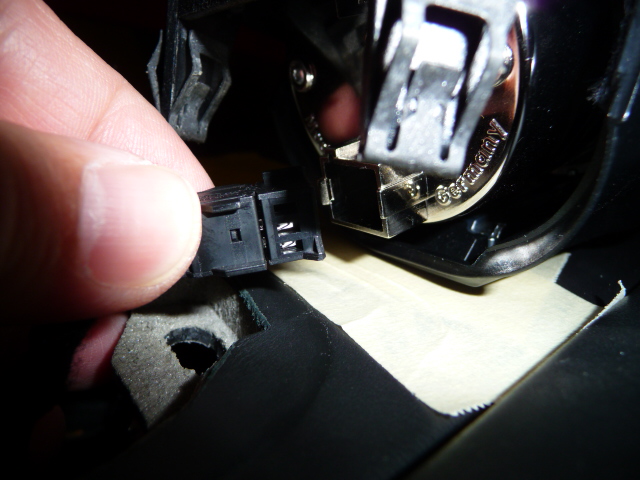
Cycle the chrono timer - start, stop, then rest. It will set the large arm back to it's centered position which may not align at exactly 12 o'clock. I keep moving the arm and then cycling the chrono stop watch function through it's entire process to final get the arm at exact center mast. Then I pressed the large arm all the way in once I was satisfied. It took me 3 tries to get it exactly centered.
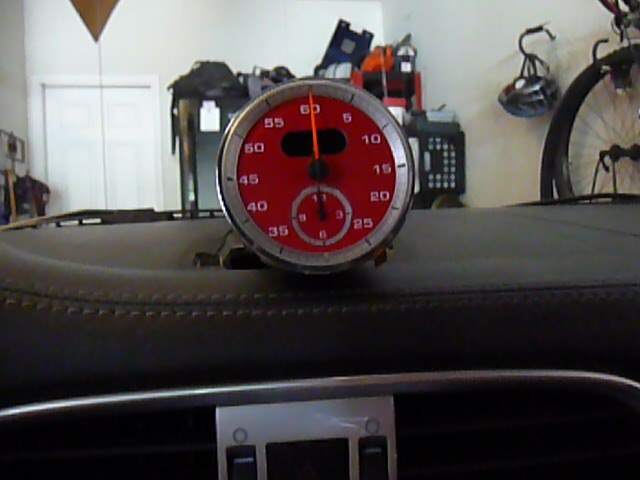
Once calibrated... turn off the car and disconnect the chrono unit. Take the it back inside and reassemble it in the revise process from what's already covered.
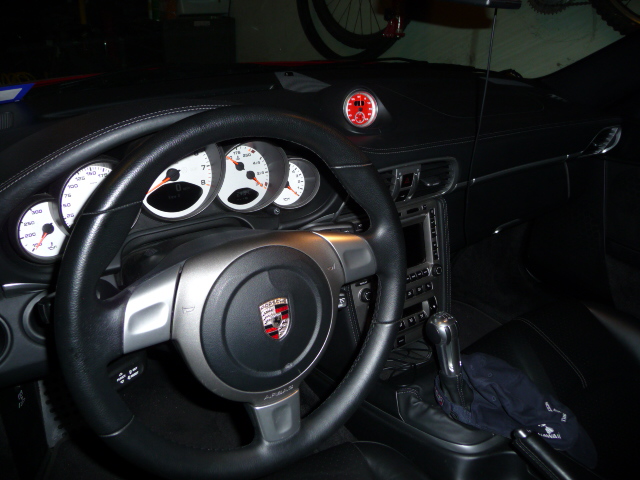
Enjoy the new Guards Red Chrono...
Now take the unit as is back to the car to calibrate the center position of the large arm. Connect it back to the electrical connection point. The connector is keyed and will simply slide in.
Cycle the chrono timer - start, stop, then rest. It will set the large arm back to it's centered position which may not align at exactly 12 o'clock. I keep moving the arm and then cycling the chrono stop watch function through it's entire process to final get the arm at exact center mast. Then I pressed the large arm all the way in once I was satisfied. It took me 3 tries to get it exactly centered.
Once calibrated... turn off the car and disconnect the chrono unit. Take the it back inside and reassemble it in the revise process from what's already covered.
Enjoy the new Guards Red Chrono...
Last edited by USMC_DS1; 07-17-2013 at 06:19 PM.
07-17-2013, 12:51 AM
#5

Nice work and write up. Looks great! Please post a pic of the finished job with Chrono installed back in the dash.
Would have looked nice too if you had left the center clock white for a combo look.
Would have looked nice too if you had left the center clock white for a combo look.
07-17-2013, 12:58 AM
#7
Drifting
Thread Starter
Thanks... I agree especially if I was going to leave the instrument panel white then the chrono in G-Red/white combo would have helped to blend with the white instrument panel. But I'm going to be changing the instrument panel to Guards Red as well so I decided to go all red on the Chrono. Hope it all works in the end.
Trending Topics
07-17-2013, 01:38 AM
#8
Rennlist Member
Great job! That would look great with my red interior!
07-17-2013, 01:45 AM
#9

Beautiful complement to the guards red exterior and red seat belts :-)
 07-17-2013, 10:10 AM
#12
Three Wheelin'
That is nice work. Now that you have headed down the gauge face color path, if you're interested in seeing what the rest of them would look like in Guards PM me and I'll send you some pics of mine.
07-17-2013, 11:02 AM
#14
Drifting
Thread Starter
Thanks gents... It was nice to work on something so delicate that it required a few jeweler's tools for once. I have to admit that it was a bit intimidating at 1st considering how I could not find anything posted on this type of mod and my SA(a former p-dealer tech) mentioned that he had never done a chrono face gauge switch. A big relief when it all worked out in the end. Now to tackle the instrument panel... 
Last edited by USMC_DS1; 07-17-2013 at 11:25 AM.
07-17-2013, 11:18 AM
#15
Racer

Join Date: Jul 2012
Location: West of Bean Town
Posts: 308
Likes: 0
Received 0 Likes
on
0 Posts
That looks great. One thing a wasn't keen on is how the orange needle is almost invisible against the red now.
Curious would you consider painting it black like the smaller?
B
Curious would you consider painting it black like the smaller?
B