
997.1 Spark Plug & Coil Pack Replacement DIY w/Photos
 09-12-2012, 03:59 AM
#1
Rennlist Member
Thread Starter
997.1 Spark Plug Change Procedure
Below are a tool list and step-by-step procedure with photos of key steps. Photos show the right side cylinder bank. Left side is largely identical with minor differences (cam solenoids are at opposite ends fore/aft, left side heat shield doesn't completely withdraw, unbolting ground cable connection on right side permits easier access to upper bolt of right-side wheel well body strut).
Car in pictures is a 2005 997 Carrera.
Completion time was about 3.5 hours on the left side proceeding carefully for the first time, then about 2.3 hours on the right side once I knew what to expect. Alldata suggests professional shop time allotment of about 4.5 hours total.
Tool List –
breaker bar (to unbolt wheels)
torque wrench(es)
19 mm socket (wheel lug nuts)
ratchet drive
drive extensions
drive universal joint
10mm socket
13mm socket
spark plug socket (small)
Torx T30 drive
Torx T40 drive
Torx E10 socket
screwdriver, flat blade
10mm ratcheting box wrench (to fit T40 drive bit)
(hydraulic jack, wheel chocks)
1) Chock diagonally opposite front wheel and lift selected rear wheel with floor jack.
2) Remove rear wheel (19mm socket, 96 ft-lbs) and slip removed wheel under engine block as safety backup.
3) Remove wheel well body strut (10mm socket 7.5 ft-lbs and T30 Torx drive, 2 ft-lbs) so that you'll have clearance to withdraw the muffler. Note, on the right (starboard) side I also removed a ground cable connection and pushed the cable out of the way to get good access to the upper bolt of the body strut.
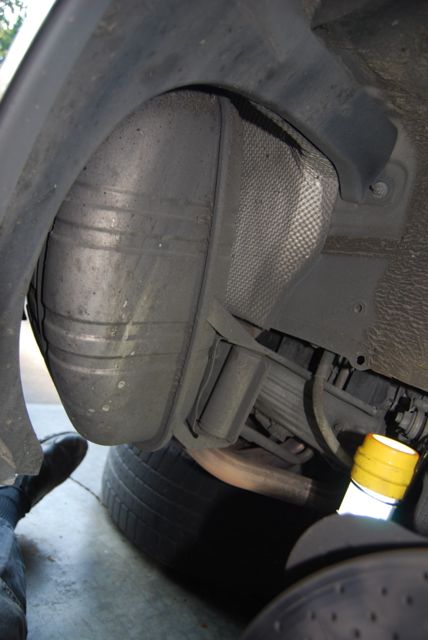
4) Loosen cuff connecting muffler to catalytic converter (two nuts) & slide toward cat (13mm socket, 17 ft-lbs). Note, a short drive extension is useful.
Here is a picture looking into the right rear wheel well towards the back:
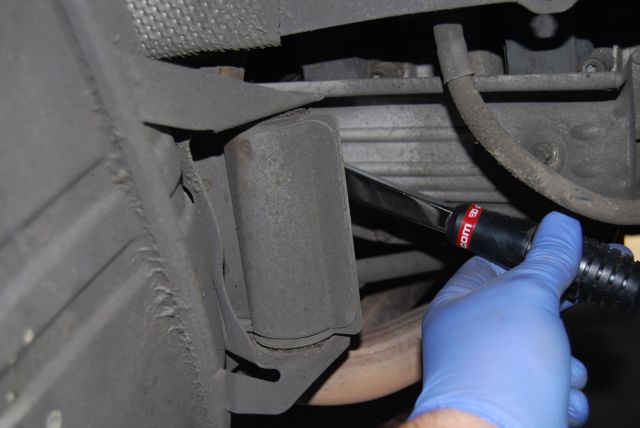
5) Remove the 3 nuts fastening muffler bracket to engine bracket (13mm socket, 17 ft-lbs). Note, insert ratchet along inner side of muffler from front & access by touch. Ratchet arcs were short, it took a little while to remove the nuts. (Pictures further below illustrate where these nuts are and how to access them).
6) Remove muffler (move muffler forward into wheel well then rotate out).
Here is a picture where the ratchet is on one of the forward 2 of the 3 nuts fastening the muffler bracket to the engine bracket. The socket, which is hidden behind the muffler bracket and not visible, is facing toward the camera:
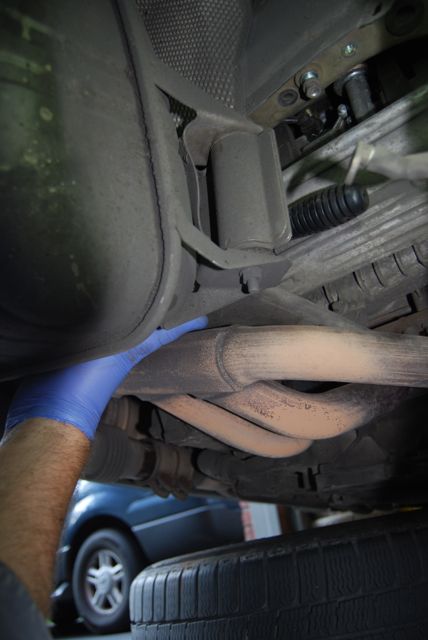
And here is a picture with the ratchet on the rearmost of the 3 nuts fastening the muffler bracket to the engine bracket. Note the black ratchet handle extending to the right, with one hand coming from underneath the muffler and over the exhaust manifold to support the socket on the nut:
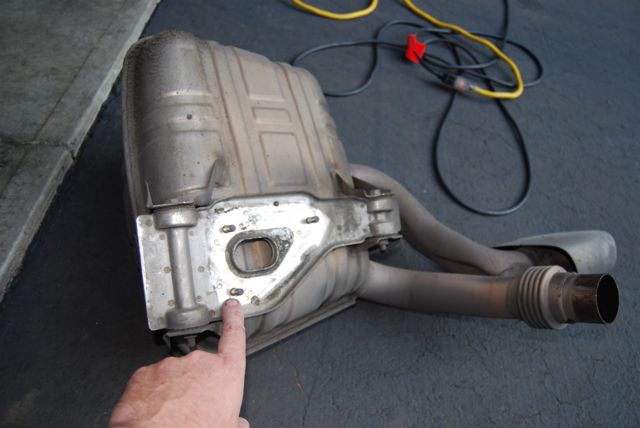
Here is a picture of the muffler removed, you can see locations of the three studs that with the nuts fasten the muffler assembly to the engine bracket:
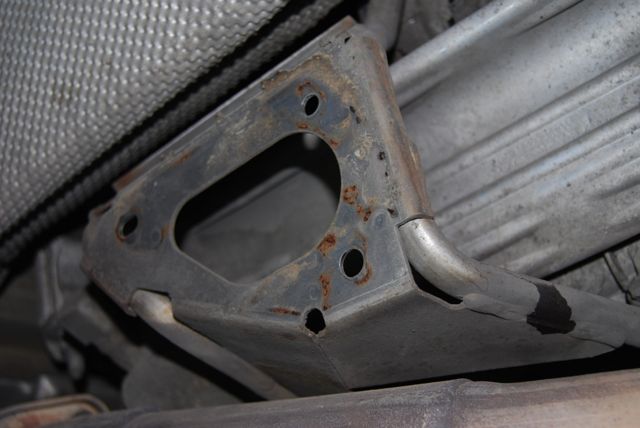
And here is a picture of the engine bracket to which the muffler was attached, showing the upper three holes through which the muffler bracket studs mounted:
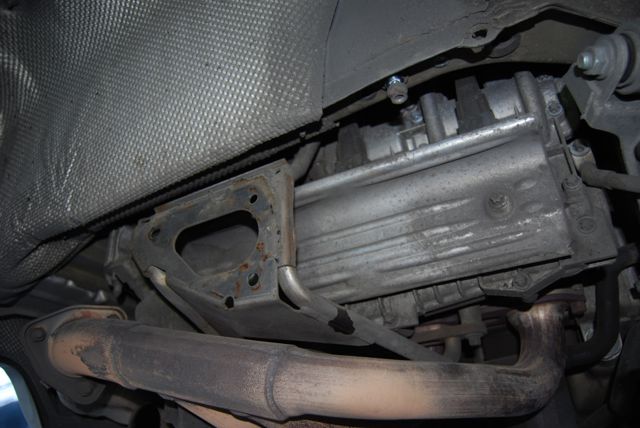
Closer shot of the engine bracket mounting face:
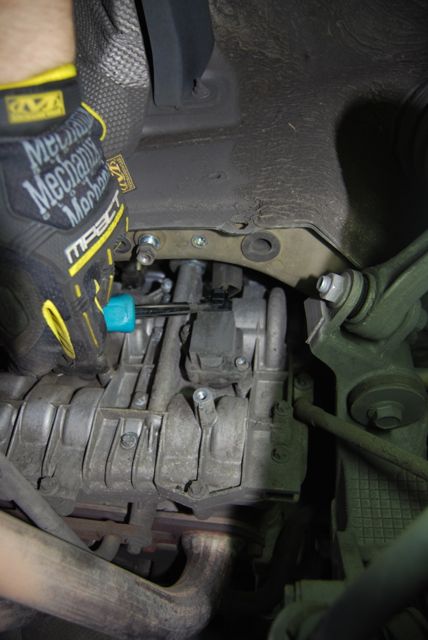
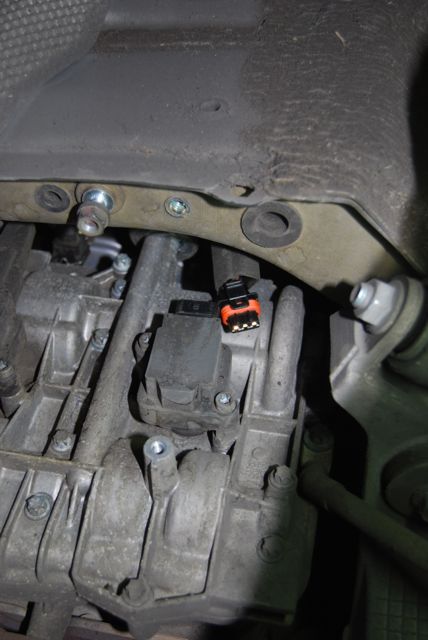
7) Unbolt heat shield from the cylinder bank to reveal the coil packs - two bolts (Torx E10 socket, 7.5 ft-lbs). Note, heat shield remains captured by engine bracket on the left side cylinder bank, but moves sufficiently to grant access. Heat shield on right side cylinder bank is completely removable. (Shields have a tab on one end and are identical, some other parts are mirror image not identical and so some geometries were slightly different between the cylinder banks).
Removing the heat shield:

8) To remove coil pack(s), first - push rubber shield up and release connector clip with screwdriver, then unplug the electrical connection. (Note: for the forward-most coil pack on the left side cylinder bank, and the rear-most coil pack on the right side cylinder bank, will likely need to unplug electrical connection to the adjacent cam solenoid for better access. To do so, slide the wire retaining clip laterally and then pull the connector off the cam solenoid in a direction straight out from the cylinder bank. Be careful and try to not pull the wire retaining clip completely off the connector, can require a delicate touch & possibly needle nose pliers to position and reinstall. At the end of this post I'll include a picture of the cam solenoid on the right cylinder bank).
Picture looking up towards the front coil pack on the right cylinder bank, rubber connector shield pushed up, screwdriver tip releasing the connector clip:
A closer shot of the screwdriver tip releasing the connector clip:
Here is a shot of the connector disengaged from the coil pack (note, be careful when reattaching the coil pack not to crush the connector between the coil pack and the head - the connector will want to fall into place, make sure it is up out of the way when bolting the coil pack back in):
9) Unbolt coil pack, two bolts (Torx T40 drive, 7.5 ft-lbs). Note, 5” drive extension for some bolts, ratcheting box wrench on drive bit for others where space was tight (one hand/finger pushing end of the drive bit, other hand running the wrench). Some of these coil pack bolts are in tight quarters - be patient. Note, middle coil pack looks difficult to remove past the engine bracket, but it will come out, rotate it to clear.
10) Remove and replace spark plug - torque to 22 ft-lbs for new plug, 19 ft-lbs if re-installing old plug. (Do not lubricate the plug threads, go gently and don't cross-thread). Note, the end plugs I could reach with a straight extension but the access to the middle plug required more flexibility. For the middle plug I needed at least one universal joint and an appropriate extension with the ratchet drive (through center aperture of the engine bracket onto which the muffler assembly bolts). If the socket/drive junctions release prematurely while you are trying to pull the plug socket off the newly installed spark plug, one effective trick is to wrap the junctions with duct tape.
11) Replace coil pack (taking care not to crush the electrical connector to the coil pack between the coil pack and the head), reconnect electrical connector, slide protective rubber shield back down over the connection.
Repeat steps 8-11 for each coil pack and spark plug.
12) (Reconnect cam solenoid), replace heat shield, muffler, wheel well strut, (ground cable connection) and wheel in reverse order. Remember to refasten the cuff between the muffler and the catalytic converter.
General Notes:
Many of the fasteners (muffler bracket to engine bracket, coil pack to head) have tight finger room and small ratchet arcs. Be patient.
At about 50k miles my original coil packs looked good, I replaced them anyway while I was in there and will keep the old ones as backups.
Original spark plugs had good color, but the electrodes looked visibly worn at 50k miles compared to new replacement spark plugs.
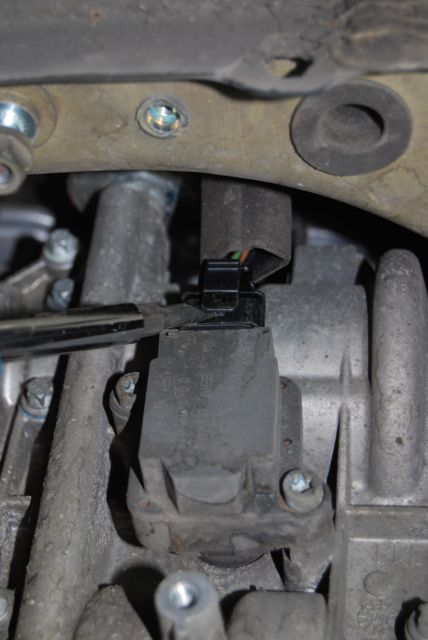
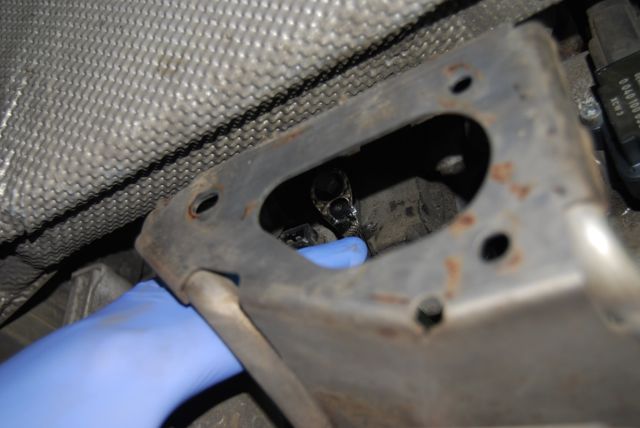
Below is a picture of (part of) the cam solenoid on the right cylinder bank. It is a bit obscure, but looking through the central aperture of the engine bracket at the tip of my blue-gloved finger, just above my finger and on the left edge of the aperture you can see the electrical blade prongs extending from the back of the cam solenoid. The tip of my finger is resting on the rearmost of the two bolts fastening the rearmost coil pack to the head. To the immediate right of my finger is the old, dusty coil pack, in contrast to the shinier new coil pack partially captured on the right edge of the picture:
Below are a tool list and step-by-step procedure with photos of key steps. Photos show the right side cylinder bank. Left side is largely identical with minor differences (cam solenoids are at opposite ends fore/aft, left side heat shield doesn't completely withdraw, unbolting ground cable connection on right side permits easier access to upper bolt of right-side wheel well body strut).
Car in pictures is a 2005 997 Carrera.
Completion time was about 3.5 hours on the left side proceeding carefully for the first time, then about 2.3 hours on the right side once I knew what to expect. Alldata suggests professional shop time allotment of about 4.5 hours total.
Tool List –
breaker bar (to unbolt wheels)
torque wrench(es)
19 mm socket (wheel lug nuts)
ratchet drive
drive extensions
drive universal joint
10mm socket
13mm socket
spark plug socket (small)
Torx T30 drive
Torx T40 drive
Torx E10 socket
screwdriver, flat blade
10mm ratcheting box wrench (to fit T40 drive bit)
(hydraulic jack, wheel chocks)
1) Chock diagonally opposite front wheel and lift selected rear wheel with floor jack.
2) Remove rear wheel (19mm socket, 96 ft-lbs) and slip removed wheel under engine block as safety backup.
3) Remove wheel well body strut (10mm socket 7.5 ft-lbs and T30 Torx drive, 2 ft-lbs) so that you'll have clearance to withdraw the muffler. Note, on the right (starboard) side I also removed a ground cable connection and pushed the cable out of the way to get good access to the upper bolt of the body strut.
4) Loosen cuff connecting muffler to catalytic converter (two nuts) & slide toward cat (13mm socket, 17 ft-lbs). Note, a short drive extension is useful.
Here is a picture looking into the right rear wheel well towards the back:
5) Remove the 3 nuts fastening muffler bracket to engine bracket (13mm socket, 17 ft-lbs). Note, insert ratchet along inner side of muffler from front & access by touch. Ratchet arcs were short, it took a little while to remove the nuts. (Pictures further below illustrate where these nuts are and how to access them).
6) Remove muffler (move muffler forward into wheel well then rotate out).
Here is a picture where the ratchet is on one of the forward 2 of the 3 nuts fastening the muffler bracket to the engine bracket. The socket, which is hidden behind the muffler bracket and not visible, is facing toward the camera:
And here is a picture with the ratchet on the rearmost of the 3 nuts fastening the muffler bracket to the engine bracket. Note the black ratchet handle extending to the right, with one hand coming from underneath the muffler and over the exhaust manifold to support the socket on the nut:
Here is a picture of the muffler removed, you can see locations of the three studs that with the nuts fasten the muffler assembly to the engine bracket:
And here is a picture of the engine bracket to which the muffler was attached, showing the upper three holes through which the muffler bracket studs mounted:
Closer shot of the engine bracket mounting face:
7) Unbolt heat shield from the cylinder bank to reveal the coil packs - two bolts (Torx E10 socket, 7.5 ft-lbs). Note, heat shield remains captured by engine bracket on the left side cylinder bank, but moves sufficiently to grant access. Heat shield on right side cylinder bank is completely removable. (Shields have a tab on one end and are identical, some other parts are mirror image not identical and so some geometries were slightly different between the cylinder banks).
Removing the heat shield:
8) To remove coil pack(s), first - push rubber shield up and release connector clip with screwdriver, then unplug the electrical connection. (Note: for the forward-most coil pack on the left side cylinder bank, and the rear-most coil pack on the right side cylinder bank, will likely need to unplug electrical connection to the adjacent cam solenoid for better access. To do so, slide the wire retaining clip laterally and then pull the connector off the cam solenoid in a direction straight out from the cylinder bank. Be careful and try to not pull the wire retaining clip completely off the connector, can require a delicate touch & possibly needle nose pliers to position and reinstall. At the end of this post I'll include a picture of the cam solenoid on the right cylinder bank).
Picture looking up towards the front coil pack on the right cylinder bank, rubber connector shield pushed up, screwdriver tip releasing the connector clip:
A closer shot of the screwdriver tip releasing the connector clip:
Here is a shot of the connector disengaged from the coil pack (note, be careful when reattaching the coil pack not to crush the connector between the coil pack and the head - the connector will want to fall into place, make sure it is up out of the way when bolting the coil pack back in):
9) Unbolt coil pack, two bolts (Torx T40 drive, 7.5 ft-lbs). Note, 5” drive extension for some bolts, ratcheting box wrench on drive bit for others where space was tight (one hand/finger pushing end of the drive bit, other hand running the wrench). Some of these coil pack bolts are in tight quarters - be patient. Note, middle coil pack looks difficult to remove past the engine bracket, but it will come out, rotate it to clear.
10) Remove and replace spark plug - torque to 22 ft-lbs for new plug, 19 ft-lbs if re-installing old plug. (Do not lubricate the plug threads, go gently and don't cross-thread). Note, the end plugs I could reach with a straight extension but the access to the middle plug required more flexibility. For the middle plug I needed at least one universal joint and an appropriate extension with the ratchet drive (through center aperture of the engine bracket onto which the muffler assembly bolts). If the socket/drive junctions release prematurely while you are trying to pull the plug socket off the newly installed spark plug, one effective trick is to wrap the junctions with duct tape.
11) Replace coil pack (taking care not to crush the electrical connector to the coil pack between the coil pack and the head), reconnect electrical connector, slide protective rubber shield back down over the connection.
Repeat steps 8-11 for each coil pack and spark plug.
12) (Reconnect cam solenoid), replace heat shield, muffler, wheel well strut, (ground cable connection) and wheel in reverse order. Remember to refasten the cuff between the muffler and the catalytic converter.
General Notes:
Many of the fasteners (muffler bracket to engine bracket, coil pack to head) have tight finger room and small ratchet arcs. Be patient.
At about 50k miles my original coil packs looked good, I replaced them anyway while I was in there and will keep the old ones as backups.
Original spark plugs had good color, but the electrodes looked visibly worn at 50k miles compared to new replacement spark plugs.
Below is a picture of (part of) the cam solenoid on the right cylinder bank. It is a bit obscure, but looking through the central aperture of the engine bracket at the tip of my blue-gloved finger, just above my finger and on the left edge of the aperture you can see the electrical blade prongs extending from the back of the cam solenoid. The tip of my finger is resting on the rearmost of the two bolts fastening the rearmost coil pack to the head. To the immediate right of my finger is the old, dusty coil pack, in contrast to the shinier new coil pack partially captured on the right edge of the picture:
Last edited by Dave R.; 09-12-2012 at 04:12 PM. Reason: adding photos, cleaning typos

The following users liked this post:
J2332 (03-10-2024)
 09-12-2012, 11:36 AM
#5
Banned

Join Date: Oct 2009
Posts: 731
Likes: 0
Received 0 Likes
on
0 Posts
Sounds like jolly fun, if I was twenty years younger and my time was only worth that of a mechanic, I'd relish the undertaking. As it stands, I'm chuffed that my '05s extended warranty (you know, the one they say is a scam  ) will pay for replacing the coil packs when needed. It just paid for a water pump ($1200). Together with the battery-starter cable and the shifter cable, the warranty has now repaid 60% of its cost with 4,5 years yet remaining.
) will pay for replacing the coil packs when needed. It just paid for a water pump ($1200). Together with the battery-starter cable and the shifter cable, the warranty has now repaid 60% of its cost with 4,5 years yet remaining.

Trending Topics
09-12-2012, 02:32 PM
#9
Nordschleife Master
Lots of respect for the DIY guys,especially the ones who take their time to post these!
Even though some projects might seem easy in theory,they can give you a hard time once you start doing it...and on top of that to be taking pictures with dirty hands and be careful at what you're doing in the same time can be challenging...
Having the right tools and a step by step guidance can be gold!
I need to start doing some work on my Porsche as I've been doing plenty on my AMG...
As hard as it may be,it's so rewarding at the end,once you know you've done the work yourself,I can't even describe the feeling of accomplishment while enjoying a cold one...
I don't need to work on my cars but I find it so much fun,you learn new things,develop new skills.
Many thanks!
The following users liked this post:
dlascoskie (08-30-2023)

 12-18-2012, 08:15 PM
#14
Great write up and the pics always add clarity. Regarding the muffler brackets, is it not possible to remove the muffler from the bracket and then the bracket from the mount ? From the pic it appears the two bolts holding the muffler to the bracket might be more easily accessible than the backet nuts. Have never done it so am just curious as I will be attempting the spark plug change in the not to distant future. Have done it on a Boxster but access was better on that engine.
12-18-2012, 11:34 PM
#15
Addict
Rennlist Member
Rennlist Member
Danka!