Quest to make Giro's 2 pc rear even lighter
 07-31-2013, 06:07 PM
#1
Drifting
Thread Starter
A few months ago i purchased a set of 2pc Giro disc. They had good life on the rotor but pretty heavy still for my liking considering the Brembo's weight 14.5 lbs and the Giros weight close to 19lbs.
Yes I will confess I'm a weight whinny, (even the driver is a on diet plan ) to make sure to get as much weight out of the car.
So I'm rebuilding my giro's 2pc. I will include pictures of before and after.
with weights.
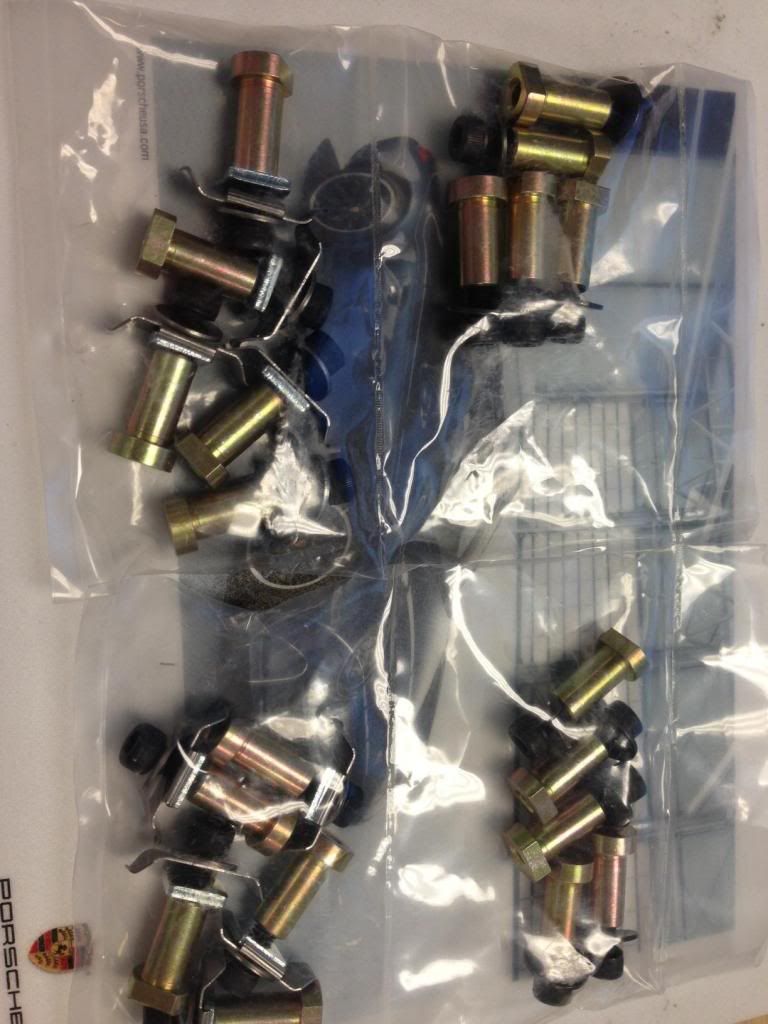
So far, I have ordered new hardware from John (powdrhound) whom is awesome to deal with. I got the hardware from Giro disc, given I know about the plating business , I did a quick test on the zinc plating, and they do not meet Military ROHS compliance which is probably why the old ones look terrible.
First thing is re-plating the hardware. I will also be anodizing the hats with Anodize Type 3, in bronze color instead of clear alodine like before. Last but not least, I have already placed an order of new rotors to my specifications ( used the same principal as AP Racing ) and i'm expecting rotors to come in weighting at 12.7lbs if my calculations are correct, with total combine weight of hat and hardware to 15.4lbs. Fingers crossed.
I will update as I go with pictures. First pictures of hardware, I will update before and after of hats as well, and then new rotors. The goal is to reduce close 10lbs off the rear axle
To bring my car to a net of 3190lbs in AWD configuration w 4/6 of tank full of fuel, and looking stock.
Yes I will confess I'm a weight whinny, (even the driver is a on diet plan
) to make sure to get as much weight out of the car. So I'm rebuilding my giro's 2pc. I will include pictures of before and after.
with weights.
So far, I have ordered new hardware from John (powdrhound) whom is awesome to deal with. I got the hardware from Giro disc, given I know about the plating business
, I did a quick test on the zinc plating, and they do not meet Military ROHS compliance which is probably why the old ones look terrible. First thing is re-plating the hardware. I will also be anodizing the hats with Anodize Type 3, in bronze color instead of clear alodine like before. Last but not least, I have already placed an order of new rotors to my specifications ( used the same principal as AP Racing ) and i'm expecting rotors to come in weighting at 12.7lbs if my calculations are correct, with total combine weight of hat and hardware to 15.4lbs. Fingers crossed.
I will update as I go with pictures. First pictures of hardware, I will update before and after of hats as well, and then new rotors. The goal is to reduce close 10lbs off the rear axle
To bring my car to a net of 3190lbs in AWD configuration w 4/6 of tank full of fuel, and looking stock.

 07-31-2013, 11:34 PM
#2
Awesome! Looking forward to the updates

08-01-2013, 03:22 AM
#3
Brembo has always had light rotors but the main reason is the fact that their rotors are of the narrow annulus design, in other words the friction ring is skinnier = less thermal mass. By comparison, the Giro 350 front rotor weight the same (give or take a few ounces) as the Giro 380 front rotors but the 380s are a narrow annulus design necessitating the use of "clipped" cup car pads. The latest design in the works will be a 380x34 full annulus rotor which will have incredible thermal mass but will weigh around 25 lbs. Everything is a tradeoff it seems.
Last edited by powdrhound; 10-14-2013 at 12:34 PM.

 08-01-2013, 02:42 PM
#5
Drifting
Thread Starter
I will try to make this boring process as entertaining as possible, thank you for the support !
Looks great Enrique. I'm looking forward to seeing the final result. It's nice to see people coming up with more options. Brembo has always had light rotors but the main reason is the fact that their rotors are of the narrow annulus design, in other words the friction ring is skinnier = less thermal mass. By comparison, the Giro 350 front rotor weight the same (give or take a few ounces) as the Giro 380 front rotors but the 380s are a narrow annulus design necessitating the use of "clipped" cup car pads. The latest design in the works will be a 380x34 full annulus rotor which will have incredible thermal mass but will weigh around 25 lbs. Everything is a tradeoff it seems.
That said, the reason why i decided to tackle this is because going from OEM of 23lbs for each rotor in the rear to the Giros at 19lbs each at the rear. My light weight fly wheel chatters MUCH less at low rpms, and the chattering goes away at a much lower RPM. Also, my throttle seems to be improved. I was not expecting any of this, so i dont think it is a placebo.
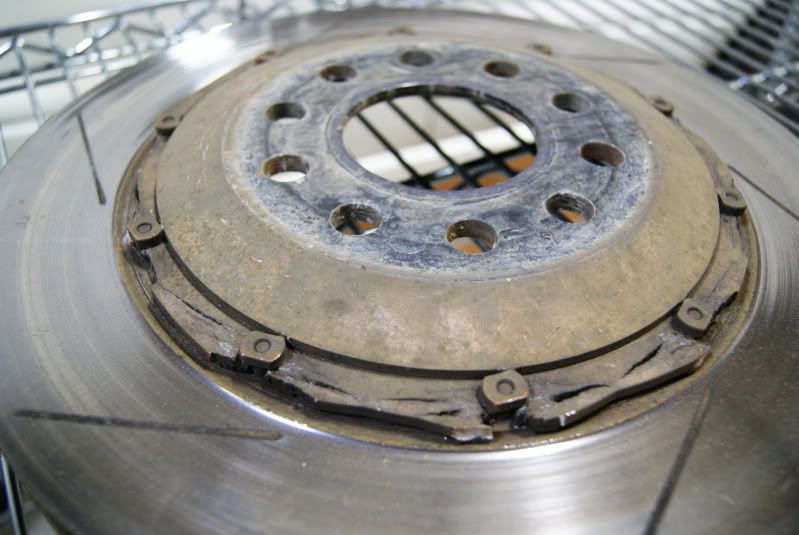
Here is a picture of what i mean excess material on the rear rotor for the Giros. The giros have about 2.5mm extra on this edge, vs OEM. They also have about 1mm in the outer edge vs oem. I'm eliminating all of this, to meet OEM specs.
 08-01-2013, 06:08 PM
#6
Drifting
Thread Starter
Here is a picture that was emailed to me after the Anodize Type 3 process. This process has a much better protection, obviously it cost more. You can still see some of the laser mark engraving left behind. They did not want to etch the part to much as would make the mounting holes bigger. That said, it looks much nicer. I'll post before and after pictures.
 08-01-2013, 07:07 PM
#7
AutoX

Join Date: Jun 2012
Posts: 11
Likes: 0
Received 0 Likes
on
0 Posts
Enrique,
I stumbled across this post last night and our production manager Ben and myself had a few thoughts we would like to share with you and the community. We are not a sponsor on here so this is intended entirely to be a technical response, I don�t want to step on anyone's feet.
Now here are a few things that we would like you to consider before modifying your rotors:
Thermal Mass
Depending on the kind of driving that you�re doing, going from a 19 lb. rotor assembly to a 15.4 lb. rotor assembly could be beneficial or detrimental. The cheeks (as we call them) on the rotor are thick to accommodate a specific amount of thermal mass, not to allow for longer wear (that is determined by the caliper and how much travel its pistons have).
I will caution you against removing too much weight from the rotors. If you are using this car for drag racing (a single high speed braking event with minutes before the next event) or autocross (low speed braking events spaced closer together but with time between sessions) decreasing thermal mass in that quantity works quite well.
For example we have an Evo 8 application that we have a standard two piece and a lightweight two piece rotor
Front Standard: 17.4 lbs Front Lightweight: 12.9 lbs � about 25% weight decrease for the assembly
Rear Standard 11.1 lbs Rear Lightweight 8.9 lbs � about 20% weight decrease for the assembly
We do not list these lightweight rotors on our website for a very good reason; these don�t belong on street cars and absolutely not on cars driven during track events. Track events, depending on the circuit, have many high speed braking events over a longer period of time (20 minutes of lapping up to a full endurance race).
Having a rotor that has too little thermal mass for the type of driving being done can do more than just cause the rotors to wear faster. If someone were to take our Evo 8 Lightweight rotor and drive it during a track event they wouldn�t notice at first, but the rotors would be running much hotter because during any given braking event the same amount of energy would be introduced to the lightweight rotor as would be to the standard rotor, but because there is less mass there: the temperature of the iron will increase at a greater rate with the lighter rotor.
When facing higher overall rotor temperatures, other things begin to be affected by the heat: pads get hotter and stay hotter and may wear faster, wear the rotor more aggressively or transfer material to the iron itself. The calipers invariably see that heat and can eventually boil the fluid.
The rotor will cool down between braking events, but the goal is to have a rotor that will not undergo extreme changes to its temperature throughout a session: this can cause thermal shock (which we have seen cause serious fractures and can cause warping) and if the rotor cools down too much between corners (another possible effect of lower thermal mass) it can affect the pad-rotor interaction and create inconsistent braking feel.
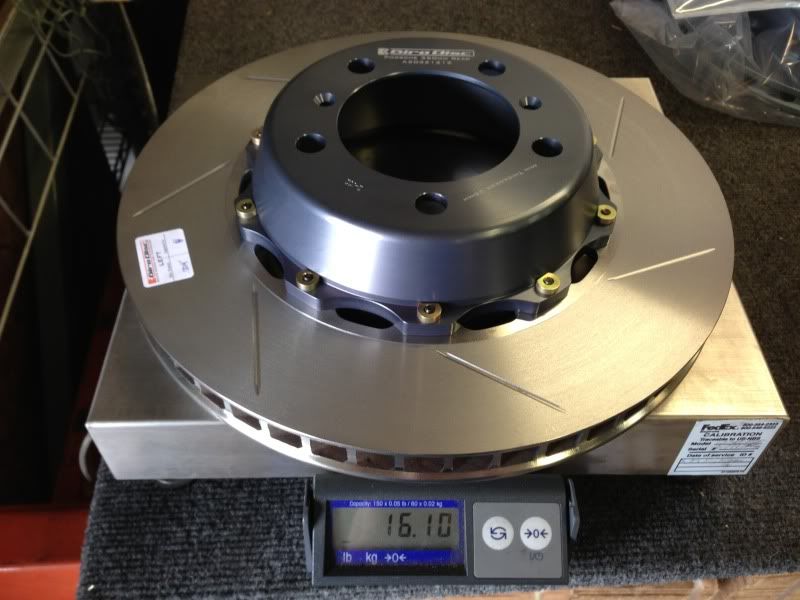
Now having said all that we have just released a new casting that we�re using for all of our 350mm Porsche rotors and this new rear rotor has dropped a couple pounds from the older variants. This new rotor weighs in at 16.1 lbs. as seen on the scale in the picture below. We�ve determined that this was a reasonable mass for the rotor while still maintaining the thermal capacity that we required.
Hardware Plating
The hardware that we manufacture and sell is not zinc plated, it is cadmium plated. We do this for a reason; we sacrifice some corrosion resistance of the drive pin in order to allow the hat to be reused more than once. This is why we include new hardware with every replacement rotor.
Being in the plating business, I�m sure that you�re aware of galvanic corrosion. For those of you who are not, here is the wiki article on it. (http://en.wikipedia.org/wiki/Galvani...anic_corrosion) The reason that we use cadmium is to prevent corrosive buildup between the steel pins and the aluminum hat.
Below is a picture of a 'another' company's hat that failed because of galvanic corrosion; look at how it fractured; the pins �grew� and broke out the flange. If this had failed from braking forces, it would have fractured in a much different place.
That being said, we do not advise that you re-plate those pins with zinc. Zinc does protect the steel from corrosion, but it only replaces the steel as the material being galvanic ally corroded.
One other thing that I�d like to mention is that we go to great lengths to tolerance our drive pins to the proper size to fit both the hat and the rotor; the cadmium plating is an additive process and we account for that when we make the pins. We have a 0.0008� (~0.02mm) range that the diameter of that pin must fit in to be considered useable.
Of course a smaller pin will fit through the holes, but in the past we have seen evidence that poor tolerancing on any two piece rotor drive pin can lead to what we call �wallowing� pin holes. This is where the pin has enough play in the hole that it can generate enough momentum to swedge the aluminum out of the way (this takes a long time, but over time it will make the hat unusable).
If you are going to re-plate those pins take special care to get those plating tolerances right.
Hat Anodizing
I, too, love the look of Type 3 hard anodize. It has a lot of stuff going for it. There are a couple problems that might be caused by hard-anodizing these hats.
Tolerancing (again): Type 3 Hard anodize is an additive process, you can specify to the vendor how much you would like to add. The thicker you lay it on, the more protective it is. The flip side is that there are a few places on these hats that we take great care to monitor tolerances. This is where the hat interacts with other parts; the hub mounting ring, the rotor mounting ring and the pin holes. All of these are made to a specific size so that they will have the proper fitment. We manufacture these parts to specification for a Type 2 anodize which is a non-additive process.
To save yourself some headache, check the fitment of hat to hub, rotor to hat and pin diameter to hole diameter before you send those off to get anodized. If they are within 0.004� already, I would expect some fitment problems. Perhaps since you are planning on anodizing a used hat, it may have the clearance necessary to facilitate some additional material.
Another thing I would think about before anodizing those hats with Type 3 is that the parking brake surface relies on that friction surface to keep the car from rolling. If you use a file on Type 2 anodize it will file off the anodizing just like it would the aluminum. Filing hard anodize, on the other hand, is much more difficult, it�s quite a bit more slick as well. This may not cause a problem right away; increased pressure should create the friction necessary to hold the car in place on a hill, but we are talking about an aluminum part; with that added pressure applied through the parking brake handle you may put the parking brake bell out of round and cause rotor runout. This is purely speculative on my part: we have never made a hard anodized hat that features an internal parking brake, so I have no idea what it might do.
My intent in explaining this all to you is first and foremost to keep your headaches to a minimum. But also, we would like to you be aware of how the changes that you�re making can affect the system that we spend so much time and energy studying to make reliable, safe and competitive.
If you have questions about anything mentioned here you are welcome to call and talk to our Production Manager, Ben, or myself. Thanks for the support guys!
I stumbled across this post last night and our production manager Ben and myself had a few thoughts we would like to share with you and the community. We are not a sponsor on here so this is intended entirely to be a technical response, I don�t want to step on anyone's feet.
Now here are a few things that we would like you to consider before modifying your rotors:
Thermal Mass
Depending on the kind of driving that you�re doing, going from a 19 lb. rotor assembly to a 15.4 lb. rotor assembly could be beneficial or detrimental. The cheeks (as we call them) on the rotor are thick to accommodate a specific amount of thermal mass, not to allow for longer wear (that is determined by the caliper and how much travel its pistons have).
I will caution you against removing too much weight from the rotors. If you are using this car for drag racing (a single high speed braking event with minutes before the next event) or autocross (low speed braking events spaced closer together but with time between sessions) decreasing thermal mass in that quantity works quite well.
For example we have an Evo 8 application that we have a standard two piece and a lightweight two piece rotor
Front Standard: 17.4 lbs Front Lightweight: 12.9 lbs � about 25% weight decrease for the assembly
Rear Standard 11.1 lbs Rear Lightweight 8.9 lbs � about 20% weight decrease for the assembly
We do not list these lightweight rotors on our website for a very good reason; these don�t belong on street cars and absolutely not on cars driven during track events. Track events, depending on the circuit, have many high speed braking events over a longer period of time (20 minutes of lapping up to a full endurance race).
Having a rotor that has too little thermal mass for the type of driving being done can do more than just cause the rotors to wear faster. If someone were to take our Evo 8 Lightweight rotor and drive it during a track event they wouldn�t notice at first, but the rotors would be running much hotter because during any given braking event the same amount of energy would be introduced to the lightweight rotor as would be to the standard rotor, but because there is less mass there: the temperature of the iron will increase at a greater rate with the lighter rotor.
When facing higher overall rotor temperatures, other things begin to be affected by the heat: pads get hotter and stay hotter and may wear faster, wear the rotor more aggressively or transfer material to the iron itself. The calipers invariably see that heat and can eventually boil the fluid.
The rotor will cool down between braking events, but the goal is to have a rotor that will not undergo extreme changes to its temperature throughout a session: this can cause thermal shock (which we have seen cause serious fractures and can cause warping) and if the rotor cools down too much between corners (another possible effect of lower thermal mass) it can affect the pad-rotor interaction and create inconsistent braking feel.
Now having said all that we have just released a new casting that we�re using for all of our 350mm Porsche rotors and this new rear rotor has dropped a couple pounds from the older variants. This new rotor weighs in at 16.1 lbs. as seen on the scale in the picture below. We�ve determined that this was a reasonable mass for the rotor while still maintaining the thermal capacity that we required.

Hardware Plating
The hardware that we manufacture and sell is not zinc plated, it is cadmium plated. We do this for a reason; we sacrifice some corrosion resistance of the drive pin in order to allow the hat to be reused more than once. This is why we include new hardware with every replacement rotor.
Being in the plating business, I�m sure that you�re aware of galvanic corrosion. For those of you who are not, here is the wiki article on it. (http://en.wikipedia.org/wiki/Galvani...anic_corrosion) The reason that we use cadmium is to prevent corrosive buildup between the steel pins and the aluminum hat.
Below is a picture of a 'another' company's hat that failed because of galvanic corrosion; look at how it fractured; the pins �grew� and broke out the flange. If this had failed from braking forces, it would have fractured in a much different place.

That being said, we do not advise that you re-plate those pins with zinc. Zinc does protect the steel from corrosion, but it only replaces the steel as the material being galvanic ally corroded.
One other thing that I�d like to mention is that we go to great lengths to tolerance our drive pins to the proper size to fit both the hat and the rotor; the cadmium plating is an additive process and we account for that when we make the pins. We have a 0.0008� (~0.02mm) range that the diameter of that pin must fit in to be considered useable.
Of course a smaller pin will fit through the holes, but in the past we have seen evidence that poor tolerancing on any two piece rotor drive pin can lead to what we call �wallowing� pin holes. This is where the pin has enough play in the hole that it can generate enough momentum to swedge the aluminum out of the way (this takes a long time, but over time it will make the hat unusable).
If you are going to re-plate those pins take special care to get those plating tolerances right.
Hat Anodizing
I, too, love the look of Type 3 hard anodize. It has a lot of stuff going for it. There are a couple problems that might be caused by hard-anodizing these hats.
Tolerancing (again): Type 3 Hard anodize is an additive process, you can specify to the vendor how much you would like to add. The thicker you lay it on, the more protective it is. The flip side is that there are a few places on these hats that we take great care to monitor tolerances. This is where the hat interacts with other parts; the hub mounting ring, the rotor mounting ring and the pin holes. All of these are made to a specific size so that they will have the proper fitment. We manufacture these parts to specification for a Type 2 anodize which is a non-additive process.
To save yourself some headache, check the fitment of hat to hub, rotor to hat and pin diameter to hole diameter before you send those off to get anodized. If they are within 0.004� already, I would expect some fitment problems. Perhaps since you are planning on anodizing a used hat, it may have the clearance necessary to facilitate some additional material.
Another thing I would think about before anodizing those hats with Type 3 is that the parking brake surface relies on that friction surface to keep the car from rolling. If you use a file on Type 2 anodize it will file off the anodizing just like it would the aluminum. Filing hard anodize, on the other hand, is much more difficult, it�s quite a bit more slick as well. This may not cause a problem right away; increased pressure should create the friction necessary to hold the car in place on a hill, but we are talking about an aluminum part; with that added pressure applied through the parking brake handle you may put the parking brake bell out of round and cause rotor runout. This is purely speculative on my part: we have never made a hard anodized hat that features an internal parking brake, so I have no idea what it might do.
My intent in explaining this all to you is first and foremost to keep your headaches to a minimum. But also, we would like to you be aware of how the changes that you�re making can affect the system that we spend so much time and energy studying to make reliable, safe and competitive.
If you have questions about anything mentioned here you are welcome to call and talk to our Production Manager, Ben, or myself. Thanks for the support guys!
Trending Topics
08-01-2013, 07:46 PM
#8
Drifting
Thread Starter
Mike,
Thank you for the post, I really appreciate it.
First I'll start with what I know. The Anodizing and Zinc. I'm aware of the very high tolerances for the mounting holes on the hat. They require masking them prior to doing anodizing. Like I said, given I'm in the business this to me is fairly inexpensive, while for someone whom is not, this gets expensive really quick. Masking + anodizing type 3, and cosmetic parts, it equals quite a premium in price to pay. Lucky for me, I don't have to pay that much ( That said you still have to do masking for type 2 as well...). That said, I believe for the e-brake scenario, that is pretty far fetch. Yes Anodizing type 3 is build up on the aluminum but so is anodizing type 2. They both do build up on aluminum. I don't believe by applying the e-brake and grinding off the anodizing due to the ebrake will cause issues in the long term to the hat. That said if it does, I'll report back and next time mask the e-brake area, and just do a chemical film process there.
The reason for Type 3, is because it last much longer, and it has a natural color to it vs Type 2 it fades away with the sun and heat. As for the Zinc, again I'm very aware of the high tolerances used here, I plan to mask the bobbin pin and only plate the area's exposed to elements. Not the shaft of the bobbin pin. When I removed the old hardware it had a lot of bad residue left behind like the picture posted by you. Given that I can get this done for cheap, I rather avoid struggling and I dislike the look of rusting bolts.
As for the rotor ring. I'm only taking what you guys have done with the rotor and enhance it better. I'm taking the OEM specs on the ring specs . Like I said on the prior post, their are area's were their is more material of the ring then needed where their is no pad touching it, and that is not found on the OEM ring. Given the rear brakes are not used much on a 996 T due to the favored brake bias to the front, I see no problem as Porsche design it like this as well. The AP racing rotor rings that i have that i modeled the ring after, also does not have this excessive material. In terms of thickness of the surface rotor ring. The rears measured in at 6.8mm thick each side if i recall correctly. I'm reducing that to 6.5mm so about .3 mm difference which should be negligible, I suspect. I'm reducing the over all thickness of the rotor which is 28mm oem to 26mm per AP racing thickness. I'm also going to use the same number of cooling vanes as the AP racing rotor ring. I will be correcting the offset of the rotor ring, by where it sits and mounts to the hat, having the extra material to centralize it.
So combine, removing excess material that the AP racing, and OEM material do not have in the surface pad area, adding the amount of cooling vanes found in the others, and reducing the amount of length on cooling vanes by 2mm but adding more cooling vanes, I suspect I will be fine. I'll report back if I don't.
P.S, If your team was able to get the rotor down to 16.10 and do it safely, why can it NOT be done by me on the basis of using OEM specs ? . My calculations of 15.8 maybe off but I'm sure we are going to be just in the same ball park in weight
Thank you for the post, I really appreciate it.
First I'll start with what I know. The Anodizing and Zinc. I'm aware of the very high tolerances for the mounting holes on the hat. They require masking them prior to doing anodizing. Like I said, given I'm in the business this to me is fairly inexpensive, while for someone whom is not, this gets expensive really quick. Masking + anodizing type 3, and cosmetic parts, it equals quite a premium in price to pay. Lucky for me, I don't have to pay that much
( That said you still have to do masking for type 2 as well...). That said, I believe for the e-brake scenario, that is pretty far fetch. Yes Anodizing type 3 is build up on the aluminum but so is anodizing type 2. They both do build up on aluminum. I don't believe by applying the e-brake and grinding off the anodizing due to the ebrake will cause issues in the long term to the hat. That said if it does, I'll report back and next time mask the e-brake area, and just do a chemical film process there. The reason for Type 3, is because it last much longer, and it has a natural color to it vs Type 2 it fades away with the sun and heat. As for the Zinc, again I'm very aware of the high tolerances used here, I plan to mask the bobbin pin and only plate the area's exposed to elements. Not the shaft of the bobbin pin. When I removed the old hardware it had a lot of bad residue left behind like the picture posted by you. Given that I can get this done for cheap, I rather avoid struggling and I dislike the look of rusting bolts.
As for the rotor ring. I'm only taking what you guys have done with the rotor and enhance it better. I'm taking the OEM specs on the ring specs . Like I said on the prior post, their are area's were their is more material of the ring then needed where their is no pad touching it, and that is not found on the OEM ring. Given the rear brakes are not used much on a 996 T due to the favored brake bias to the front, I see no problem as Porsche design it like this as well. The AP racing rotor rings that i have that i modeled the ring after, also does not have this excessive material. In terms of thickness of the surface rotor ring. The rears measured in at 6.8mm thick each side if i recall correctly. I'm reducing that to 6.5mm so about .3 mm difference which should be negligible, I suspect. I'm reducing the over all thickness of the rotor which is 28mm oem to 26mm per AP racing thickness. I'm also going to use the same number of cooling vanes as the AP racing rotor ring. I will be correcting the offset of the rotor ring, by where it sits and mounts to the hat, having the extra material to centralize it.
So combine, removing excess material that the AP racing, and OEM material do not have in the surface pad area, adding the amount of cooling vanes found in the others, and reducing the amount of length on cooling vanes by 2mm but adding more cooling vanes, I suspect I will be fine. I'll report back if I don't.
P.S, If your team was able to get the rotor down to 16.10 and do it safely, why can it NOT be done by me on the basis of using OEM specs ? . My calculations of 15.8 maybe off but I'm sure we are going to be just in the same ball park in weight
Enrique,
I stumbled across this post last night and our production manager Ben and myself had a few thoughts we would like to share with you and the community. We are not a sponsor on here so this is intended entirely to be a technical response, I don’t want to step on anyone's feet.
Now here are a few things that we would like you to consider before modifying your rotors:
Thermal Mass
Depending on the kind of driving that you’re doing, going from a 19 lb. rotor assembly to a 15.4 lb. rotor assembly could be beneficial or detrimental. The cheeks (as we call them) on the rotor are thick to accommodate a specific amount of thermal mass, not to allow for longer wear (that is determined by the caliper and how much travel its pistons have).
I will caution you against removing too much weight from the rotors. If you are using this car for drag racing (a single high speed braking event with minutes before the next event) or autocross (low speed braking events spaced closer together but with time between sessions) decreasing thermal mass in that quantity works quite well.
For example we have an Evo 8 application that we have a standard two piece and a lightweight two piece rotor
Front Standard: 17.4 lbs Front Lightweight: 12.9 lbs – about 25% weight decrease for the assembly
Rear Standard 11.1 lbs Rear Lightweight 8.9 lbs – about 20% weight decrease for the assembly
We do not list these lightweight rotors on our website for a very good reason; these don’t belong on street cars and absolutely not on cars driven during track events. Track events, depending on the circuit, have many high speed braking events over a longer period of time (20 minutes of lapping up to a full endurance race).
Having a rotor that has too little thermal mass for the type of driving being done can do more than just cause the rotors to wear faster. If someone were to take our Evo 8 Lightweight rotor and drive it during a track event they wouldn’t notice at first, but the rotors would be running much hotter because during any given braking event the same amount of energy would be introduced to the lightweight rotor as would be to the standard rotor, but because there is less mass there: the temperature of the iron will increase at a greater rate with the lighter rotor.
When facing higher overall rotor temperatures, other things begin to be affected by the heat: pads get hotter and stay hotter and may wear faster, wear the rotor more aggressively or transfer material to the iron itself. The calipers invariably see that heat and can eventually boil the fluid.
The rotor will cool down between braking events, but the goal is to have a rotor that will not undergo extreme changes to its temperature throughout a session: this can cause thermal shock (which we have seen cause serious fractures and can cause warping) and if the rotor cools down too much between corners (another possible effect of lower thermal mass) it can affect the pad-rotor interaction and create inconsistent braking feel.
Now having said all that we have just released a new casting that we’re using for all of our 350mm Porsche rotors and this new rear rotor has dropped a couple pounds from the older variants. This new rotor weighs in at 16.1 lbs. as seen on the scale in the picture below. We’ve determined that this was a reasonable mass for the rotor while still maintaining the thermal capacity that we required.
Hardware Plating
The hardware that we manufacture and sell is not zinc plated, it is cadmium plated. We do this for a reason; we sacrifice some corrosion resistance of the drive pin in order to allow the hat to be reused more than once. This is why we include new hardware with every replacement rotor.
Being in the plating business, I’m sure that you’re aware of galvanic corrosion. For those of you who are not, here is the wiki article on it. (http://en.wikipedia.org/wiki/Galvani...anic_corrosion) The reason that we use cadmium is to prevent corrosive buildup between the steel pins and the aluminum hat.
Below is a picture of a 'another' company's hat that failed because of galvanic corrosion; look at how it fractured; the pins ‘grew’ and broke out the flange. If this had failed from braking forces, it would have fractured in a much different place.
That being said, we do not advise that you re-plate those pins with zinc. Zinc does protect the steel from corrosion, but it only replaces the steel as the material being galvanic ally corroded.
One other thing that I’d like to mention is that we go to great lengths to tolerance our drive pins to the proper size to fit both the hat and the rotor; the cadmium plating is an additive process and we account for that when we make the pins. We have a 0.0008” (~0.02mm) range that the diameter of that pin must fit in to be considered useable.
Of course a smaller pin will fit through the holes, but in the past we have seen evidence that poor tolerancing on any two piece rotor drive pin can lead to what we call ‘wallowing’ pin holes. This is where the pin has enough play in the hole that it can generate enough momentum to swedge the aluminum out of the way (this takes a long time, but over time it will make the hat unusable).
If you are going to re-plate those pins take special care to get those plating tolerances right.
Hat Anodizing
I, too, love the look of Type 3 hard anodize. It has a lot of stuff going for it. There are a couple problems that might be caused by hard-anodizing these hats.
Tolerancing (again): Type 3 Hard anodize is an additive process, you can specify to the vendor how much you would like to add. The thicker you lay it on, the more protective it is. The flip side is that there are a few places on these hats that we take great care to monitor tolerances. This is where the hat interacts with other parts; the hub mounting ring, the rotor mounting ring and the pin holes. All of these are made to a specific size so that they will have the proper fitment. We manufacture these parts to specification for a Type 2 anodize which is a non-additive process.
To save yourself some headache, check the fitment of hat to hub, rotor to hat and pin diameter to hole diameter before you send those off to get anodized. If they are within 0.004” already, I would expect some fitment problems. Perhaps since you are planning on anodizing a used hat, it may have the clearance necessary to facilitate some additional material.
Another thing I would think about before anodizing those hats with Type 3 is that the parking brake surface relies on that friction surface to keep the car from rolling. If you use a file on Type 2 anodize it will file off the anodizing just like it would the aluminum. Filing hard anodize, on the other hand, is much more difficult, it’s quite a bit more slick as well. This may not cause a problem right away; increased pressure should create the friction necessary to hold the car in place on a hill, but we are talking about an aluminum part; with that added pressure applied through the parking brake handle you may put the parking brake bell out of round and cause rotor runout. This is purely speculative on my part: we have never made a hard anodized hat that features an internal parking brake, so I have no idea what it might do.
My intent in explaining this all to you is first and foremost to keep your headaches to a minimum. But also, we would like to you be aware of how the changes that you’re making can affect the system that we spend so much time and energy studying to make reliable, safe and competitive.
If you have questions about anything mentioned here you are welcome to call and talk to our Production Manager, Ben, or myself. Thanks for the support guys!
Last edited by F1CrazyDriver; 08-01-2013 at 08:09 PM.
08-03-2013, 03:52 AM
#9
Track Day

Join Date: Mar 2013
Posts: 16
Likes: 0
Received 0 Likes
on
0 Posts
Haven't read the full post, but as an engineer, I well know that everything in automotive design is a compromise. "Fit for function" depends on the application (use), and driver capability (yes even with abs).
I do not have any data specific to the the 996tt, but the data for another vehicle had a 1m (3ft) difference in braking from 100km/h to 0 (62mph-0 ?) when the thickness of the rotor was decreased from 32mm to 28mm, with nothing else changing (same internal ventillation, material, pads, Outside diameter, application time/force, etc). These tests were performed by OEM to ensure the results were repeatable and statistically sound.
Less weight, greater stopping distance, potentially better handling, and resistance to fade are all considerations in this example. DBA and bendix use to have good tech info on web site, not sure if they still do.
Brakes and tyres are one of the very few areas I trust the OEM/big name suppliers on, without consideration for modification -time/money to test/get data/confirm the design choices are fit for intended use (this would probably be a great update for normal driving in normal traffic)
On the flip side, Innovation is critical to mankind moving forward, and I am not trying to be negative about the project, simply highlighting that design choices require compromise and a full understanding of the function intended.
Finally, back to the OP, For further weight savings, significant reduction can also be had with different tyres, lithium battery upgrade, and light weight exhaust. But all have cost/compromise implications.
08-03-2013, 03:37 PM
#10
Drifting
Thread Starter
Haven't read the full post, but as an engineer, I well know that everything in automotive design is a compromise. "Fit for function" depends on the application (use), and driver capability (yes even with abs).
I do not have any data specific to the the 996tt, but the data for another vehicle had a 1m (3ft) difference in braking from 100km/h to 0 (62mph-0 ?) when the thickness of the rotor was decreased from 32mm to 28mm, with nothing else changing (same internal ventillation, material, pads, Outside diameter, application time/force, etc). These tests were performed by OEM to ensure the results were repeatable and statistically sound.
Less weight, greater stopping distance, potentially better handling, and resistance to fade are all considerations in this example. DBA and bendix use to have good tech info on web site, not sure if they still do.
Brakes and tyres are one of the very few areas I trust the OEM/big name suppliers on, without consideration for modification -time/money to test/get data/confirm the design choices are fit for intended use (this would probably be a great update for normal driving in normal traffic)
On the flip side, Innovation is critical to mankind moving forward, and I am not trying to be negative about the project, simply highlighting that design choices require compromise and a full understanding of the function intended.
Finally, back to the OP, For further weight savings, significant reduction can also be had with different tyres, lithium battery upgrade, and light weight exhaust. But all have cost/compromise implications.
I do not have any data specific to the the 996tt, but the data for another vehicle had a 1m (3ft) difference in braking from 100km/h to 0 (62mph-0 ?) when the thickness of the rotor was decreased from 32mm to 28mm, with nothing else changing (same internal ventillation, material, pads, Outside diameter, application time/force, etc). These tests were performed by OEM to ensure the results were repeatable and statistically sound.
Less weight, greater stopping distance, potentially better handling, and resistance to fade are all considerations in this example. DBA and bendix use to have good tech info on web site, not sure if they still do.
Brakes and tyres are one of the very few areas I trust the OEM/big name suppliers on, without consideration for modification -time/money to test/get data/confirm the design choices are fit for intended use (this would probably be a great update for normal driving in normal traffic)
On the flip side, Innovation is critical to mankind moving forward, and I am not trying to be negative about the project, simply highlighting that design choices require compromise and a full understanding of the function intended.
Finally, back to the OP, For further weight savings, significant reduction can also be had with different tyres, lithium battery upgrade, and light weight exhaust. But all have cost/compromise implications.
...now im waiting on the rotors to arrive...should be in from so cal soon.


 08-09-2013, 04:11 PM
#11
Drifting
Thread Starter
Rotors are in...
Giros weight at 15.77 with 27mm thicknes.
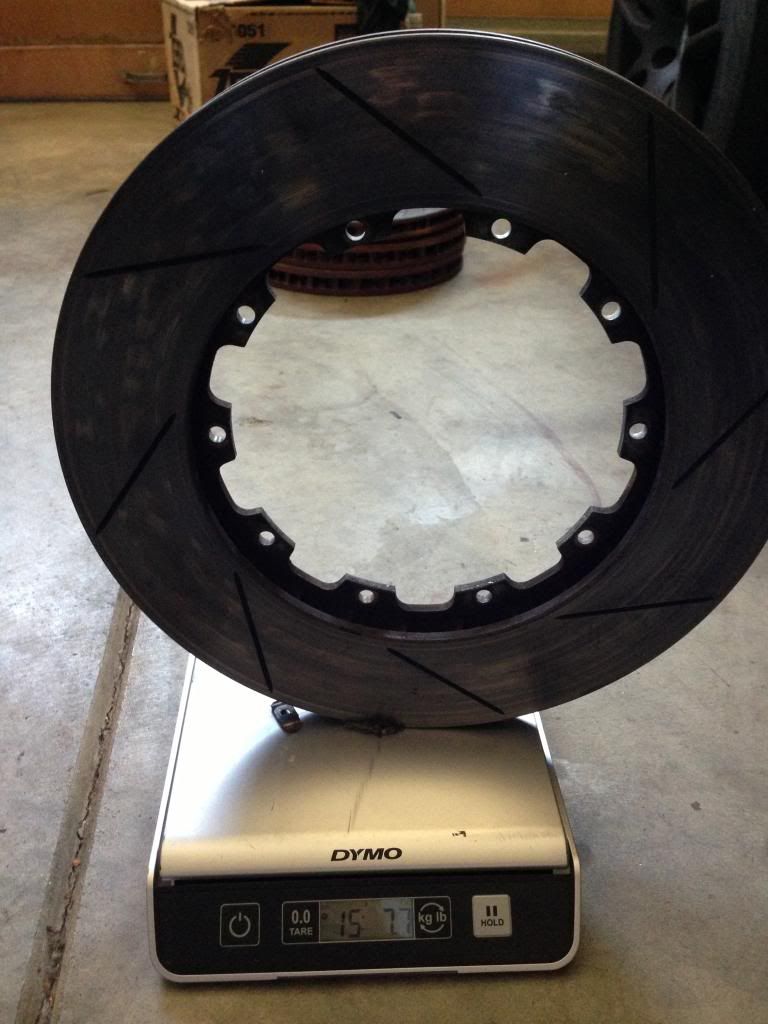
My rotors weight in at 14.2 lbs with 26mm thickness.
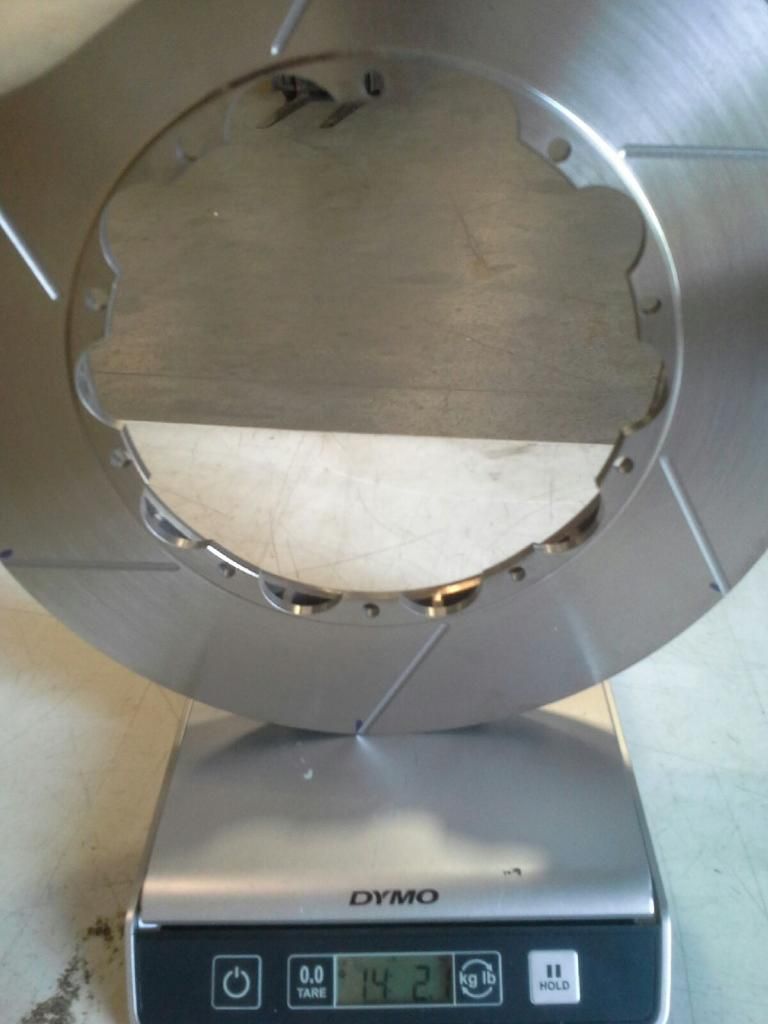
Net result of 1.5lbs loss weight over the Giros.
Total weight of each rear rotor with hat + hardware is 16 lbs. 12oz with my setup.
OEM 23lbs.
Net loss of 6.5lbs x 2 = 13lbs.
Maybe I will sell these and follow through with my hat design. According to solid works my hat weights 1.9lbs vs 2.5 of giros. My weight savings is done where the e-brake is located. MY goal is track rotor/hat combo. If you track, you know the e brake is not used when you pull into the pits hot. Its only for when driving around the street or on the trailer...anyways.
This is my report. Worth spending the extra few hundredth bucks on these rotors for 1.5lbs loss ? Probably not, but my giro disc have plenty of life. I'll keep those for street driving
In terms of forces at 85mph per rotor ( using 85 as its my avg speed per lap) : http://www.calctool.org/CALC/phys/newtonian/centrifugal
OEM: 8,430.72 lb's of force.
GIROS: 6,674.32lb's of force
F1Crazydriver 5,796.12lb's of force
so I reduced about 6,000lbs of force vs oem, and 2,000lbs of force vs giros.
About 14%... thats great in my book !
08-10-2013, 06:05 AM
#12
Drifting
Thread Starter
its 2 am.. i have been driving the car for the last hour and WOW!!! what an awesome difference. I want ceramics now! Detail write up to follow. Now for some sleep. Been up for nearly 21 hours !

