Oil temp gauge using the built-in oil temp sensor
 08-05-2014, 12:19 AM
#1
Nordschleife Master
Thread Starter
Hi folks,
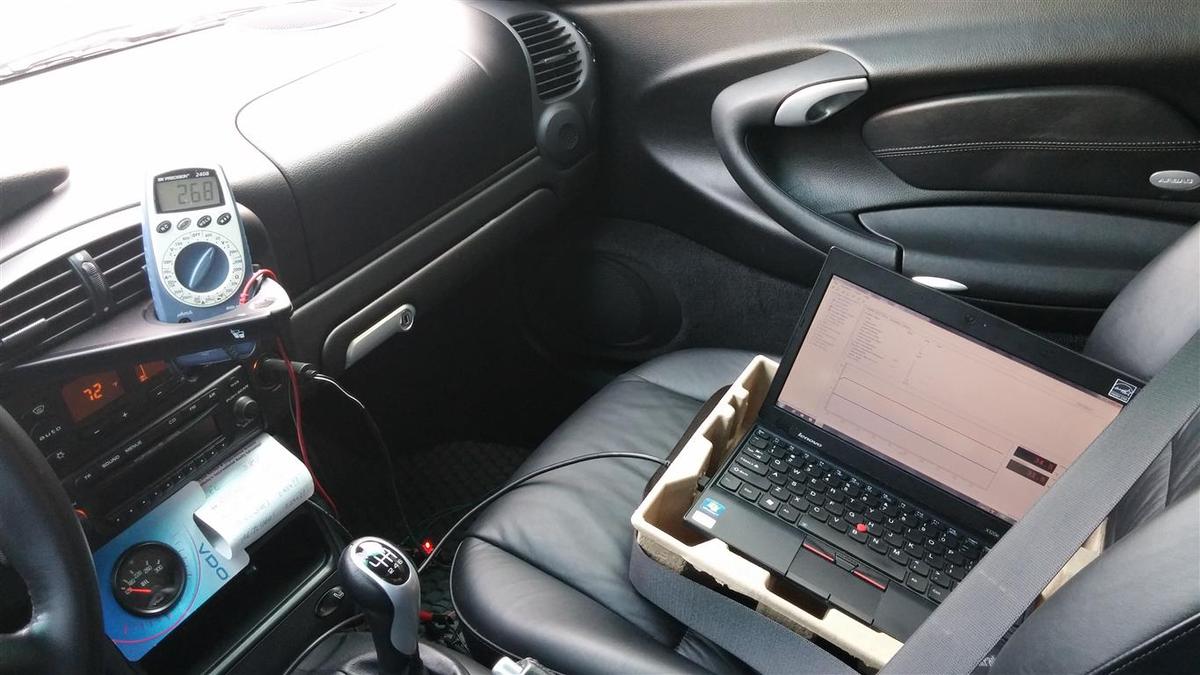
Just wanna share with you it's possible to convert the stock DME oil temp sensor signal to drive a VDO 300F oil temp gauge. Takes about a dozen electronic components, a microcontroller, and 8 lines of Arduino code.
I used Duramatric to map the oil temp to the analogue sensor signal (tapped from the DME but no splicing needed so the whole mod is completely reversible), then I just made a circuit to drive the gauge based on the analogue signal. I figured out the different voltages needed to drive the gauge on the 5 diff temp settings on the gauge then just mapped those to the signal using a quadratic equation (implemented in the microcontroller). Alarm/LED warning based on programmable oil temp can also be added if needed.
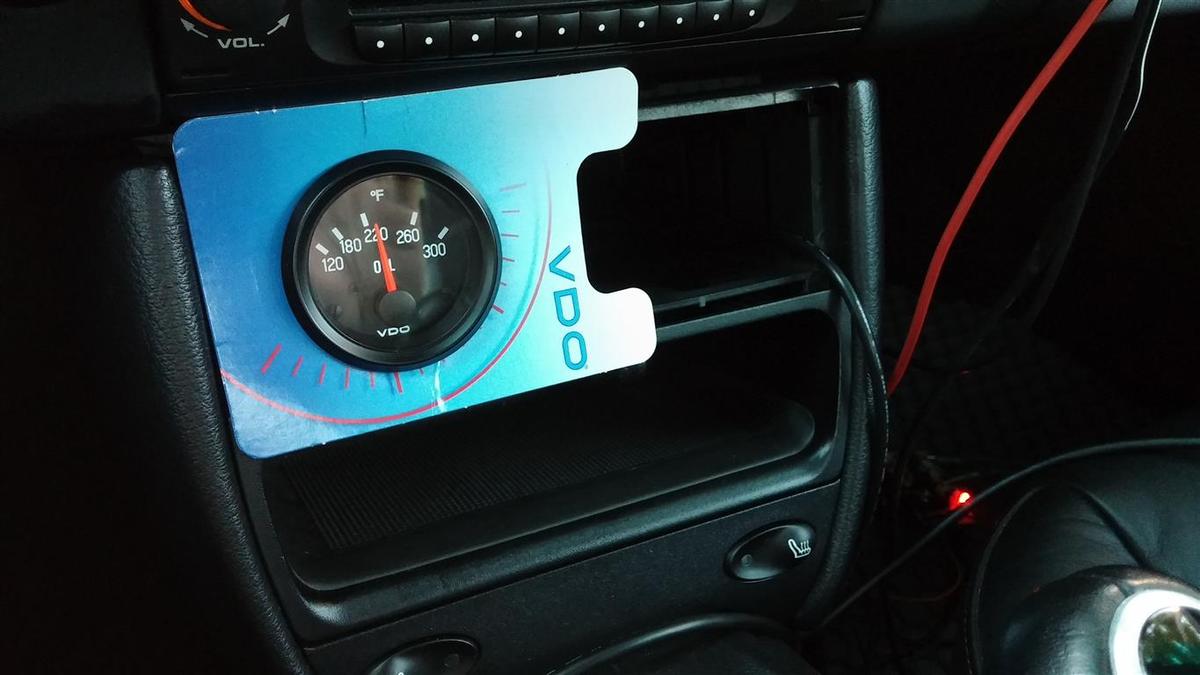
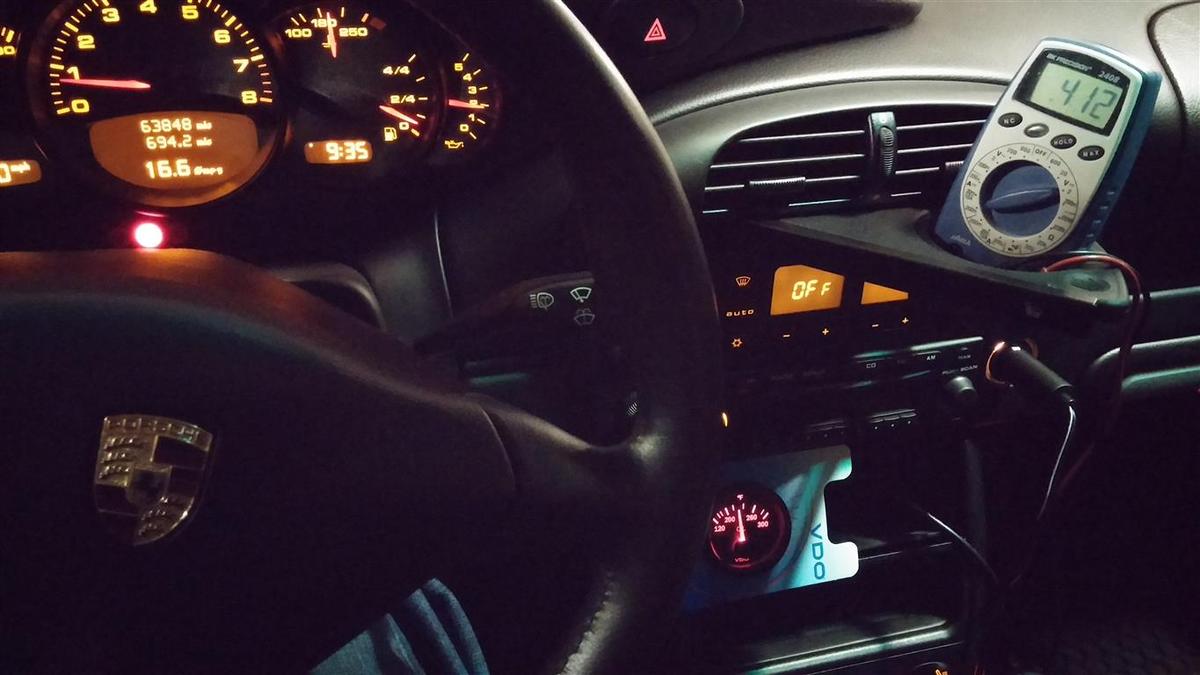
I have not mounted the gauge but the photo below shows how it can be mounted in the single DIN slot with a proper face plate. I tested the gauge and it's very accurate. This may be too much trouble for most people but I can share more details if there are interests. A good project if you have a thing for electronic projects
Just wanna share with you it's possible to convert the stock DME oil temp sensor signal to drive a VDO 300F oil temp gauge. Takes about a dozen electronic components, a microcontroller, and 8 lines of Arduino code.
I used Duramatric to map the oil temp to the analogue sensor signal (tapped from the DME but no splicing needed so the whole mod is completely reversible), then I just made a circuit to drive the gauge based on the analogue signal. I figured out the different voltages needed to drive the gauge on the 5 diff temp settings on the gauge then just mapped those to the signal using a quadratic equation (implemented in the microcontroller). Alarm/LED warning based on programmable oil temp can also be added if needed.
I have not mounted the gauge but the photo below shows how it can be mounted in the single DIN slot with a proper face plate. I tested the gauge and it's very accurate. This may be too much trouble for most people but I can share more details if there are interests. A good project if you have a thing for electronic projects

 08-05-2014, 09:26 AM
#6

I am EXTREMELY interested, I have been asking everywhere for this for years !!!!
you are a savior
I am totally interested but I would need detail info as I know nothing about electronic but I am a qualified geek.
If you decide to sell the gizmo put my name on the list !
you are a savior
I am totally interested but I would need detail info as I know nothing about electronic but I am a qualified geek
. If you decide to sell the gizmo put my name on the list !
08-05-2014, 10:02 AM
#7
Instructor

Join Date: Nov 2013
Location: Memphis TN
Posts: 168
Likes: 0
Received 0 Likes
on
0 Posts
HOLY CRAP! That's COOL!
Do you know what the PID'S are? I think if you know that, you can put custom PIDS into some OBD readers on the IPhone and such and see the Oil Temp.
Do you know what the PID'S are? I think if you know that, you can put custom PIDS into some OBD readers on the IPhone and such and see the Oil Temp.
Trending Topics
 08-05-2014, 07:15 PM
#10
Nordschleife Master
Thread Starter
Thanks guys! Give me some time and I'll do a more detailed write-up.
@mikeborden, unfortunately the PID is not available for the regular OBDII ISO9141-2 protocol (which any generic OBDII reader uses). The PID is only available via Porsche protocol and h/w (e.g., Durametric). It will involve some serious reverse engineering (at least for me) to get the digital oil temp info from the DME. If someone knows how, please do share.
@mikeborden, unfortunately the PID is not available for the regular OBDII ISO9141-2 protocol (which any generic OBDII reader uses). The PID is only available via Porsche protocol and h/w (e.g., Durametric). It will involve some serious reverse engineering (at least for me) to get the digital oil temp info from the DME. If someone knows how, please do share.
 08-05-2014, 07:42 PM
#12

Very nice bit of engineering. So this basically uses the factory input, saving someone from running a separate sensor and line into the cabin?
Personally for the effort involved, I'd rather try to find a good stock tap in point for a sensor and run the wiring through with aftermarket gauge kit.
Although I wear a pager and no cell phone so I might as well run a hot oil line into the cabin and do it really old school. J/k
Nice job either way.
08-05-2014, 07:59 PM
#13
Nordschleife Master
Thread Starter
Very nice bit of engineering. So this basically uses the factory input, saving someone from running a separate sensor and line into the cabin?
Personally for the effort involved, I'd rather try to find a good stock tap in point for a sensor and run the wiring through with aftermarket gauge kit.
Although I wear a pager and no cell phone so I might as well run a hot oil line into the cabin and do it really old school. J/k
Nice job either way.
Personally for the effort involved, I'd rather try to find a good stock tap in point for a sensor and run the wiring through with aftermarket gauge kit.
Although I wear a pager and no cell phone so I might as well run a hot oil line into the cabin and do it really old school. J/k
Nice job either way.
08-06-2014, 03:33 PM
#15
Nordschleife Master
Thread Starter
Ok, here's a very long write up. Enjoy
**DISCLAIMER: Use the following info at your own risks. I'm not responsible for any damage to your car or your self-esteem
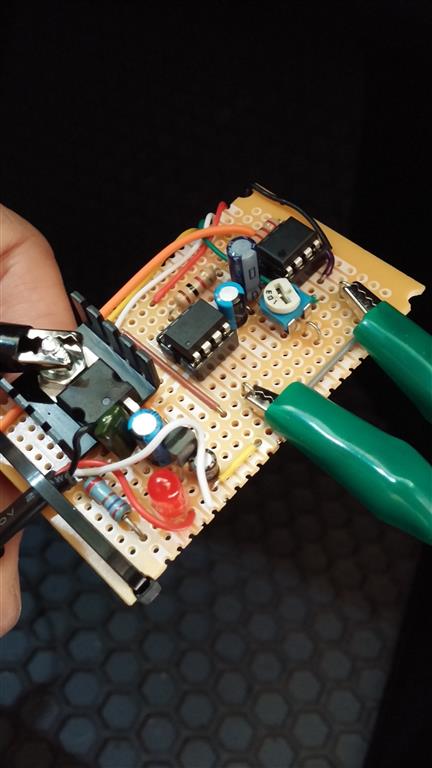
Things you need:
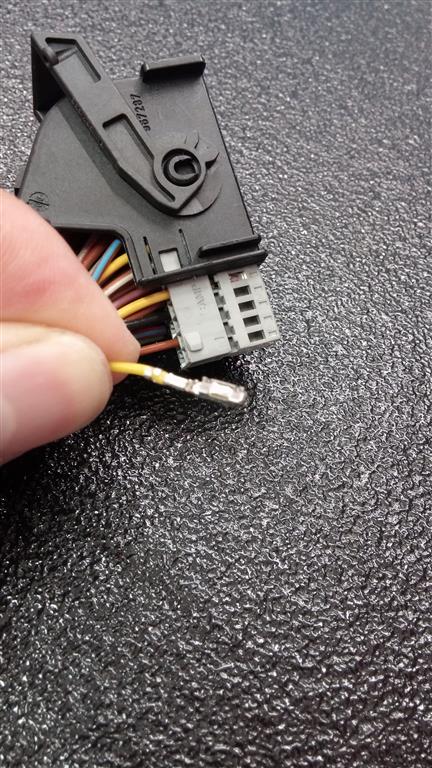
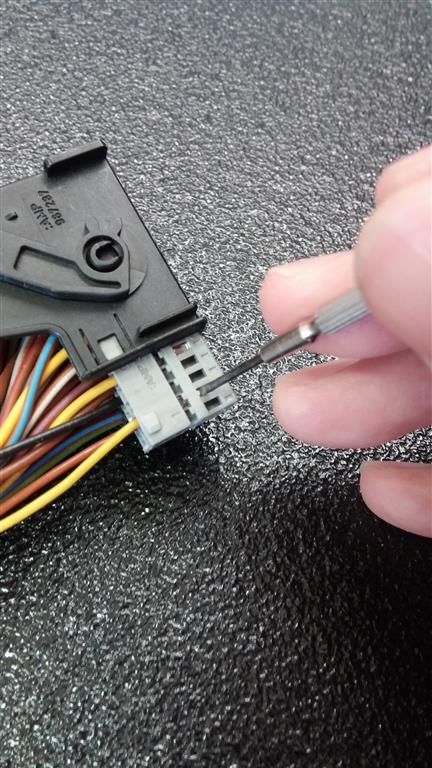
A) DME female pin x1 and male pin x1.
http://www.mouser.com/ProductDetail/...LHPnvMw0tP4w==
http://www.mouser.com/ProductDetail/...ge2OikIF63U%3d
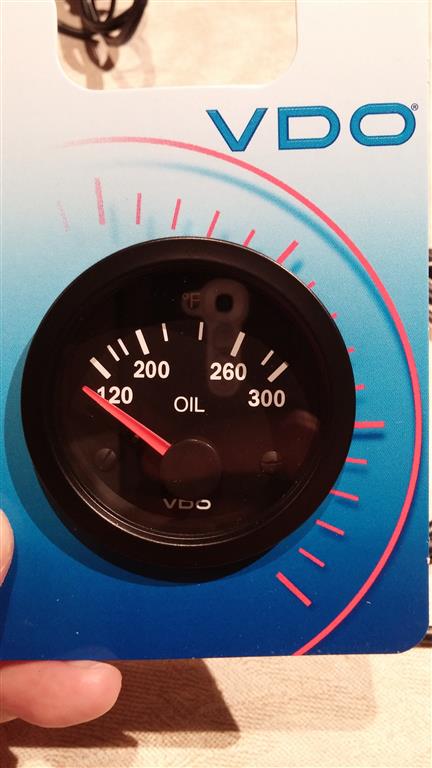
B) VDO Vision 300F Oil temp gauge ($30) or VDO regular 300F oil temp gauge ($20) (I highly recommend the Vision instead since it uses backlit lighting and it matches the rest of the stock gauges very well)
C) The driver(~$15) (see the schematic for parts needed)
D) A programmer to flash the ATtiny85 micro-controller $10 Arduino nano from eBay and these links
http://arduinodiy.wordpress.com/2012...-arduino-nano/)
http://forums.4fips.com/viewtopic.php?f=3&t=1080
E) Arduino IDE (free download here http://arduino.cc/en/Main/Software)
======================================================================== =========================================
Explanation of how everything works together.
1) Oil temp signal from DME plug III/Pin 5
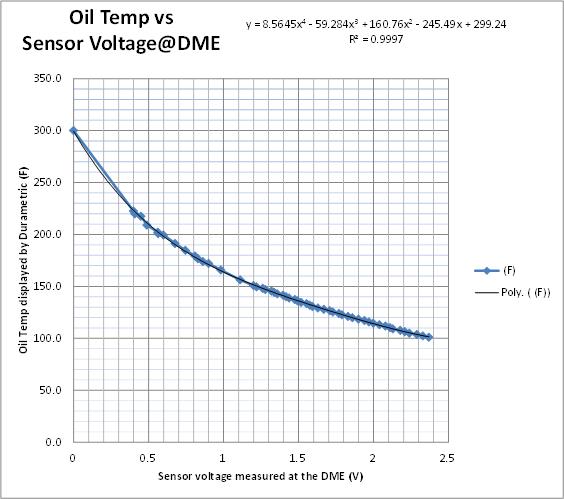
This signal (relative to ground) varies from 0-5v. Higher the temp, lower the voltage (NTC type sensor) e.g,. 1.8V=120F, 1.0V=165F, 0.5V=210F. Using Durametric, I figured out the voltage<->temp mapping (100F to 220F). 220F is the highest I could get my oil temp up to. I just added (0v=300F) based on my estimate and used the Excel trendline to extrapolate the rest of the range (220F to 300F). More measurements above 220F can increase the extrapolation accuracy even further.
2) VDO Vision 300F Oil temp gauge
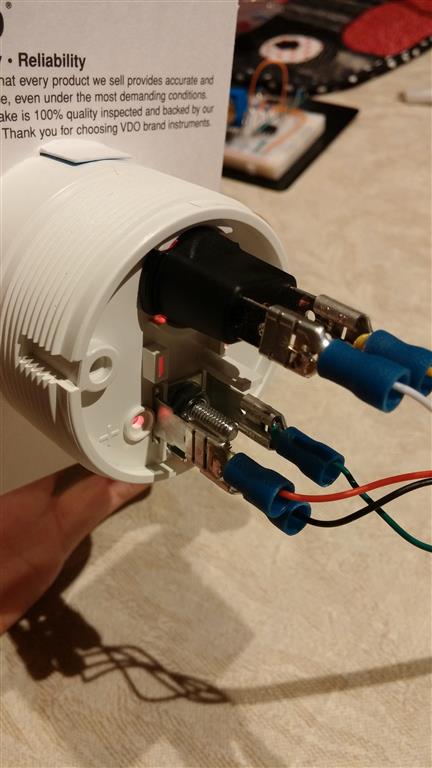
This gauge has 5 terminals - "+", "-", "S", and two terminals for its light bulb. The "+" is connected to the 12v ignition power and "-" to ground. "S" is normally connected to a VDO temp sensor then to ground. Without the VDO sensor, we can still drive the gauge by supplying regulated 9v to "+", and applying variable voltage to the "S" pin to get different gauge temp readings.
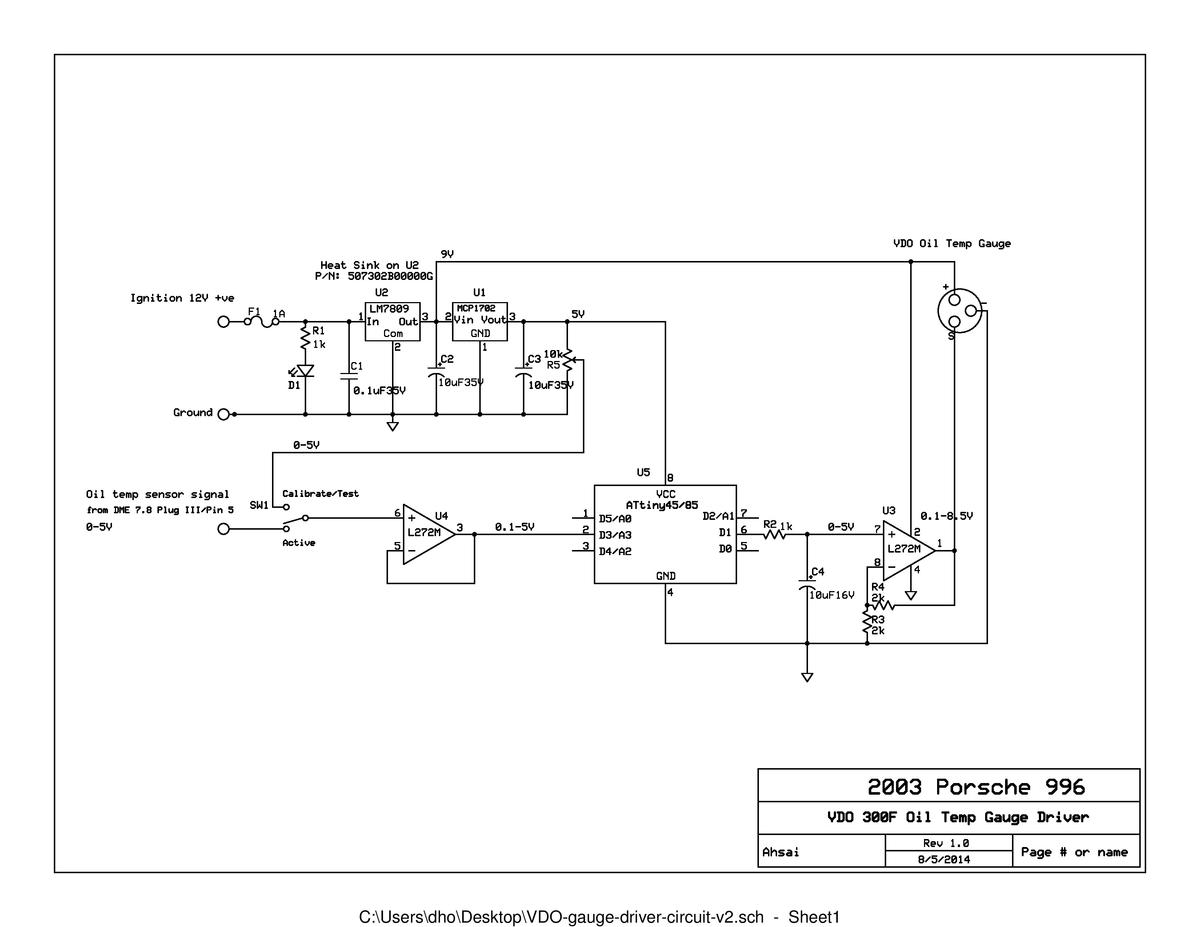
3) The circuit
The principle is very simlpe. The circuit supplies the correct voltage to drive the "S" pin of the gauge based on the oil temp sensor voltage input. The tricky part is how to figure out this mapping and how to implement it digitally (easy calibration).
There are two voltage regulators U1 and U2: 5v for the micro-controller (ATtiny85) and 9v for the gauge and the opamps. The input signal feeds the opamp buffer U4 (1:1, no amplification) to ensure negligible current drawn from the DME (thanks to the extremely high input resistance of the opamp). The output of the opamp feeds the micro-controller's U5 input pin.
The micro-controller then converts this voltage (0-5v) to a PWM singal. The simple RC low-pass filter (R2 and C4) then filters this PWM signal to a steady DC voltage that feeds the second opamp U3(with a x2 amplification) to drive the gauge.
ExpressSCH.pdf
4) If you use the VDO Vision (or regular) 300F Oil temp gauge, you can just flash the ATtiny with the code below and follow the inline instructions in the code. You can skip 5) and 6) below.
5) 9-point Calibration
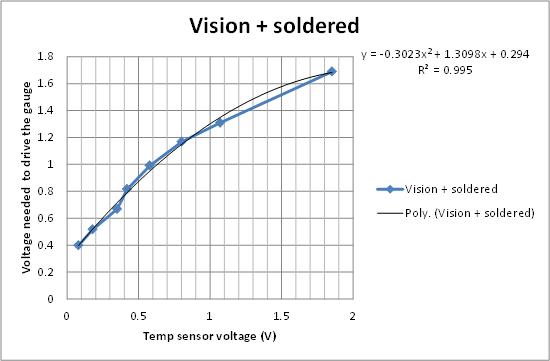
First load a calibration flash that just implements a direct mapping (i.e., Vout = Vin) to the ATtiny. Then use the potentiometer (SW1 set to "Calibrate/Test") to simulate the oil temp sensor signal and feed different Vin to find out the voltage levels needed for the 9 diff temp marks (i.e., 120, 160, 180, 200, 220, 240, 260, 280, and 300F).
Then from the Excel curve in 1) above, figure out how to convert the oil temp signal to this voltage. Then load a new flash that implements this conversion (turns out to be a quadractic equation) to the ATtiny.
6) Testing
Set SW1 to "Calibrate/Test", adjust the potentiometer to diff voltage in 1) and verify the gauge's reading is correct.
Flip SW1 back to "Active" and the driver is now ready.
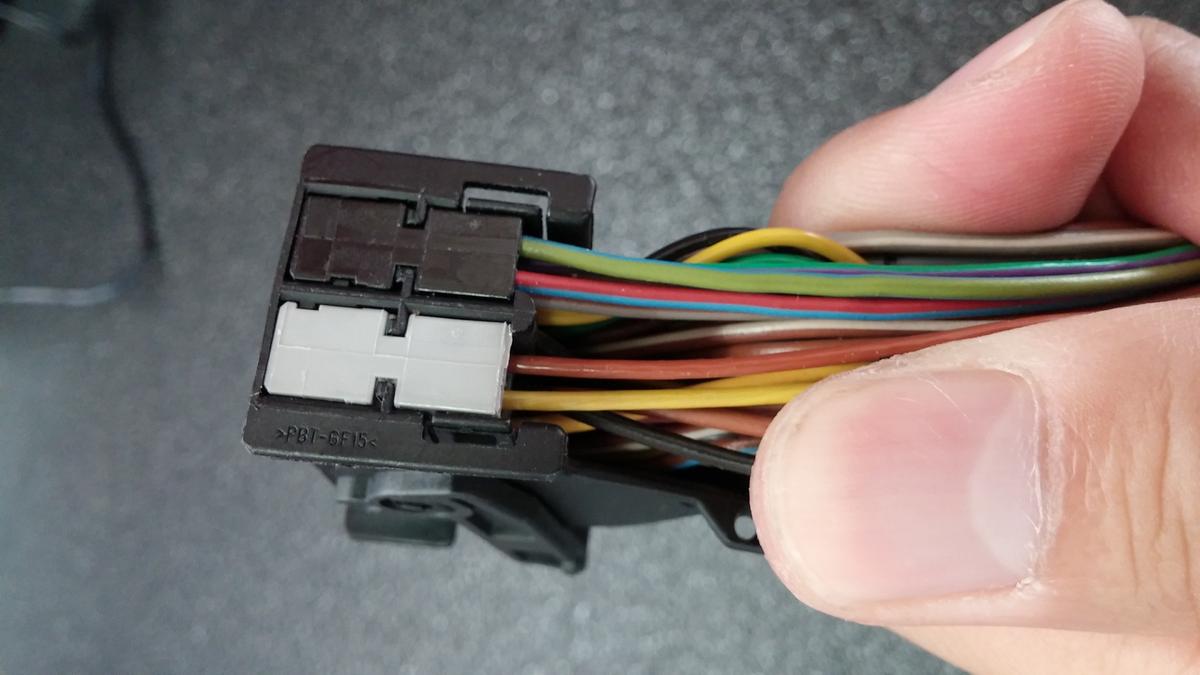
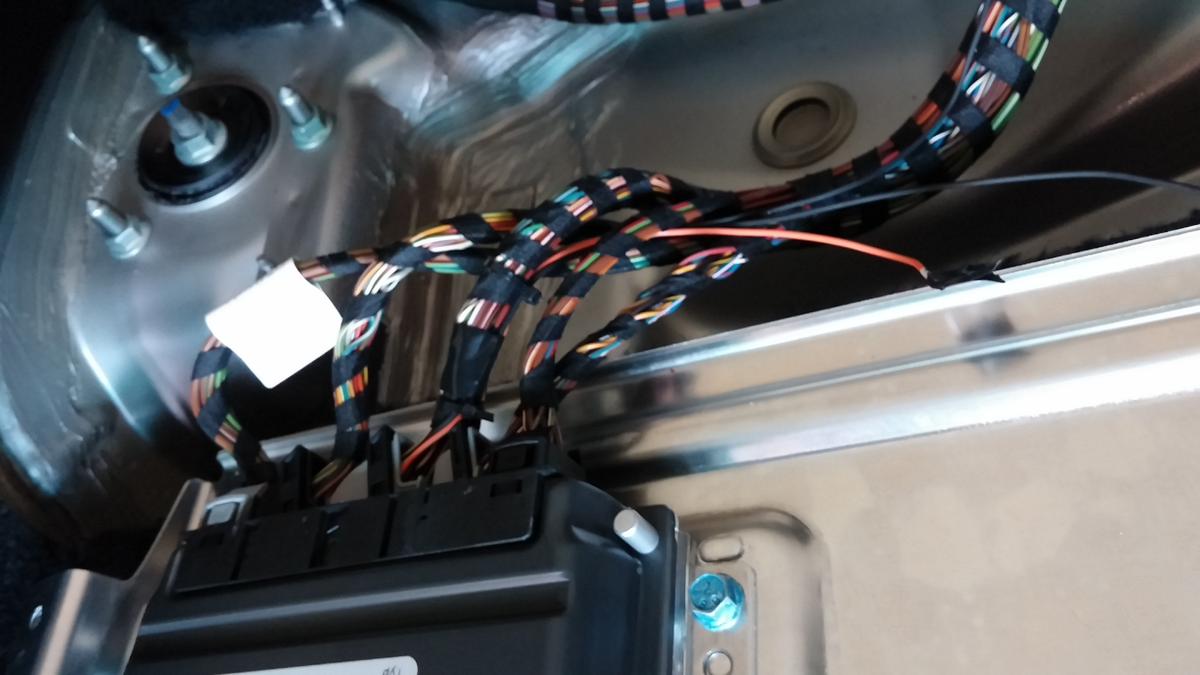
7) Tap into the DME (reversible and no splicing needed)
Just solder a "Y" or "T" wire between the two pins in A) above. Remove the DME PlugIII/Pin5 and insert this piece between the socket housing and the oil temp sensor green/red wire. Insulate any exposed metal parts appropriately. Tug it away and zip tie it neatly.
======================================================================== ====================================
The Arduino Code
/*
VDO Vision oil temperature gauge driver (7/31/2014) by Ahsai
Tap the DME NTC oil temp sensor voltage reading of 2003 Porsche 996 (0 - 5V. High voltage = low temp)
Reads an analog input, converts it to voltage, then converts the voltage to voltage_out
using a function (based on Durametric reading, gauge calibration data and Excel spreadsheet trendline equation).
Write voltage_out to analog output pin D1, as a fraction of 5.0v, to drive the VDO gauage
*/
// the setup routine runs once when you press reset:
void setup() {}
// the loop routine runs over and over again forever:
void loop() {
// read the input on analog pin A3 and convert the analog reading (which goes from 0 - 1023) to voltage (0 - 5V):
float v = analogRead(A3) * (5.0 / 1023.0);
float vout = 2.0; // To ensure the needle stays below 120F when the temp is below 120F
//y = -0.3023x2 + 1.3098x + 0.294
if (v < 2.0) { vout = -0.3023*pow(v,2) + 1.3098*v + 0.294; }
// If using a non-Vision VDO oil temp gauge, comment out the previous line and uncomment the following line
//if (v < 2.0) { vout = -0.2352*pow(v,2) + 1.3098*v + 0.3117; }
//float vout = v; // Uncomment this line for calibration
// convert vout (0 - 5.0V) to output (0 - 255) and write to D1
analogWrite(1, (int)(255.0*vout/5.0));
delay(100);
}
**DISCLAIMER: Use the following info at your own risks. I'm not responsible for any damage to your car or your self-esteem
Things you need:
A) DME female pin x1 and male pin x1.
http://www.mouser.com/ProductDetail/...LHPnvMw0tP4w==
http://www.mouser.com/ProductDetail/...ge2OikIF63U%3d
B) VDO Vision 300F Oil temp gauge ($30) or VDO regular 300F oil temp gauge ($20) (I highly recommend the Vision instead since it uses backlit lighting and it matches the rest of the stock gauges very well)
C) The driver(~$15) (see the schematic for parts needed)
D) A programmer to flash the ATtiny85 micro-controller $10 Arduino nano from eBay and these links
http://arduinodiy.wordpress.com/2012...-arduino-nano/)
http://forums.4fips.com/viewtopic.php?f=3&t=1080
E) Arduino IDE (free download here http://arduino.cc/en/Main/Software)
======================================================================== =========================================
Explanation of how everything works together.
1) Oil temp signal from DME plug III/Pin 5
This signal (relative to ground) varies from 0-5v. Higher the temp, lower the voltage (NTC type sensor) e.g,. 1.8V=120F, 1.0V=165F, 0.5V=210F. Using Durametric, I figured out the voltage<->temp mapping (100F to 220F). 220F is the highest I could get my oil temp up to. I just added (0v=300F) based on my estimate and used the Excel trendline to extrapolate the rest of the range (220F to 300F). More measurements above 220F can increase the extrapolation accuracy even further.
2) VDO Vision 300F Oil temp gauge
This gauge has 5 terminals - "+", "-", "S", and two terminals for its light bulb. The "+" is connected to the 12v ignition power and "-" to ground. "S" is normally connected to a VDO temp sensor then to ground. Without the VDO sensor, we can still drive the gauge by supplying regulated 9v to "+", and applying variable voltage to the "S" pin to get different gauge temp readings.
3) The circuit
The principle is very simlpe. The circuit supplies the correct voltage to drive the "S" pin of the gauge based on the oil temp sensor voltage input. The tricky part is how to figure out this mapping and how to implement it digitally (easy calibration).
There are two voltage regulators U1 and U2: 5v for the micro-controller (ATtiny85) and 9v for the gauge and the opamps. The input signal feeds the opamp buffer U4 (1:1, no amplification) to ensure negligible current drawn from the DME (thanks to the extremely high input resistance of the opamp). The output of the opamp feeds the micro-controller's U5 input pin.
The micro-controller then converts this voltage (0-5v) to a PWM singal. The simple RC low-pass filter (R2 and C4) then filters this PWM signal to a steady DC voltage that feeds the second opamp U3(with a x2 amplification) to drive the gauge.
ExpressSCH.pdf
4) If you use the VDO Vision (or regular) 300F Oil temp gauge, you can just flash the ATtiny with the code below and follow the inline instructions in the code. You can skip 5) and 6) below.
5) 9-point Calibration
First load a calibration flash that just implements a direct mapping (i.e., Vout = Vin) to the ATtiny. Then use the potentiometer (SW1 set to "Calibrate/Test") to simulate the oil temp sensor signal and feed different Vin to find out the voltage levels needed for the 9 diff temp marks (i.e., 120, 160, 180, 200, 220, 240, 260, 280, and 300F).
Then from the Excel curve in 1) above, figure out how to convert the oil temp signal to this voltage. Then load a new flash that implements this conversion (turns out to be a quadractic equation) to the ATtiny.
6) Testing
Set SW1 to "Calibrate/Test", adjust the potentiometer to diff voltage in 1) and verify the gauge's reading is correct.
Flip SW1 back to "Active" and the driver is now ready.
7) Tap into the DME (reversible and no splicing needed)
Just solder a "Y" or "T" wire between the two pins in A) above. Remove the DME PlugIII/Pin5 and insert this piece between the socket housing and the oil temp sensor green/red wire. Insulate any exposed metal parts appropriately. Tug it away and zip tie it neatly.
======================================================================== ====================================
The Arduino Code
/*
VDO Vision oil temperature gauge driver (7/31/2014) by Ahsai
Tap the DME NTC oil temp sensor voltage reading of 2003 Porsche 996 (0 - 5V. High voltage = low temp)
Reads an analog input, converts it to voltage, then converts the voltage to voltage_out
using a function (based on Durametric reading, gauge calibration data and Excel spreadsheet trendline equation).
Write voltage_out to analog output pin D1, as a fraction of 5.0v, to drive the VDO gauage
*/
// the setup routine runs once when you press reset:
void setup() {}
// the loop routine runs over and over again forever:
void loop() {
// read the input on analog pin A3 and convert the analog reading (which goes from 0 - 1023) to voltage (0 - 5V):
float v = analogRead(A3) * (5.0 / 1023.0);
float vout = 2.0; // To ensure the needle stays below 120F when the temp is below 120F
//y = -0.3023x2 + 1.3098x + 0.294
if (v < 2.0) { vout = -0.3023*pow(v,2) + 1.3098*v + 0.294; }
// If using a non-Vision VDO oil temp gauge, comment out the previous line and uncomment the following line
//if (v < 2.0) { vout = -0.2352*pow(v,2) + 1.3098*v + 0.3117; }
//float vout = v; // Uncomment this line for calibration
// convert vout (0 - 5.0V) to output (0 - 255) and write to D1
analogWrite(1, (int)(255.0*vout/5.0));
delay(100);
}
Last edited by Ahsai; 08-06-2014 at 03:55 PM.