How to remove transmission input shaft seal
 08-20-2013, 11:15 PM
#16
Captain Obvious
Super User
Super User
If there is damage to the bearing, it won't be at the point where the tool contacted the race but when the *****/rollers contact the race. All it takes is some small bimples and the bearingnis done. The queation is, were the hammer blows big ebough to do this?
 08-21-2013, 08:10 AM
#17
Pro
Thread Starter
I checked the manual and that bearing is an angular contact bearing. The bearing is on the inside with the race on the outside so the tool was against the race when I was banging on it. Since the race is pressed on with a hydraulic press it is highly unlikely the banging could have damaged it or moved it, especially since it was assembled and all the other press-on items were supporting it. Also the tool contacted the race evenly all around so the force was evenly applied.
I think this will end up a non-issue, but certainly not advisable. If I could have found a pic if the area before I started and had seen how everything fit behind the seal I would have known not to use the hammer. I'll post a few pics for posterity so others don't make the same mistake. Stupid, worthless tool...
I think this will end up a non-issue, but certainly not advisable. If I could have found a pic if the area before I started and had seen how everything fit behind the seal I would have known not to use the hammer. I'll post a few pics for posterity so others don't make the same mistake. Stupid, worthless tool...
08-23-2013, 10:55 AM
#18
Pro
Thread Starter
I wanted to post a few more pics so anyone else tackling this task can see what they are dealing with and what to expect.
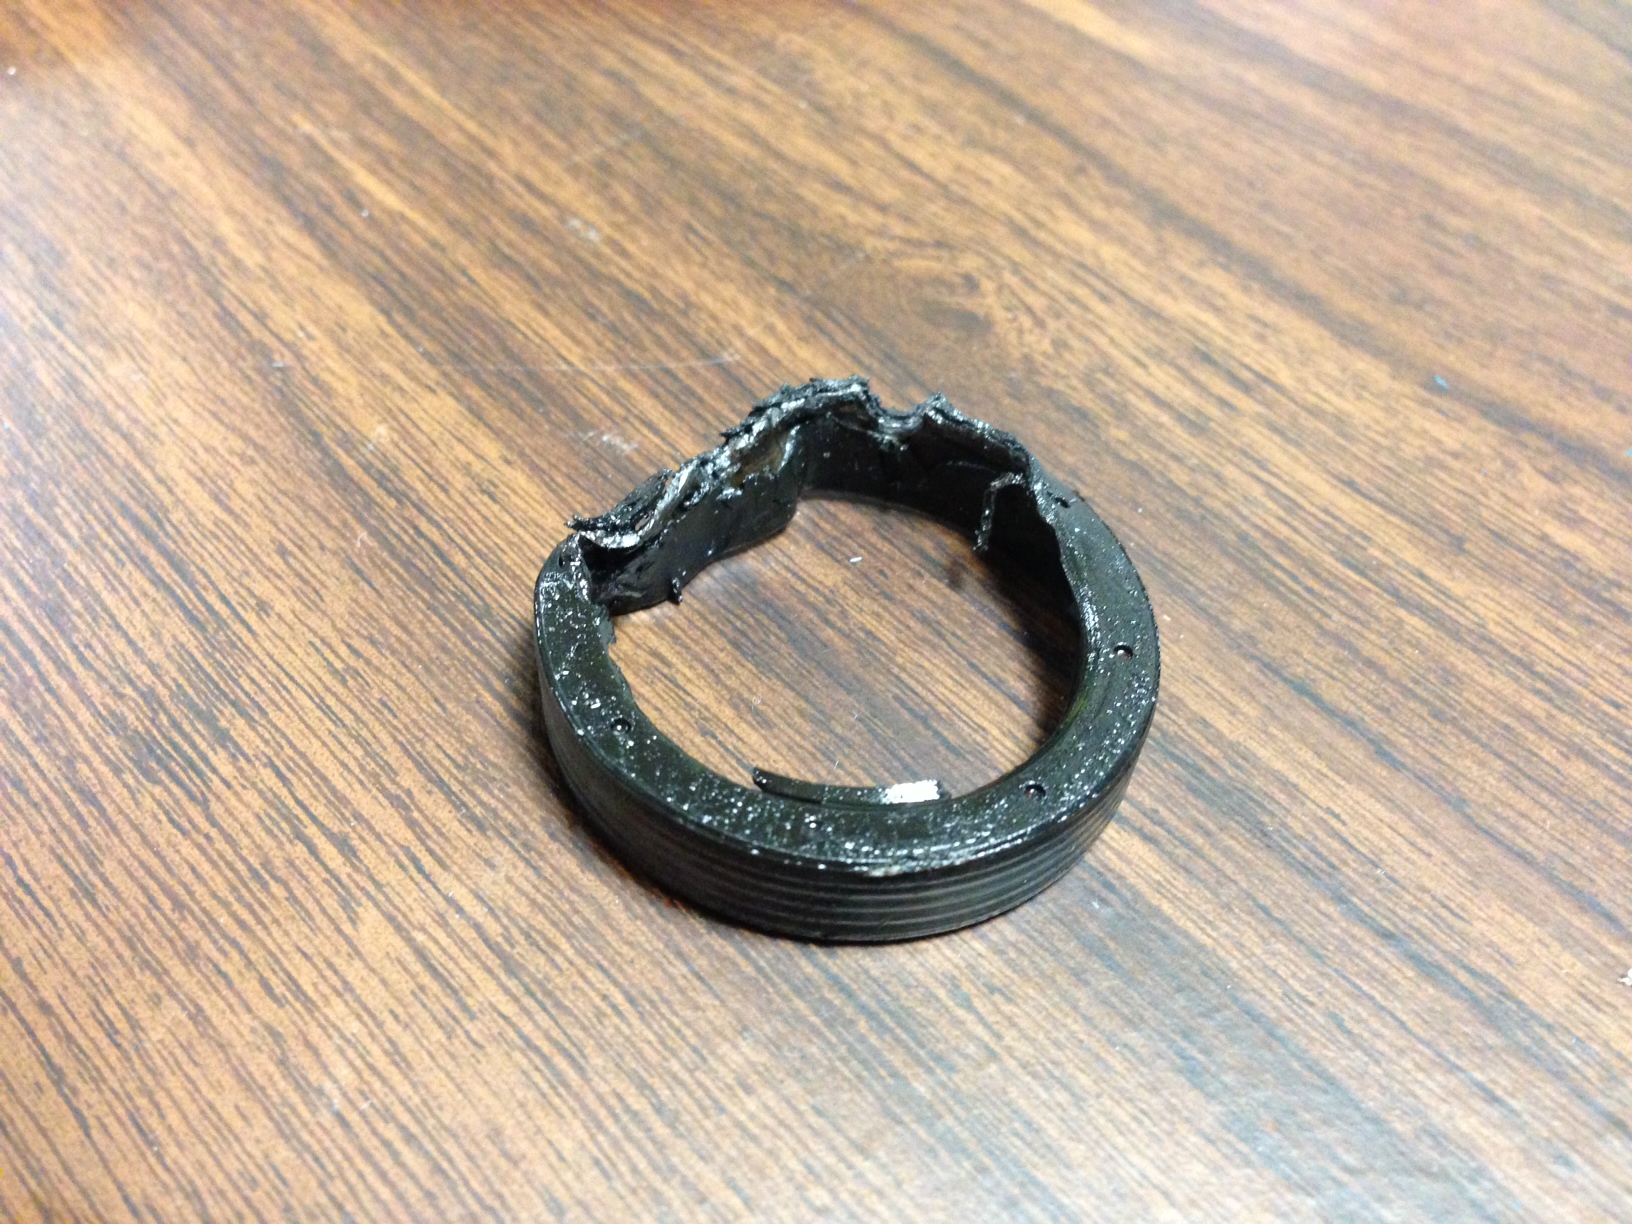
Here is the seal after I finally removed it.
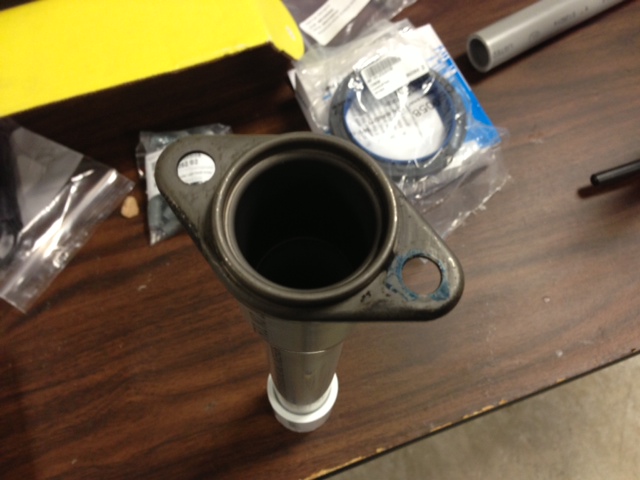
Here one can see the bore step-down in diameter. The outer diameter has the gap in it as shown in the next photo so the seal could not reside here. The middle diameter is where the seal sits. The inner diameter is where the bearing race for the input shaft resides.
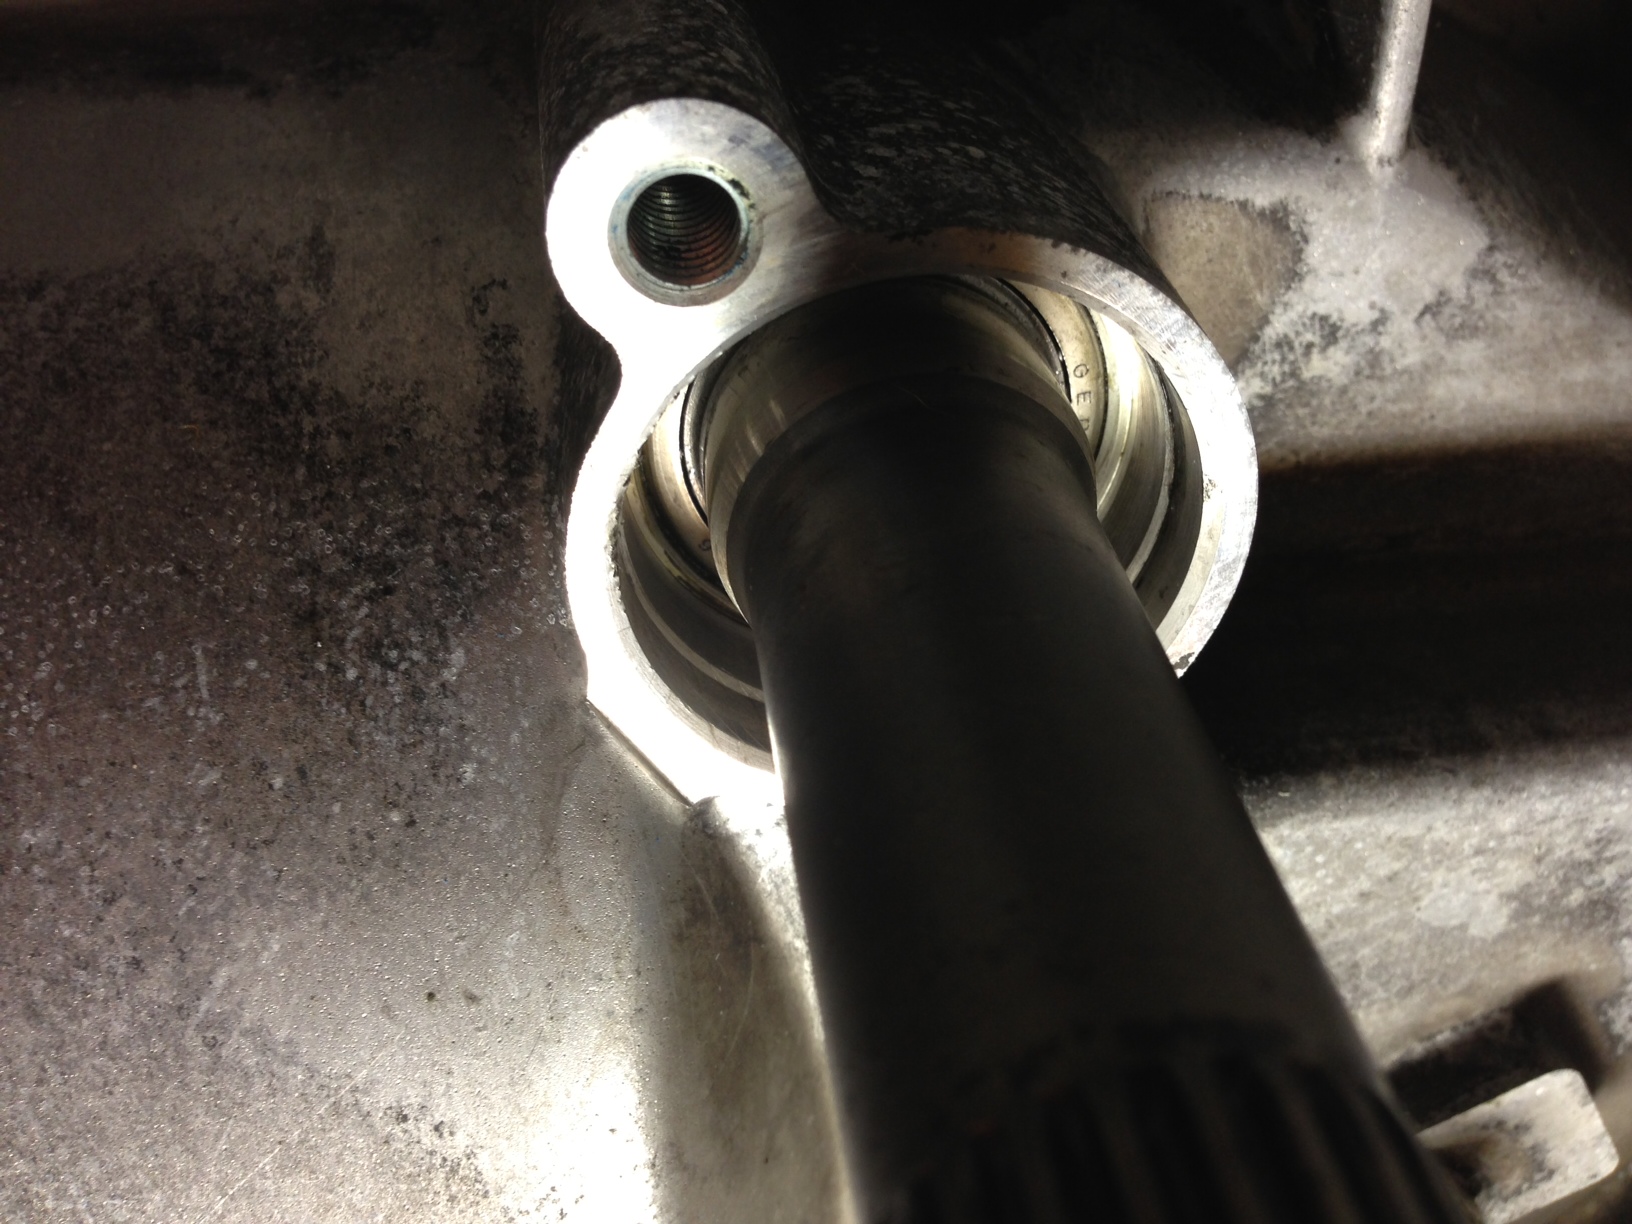
Here is the gap I referred to. One can clearly see the three steps of the bore diameter. Also note the steps in the input shaft, specifically the inner one where the seal will bear against the shaft.

Hope this is helpful. I couldn't find any pics like this before I started this task but they sure would have helped me.
Here is the seal after I finally removed it.
Here one can see the bore step-down in diameter. The outer diameter has the gap in it as shown in the next photo so the seal could not reside here. The middle diameter is where the seal sits. The inner diameter is where the bearing race for the input shaft resides.
Here is the gap I referred to. One can clearly see the three steps of the bore diameter. Also note the steps in the input shaft, specifically the inner one where the seal will bear against the shaft.
Hope this is helpful. I couldn't find any pics like this before I started this task but they sure would have helped me.
08-23-2013, 11:01 AM
#19
Pro
Thread Starter
Also, I went to HD to pick up something to install the seal. I ended up with 1" dia galv pipe with a union to bear up against the seal. The union was the perfect size to support the seal, unfortunately the inside dia of the pipe was too small to fit over the input shaft.
If anyone can be specific about what they used to install the seal, besides the proper tool of course, it would be very helpful and appreciated.
If anyone can be specific about what they used to install the seal, besides the proper tool of course, it would be very helpful and appreciated.
08-23-2013, 03:22 PM
#20
Pro
Thread Starter
I devised an ingenious tool (if I do say so myself) to install the seal. I took a section of 1" PVC electrical conduit that has a union formed in the end and the old guide tube. The guide tube would fit in the end of the conduit but the fit was much too tight to force it all the way in. So I heated up the flared end of the conduit with a heat gun and pushed the guide tube in until it bottomed out.

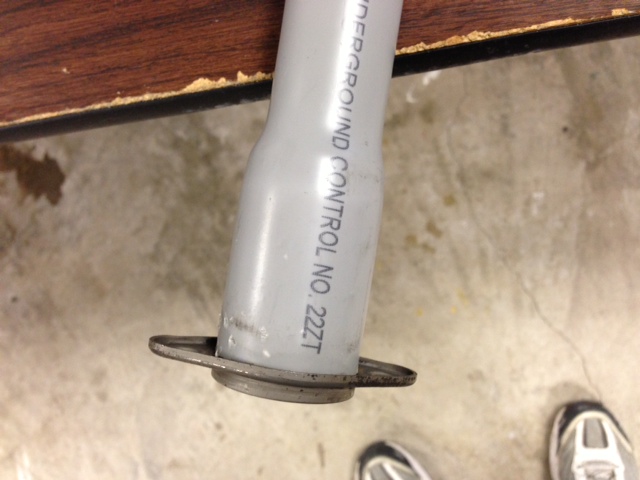
Then I took a sch 40 pvc union and 1" to 1/2" adapter and installed them on the other end to give a surface to hammer on. A cap would have been simpler but the only ones available had a rounded end and I wanted a flat end to hammer on.
Now I will place the seal in the bore, slide the tool over the shaft, thread in the old bolts as a guide to keep the tool straight, and tap the seal into place. The lip on the old guide tube will keep the seal straight in the bore and provide a stop to prevent the seal from being driven too far into the bore.
Giddieup...
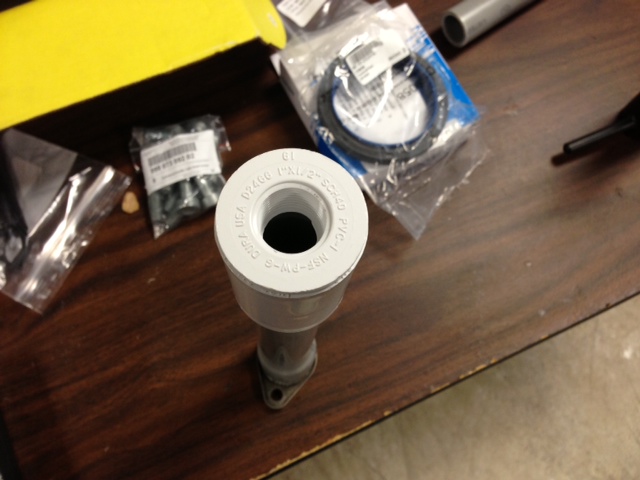
08-23-2013, 03:32 PM
#21
Captain Obvious
Super User
Super User
Last pic in the second last post. See that gap in the casting? That's where a flathead screwdriver should have been used to pry out the seal.  You need to do some cleaning up on that edge that got mangled during the seal removal. I wouls use a thin layer of RTV on the outer rim of the new seal. Last thing you need is a leak because of the damage on the housing. Nice DIY tool.
You need to do some cleaning up on that edge that got mangled during the seal removal. I wouls use a thin layer of RTV on the outer rim of the new seal. Last thing you need is a leak because of the damage on the housing. Nice DIY tool.
08-23-2013, 03:36 PM
#22

Great idea on the homemade tool so I feel bad Im late on this. The install tool is much, much cheaper (@$35) than the rather expensive seal removal tool. Im slowly collecting most of the Porsche specialty tools so if you dont need it, I might buy the SIR tool from you if its not too damaged. Again great improvised tool.
08-23-2013, 05:59 PM
#23
Pro
Thread Starter
Last pic in the second last post. See that gap in the casting? That's where a flathead screwdriver should have been used to pry out the seal. You need to do some cleaning up on that edge that got mangled during the seal removal. I wouls use a thin layer of RTV on the outer rim of the new seal. Last thing you need is a leak because of the damage on the housing. Nice DIY tool.
You need to do some cleaning up on that edge that got mangled during the seal removal. I wouls use a thin layer of RTV on the outer rim of the new seal. Last thing you need is a leak because of the damage on the housing. Nice DIY tool.I didn't actually see the gap in the case until after I'd removed the seal. If I had I could have tried your suggestion.
I'm debating on whether to use some of the Curil T, Loctite 574, or other suitable sealant when I install the seal. I noticed the manual specifically recommends the RMS be installed dry so I'm not sure whether I should use a sealant or not. More research...
08-23-2013, 06:02 PM
#24
Pro
Thread Starter
Great idea on the homemade tool so I feel bad Im late on this. The install tool is much, much cheaper (@$35) than the rather expensive seal removal tool. Im slowly collecting most of the Porsche specialty tools so if you dont need it, I might buy the SIR tool from you if its not too damaged. Again great improvised tool.
08-24-2013, 03:01 AM
#25
I didn't actually see the gap in the case until after I'd removed the seal. If I had I could have tried your suggestion.
And another note about specialty tools. Looks like the RMS tool is no longer available. Glad I got one. Let me know if you need it.
Last edited by KrazyK; 08-26-2013 at 10:44 AM.
08-25-2013, 02:28 PM
#28
Pro
Thread Starter
 Not to be argumentative but why would Porsche provide a special tool and procedure to remove the seal if it designed the gap into the bore to remove the seal?
