
Ruf upgrades!
 10-05-2014, 08:20 PM
#31
Addict
Lifetime Rennlist
Member
Lifetime Rennlist
Member
Thats the problem with those seats. GREAT track seats, but not a whole lot of adjustability. I had them in my 996 GT3 and getting them right was hard, but once it was done then you are finished. On the track I had to use some pillows and stuff to get the finishing adjustments done.
 10-05-2014, 09:55 PM
#32
Race Car
Thread Starter
Thats the problem with those seats. GREAT track seats, but not a whole lot of adjustability. I had them in my 996 GT3 and getting them right was hard, but once it was done then you are finished. On the track I had to use some pillows and stuff to get the finishing adjustments done.
10-21-2014, 10:33 PM
#34
Instructor
Join Date: May 2013
Posts: 108
Likes: 0
Received 0 Likes
on
0 Posts
I have 997 GT3 seats in my 993tt and ended up using Brey Krause mounts to bolt the seats directly to the floor. There was a lot of options with positioning, and since I am really the only one that drives the car, having the seat adjustment front to back wasn't necessary.
http://www.bkauto.com/category_s/224.htm
http://www.bkauto.com/category_s/224.htm

 10-22-2014, 08:19 AM
#38
Race Car
Thread Starter
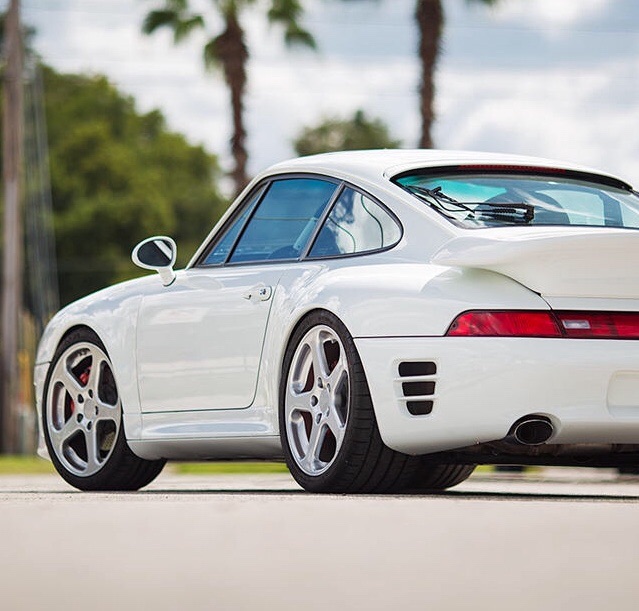
Thanks guys, had a friend over yesterday and he spent all day detailing the car. I decided to remove the 18 year old stone guard.  One done and one to go.
  :big gulp:
One done and one to go. :big gulp:
10-22-2014, 08:44 AM
#39
Burning Brakes
Looks incredible....like a completely different car from what you started with...with just subtle Ruf bits. Noticed two things:
1. Why not white/clear turn signals?....Sylvania makes a silver coated one...and better yet a switchback led would look white as well when not illuminated and both turn amber when in engaged for inspections.....but then again maybe who cares?...ha!
2. Make sure you put the stone guards back on. I ran with them off too for a while/big mistake...looked like the General Lee peppered with shotgun blasts. I spend more time touching up with an artists brush.
Use Darin's from FD Motorsports...his are thicker/more durable than OEM and less expensive.
10-22-2014, 02:42 PM
#41
Drifting
1. Why not white/clear turn signals?....Sylvania makes a silver coated one...and better yet a switchback led would look white as well when not illuminated and both turn amber when in engaged for inspections.....but then again maybe who cares?...ha!
2. Make sure you put the stone guards back on. I ran with them off too for a while/big mistake...looked like the General Lee peppered with shotgun blasts. I spend more time touching up with an artists brush.
Use Darin's from FD Motorsports...his are thicker/more durable than OEM and less expensive.
2. Make sure you put the stone guards back on. I ran with them off too for a while/big mistake...looked like the General Lee peppered with shotgun blasts. I spend more time touching up with an artists brush.
Use Darin's from FD Motorsports...his are thicker/more durable than OEM and less expensive.
http://www.autolumination.com/1156_1157.htm
+1 on FD stone guards. They are superior to OEM, in that they have less orange peel and much clearer in appearance too. We put some on my brother's yellow 4S and they are better than my OEM replacements from Pelican.
 looks "tubbed" :-)
10-22-2014, 03:33 PM
looks "tubbed" :-)
10-22-2014, 03:33 PM
#43
I spent many hours scratching my head (ten years ago) when I first received my GT3 seats.
The 'problem' is that if you install them as is, they are leaned too far forwards. The side brackets need REVERSING.
So, if you put the seats side-by-side then the brackets nearest the doors swap over. Do the same with the inner brackets.
By doing so you're rotating the bracket 180 degrees and instantly lowering the seat AND leaning it back. You may (I did) want a couple of shims under the sliders at the back to raise it up slightly.
It's then possible to install EIGHT bolts in each seat to mount it to the car. The seat will slide further back than standard as the rails are longer.
10-22-2014, 04:46 PM
#44
Race Car
Thread Starter
I spent many hours scratching my head (ten years ago) when I first received my GT3 seats. The 'problem' is that if you install them as is, they are leaned too far forwards. The side brackets need REVERSING. So, if you put the seats side-by-side then the brackets nearest the doors swap over. Do the same with the inner brackets. By doing so you're rotating the bracket 180 degrees and instantly lowering the seat AND leaning it back. You may (I did) want a couple of shims under the sliders at the back to raise it up slightly. It's then possible to install EIGHT bolts in each seat to mount it to the car. The seat will slide further back than standard as the rails are longer.