When you click on links to various merchants on this site and make a purchase, this can result in this site earning a commission. Affiliate programs and affiliations include, but are not limited to, the eBay Partner Network.
Where did you get the hood struts? Could you provide a link? I just recently noticed the hood refuses to stay all the way up and are being added to the never ending list of mods/repairs.
Where did you get the hood struts? Could you provide a link? I just recently noticed the hood refuses to stay all the way up and are being added to the never ending list of mods/repairs.
Thanks for the info guys. Theres already a cabin filter cover clip floating around somewhere down there. I dont want it to have more friends.
Did you go with Stabilus, OEM, or Tuff? The reviews are all over the place for Stabilus and non existant for Tuff. I'd be nice to have something that just works for more than a couple years.
Last edited by phoneyman; 04-23-2015 at 06:27 PM.
Reason: forgot info.
Stabilus, we'll see how long they hold up. Not sure what the old set was (I can double-check) but they did reasonably well for 10 years.
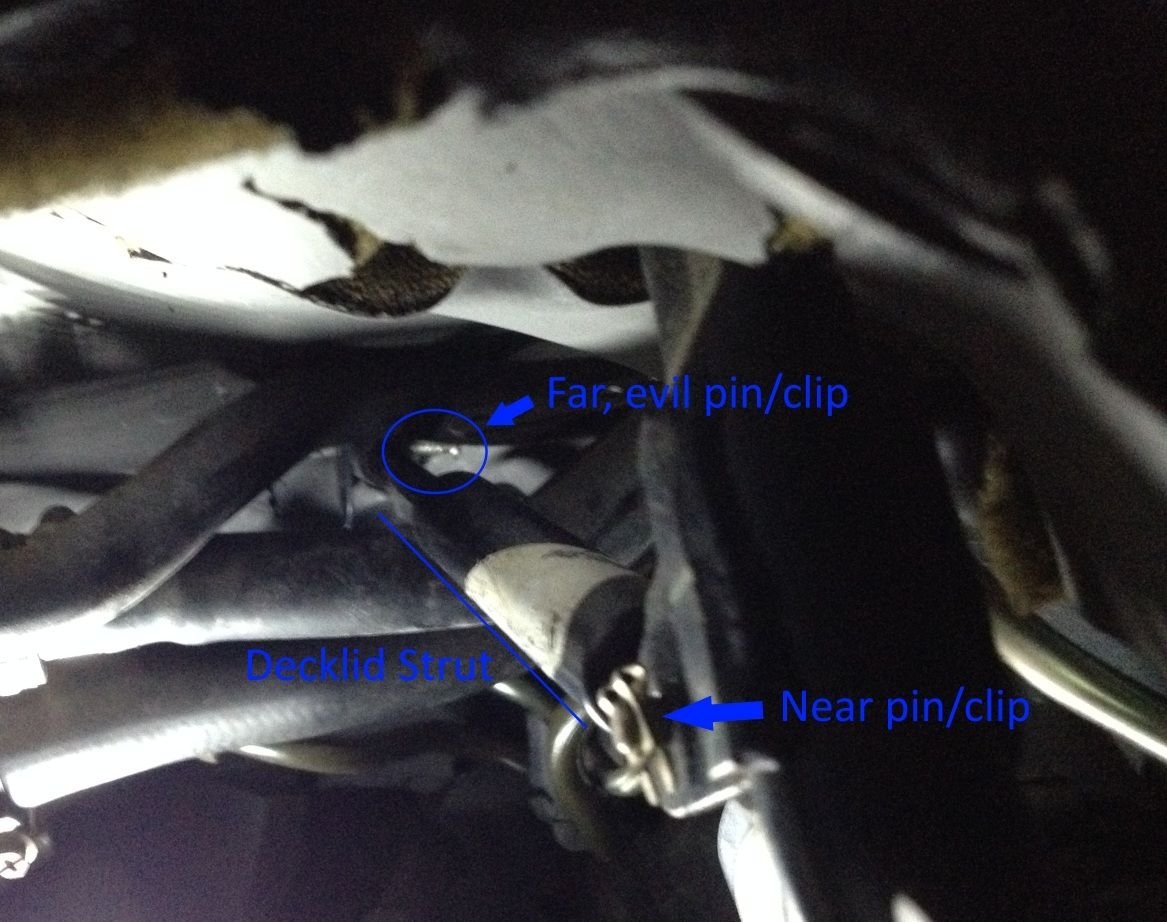
Got the decklid struts replaced over the weekend. Left side took maybe 5 minutes. The right side strut was a pain, since the far pin/clip are buried in various lines, and in my case the pin was jammed trying to come out. Here's a photo, only because I felt that something that gave me so much grief should be photo-worthy (yes, my sound mat is crumbling):
I also replaced the 3 plugs on the bottom left. You really have to use The Force to get those plugs in there. And those were the easy ones. I'm curious if anyone's tried the method recommended in Adrian's book -- using 1/4" tubing on the back of the plug to feed it into the hole and get some good tactile feedback, then come back with the socket and extensions once it's hand started.
Dave, have you tried the factory spark plug tool for inserting the new ones? And have you removed the tin on the right side yet? It will make plug replacement on that side a lot easier!
OK, time to bump this thread back to the top and get back to work!
Originally Posted by techman1
Dave, have you tried the factory spark plug tool for inserting the new ones? And have you removed the tin on the right side yet? It will make plug replacement on that side a lot easier!
I have not tried the factory tool, but I can definitely see where that would make things easier. I got the muffler off and the bottom right plugs replaced last night, and made another attempt at the top left plugs. Seems like you want both a lot of flexibility right near the socket/plug to get the right clearance, but you also want a long, fixed extension to get a nice straight shot at seating the new plug with good tactile feedback. Kind of hard to do both at once, so maybe this factory tool fits the bill.
While waiting for inspiration to strike on the upper plugs, I replaced the fuel filter. Again, the writeups here and on pcarworkshop were more than detailed enough for the task, and since I had already removed the airbox weeks ago, the filter itself was relatively easy. The hardest part is keeping the fuel spill to a minimum. In my case, I used one of those magnetic trays that you might use for nuts & bolts - it had enough of a bowl shape to catch the fuel. I had sort of assumed that since the car had been sitting for over a month now, the pressure had relaxed. While that may have been the case, there was still plenty of fuel in the lines and the filter, and when you release the inlet fitting (far side), get ready!
One question comes to mind as I look ahead to putting the new belts on: at this point I have no extra shims, and was just planning to put the belts on with the same pulley/shim configuration as before. Will this work with the new belts, or should I plan to have extra shims until the belts have stretched/seated? I do have the krikit-style tensioner to measure things more accurately.
I went to swap out my plugs, got the forward-most plug in the upper-left bank out ... and discovered I ordered the wrong spark plugs (somehow I ordered the 2-electrode turbo plugs instead of the 3-electrode NA plugs). So those will need to be exchanged.
Just curious, did you replace the plugs?
I bought the 30k mile service kit from Suncoast and they came with the 2-electrode spark plugs for my NA C2S. I read on the forum in a DIY a warning that the 2-electrode ones were wrong and they should be 3-electrode for the NA engine. I called Suncoast and they told me the 2-electrode plugs are the right ones.
Meanwhile though in the 993 Parts 'Katalog' available online, for the NA engines it lists the 3-electrode plugs, but right below it lists also the 2-electrode plugs with a "WW" code that in the back of the manual translates into "This part can be used instead of the preceding one".
Bottom line: for NA engines both 2-electrode and 3-electrode plugs work.
Thanks for the info. I am still in the process of replacing the plugs, but I did exchange the 2-electrode plugs for 3-electrode. I was confused about exactly how "optional" was the optional plug, and most of the references I used suggested the 3-electrode for the NA engines. And since the old plugs I removed were 3-electrode, I decided to go like for like.
Normally I would say less is more when doing these sorts of tasks but at 88k miles one will run into symptom related issues if some of these things are left undone. Also car theropy can be good for the soul. Good luck and may you not run into consequentual issues!
For the guys dropping clips into the "abyss" of the engine bay. Get yourselves a bendy or telescoping magnet tool from Harbor Frieght (or wherever). It really comes in handy to retrieve lost metal objects, but also just to help you hold a screw or a nut, etc...
On this week's episode of "As The Wrench Turns"...
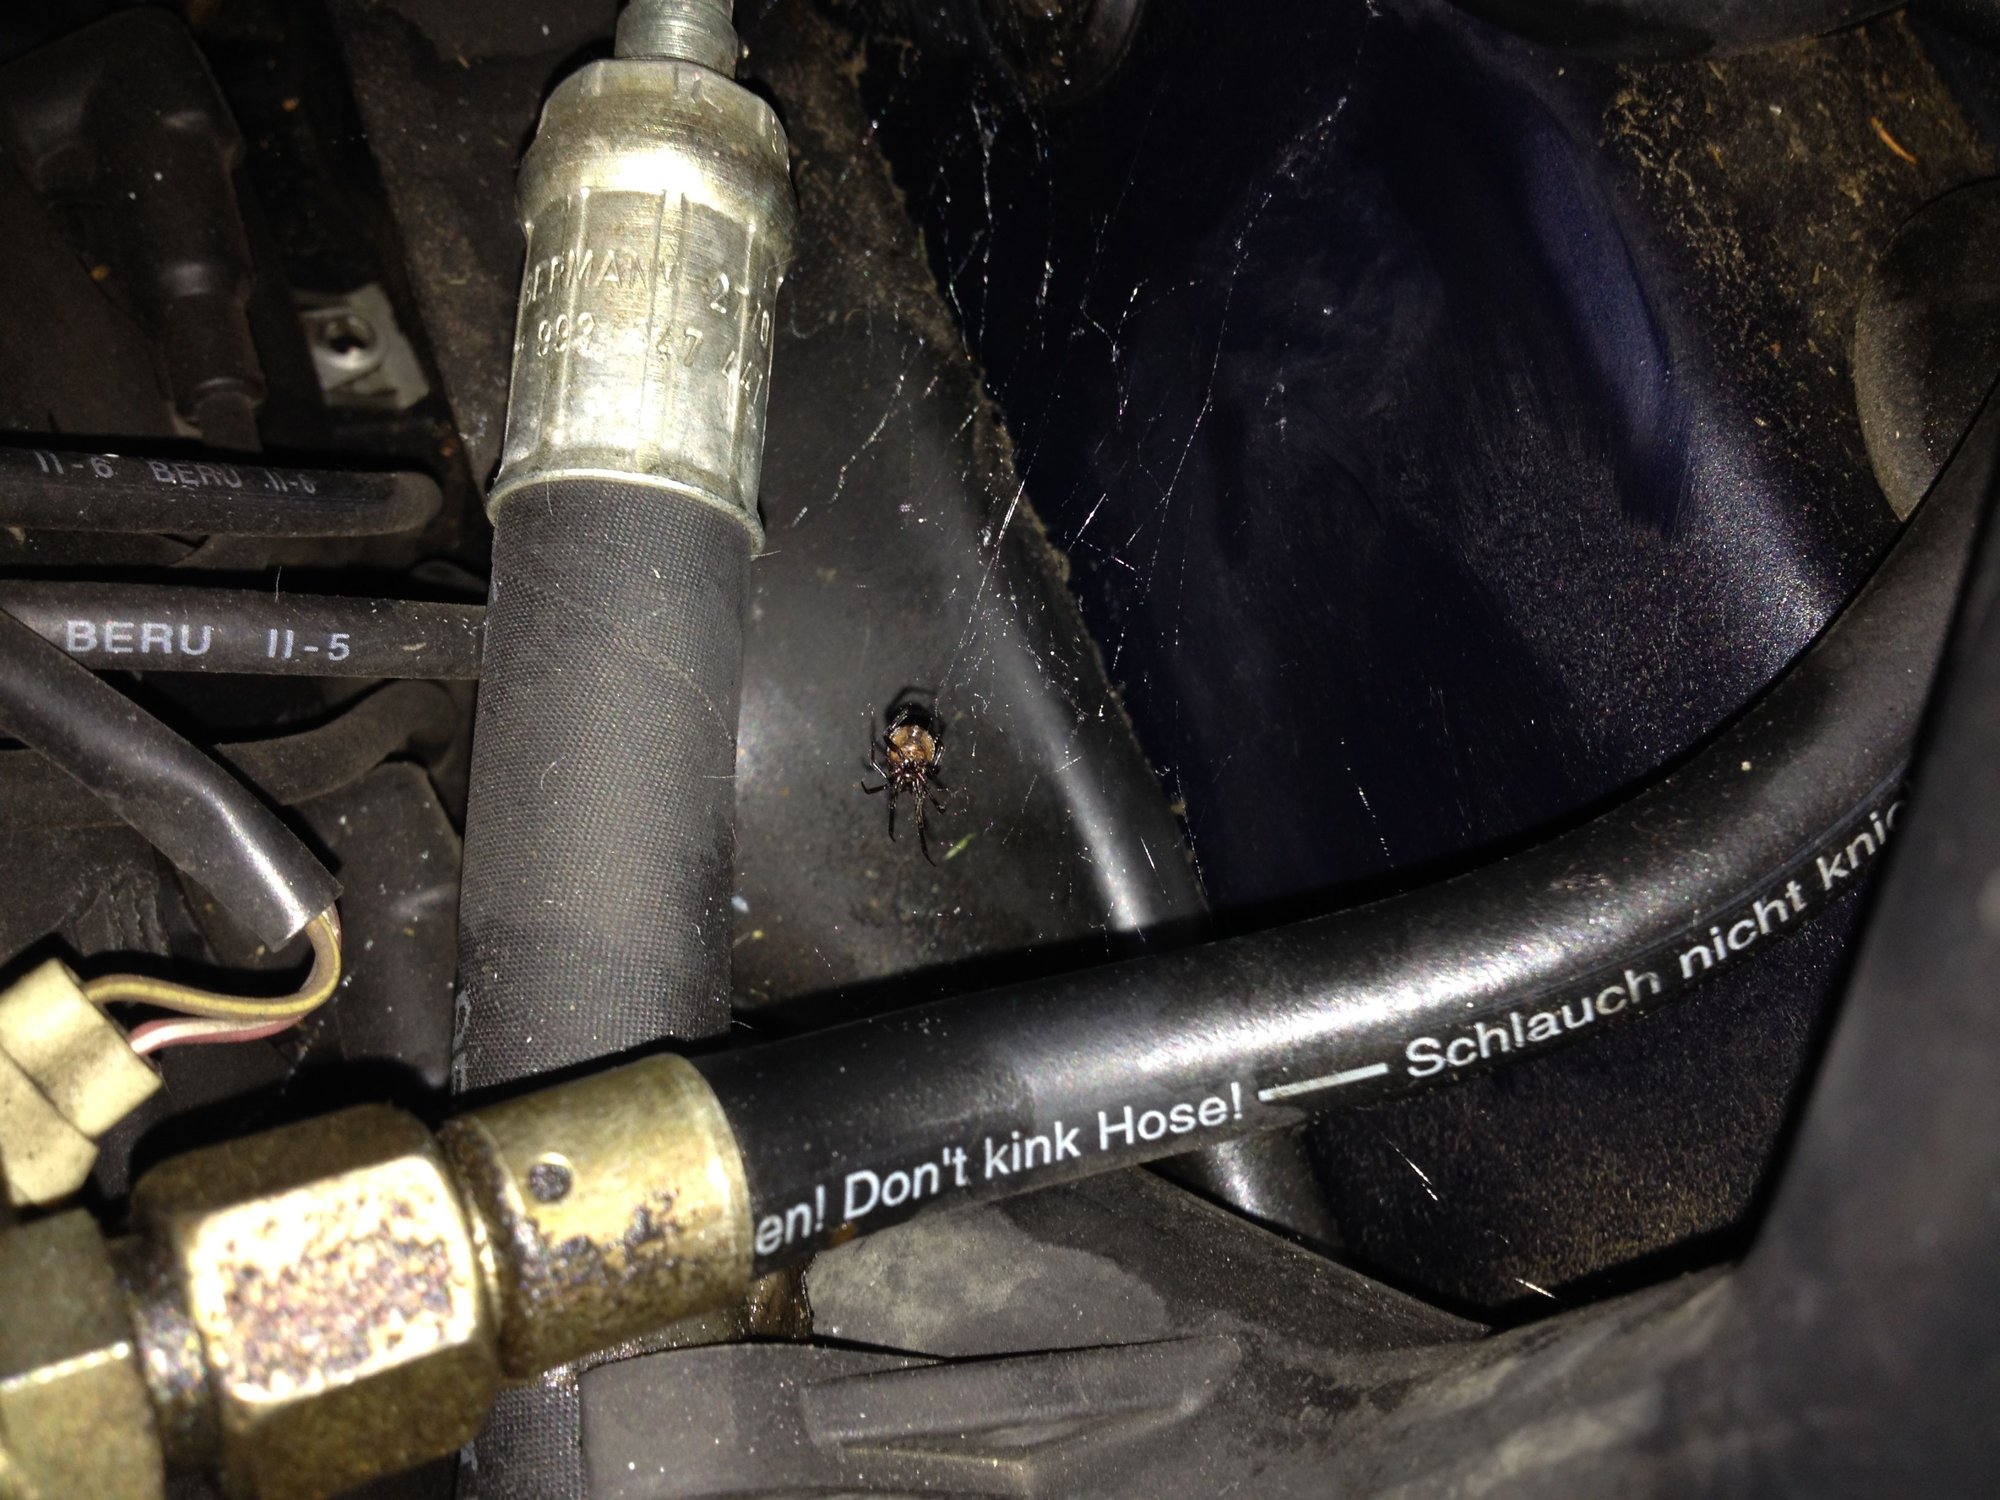
First thing's first, get the spider (spyder?) out of the engine bay:
Once that was done (and I also vacuumed up some leaves caught between the engine carrier and the body), I went ahead and put on my new belts. Bruce's thread (https://rennlist.com/forums/993-foru...e-v-belts.html) was very helpful here, particularly the method of installing the A/C compressor (spoiler alert: start with the front left bolt and go counter-clockwise).
In the process, I managed to earn my "Try to Put the Alternator Belt on the Fan Pulley First by Accident" badge, as well as my "Drop a Square Compressor Nut in the Engine Bay" and "Nearly Get Your Hand Crushed Between the A/C Compressor and the Intake Manifold" badges.
Once the belts were on, I used the Krikit tool, and got high-normal tensions on all belts (cold). I do have a shim for the alternator pulley after all, so maybe I'll pick up a spare fan pulley shim just in case I need to release some tension from the belts after they've set.
I need to get these top plugs replaced, then it's just a matter of bolting stuff back onto the car. It's been almost 2 months since I started this thread, and while that's about what I expected given the amount of free time I have to work on the car, I'm ready go shift back from "Porsche mechanic" to "Porsche driver".
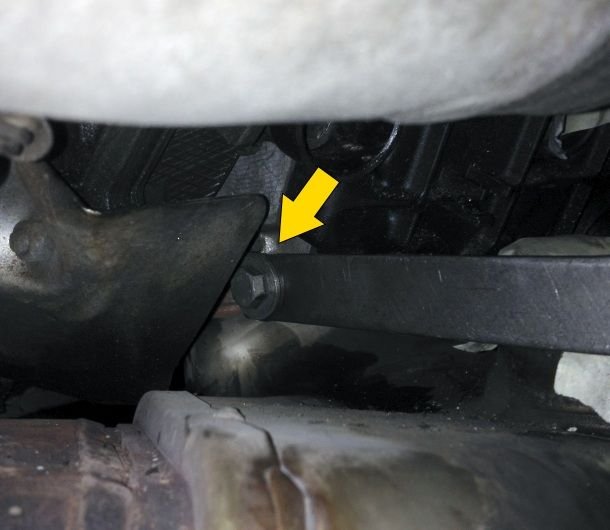
The saga continues on what is possibly the longest spark plug change / major service in all of 993-dom. Over the weekend I managed to replace the 3 upper plugs on cylinders 1-3. Now the fun part! Approaching from the bottom, I have the bolts for the clutch vent pipe undone, and the top allen bolt on the muffler bracket off. The bottom (hex) bolt is evil, and has not budged even with liberal use of penetrating oil. I'm going to try giving it a sharp tap to see if that loosens the corrosion, and failing that may need to look into a microtorch to get into the tight space.
Evil bolt:
Doing a search in the archives, I'm at least comforted by the fact that I'm not alone, and that these bolts have been a major source of frustration for others.
On a more positive note, what finally worked for me on the upper left plugs was:
Spark plug socket (magnetic)
3" wobble extension
U-joint
3" locking extension
Ratchet
Also, I found out last week my sprinkler guy also has a 993 ('95 triple black cab). We joked that hopefully when he came back in the fall to turn off my system that my car would finally be off the jack stands! (At least, I hope we were joking!)
I am sitting in my office looking out the window at my car as I type this, so at least you know now that the car is back on the road.
It's been a long and winding road since my last post, nearly three months ago. I ran into many, many delays and sidetracks, due in part to (among other things): kids, minor health issues, work commitments, Walter White, kids again, house projects, power failures, heat waves, etc., etc.
After many different attempts at the bolt mentioned in my last post (which would not budge the slightest), I was looking at a few options:
1) Keep trying, and likely shear or round the bolt in the process, which would have meant drilling into the engine case.
2) Have the car and all its disassembled parts towed to my local independent, and fully admit defeat.
3) Put the car back together, run it for awhile with 9 new and 3 old plugs, then drive it to my local independent, and partially admit defeat.
I went with option #3. I'm not happy about it, but I'll admit that I reached the limits of my garage, my tools and my skills. I'm happy to be driving the car again, and all of my other work seems to have yielded successful results. I'm rounding this up to a win.
FWIW when I did my plugs at 90K I ended up with option #3 as well. I actually got to 11 of 12 but could not figure out how to do the passenger-side front plug with the PS pump in the way.


 04-22-2015, 11:54 PM