When you click on links to various merchants on this site and make a purchase, this can result in this site earning a commission. Affiliate programs and affiliations include, but are not limited to, the eBay Partner Network.
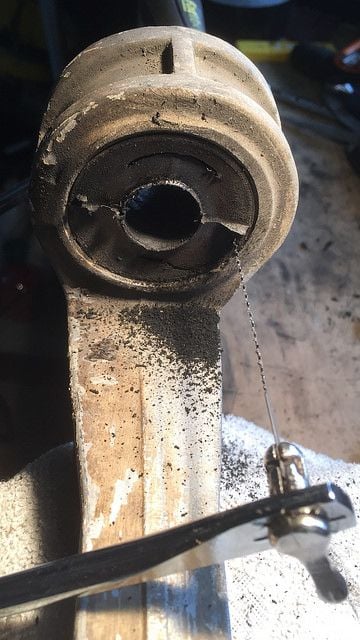
Over the last few days I have been working on this as well. I followed FD's DIY and also removed most of the rubber, but with a coping saw and went as close to the edge as possible. Then slotted the outer bearing shell with a mini hack saw. Next, punch one side and the shell curled out. See pics.
Cleaned all the parts in Lacquer Thinner to remove the cosmoline before installing the new Urethane bushings with the vise.
Once you go through the battle with the first one, the second Arm seems somewhat easier.......
You can take the arms outside (after old crap's removed) and coat them in "easy off" oven cleaner. Let me sit for a few hours and it helps clean em up.
You can take the arms outside (after old crap's removed) and coat them in "easy off" oven cleaner. Let me sit for a few hours and it helps clean em up.
Now then, I don't know if these arms are anodized but I work in aerospace and just last month we needed to remove the anodizing from inside the threads of a fuel fitting (for electrical bonding purposes ) and it was said that 'easy off' would achieve this. It's no surprise your arms became clean but let's see what they look like in a years time.
I also do not know the long term effect of 'easy off' on aluminum. Perhaps it is detrimental to it's strength. I'm only saying.
Oh and on the bushing removal topic I would go with pressing them out carefully, although there are many ways to skin a cat.
Good luck.
I got the sleeves out of 1 side....it was horrible. I did end up cutting into the side wall of the aluminum a bit on accident....got a little overzealous with the saw. Will this affect the performance of the new Walrods?
I got the sleeves out of 1 side....it was horrible. I did end up cutting into the side wall of the aluminum a bit on accident....got a little overzealous with the saw. Will this affect the performance of the new Walrods?
It won't affect the performance of the walrods but it may do the arms over time, depending on how much you cut into them and whether you blended out the damage or not. If damage was minor I wouldn't worry too much
Now then, I don't know if these arms are anodized but I work in aerospace and just last month we needed to remove the anodizing from inside the threads of a fuel fitting (for electrical bonding purposes ) and it was said that 'easy off' would achieve this. It's no surprise your arms became clean but let's see what they look like in a years time.
I also do not know the long term effect of 'easy off' on aluminum. Perhaps it is detrimental to it's strength. I'm only saying.
Oh and on the bushing removal topic I would go with pressing them out carefully, although there are many ways to skin a cat.
Good luck.
Yes, I am fully aware of the corrosive capabilities of the oven cleaner. I left it on for about 2-3 hours then used a wire brush and very soapy water to scrub the F outta the arms. This was years ago and the arms are fine. I don't drive in poor conditions and am pretty **** about spraying the under pan any time I wash the car. As long as you constantly inspect and try to locate problems before they arise, you should be able to avert problems. It's when ya "put gas" and drive, that ya get get those "unexpected" surprises.
Aloha
FWIW, I did find that on the side with the 2 sleeves, when you get the first side off, you can slip a 22mm socket in the opening and pound the other side out. I put a piece of metal over the socket before pounding it to protect the socket, but it worked like a charm and the other side only too a few whacks.
FWIW, I did find that on the side with the 2 sleeves, when you get the first side off, you can slip a 22mm socket in the opening and pound the other side out. I put a piece of metal over the socket before pounding it to protect the socket, but it worked like a charm and the other side only too a few whacks.
I bit the bullet and paid $700 for two new control arms (that included a 10% discount). After reading this thread it looks like it was money well spent after all. Good luck with this project!
I'm probabaly making it seem worse than what it is, but there was definately a learning curve. Like many said, not one way to skin a cat, but there are easier ways than others.

 02-22-2015, 01:06 PM