Suspension refresh - front and rear
 01-21-2015, 05:47 PM
#1
Instructor
Thread Starter
This place is dangerous.
It all started with an intermittent shimmy up front.
Since I am taking the front knuckles off, lets eliminate bump steer.....
Now that I think of it, I bet those rear panel bushing are shot....
And how soft do those control arm bushings......
I bet those rear bearings are on their last legs.....
And since I am taking all of that out......
Down that slippery slope at mach 1.
Day 1:

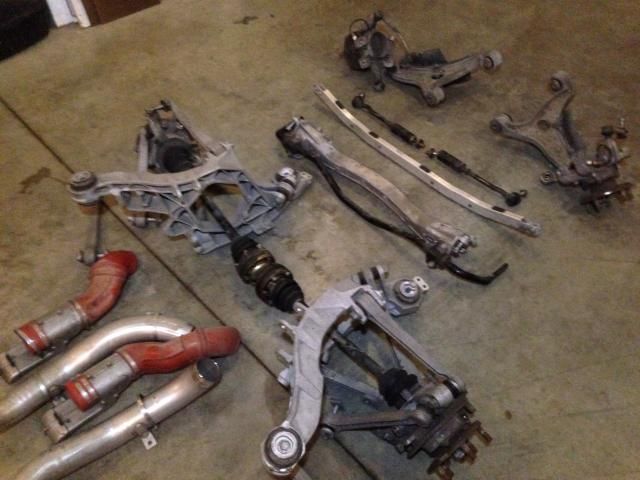
I have removed all the bushings on the rear subframe side panels, all rear control rods, front control arms, and rear control arms.
Everything has been cleaned.
Last edited by jason89i; 01-21-2015 at 06:03 PM.
 01-21-2015, 05:57 PM
#2
Instructor
Thread Starter

I now have all the suspension pieces out, cleaned, taped and ready for bead blasting.
Should I paint after a self etch? I like the natural clean aluminum look. but want something that does not attract dirt, oil and dust. Anyone have experience with Eastwood satin clear? It is a moisture cured urethane (MCU.) Thoughts?
Last edited by jason89i; 01-21-2015 at 11:20 PM.
01-22-2015, 12:39 AM
#4
Instructor
Thread Starter
On a side note. Does anyone know why there are two different bushings used in the rear suspension. One (oe Porsche part # ) has a smaller diameter sleeve, the other (TRW markings) has a larger diameter sleeve and a thinner (but more protruding) rubber filling.

 01-22-2015, 11:14 AM
#6
Instructor
Thread Starter

Trending Topics
01-22-2015, 11:18 AM
#8
Track Day

Join Date: Aug 2004
Posts: 16
Likes: 0
Received 0 Likes
on
0 Posts
Great overhaul and taking extra steps to clean it all!
For the sake of cleanliness, I'd probably choose to paint after the self etch primer. Although it deviates a little from Porsche factory, I think it'll stay clean for a longer time.
Looking forward to your driving feedback!
For the sake of cleanliness, I'd probably choose to paint after the self etch primer. Although it deviates a little from Porsche factory, I think it'll stay clean for a longer time.
Looking forward to your driving feedback!
01-22-2015, 04:57 PM
#9
Rennlist Member
As long as you have all of that rear suspension crap out of the way, how do the seals on the engine look? and what about that exhaust? plug wires? hee hee hee.  Seriously, what you're doing will be awesome for the ride!
Seriously, what you're doing will be awesome for the ride!
01-22-2015, 05:51 PM
#10
Instructor
Thread Starter

Tranny was re-geared by the p.o. (15k ago) with LWF and new rear main seal.
Moton club sports are already on the car. After this it should be set ...... Except for ....... Oh never mind.
01-22-2015, 06:38 PM
#12

bill has explained this someplace on here. I remember seeing it when I pressed out the old bushings, one of the bushings is for the a-arm, other for kinematic, or something like that. search for posts by bill about the bushings.
 01-22-2015, 09:29 PM
#14
Engine seals look pretty good. This was last year... https://rennlist.com/forums/993-foru...otor-drop.html Tranny was re-geared by the p.o. (15k ago) with LWF and new rear main seal. Moton club sports are already on the car. After this it should be set ...... Except for ....... Oh never mind.
01-22-2015, 11:31 PM
#15
Instructor
Thread Starter
I will look him up. Very interested to see what product he used.
Found it. Very interesting.
Dual.
Heated slab. But without a lift.
Cheers. Jason.
Dual.
Cheers. Jason.

