993 Door Pocket Attachment Reinforcement
 01-21-2014, 01:18 AM
#1
Rennlist Member
Thread Starter
993 HiFi and Standard Door Pocket Reinforcements
If there is interest, I will ship these out once per month, typically the last Friday of the month.
If you are interested in a set of 993 HiFi or Standard door pocket reinforcements:
$14 per HiFi set, $15 per Standard set. And this includes shipping to the US via USPS. Add $12 if shipping to Canada. PM me first if you are not in the US or Canada.
No items get shipped until PayPal received.
Door Pocket Attachment Reinforcement General Installation Instructions
Things you will need before starting:
General instructions for installing a set of 964 or 993 door pocket attachment reinforcements
Detailed instructions for installing a set of 964 or 993 door pocket attachment reinforcements
Installation posts from members
--------------------------------------------------------------------------------------------------
original post below
--------------------------------------------------------------------------------------------------
Not a fix for everyone, but this worked for me.
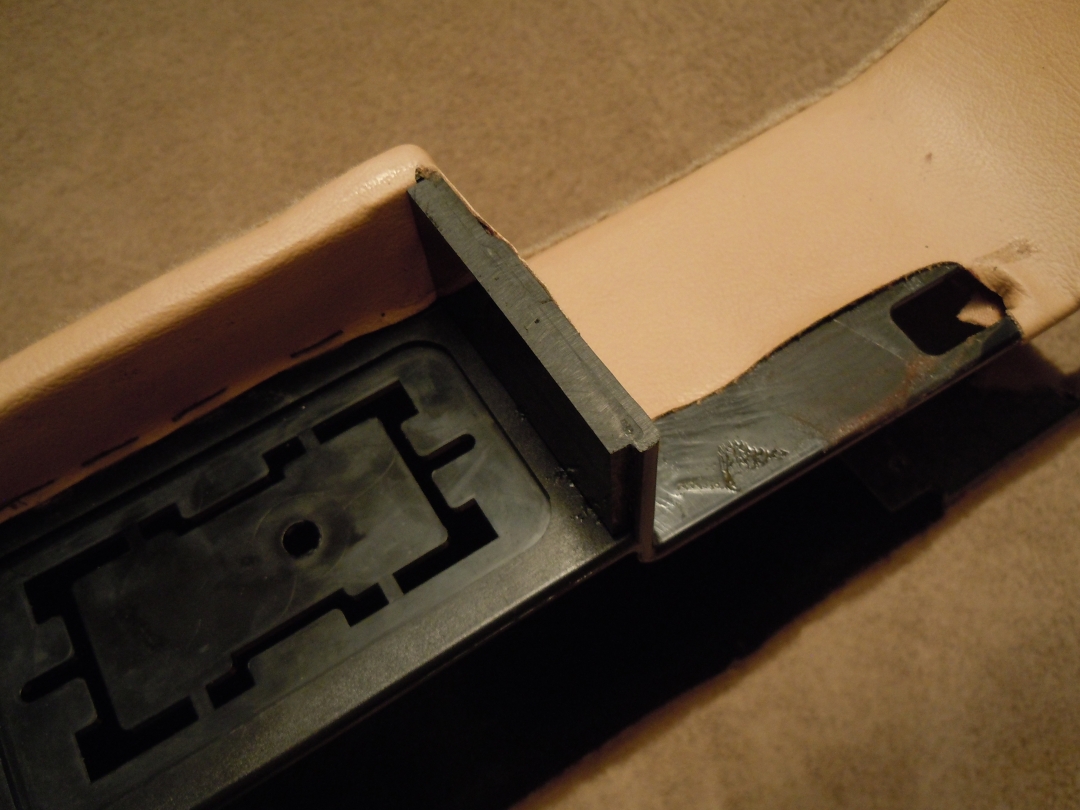
I cut 1/4" ABS (NOTE: currently produced from 3/16" ABS sheet) to dimension and cut a shoulder in it to fit the zig in the ABS of the door pocket where it is screwed in behind to the rear of the door handle.
Here is a couple of pics. Dimensions, etc. tomorrow evening hopefully.
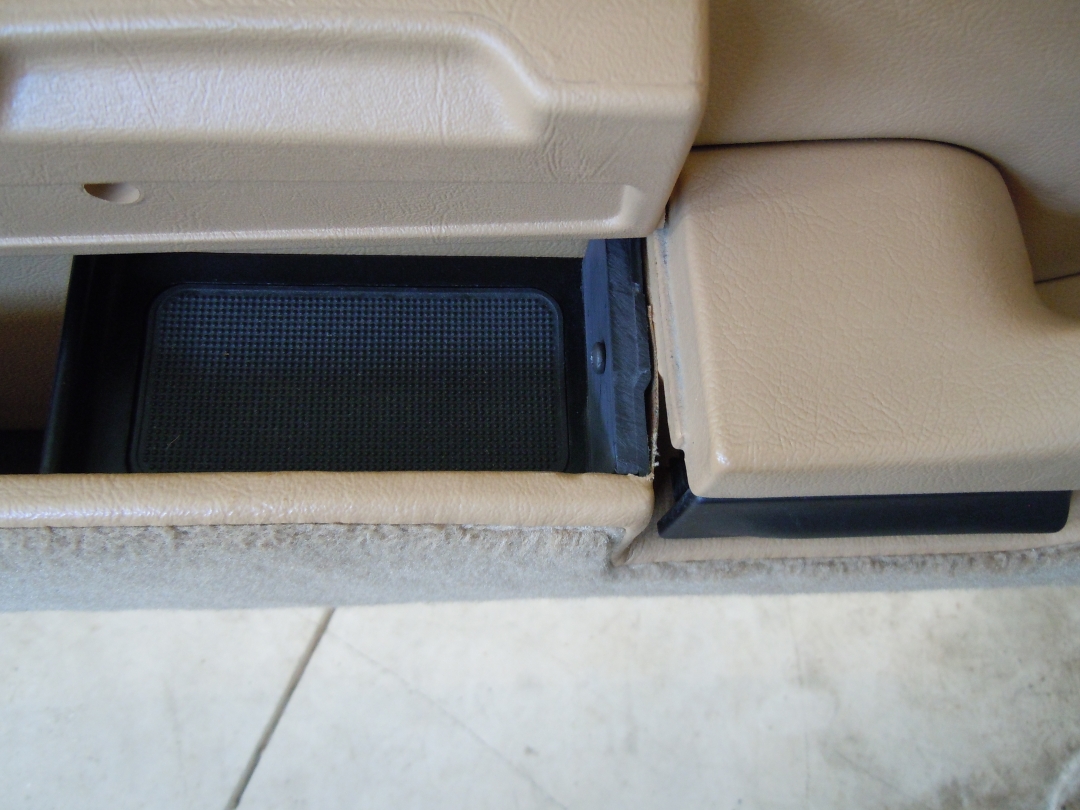
Motivation for the fix....

If there is interest, I will ship these out once per month, typically the last Friday of the month.
If you are interested in a set of 993 HiFi or Standard door pocket reinforcements:
- First - You post to this thread and indicate HiFi or Standard. Click here to determine HiFi or Standard.
- Second - You follow up with a PM to me that indicates HiFi or Standard along with your name.
- After you complete the 2 steps above, I will PM you my PayPal link with an amount. Use a browser (not one of the mobile apps) to view this PM because links in PMs are disabled by the mobile apps. In PayPal, you MUST change the type of payment from 'Sending to a friend' to 'Paying for an item or service.' If you don't make this change, I will not be able to create a USPS First Class Package (thick envelope) shipping label in PayPal and I will have to issue a refund and ask you to try again (hassle for both of us). I will ship your item to your PayPal address. PayPal no longer allows me to modify the shipping address.
$14 per HiFi set, $15 per Standard set. And this includes shipping to the US via USPS. Add $12 if shipping to Canada. PM me first if you are not in the US or Canada.
No items get shipped until PayPal received.
Door Pocket Attachment Reinforcement General Installation Instructions
Things you will need before starting:
- Time
- Time to glue the reinforcements in place
- Time to let the glue cure - over night is best - Tools
- Light Clamps (2)
- Philips screwdriver
- Drill
- 5/32 or 3/16 drill bit (diameter of your door pocket attachment screw) - Materials
- Set of ABS plastic door pocket attachment reinforcements
- Set of 964 or 993 door pockets removed from the doors
- Oatey Medium Black ABS Cement
. . . . Available at most home stores (Home Depot, Lowes, Menards, etc)
. . . . This is the best glue, it fuses the ABS pieces together
. . . . New glue is best, it loses its effectiveness over time
- Newspaper to work on
- Tape to mask off areas that you don't want ABS glue on (i.e. vinyl, carpet, leather, etc)
General instructions for installing a set of 964 or 993 door pocket attachment reinforcements
- Remove both door pockets from the doors.
- 964 door pocket removal: See Post #6 of Marc Shaw's Door Panel Removal Guide
- 993 door pocket removal: See step 1 of p-car.com's "How to remove the door panel on a 993" - Check fitment of the reinforcing pieces. Trim or shape as needed.
- Mask off the door pockets in the areas where the reinforcing pieces will be glued.
- Apply the ABS cement to one door pocket and one reinforcing piece.
- Put the two pieces together, ensuring the reinforcing piece is where you want it.
- Clamp.
- Repeat steps 4 through 6 with the other door pocket and reinforcing piece.
- Let the glue cure over night.
- Remove clamps.
- Use the original holes in the door pockets as a guide for drilling the holes through the reinforcing piece for the screw that holds the door pocket to the door handle.
- Install both door pockets onto the doors.
Detailed instructions for installing a set of 964 or 993 door pocket attachment reinforcements
Installation posts from members
--------------------------------------------------------------------------------------------------
original post below
--------------------------------------------------------------------------------------------------
Not a fix for everyone, but this worked for me.
I cut 1/4" ABS (NOTE: currently produced from 3/16" ABS sheet) to dimension and cut a shoulder in it to fit the zig in the ABS of the door pocket where it is screwed in behind to the rear of the door handle.
Here is a couple of pics. Dimensions, etc. tomorrow evening hopefully.
Motivation for the fix....
Last edited by BesideTheBox; 10-22-2021 at 11:09 AM. Reason: Price adjustment


 01-21-2014, 03:53 AM
#3
Rennlist Member
Nice Job.
The following users liked this post:
VTPorsche993 (06-27-2022)

Trending Topics
01-21-2014, 12:11 PM
#8

I did something similar with 1/8 aluminum stock and hand bent the zig in and glued to the existing. I covered the aluminum with black felt so you can even see it or know its there. I like aluminum since it's stronger and doesn't look any different than orig since it's so narrow.
 01-21-2014, 11:02 PM
#11
Rennlist Member
Thread Starter
The 1/4" ABS sheet came from a vendor on Amazon. A 12" x 12" piece was about $10 and I got free shipping on it.
The plastic is smooth on one side and textured on the other side.
Dimensions are 2 13/16" long by 1 3/8" tall.
A 15/16" long shoulder was cut to a depth of 1/16", leaving approximately 3/16" of material.
The shoulder was cut into the textured side of the sheet and is cut to accommodate the zig in the door pocket plastic.
Working with ABS can be tricky in that you can't move too slow. If you do, the material heats up, starts melting, and proceeds to make a mess.
I used plumbers ABS cement to glue the reinforcement to the door pocket. Both materials to be joined are ABS,
so I think the glue should hold long term. I carefully applied glue on the textured side of the reinforcement and on the door pocket.
I clamped the two pieces together for an hour.
Ah yes, drilling the new hole... If you have a right angle drill with a short bit, this would be easier than drilling with a full size drill.
You can just use the original hole as a guide for drilling through the new ABS.
-- OR --
Next time (if there is a next time), I would fill the existing hole on the door that the screw is turned into.
Then I would mark the center of the spot that the screw is turned into, and test fit the door pocket.
Get the door pocket where you want it and transfer the center line from the spot back to the door pocket so you have a good idea
where to drill the new hole through the plastic. Pull the pocket back off the door and drill the hole.
Then you can set the depth of the door pocket -exactly- where you want it to provide optimal door pocket lid support.
You may want to find a screw that is 1/4" longer than the original one. I'm using the original screw and it seems to be fine.
01-21-2014, 11:22 PM
#12
Rennlist Member
I used plumbers ABS cement to glue the reinforcement to the door pocket. Both materials to be joined are ABS,
so I think the glue should hold long term. I carefully applied glue on the textured side of the reinforcement and on the door pocket.
I clamped the two pieces together for an hour.
so I think the glue should hold long term. I carefully applied glue on the textured side of the reinforcement and on the door pocket.
I clamped the two pieces together for an hour.
Thx for sharing!
01-21-2014, 11:24 PM
#13
Rennlist Member
Amazing, a whole new slippery slope of interior mods. I found the cracked seat hinge parts but must admit to not looking too closely in the door pockets.
I think Ferry would be proud, this is form following function. Nice job!
I think Ferry would be proud, this is form following function. Nice job!
05-24-2015, 11:18 AM
#15

Just another take on this issue...I used a small piece of 18 gauge steel (little piece of roof flashing) and epoxied it over the original cracked web. The one issue all of these reinforcement strategies don't seem to have is a covering of cracks from as seen from the top. I bent a 90 degree lip in the top of the steel to cover the edge of the cracked web. Afterward, I painted it and I doubt anybody would even notice the repair. After taking the pockets off the doors I found other cracks in the pocket. Everywhere I found them I reinforced in the same manner. Cheers