Recaro Sport Seat Installation – Instructions Update
 08-19-2007, 06:34 PM
#1
Rennlist Member
Thread Starter
After quite a frustrating and harrowing time, I did finally get my seats installed. However, I decided to post this update to complement information already available in previous posts and at p-car.com. I’m hoping that this will save some of you some of the frustration I experienced.
First off, the guys at FVD (especially Jeff), were extremely helpful throughout the process. This installation is not for the faint of heart. Take your time, gather all the tools and parts, and read previous posts and instructions at p-car.com prior to starting.
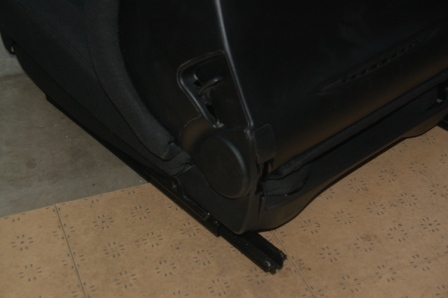
I started out with Recaro Sport Sportline seats in Black nardo (cloth). I debated for a while about fixed back seats and the potential need in the future for a 5- or 6-point harness, but in truth, 99% of my driving is on the street, and comfort was paramount. I wanted a supportive, comfortable seat and perhaps a little bit more headroom. I initially planned on bolting the seats and sliders directly to the floor of the car, and then add the Brey Krause seat belt anchor. However, I eventually decided to fork over the bucks (just north of $200 per seat) for the Recaro 993 application-specific bracket kit. This included rails that are mounted to the floor, sliders, and a spacer bar that goes between the seat and the rails.

The tunnel side spacer contains the threaded hole for attaching the stock seat belt receiver.

1. Removing the stock seats: As amply described elsewhere, be extremely careful removing the bolts. Move the seat all the way forward and up and remove the aft bolts with 7 mm hex rachet (do not use a regular allen wrench or you will likely strip the bolt). Slide the seat back and remove the front bolts. Before detaching the electrical connections, return the seat position back to midway (apparently, the old seats can seize or lock if left in full up or back position for prolonged periods in storage). Pull the fuses for the power seats, tilt the seat back and detach the electrical connections (two on the driver side, one on the passenger side) and clip all tie-wraps. Pull out the stock seat (easy for me as I had the cab top down… not sure how hard this step is in the coupes). Remember to cover the carpet with a rag or towel as it is easy to get grease all over, and be careful around your precious paint and trim pieces.

2. Prepping the Recaro Seats for installation: Here’s where things can get dicey. Initially, the kit from Recaro did not contain the right bolts (common complaint apparently). The bolts were not long enough to fit through the slider and spacer. Unfortunately, I found out only after stripping the threads on the aft holes on the metal seat base frame. This is a welded connection (not a removable nut) and thus I thought I had ruined the seats!

Fortunately, I found a parts catalogue on the internet and the guys at FVD were able to track down a part from Recaro (Recaro typically will not sell parts directly to wholesalers… they typically will only sell to repair centers). Somehow, Jeff was able to get them to send the seat base frame ($80 part). Two weeks later, I had to disassemble the entire seat base and replace the whole metal seat base assembly. Let me tell you… you do not want to have to do this. (could warrant another thread if someone else ends up needing to do this in the future. The process was somewhat educational, as I now feel pretty comfortable dismantling the entire seat, should I choose to reupholster in the future. For the record, the appropriate bolt size is 8mm x 30 mm socket cap with 1.25 thread pitch (available at Lowe’s or Home Depot).
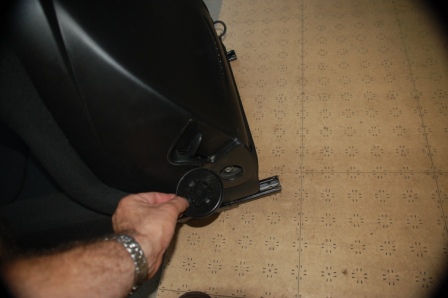
The next agonizing step for me came after realizing the Recaro bracket does not align with the bolt holes in the seat, as the seat’s plastic side trim piece interferes with the back of the back of the threaded seat belt anchor. You need to remove a section of the plastic to allow the anchor to align correctly. Score the plastic trim piece or use a marker and use nippers (followed by smoothening with Dremel) to remove about a quarter-sized inset. (see picture).

Next step is to remove the recliner adjustment ***** from the tunnel-sides of the seats. I tried; they will definitely not fit in the car. Remove the cover, use a dremel cut-off wheel, and remove as much of the drive rod as possible. Make sure you get the plastic cover to go over the whole (I did not see that mentioned in other posts). See picture for details.

Once you have the sliders attached to the seat, remove the stock seat belt receiver from the original seat (use 17 mm socket), and attach to the receiver on the Recaro Seat.
3. Installing the Seats: Again, frustrations regarding this step are well-documented on this forum. Everything lined up perfectly on my work bench, but when I go in the car, all bets were off. First step is to attach the Recaro Floor mounts to the car. Now, fold up the seat, prop against rear seat and attach the driver’s side seatbelt electrical connection, tie wrap, and place the seat on the floor mounts. Trying to get the bolt holes to align is almost impossible… the seats are a tight fit, so place a towel over the seat belt receiver to keep it from damaging the center console as it slides and pushes during the installation. I tried a number of approaches, but the sequence that appears to work best is to start with the front tunnel side bolt. Be careful not to strip the bolts… each bolt requires a lot of maneuvering, pressure and patience. Then proceed to the front outside bolt. I actually used a 2x4 propped up against my shoulder (I was alone) to push the slider into place, flashlight in my mouth, both hands cramping up in the tight crevice, and… ahhhh got it. Slide the seats forward and go to work on the aft bolts. Start with the tunnel side bolt (again use a 2x4 or get some help from wifey to manhandle the slider over the hole). A standard allen wrench will not work. You’ll either need to hack off the end or use a special tool (see picture of wrench from my bicycle repair tools).

These back bolts are extremely hard to tighten down. You’ll be sore, sweaty, dirty and exhausted by the time you get them in place.
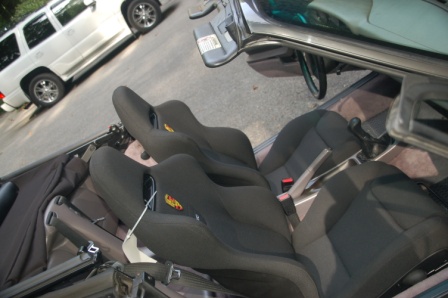
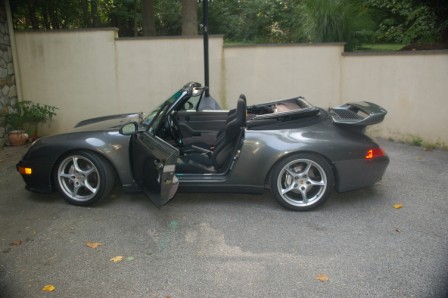
4. Final touches and pictures: Drive around the block and enjoy the ride. These seats are incredibly supportive and yet comfortable. The inflatable lumbar support, adjustable thigh bolster, and side supports were perfect for my frame (5’10 and 185 lbs). There just about as comfortable as the seats in my M5 (and I thought I’d never say that). After some spirited driving, go back and tighten the bolts again (they definitely “seated” a bit after the first ride).
5. Final Verdict: I’m definitely pleased (albeit tired, and weary of ever having to do that again). I was concerned about the black seats with the grey interior, but with the black cloth on the cab, black steering wheel, and black shifter, things look pretty sweet.
6. Regrets: I’m extremely pleased…. But of course, after all this effort, I’m wondering if it would have been worth it to go with leather. I could have upgraded to the new Sportster CS seats for about $2000 extra. I guess, I could also save $1000 and get the seats reupholstered in classic grey at some point. After the install, I also realized it would have been a good time to upgrade the ECU. I sure don’t want to pull those seats out again any time soon.


Last touch was the Porsche badges. I saw this on a previous post with the SRD seat. Bought Porsche patches on eBay and ironed on some Velcro; it sticks to the seat material beautifully.

First off, the guys at FVD (especially Jeff), were extremely helpful throughout the process. This installation is not for the faint of heart. Take your time, gather all the tools and parts, and read previous posts and instructions at p-car.com prior to starting.
I started out with Recaro Sport Sportline seats in Black nardo (cloth). I debated for a while about fixed back seats and the potential need in the future for a 5- or 6-point harness, but in truth, 99% of my driving is on the street, and comfort was paramount. I wanted a supportive, comfortable seat and perhaps a little bit more headroom. I initially planned on bolting the seats and sliders directly to the floor of the car, and then add the Brey Krause seat belt anchor. However, I eventually decided to fork over the bucks (just north of $200 per seat) for the Recaro 993 application-specific bracket kit. This included rails that are mounted to the floor, sliders, and a spacer bar that goes between the seat and the rails.
The tunnel side spacer contains the threaded hole for attaching the stock seat belt receiver.
1. Removing the stock seats: As amply described elsewhere, be extremely careful removing the bolts. Move the seat all the way forward and up and remove the aft bolts with 7 mm hex rachet (do not use a regular allen wrench or you will likely strip the bolt). Slide the seat back and remove the front bolts. Before detaching the electrical connections, return the seat position back to midway (apparently, the old seats can seize or lock if left in full up or back position for prolonged periods in storage). Pull the fuses for the power seats, tilt the seat back and detach the electrical connections (two on the driver side, one on the passenger side) and clip all tie-wraps. Pull out the stock seat (easy for me as I had the cab top down… not sure how hard this step is in the coupes). Remember to cover the carpet with a rag or towel as it is easy to get grease all over, and be careful around your precious paint and trim pieces.
2. Prepping the Recaro Seats for installation: Here’s where things can get dicey. Initially, the kit from Recaro did not contain the right bolts (common complaint apparently). The bolts were not long enough to fit through the slider and spacer. Unfortunately, I found out only after stripping the threads on the aft holes on the metal seat base frame. This is a welded connection (not a removable nut) and thus I thought I had ruined the seats!
Fortunately, I found a parts catalogue on the internet and the guys at FVD were able to track down a part from Recaro (Recaro typically will not sell parts directly to wholesalers… they typically will only sell to repair centers). Somehow, Jeff was able to get them to send the seat base frame ($80 part). Two weeks later, I had to disassemble the entire seat base and replace the whole metal seat base assembly. Let me tell you… you do not want to have to do this. (could warrant another thread if someone else ends up needing to do this in the future. The process was somewhat educational, as I now feel pretty comfortable dismantling the entire seat, should I choose to reupholster in the future. For the record, the appropriate bolt size is 8mm x 30 mm socket cap with 1.25 thread pitch (available at Lowe’s or Home Depot).
The next agonizing step for me came after realizing the Recaro bracket does not align with the bolt holes in the seat, as the seat’s plastic side trim piece interferes with the back of the back of the threaded seat belt anchor. You need to remove a section of the plastic to allow the anchor to align correctly. Score the plastic trim piece or use a marker and use nippers (followed by smoothening with Dremel) to remove about a quarter-sized inset. (see picture).
Next step is to remove the recliner adjustment ***** from the tunnel-sides of the seats. I tried; they will definitely not fit in the car. Remove the cover, use a dremel cut-off wheel, and remove as much of the drive rod as possible. Make sure you get the plastic cover to go over the whole (I did not see that mentioned in other posts). See picture for details.
Once you have the sliders attached to the seat, remove the stock seat belt receiver from the original seat (use 17 mm socket), and attach to the receiver on the Recaro Seat.
3. Installing the Seats: Again, frustrations regarding this step are well-documented on this forum. Everything lined up perfectly on my work bench, but when I go in the car, all bets were off. First step is to attach the Recaro Floor mounts to the car. Now, fold up the seat, prop against rear seat and attach the driver’s side seatbelt electrical connection, tie wrap, and place the seat on the floor mounts. Trying to get the bolt holes to align is almost impossible… the seats are a tight fit, so place a towel over the seat belt receiver to keep it from damaging the center console as it slides and pushes during the installation. I tried a number of approaches, but the sequence that appears to work best is to start with the front tunnel side bolt. Be careful not to strip the bolts… each bolt requires a lot of maneuvering, pressure and patience. Then proceed to the front outside bolt. I actually used a 2x4 propped up against my shoulder (I was alone) to push the slider into place, flashlight in my mouth, both hands cramping up in the tight crevice, and… ahhhh got it. Slide the seats forward and go to work on the aft bolts. Start with the tunnel side bolt (again use a 2x4 or get some help from wifey to manhandle the slider over the hole). A standard allen wrench will not work. You’ll either need to hack off the end or use a special tool (see picture of wrench from my bicycle repair tools).
These back bolts are extremely hard to tighten down. You’ll be sore, sweaty, dirty and exhausted by the time you get them in place.
4. Final touches and pictures: Drive around the block and enjoy the ride. These seats are incredibly supportive and yet comfortable. The inflatable lumbar support, adjustable thigh bolster, and side supports were perfect for my frame (5’10 and 185 lbs). There just about as comfortable as the seats in my M5 (and I thought I’d never say that). After some spirited driving, go back and tighten the bolts again (they definitely “seated” a bit after the first ride).
5. Final Verdict: I’m definitely pleased (albeit tired, and weary of ever having to do that again). I was concerned about the black seats with the grey interior, but with the black cloth on the cab, black steering wheel, and black shifter, things look pretty sweet.
6. Regrets: I’m extremely pleased…. But of course, after all this effort, I’m wondering if it would have been worth it to go with leather. I could have upgraded to the new Sportster CS seats for about $2000 extra. I guess, I could also save $1000 and get the seats reupholstered in classic grey at some point. After the install, I also realized it would have been a good time to upgrade the ECU. I sure don’t want to pull those seats out again any time soon.
Last touch was the Porsche badges. I saw this on a previous post with the SRD seat. Bought Porsche patches on eBay and ironed on some Velcro; it sticks to the seat material beautifully.
Last edited by ninjabones; 08-19-2007 at 08:54 PM.
 08-19-2007, 11:28 PM
#3
Weathergirl
Rennlist Member
Rennlist Member
Two comments: I agree it was really frustrating and took 5x as long as a seat installation should (especially with exhorbitantly priced custom rails/sliders). But mine also fit with the inside adjustment *****. Go figure.
Did you manage to get these to fit anywhere?
Did you manage to get these to fit anywhere?
08-20-2007, 08:50 AM
#4
Rennlist Member
Thread Starter
Yes, they will fit if you use 30 mm bolts. I called the tech at FVD asking the same question, as the included bolts were not long enough to include this piece. From Jeff, apparently, this piece is important for the stability of the seat and also provides some form of counterpressure to assure that the bolts stay tight and do not loosen with the car jostling about. These rods slide (tilt then slide) through the slider mechanism and sit flush against the underside of the slider. Sequence frombottom to top: bolt, support rod, slider, spacer (tunnel side with seat belt anchor), seat.
Question for you... were you able to use all the bolt holes? I was only able to use 5 bolts to secure each set of floor mounts (the 6th hole did not line up or there was no hole in the floor to accept) and only 4 bolts to secure the rails to the mount. I couldn't for the life of me reach the forward pair of aft bolts on the seat rail (even with my shortened allen wrench). I'm going to continue to work on it, but do you have any tips on this, or did you accept that 4 bolts should be secure enough?
08-20-2007, 10:05 AM
#5
Weathergirl
Rennlist Member
Rennlist Member
For the driver's seat, I used the spacer and mounted the seat more or less in the middle using four bolts.
For the passenger seat, I did not use the spacer, and the holes in the sliders didn't match up with the holes in the floor at all. So I used the frontmost holes in the rails (to get the seat as far back as possible) and drilled two more holes in the back to match the holes in the floor. Again, four bolts.
I did use Grade 12.9 bolts I had around rather than the ones that came with the kit. Should be strong enough.
08-20-2007, 01:44 PM
#6
Rennlist Member
Thread Starter
For the driver's seat, I used the spacer and mounted the seat more or less in the middle using four bolts.
For the passenger seat, I did not use the spacer, and the holes in the sliders didn't match up with the holes in the floor at all. So I used the frontmost holes in the rails (to get the seat as far back as possible) and drilled two more holes in the back to match the holes in the floor. Again, four bolts.
I did use Grade 12.9 bolts I had around rather than the ones that came with the kit. Should be strong enough.
For the passenger seat, I did not use the spacer, and the holes in the sliders didn't match up with the holes in the floor at all. So I used the frontmost holes in the rails (to get the seat as far back as possible) and drilled two more holes in the back to match the holes in the floor. Again, four bolts.
I did use Grade 12.9 bolts I had around rather than the ones that came with the kit. Should be strong enough.
As an afterthought, I wonder if it would have been possible to bolt the sliders onto the floor mounts first (thus allowing all 6 bolts to be secured), then work in reverse by putting the seat in and bolting the spacer and seat in from the bottom while the seats are on the car. You would be working blind though, as there would be no way to see the hole lined up.
08-21-2007, 05:06 AM
#7
Ninja, nice write up. Do you have a part number for those 993 specific sliders? I fabbed my own by welding on a Porsche seat belt tab onto some generic Porsche/Recaro sliders, you know the $100 set. But the ones you have look much more stout, especially how that seat belt tab is attached. As far as the spacer bar, is in necessary to use that or is it just included to gain extra height if needed. In other words, can you mount the rails to the seat without using that spacer?
Trending Topics
08-21-2007, 10:20 AM
#8
Rennlist Member
Nice write up but why do you say the Sportster CS's would cost you $2000 more. Mine cost me only $3228.00 from FVD. Or did it have to do with the color?
If it was the color the black does not match the black interior of the 964's anyhow and I had to dye my new seats black as it was. You could have easily purchased the black seats and dyed them to match. Simple process and will last as long as the factory dye.
I also found the 993 seat rails make you sit high in these cars so if you are over 6" tall you will need to use sparco sliders or a Brey Krause seat belt anchor to lower the seat a little.
Here is a picture of my Sportster CS's after I dyed them. They were originally a more silver black than the deep gloss black of the 964. You could dye them any color and it would look great and last.
08-21-2007, 10:28 AM
#9
Weathergirl
Rennlist Member
Rennlist Member
The countersunk screws would make that impossible.
As an afterthought, I wonder if it would have been possible to bolt the sliders onto the floor mounts first (thus allowing all 6 bolts to be secured), then work in reverse by putting the seat in and bolting the spacer and seat in from the bottom while the seats are on the car. You would be working blind though, as there would be no way to see the hole lined up.
08-21-2007, 10:30 AM
#10
Weathergirl
Rennlist Member
Rennlist Member
If I has it to do over, I would buy a set of normal Porsche sliders from Ebay and do the rest myself. No way is a seatbelt mount worth $200.
Ninja, nice write up. Do you have a part number for those 993 specific sliders? I fabbed my own by welding on a Porsche seat belt tab onto some generic Porsche/Recaro sliders, you know the $100 set. But the ones you have look much more stout, especially how that seat belt tab is attached. As far as the spacer bar, is in necessary to use that or is it just included to gain extra height if needed. In other words, can you mount the rails to the seat without using that spacer?
08-21-2007, 11:43 AM
#11
Rennlist Member
Thread Starter
Nice write up but why do you say the Sportster CS's would cost you $2000 more. Mine cost me only $3228.00 from FVD. Or did it have to do with the color?
If it was the color the black does not match the black interior of the 964's anyhow and I had to dye my new seats black as it was. You could have easily purchased the black seats and dyed them to match. Simple process and will last as long as the factory dye.
I also found the 993 seat rails make you sit high in these cars so if you are over 6" tall you will need to use sparco sliders or a Brey Krause seat belt anchor to lower the seat a little.
Here is a picture of my Sportster CS's after I dyed them. They were originally a more silver black than the deep gloss black of the 964. You could dye them any color and it would look great and last.
If it was the color the black does not match the black interior of the 964's anyhow and I had to dye my new seats black as it was. You could have easily purchased the black seats and dyed them to match. Simple process and will last as long as the factory dye.
I also found the 993 seat rails make you sit high in these cars so if you are over 6" tall you will need to use sparco sliders or a Brey Krause seat belt anchor to lower the seat a little.
Here is a picture of my Sportster CS's after I dyed them. They were originally a more silver black than the deep gloss black of the 964. You could dye them any color and it would look great and last.
I initially thought I would sell the seats on Ebay and use the money toward the Sportster seats. I ended up getting a final bid of $1500 on ebay for the seats, but the purchaser was in Atlanta and we couldn't work out the shipping ( i had stipulated in the sale that they were for local pickup only). I also debated again whether it was wroth another $2500 (on top of the $1500 from the ebay sale) to get the Sportster CS in black leather, vs just enjoying these seats for a while and maybe upgrading later. I thought I'd use the $2,500 on other more worthwhile mods for me that are more pressing (likely will need new clutch soon and will probably go with a LWF at the same time). Want to upgrade the stereo, and recently had more than $2,000 in repairs to the cabriolet top (new transmissions, cables and motor). I figured I could always recover the seats in the future, hopefully in classic grey.
08-21-2007, 12:04 PM
#12
Rennlist Member
Thread Starter
Ninja, nice write up. Do you have a part number for those 993 specific sliders? I fabbed my own by welding on a Porsche seat belt tab onto some generic Porsche/Recaro sliders, you know the $100 set. But the ones you have look much more stout, especially how that seat belt tab is attached. As far as the spacer bar, is in necessary to use that or is it just included to gain extra height if needed. In other words, can you mount the rails to the seat without using that spacer?
1. Passenger side - 869 426
2. Driver Side - 869 416
They were $205/ea.
Unfortunately, the spacer/anchor are one-in-the-same. It measures just about 1 cm in height. I think, however, that the floor mounts are not neccessary. You could easily mount the slider directly to the floor by simply drilling two holes to mach up with the holes in the floor (I think one of the other posters on this thread did that). That would save you about 1.5 cm in seat height.
08-21-2007, 01:18 PM
#13
Rennlist Member
Wow, those Sportster CS seats look totally amazing. I just couldn't bite the bullet. The black leather Sportster CS seats are $1699 per seat at FVD, so with sliders and shipping that would be close to $4000. I got my seats essentially for free, as they were thrown in with my car when I purchased last month. The previous owner had purchased them last year and never got around to install them. I saw them in his garage, along with the Das Sport rollbar and worked out a deal where I got both included in the sale price.
I initially thought I would sell the seats on Ebay and use the money toward the Sportster seats. I ended up getting a final bid of $1500 on ebay for the seats, but the purchaser was in Atlanta and we couldn't work out the shipping ( i had stipulated in the sale that they were for local pickup only). I also debated again whether it was wroth another $2500 (on top of the $1500 from the ebay sale) to get the Sportster CS in black leather, vs just enjoying these seats for a while and maybe upgrading later. I thought I'd use the $2,500 on other more worthwhile mods for me that are more pressing (likely will need new clutch soon and will probably go with a LWF at the same time). Want to upgrade the stereo, and recently had more than $2,000 in repairs to the cabriolet top (new transmissions, cables and motor). I figured I could always recover the seats in the future, hopefully in classic grey.
I initially thought I would sell the seats on Ebay and use the money toward the Sportster seats. I ended up getting a final bid of $1500 on ebay for the seats, but the purchaser was in Atlanta and we couldn't work out the shipping ( i had stipulated in the sale that they were for local pickup only). I also debated again whether it was wroth another $2500 (on top of the $1500 from the ebay sale) to get the Sportster CS in black leather, vs just enjoying these seats for a while and maybe upgrading later. I thought I'd use the $2,500 on other more worthwhile mods for me that are more pressing (likely will need new clutch soon and will probably go with a LWF at the same time). Want to upgrade the stereo, and recently had more than $2,000 in repairs to the cabriolet top (new transmissions, cables and motor). I figured I could always recover the seats in the future, hopefully in classic grey.

BTW FVD discounts their pricing 5% from what they list, it helps but your route was a wise move.
