Fog Lights Yellow? - Here's A Way To Make Them Shine
 01-19-2006, 09:57 PM
#1
Rennlist Member
Thread Starter
Join Date: Aug 2005
Location: Huntington Beach, CA
Posts: 1,353
Likes: 0
Received 2 Likes
on
2 Posts
My fog lights had that slightly yellow look and the marker lights didn’t evenly fill the lenses. So, using some Rennlist info from other threads, I set out to restore them as best I could.
This fog light R&R is a follow up to this post by Pedro365:
https://rennlist.com/forums/993-forum/243226-fog-lights-repair-yellow-ish.html
and basically documents what Jeff A 993 and other Rennlisters did in this post:
https://rennlist.com/forums/993-forum/183775-had-any-luck-polishing-your-oxidized-fog-lenses.html
Special thanks go to Kelly Kim for shipping his old damaged fog light to dissect . I used Kelly’s cadaver as a prototype to determine the best way to separate the glass lens from the assembly body before doing this DIY on my own fog lights.
So here's what you'll need:

Single edge razor blade
Small and medium sized flat blade screwdrivers (⅛” to Ľ” )
Dremel tool with fine tooth saw blade (optional)
White or automotive spray primer
Chrome spray paint
GE Silicone II Door and Window Sealant
Painters blue tape
Fog Light Removal
Remove the bumperettes and fog lights from the bumper. Remove the parking light from the fog light assembly.
The lens fits into a U shaped channel and is secured by a strong, gray adhesive. Most of the adhesive is on the bottom of the channel and up the inside wall, so there’s not easy way to get to it directly.
Jeff A 993 had the best method by using a Dremel tool to cut off the outside portion of the U channel/flange. You’ll want to cut off enough to expose the gray adhesive holding the lens in place. It’s very strong stuff, so trying to forcefully pry out the lens will only crack the housing and/or glass lens.
While most of the adhesive is at the bottom, it’s a good idea to run a razor blade around the perimeter between the lens and the plastic. This will cut through any goop the may have squeezed up the sizes.
Not having a Dremel tool, I used the screwdriver method that I tested on the cadaver:
Using a flat blade screw driver, insert the blade into the channel between the lens and plastic. Gently rock the screwdriver up and down along the channel. This will break the edge of the plastic fairly cleanly and expose the gray adhesive. This results in a slightly jagged edge, but will not be seen when reinstalled.
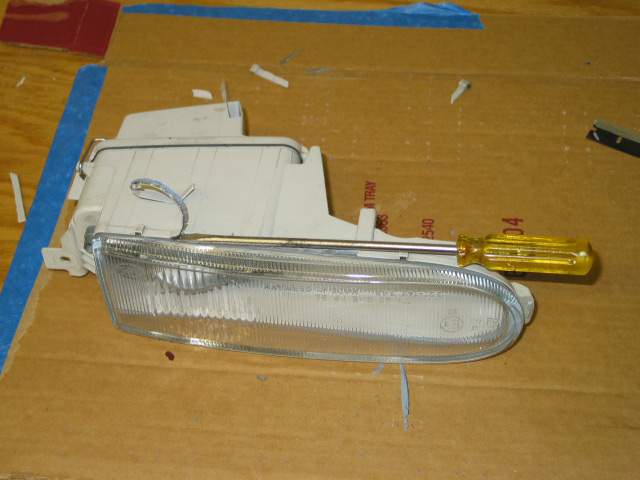
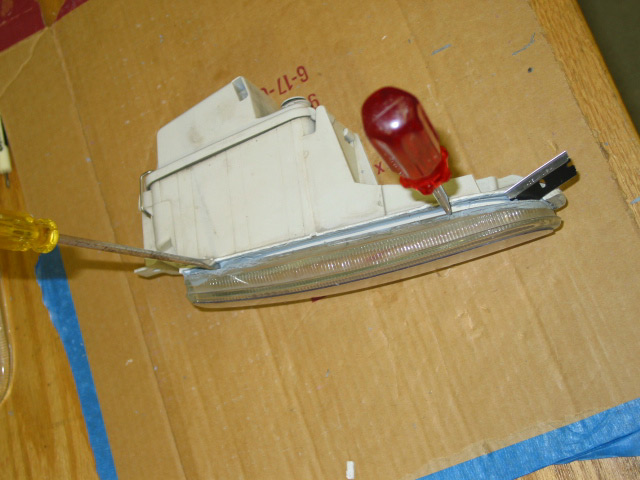
Use the razor blade to cut through the adhesive at the base of the lens. With a pair of flat blade screwdrivers, carefully pry the lens from the plastic base and use the razor blade to cut through the remaining adhesive.
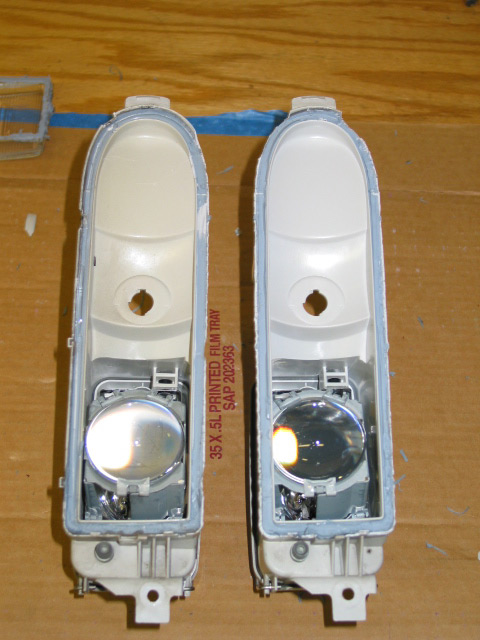
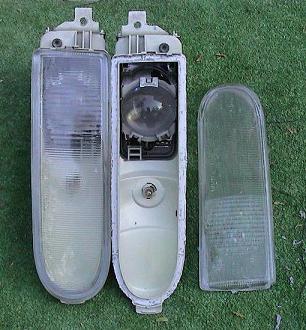
As it turns out, the inside of my housing wasn’t very yellow. Here’s mine on the right compared to the yellowing cadaver on the left:
Use a thin flat screwdriver and a razor blade to clean out the old adhesive from the channel and the lens. You’ll want the base and wall of the channel to be as clean as possible. The 3M adhesive remover is helpful on the glass lense to loosen glue. Once cleaned up, it should look something like this:

Prep and Paint
1. Using a damp cloth, clean the inside of the assembly and allow to dry.
2. Tape off the fog light bulb, around the bulb base, and the U channel where the lens will be resealed.
3. Spray 1-2 light coats of primer and allow to dry.
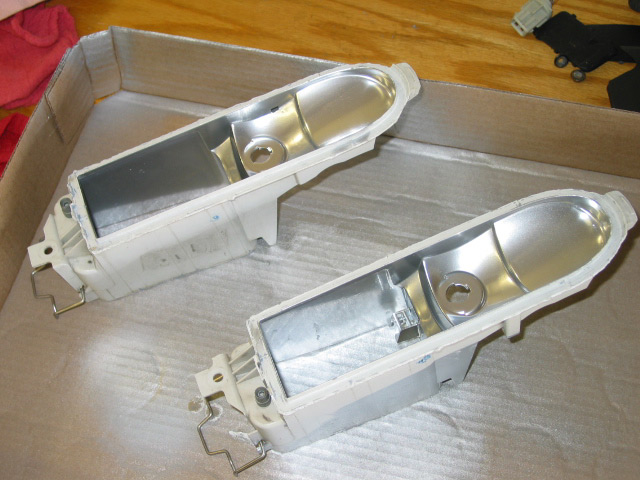
4. Spray 1-3 very light coats of the chrome paint following the instructions on the can. Use caution as this is very thick paint and runs can easily develop.

5. When dry, remove the tape and re-clean the fog light bulb if necessary.
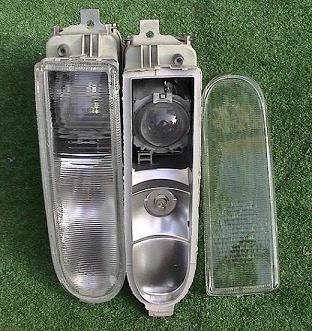
After removing the taped off fog light and test fitting the lens, I realized that you could see some areas that didn’t get painted – and it was obvious because the chrome paint is so bright. So, I decided to remove the fog lamp assemble and repaint the entire housing. I didn't remove it initially because I didn't want to have to realign them.
Lens Resinstallation
Clean the glass lenses with soap and water, then dry completely. For now, I buffed the outside of the lenses with Scratch X, a very mild abrasive. It doesn’t remove chips and pitting, but removes the residue that’s built up.
Using GE Silicone II sealant, run a thick continuous bead along the base of the channel. Be generous here and make the bead as wide as the channel base. Don’t worry about using too much as you want to use enough to be strong and create water tight seal. Carefully press the lens into place. Center the lens along the channel base. Some of the silicone should squeeze out to sides, but just smooth it out with your finger. Secure the lens to the assembly with blue tape and allow to cure for 24 hours.
When cured, wipe the parking light bulb clean and reinstall. Mount the assembly and follow the fog light alignment procedure in the owner’s manual to set the beams. Then, remount in the bumperettes and enjoy!
Here’s the before & after shots. On the before shot, notice how the light doesn’t completely fill the lense. If you have discoloration, you would also see a yellow hue.

After restoration, the light fills the lens better and appears whiter.

I'm not sure the before and after pictures show the real improvement. It was difficult for me to get the true colors with the camera (hey, I'm an amatuer). But in person with the lights on or off, they definitely look a lot better.
Sorry for the long post, but I wanted to be thorough. Overall, total cost was less than $15.00. Timewise, it took a day to prep, paint and cure. Then, one more day to allow sealant to fully set. Lastly, 10 minutes to resinstall.
This fog light R&R is a follow up to this post by Pedro365:
https://rennlist.com/forums/993-forum/243226-fog-lights-repair-yellow-ish.html
and basically documents what Jeff A 993 and other Rennlisters did in this post:
https://rennlist.com/forums/993-forum/183775-had-any-luck-polishing-your-oxidized-fog-lenses.html
Special thanks go to Kelly Kim for shipping his old damaged fog light to dissect
. I used Kelly’s cadaver as a prototype to determine the best way to separate the glass lens from the assembly body before doing this DIY on my own fog lights.So here's what you'll need:
Single edge razor blade
Small and medium sized flat blade screwdrivers (⅛” to Ľ” )
Dremel tool with fine tooth saw blade (optional)
White or automotive spray primer
Chrome spray paint
GE Silicone II Door and Window Sealant
Painters blue tape
Fog Light Removal
Remove the bumperettes and fog lights from the bumper. Remove the parking light from the fog light assembly.
The lens fits into a U shaped channel and is secured by a strong, gray adhesive. Most of the adhesive is on the bottom of the channel and up the inside wall, so there’s not easy way to get to it directly.
Jeff A 993 had the best method by using a Dremel tool to cut off the outside portion of the U channel/flange. You’ll want to cut off enough to expose the gray adhesive holding the lens in place. It’s very strong stuff, so trying to forcefully pry out the lens will only crack the housing and/or glass lens.
While most of the adhesive is at the bottom, it’s a good idea to run a razor blade around the perimeter between the lens and the plastic. This will cut through any goop the may have squeezed up the sizes.
Not having a Dremel tool, I used the screwdriver method that I tested on the cadaver:
Using a flat blade screw driver, insert the blade into the channel between the lens and plastic. Gently rock the screwdriver up and down along the channel. This will break the edge of the plastic fairly cleanly and expose the gray adhesive. This results in a slightly jagged edge, but will not be seen when reinstalled.
Use the razor blade to cut through the adhesive at the base of the lens. With a pair of flat blade screwdrivers, carefully pry the lens from the plastic base and use the razor blade to cut through the remaining adhesive.
As it turns out, the inside of my housing wasn’t very yellow. Here’s mine on the right compared to the yellowing cadaver on the left:
Use a thin flat screwdriver and a razor blade to clean out the old adhesive from the channel and the lens. You’ll want the base and wall of the channel to be as clean as possible. The 3M adhesive remover is helpful on the glass lense to loosen glue. Once cleaned up, it should look something like this:
Prep and Paint
1. Using a damp cloth, clean the inside of the assembly and allow to dry.
2. Tape off the fog light bulb, around the bulb base, and the U channel where the lens will be resealed.
3. Spray 1-2 light coats of primer and allow to dry.
4. Spray 1-3 very light coats of the chrome paint following the instructions on the can. Use caution as this is very thick paint and runs can easily develop.
5. When dry, remove the tape and re-clean the fog light bulb if necessary.
After removing the taped off fog light and test fitting the lens, I realized that you could see some areas that didn’t get painted – and it was obvious because the chrome paint is so bright. So, I decided to remove the fog lamp assemble and repaint the entire housing. I didn't remove it initially because I didn't want to have to realign them.
Lens Resinstallation
Clean the glass lenses with soap and water, then dry completely. For now, I buffed the outside of the lenses with Scratch X, a very mild abrasive. It doesn’t remove chips and pitting, but removes the residue that’s built up.
Using GE Silicone II sealant, run a thick continuous bead along the base of the channel. Be generous here and make the bead as wide as the channel base. Don’t worry about using too much as you want to use enough to be strong and create water tight seal. Carefully press the lens into place. Center the lens along the channel base. Some of the silicone should squeeze out to sides, but just smooth it out with your finger. Secure the lens to the assembly with blue tape and allow to cure for 24 hours.
When cured, wipe the parking light bulb clean and reinstall. Mount the assembly and follow the fog light alignment procedure in the owner’s manual to set the beams. Then, remount in the bumperettes and enjoy!
Here’s the before & after shots. On the before shot, notice how the light doesn’t completely fill the lense. If you have discoloration, you would also see a yellow hue.
After restoration, the light fills the lens better and appears whiter.
I'm not sure the before and after pictures show the real improvement. It was difficult for me to get the true colors with the camera (hey, I'm an amatuer). But in person with the lights on or off, they definitely look a lot better.
Sorry for the long post, but I wanted to be thorough. Overall, total cost was less than $15.00. Timewise, it took a day to prep, paint and cure. Then, one more day to allow sealant to fully set. Lastly, 10 minutes to resinstall.

The following users liked this post:
997 GT2 (12-20-2020)
01-19-2006, 10:19 PM
#2
Addict
Rennlist Member
Rennlist Member

Eric,
Awesome writeup!! Glad to have been able to contribute something to the cause.
I don't know if it would help in this case, but when the Honda guys work to separate the headlight lens from the assembly, they throw the headlight in an oven at 200degrees for about 5-10 minutes to soften the glue that holds the lens in place. Might or might not work depending on what type of adhesive Porsche originally used in the fog lights.
Outcome looks well worth the effort.
01-19-2006, 11:39 PM
#3
Addict
Rennlist Member
Rennlist Member
Join Date: Jul 2003
Location: Agoura Hills (Los Angeles) California
Posts: 5,178
Received 355 Likes
on
210 Posts
Eric....Great write. I did the same mod to mine. Not nearly as a clean job as yours though. I too noticed a big difference. It is particularly noticeable when the lights are off in the daylight.
Last edited by Chuck W.; 03-15-2011 at 07:34 PM.
01-20-2006, 05:07 AM
#5
Technical Guru
Rennlist Member
Rennlist Member
Nice Writeup!
Instead of (or under) using a regular primer try an adhesion promotor specifically made for plastic like Bulldog. Think of it as added insurance.
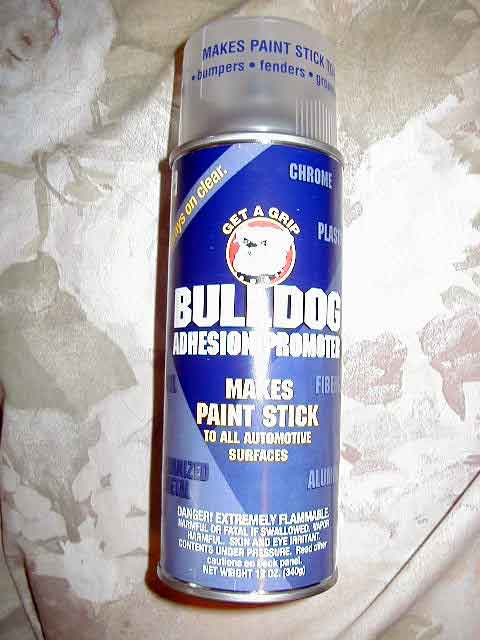
Instead of (or under) using a regular primer try an adhesion promotor specifically made for plastic like Bulldog. Think of it as added insurance.
01-20-2006, 10:03 AM
#6
Addict
Rennlist Member
Rennlist Member
Thank you very much !
01-20-2006, 10:51 AM
#7
Rennlist Member
Thread Starter
Join Date: Aug 2005
Location: Huntington Beach, CA
Posts: 1,353
Likes: 0
Received 2 Likes
on
2 Posts
Thanks Kelly. Your old fog light made it much easier to figure this out - thanks again!. It gave its life for a good cause  I never thought about warming up the glue, but may try just to see how it works. I'm sure my wife won't mind if I slip it in the oven next to her cookies
I still want to figure out a way to fill the stone chips. I was going to try a windsheild repair product on your old lens to see if it's everything it's cracked up to be (pun intended). It's a glass filler so maybe it will do a good job.
Jason - thanks. I had not seen that product before. The auto primer I used listed metal and plastic as accepted surfaces. We'll see how this holds up. If it doesn't, at least it will be much easier to remove the lens the next time around.
I never thought about warming up the glue, but may try just to see how it works. I'm sure my wife won't mind if I slip it in the oven next to her cookies I still want to figure out a way to fill the stone chips. I was going to try a windsheild repair product on your old lens to see if it's everything it's cracked up to be (pun intended). It's a glass filler so maybe it will do a good job.
Jason - thanks. I had not seen that product before. The auto primer I used listed metal and plastic as accepted surfaces. We'll see how this holds up. If it doesn't, at least it will be much easier to remove the lens the next time around.
Trending Topics
01-20-2006, 04:47 PM
#8
Addict
Rennlist Member
Rennlist Member
Originally Posted by epj993
I still want to figure out a way to fill the stone chips. I was going to try a windshield repair product on your old lens to see if it's everything it's cracked up to be (pun intended). It's a glass filler so maybe it will do a good job.
Good luck

 04-30-2006, 06:31 PM
#10
Instructor
Join Date: Apr 2004
Location: SE Michigan
Posts: 130
Likes: 0
Received 0 Likes
on
0 Posts
Hi --
Looks good, thanks for the documentation.
The daytime pics of the fogs out of the car really show the impact.
I have since added silverstar low/high/fog bulbs, and the BMW 10w halogen for the fog marker lights. Finishes off the front of the car quite nicely.
-- Jeff
Looks good, thanks for the documentation.
The daytime pics of the fogs out of the car really show the impact.
I have since added silverstar low/high/fog bulbs, and the BMW 10w halogen for the fog marker lights. Finishes off the front of the car quite nicely.
-- Jeff
 01-27-2009, 04:43 PM
#14
Seared
Rennlist Member
Rennlist Member
Eric,
How has the painted finish held up? Have you noticed any change?
Also, do you have a head-on shot showing the cleaned-up lights mounted on the car?
Andreas
How has the painted finish held up? Have you noticed any change?
Also, do you have a head-on shot showing the cleaned-up lights mounted on the car?
Andreas
01-27-2009, 06:22 PM
#15
Rennlist Member
Thread Starter
Join Date: Aug 2005
Location: Huntington Beach, CA
Posts: 1,353
Likes: 0
Received 2 Likes
on
2 Posts
Andreas,
I think they held up very well. I had them installed for almost two years and no fading or chipping. If prepped and painted properly, they should stay in good shape for a long time.
Here's a couple of shots in bright sun about a year after I did the R&R. Since then, I went with the Euro bumper and TechArts. I gave the same treatment to the TechArts and they look great too. Sorry for the average pics, just my attempt to try and get that shot no one has ever gotten before
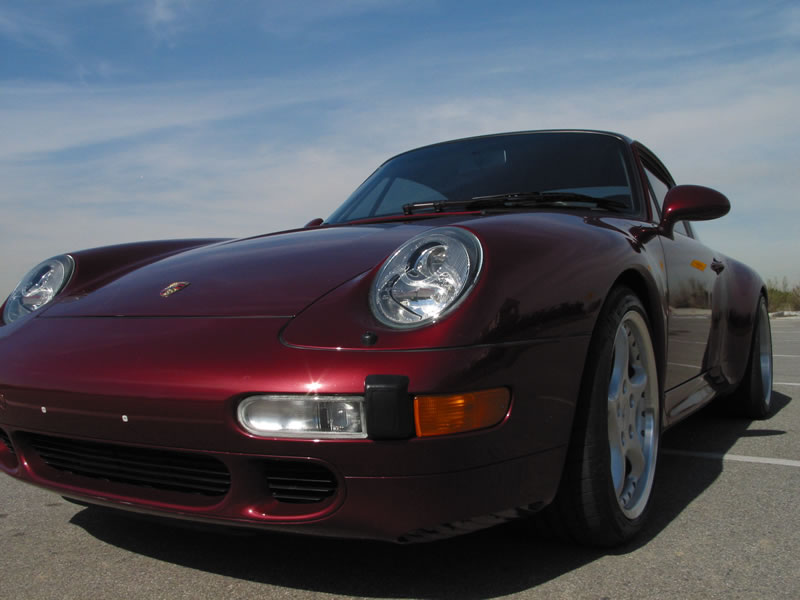
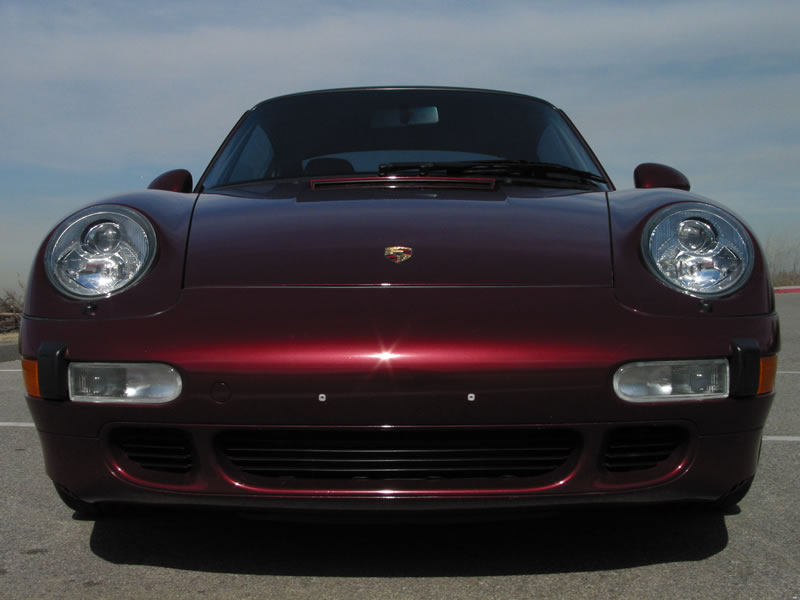

