Coupe Fuel Smelll in the Cabin - My Fix
 11-21-2013, 10:07 AM
#1
Rennlist Member
Thread Starter
When I bought my 968, it had the dreaded fuel smell in the cabin. I troubleshot it at the gas fill line, that was not it. But when I did do my troubleshooting on the fill line, I accidently did not get the fill line back onto the tank neck correctly and when I went to fill the tank, fuel spilled out of the neck, dripped onto the fuel sending unit portion of the tank and I saw small bubbles coming from the gasket/cap area for the sending unit.
This lead me to replace this gasket and it solved my fuel smell in the cabin. Here are the details:
I believe I fixed my fuel smell in the cabin yesterday by changing out the sending unit rubber gasket. It went something like this:
Sometimes those hose clamps are loose, so you might want to check that first.
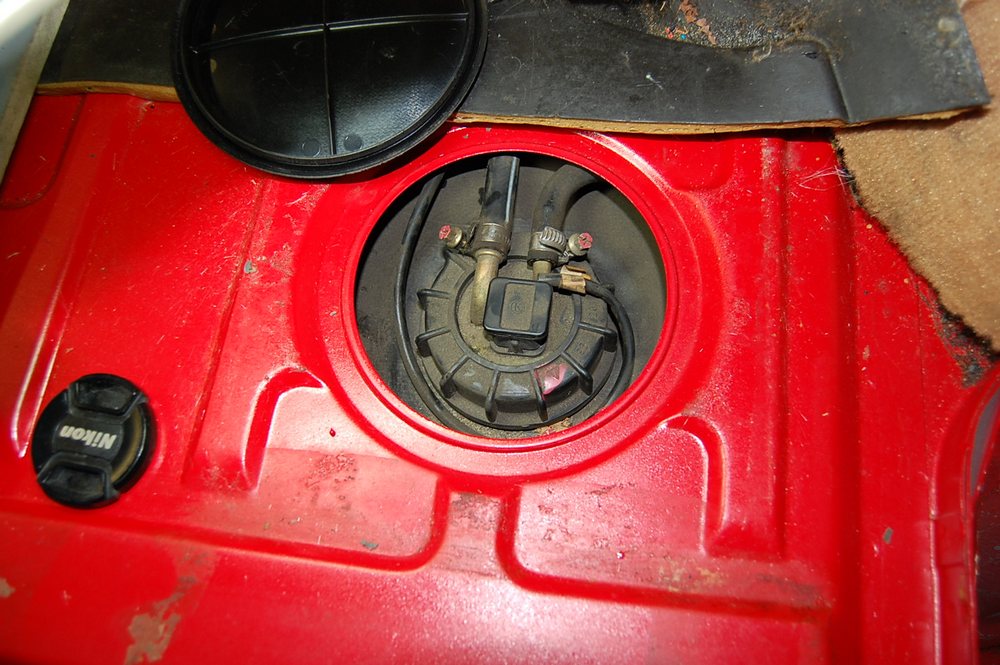
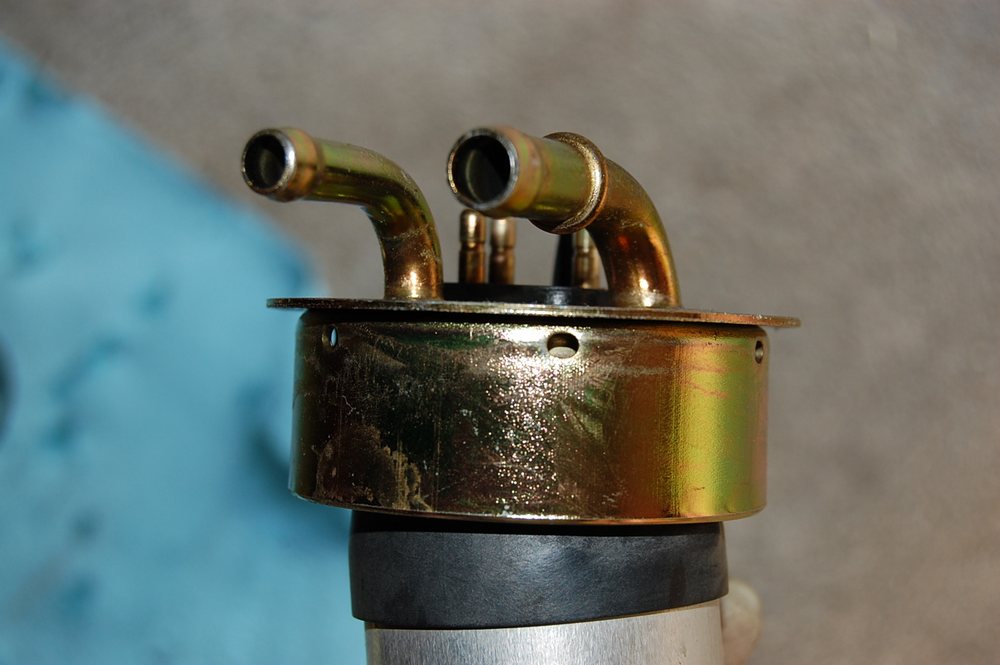
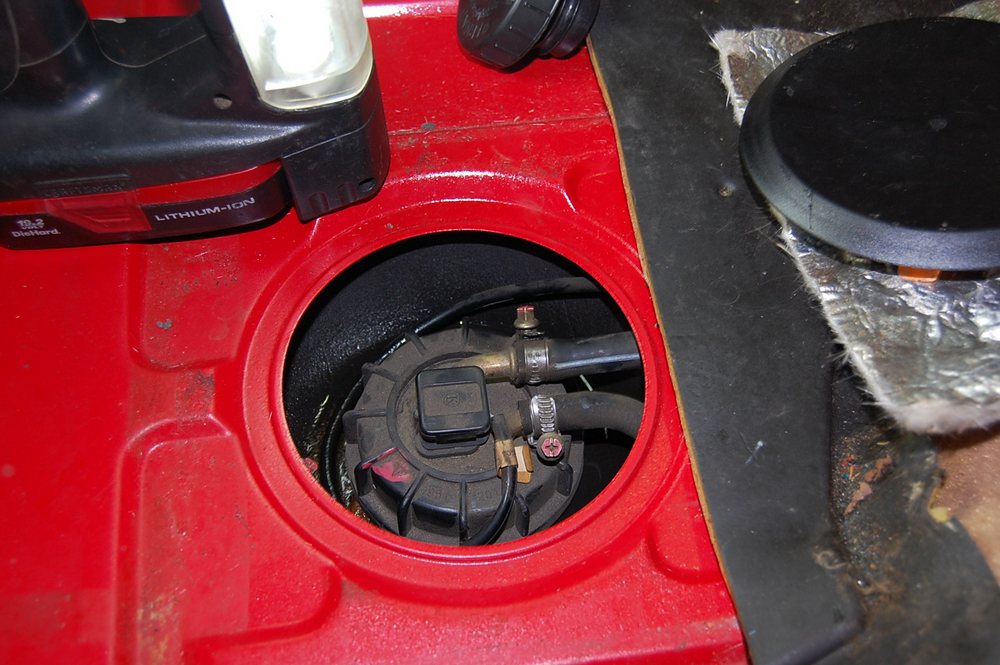
The gasket actually sits on top of the plastic neck and is mounted on underside of the sending unit. There are vent holes for the fuel at the top right at the gasket location.
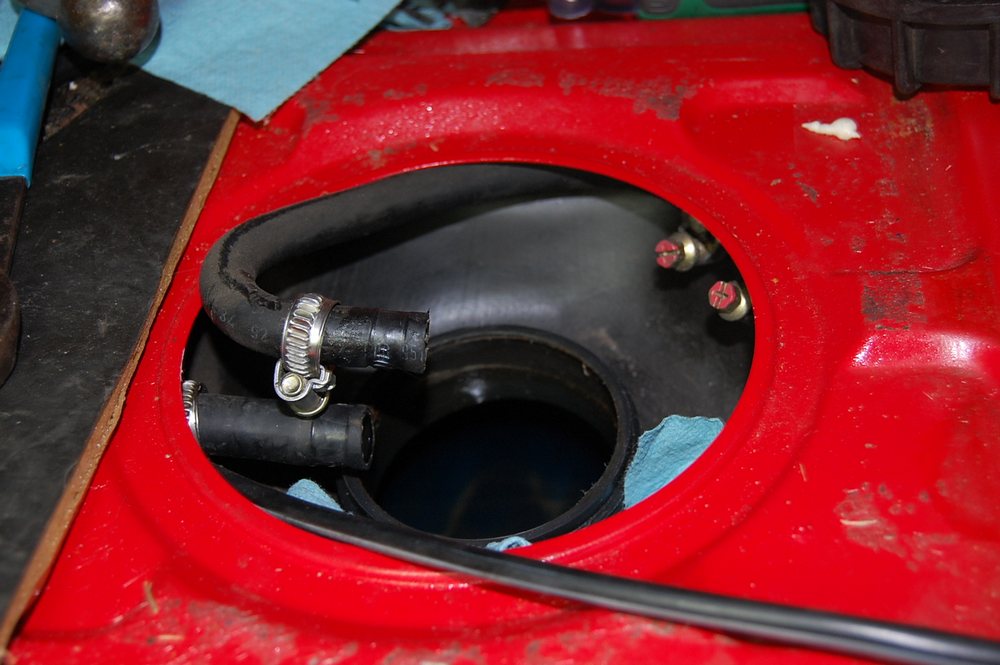
The little hose on the right in the picture above, just loops around to a "T" connection that goes into the tank (see pictures of tank below), and then it goes off to the left hand side of the car. The neck is about 2" high. Forward (from back of car to front of car) in the image below is to the left, where forward in the image above it up.
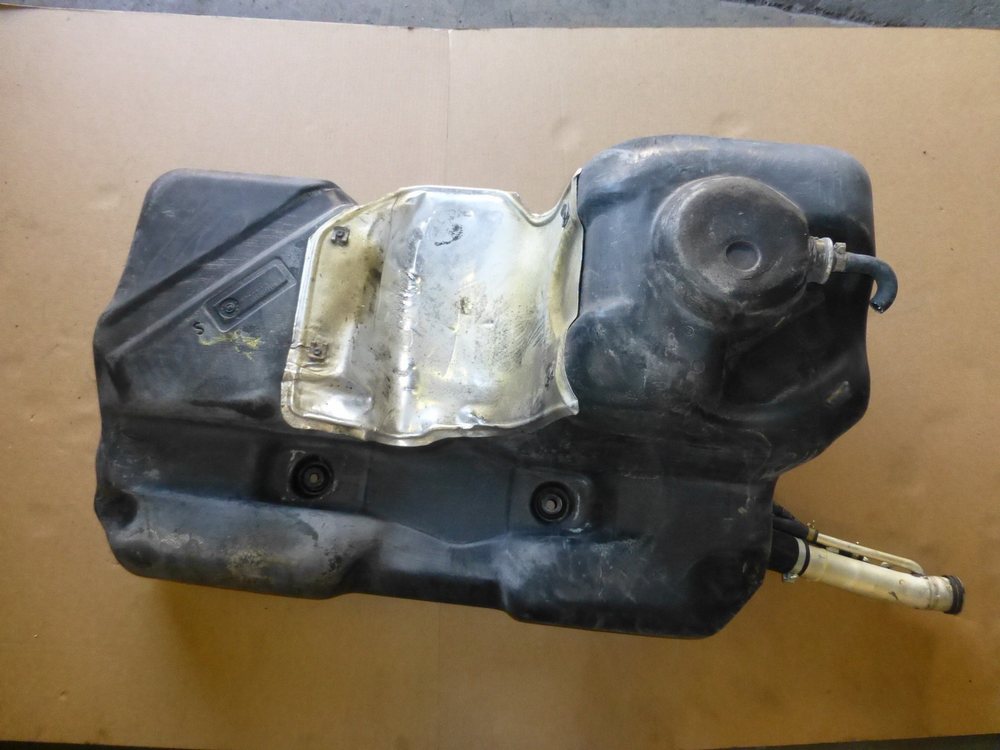
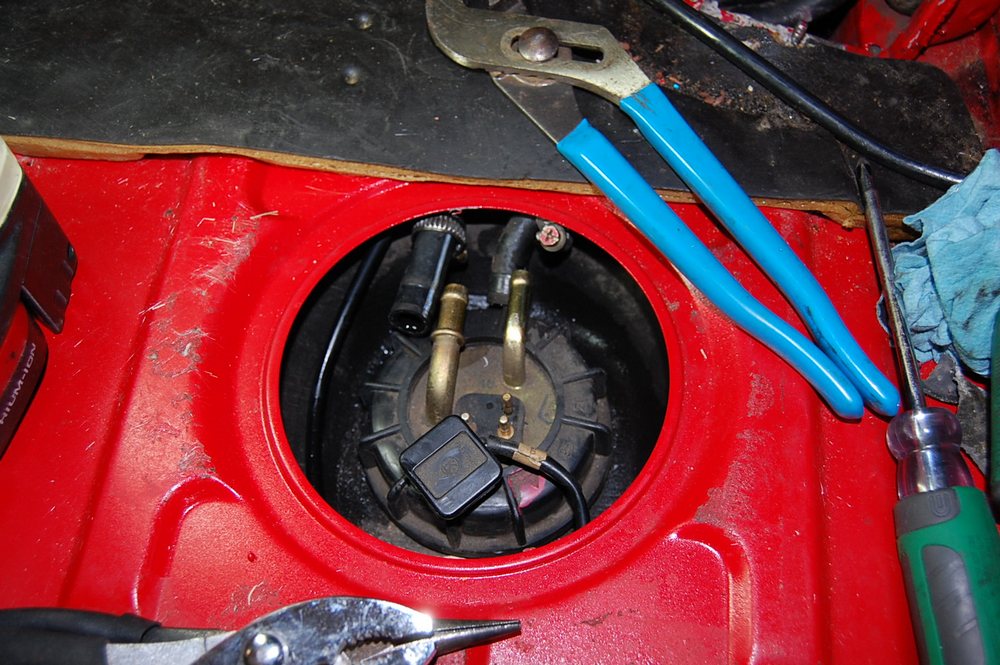
Here are a few tank pictures, you can see where the sending unit is.
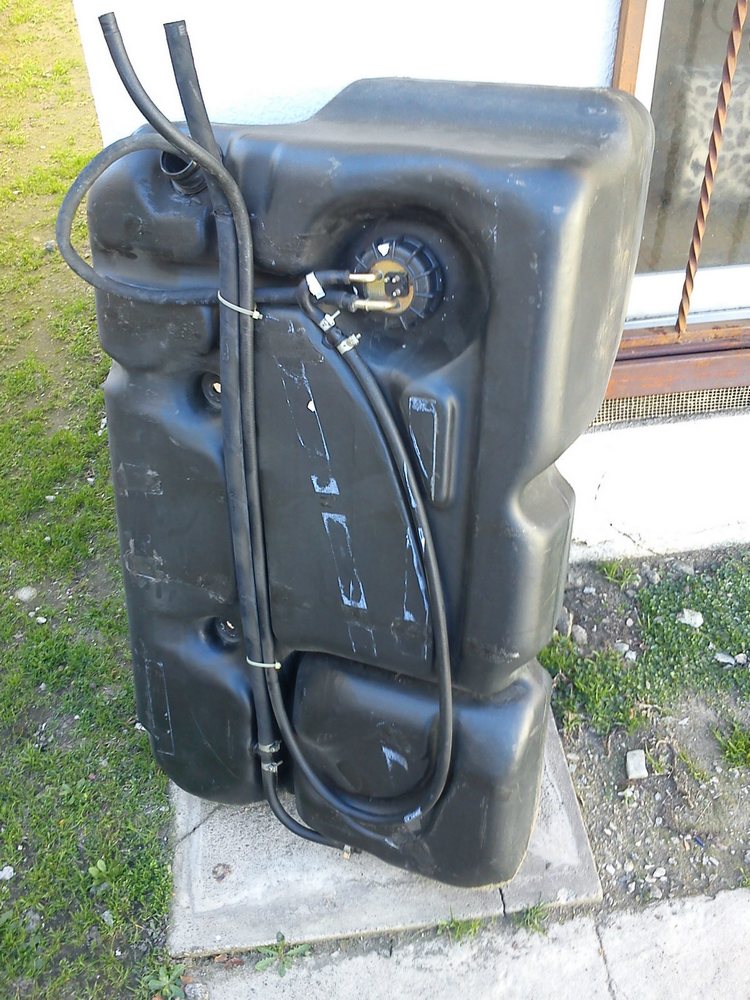
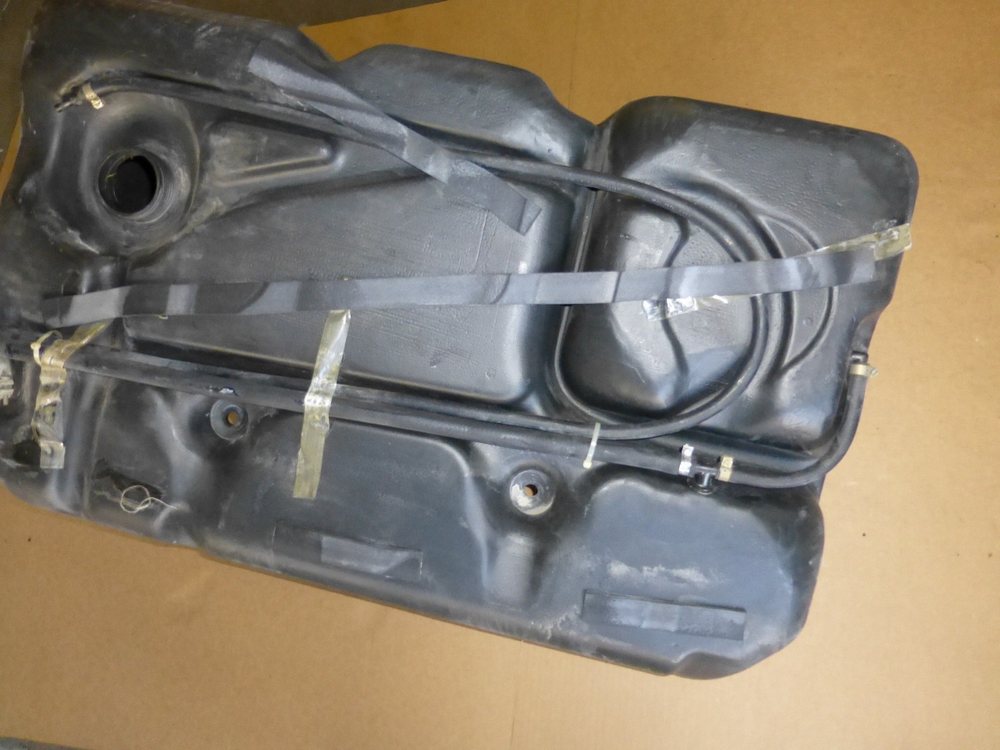
Here is the bottom of the tank, this is the suction for the fuel pump and external fuel filter. There is a suction fuel filter in the tank also for the pump.
You can see the vent holes, there are six? of them going around that the gasket half covers when in place.

New gasket installed, you can see how the holes get partially covered up. Gas is going to splash out of those holes, and if the gasket is compromised or taken a compression set over the years, it's going to vent the tank across it with the gas vapor:

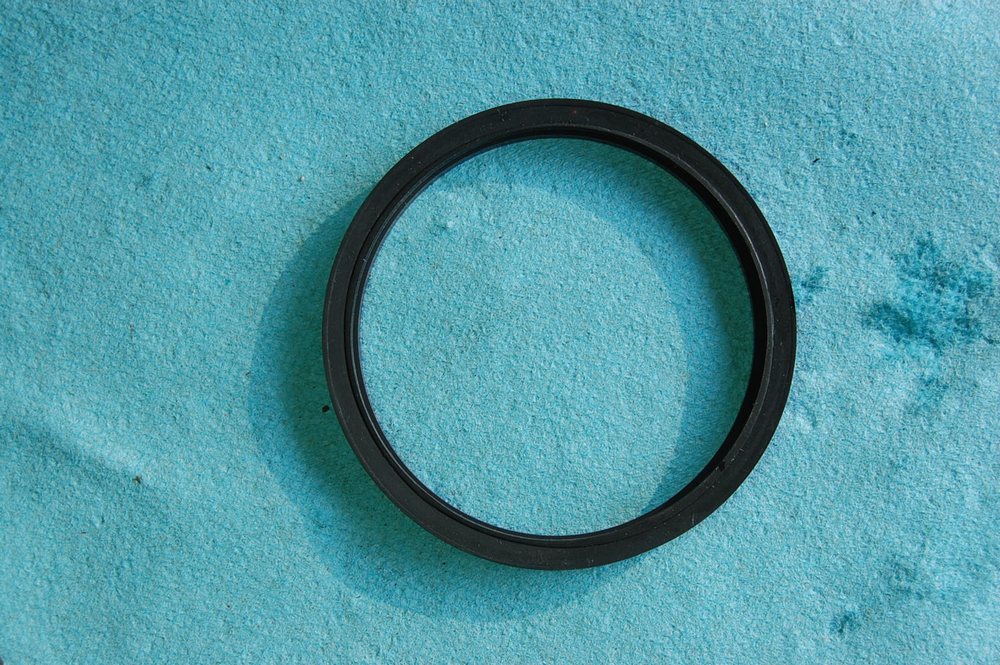
Here is a comparison between the old and new gasket, the new gasket has a smaller inside diameter (ID) and smaller outside diameter (OD), new gasket on the right, old one on the left:
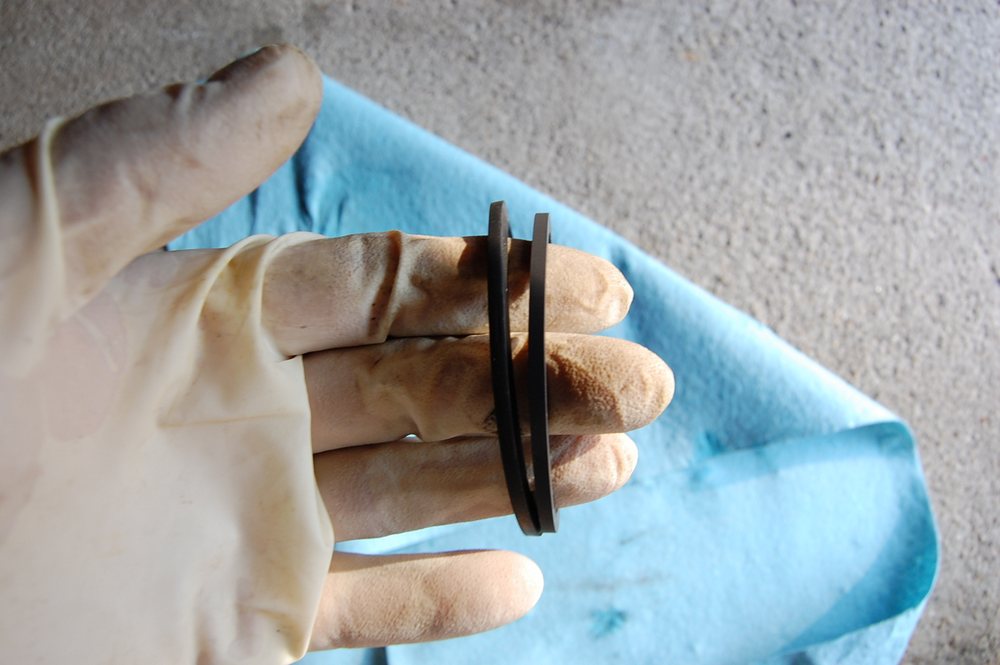
And here the old gasket sitting on top of the new gasket, you can see how the inside diameter is very much different, the old gasket took a compression set over the many years of service:
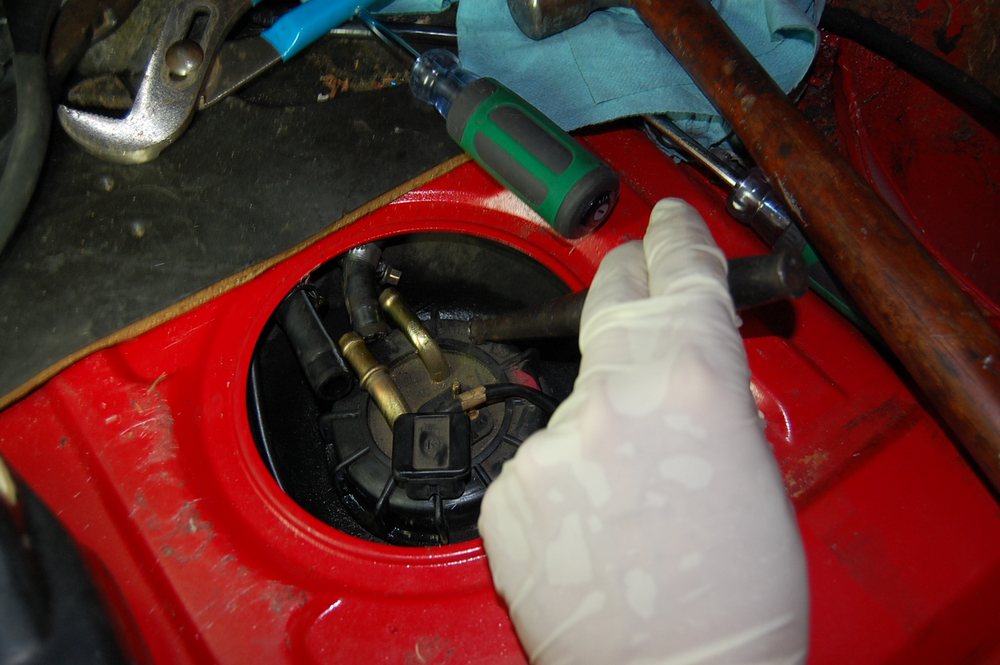
I did not get the cap as tight as it was when I started....here is the starting position of the cap:
I used a blunt chisel and hammer to loosen it, I'm sure there is a tool for this, but I don't have one. If you do this on a cold day, use a hair dryer or something to heat up the plastic so it won't be so brittle:
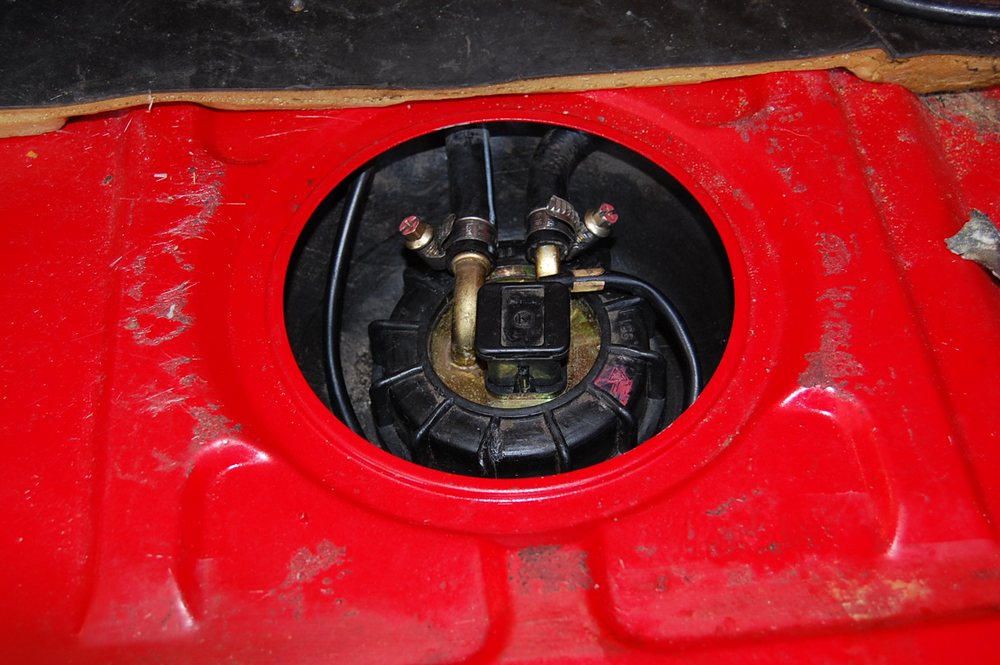
And here is the final position of the cover after I tightened it down, kept wacking it gently (if there is such a thing), I thought I over tightened it myself, but now that I look at the pictures, I see it is less tight.
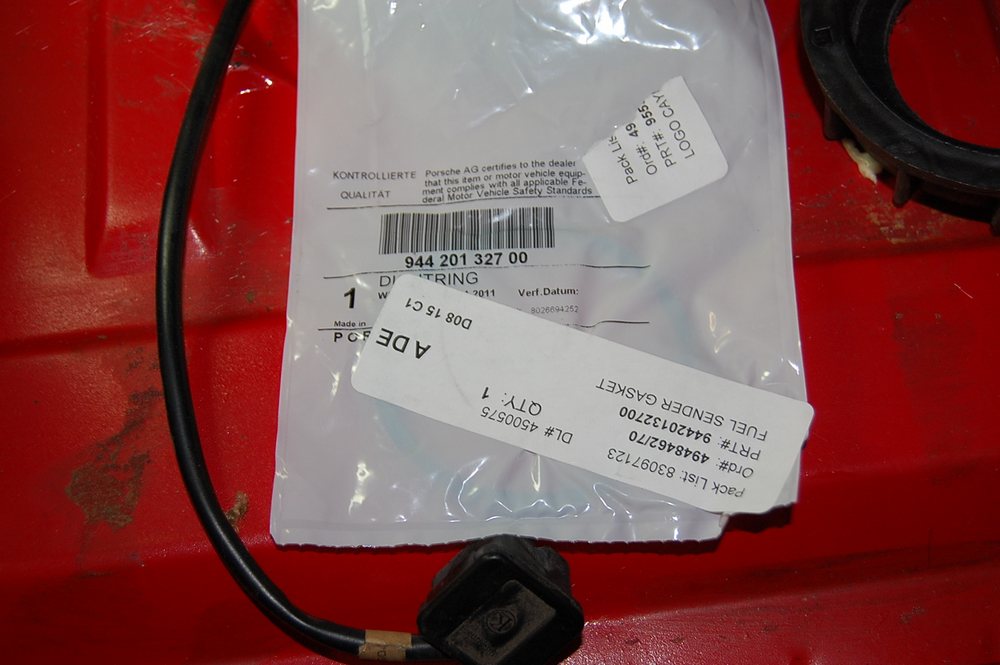
The part number for the gasket is 944 201 327 00 and it's about $10.
Here is a picture of the backside of the cap:

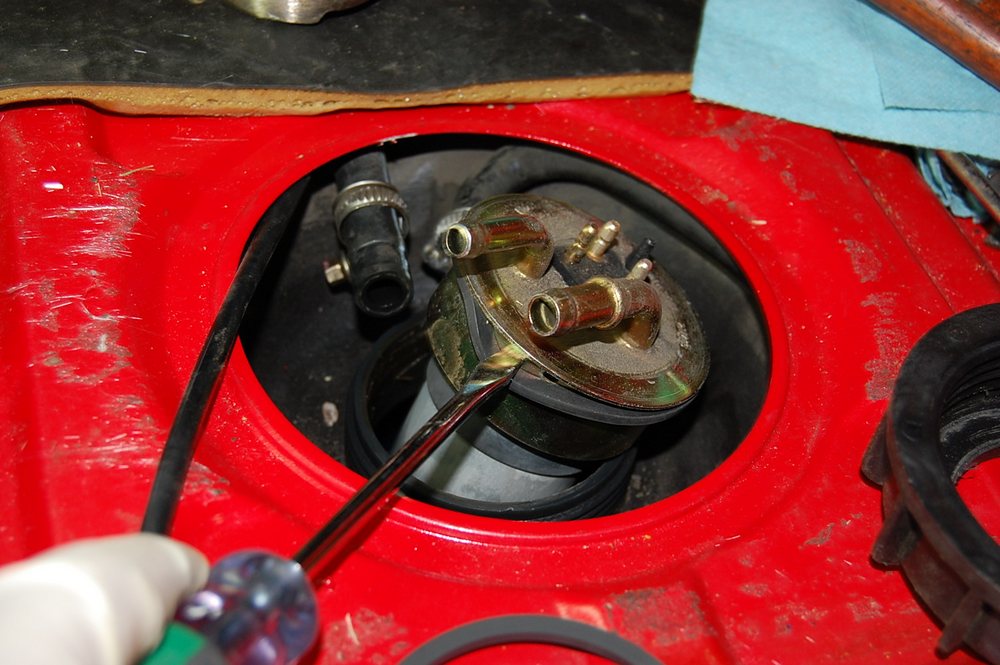
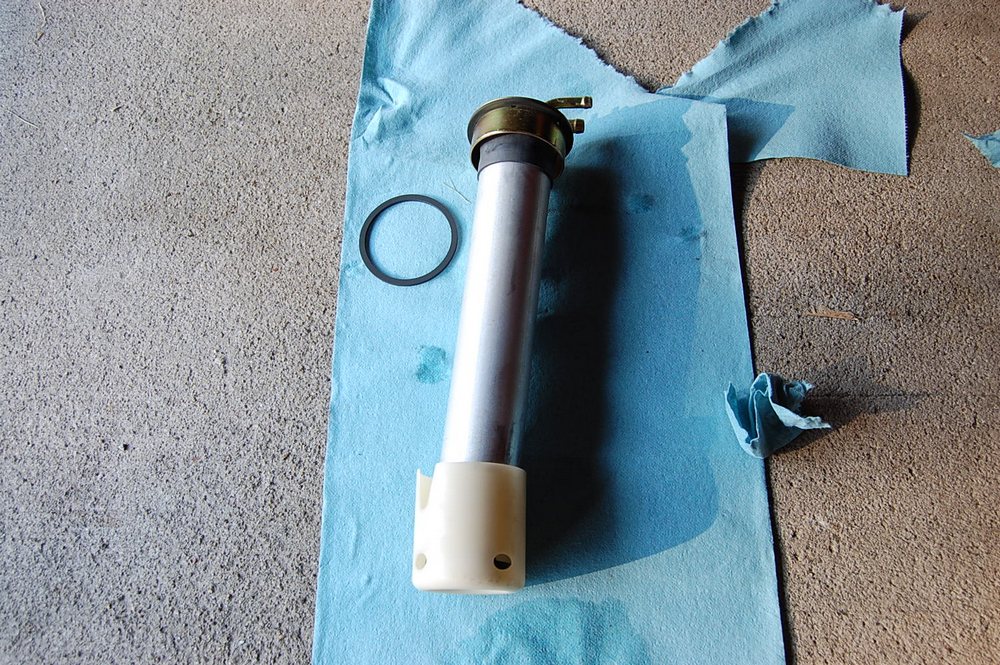
Here is the whole unit, it's skewed, so when you take it out of the tank, it comes up about an inch, then you have to skew it to get it the rest of the way out. It is skewed towards the center of the tank.
And to recap my smell/fix:
Hope this helps others.
Keywords: vapor, gas, 968, 944, tank
This lead me to replace this gasket and it solved my fuel smell in the cabin. Here are the details:
I believe I fixed my fuel smell in the cabin yesterday by changing out the sending unit rubber gasket. It went something like this:
- It was an unseasonably hot day yesterday in Chicago, took the car out the garage and drove it about 20 minutes. No gas fumes initially. The fuel is "cold" and it had been sitting for 4 or 5 days, so no fuel wicked up to the gasket area.
- Parked it in the sun for an hour, came back, TOTAL fuel smell in the car. This is with the cover off on the fuel tank sending unit. Drive it a little bit, you can tell there is more fumes coming in the car.
- Stop at a store, do a "nose" test at the sending unit, can definitely smell it very strong right there, nothing "wet".
- Drive the car around to "splash" the fuel in the tank, the level was about 2" below the neck that holds the sending unit.
- Parked it in the sun for about 20 minutes with the windows up, no smell of fuel at all. Did the smell test at the sending unit, nothing.
- Buttoned everything up and drove it last night. It did get dark, but I would normally smell fuel, just not nearly as strong at night, but NOTHING.
- Left the car in the garage with the windows up, this morning no fuel smell at all.
- Drove it around in cooler weather, no fuel smell.
It has been two months since the repair, and it is gone for good. The old gasket definitely had a compression set, and the hose clamps could of used a little more tightening, but I think this might of proved what I saw at the gas station with the small bubbles coming out around the sending unit plastic cap when filling it....I believe it was venting through this connection.
Sometimes those hose clamps are loose, so you might want to check that first.
The gasket actually sits on top of the plastic neck and is mounted on underside of the sending unit. There are vent holes for the fuel at the top right at the gasket location.
The little hose on the right in the picture above, just loops around to a "T" connection that goes into the tank (see pictures of tank below), and then it goes off to the left hand side of the car. The neck is about 2" high. Forward (from back of car to front of car) in the image below is to the left, where forward in the image above it up.
Here are a few tank pictures, you can see where the sending unit is.
Here is the bottom of the tank, this is the suction for the fuel pump and external fuel filter. There is a suction fuel filter in the tank also for the pump.
You can see the vent holes, there are six? of them going around that the gasket half covers when in place.
New gasket installed, you can see how the holes get partially covered up. Gas is going to splash out of those holes, and if the gasket is compromised or taken a compression set over the years, it's going to vent the tank across it with the gas vapor:
Here is a comparison between the old and new gasket, the new gasket has a smaller inside diameter (ID) and smaller outside diameter (OD), new gasket on the right, old one on the left:
And here the old gasket sitting on top of the new gasket, you can see how the inside diameter is very much different, the old gasket took a compression set over the many years of service:
I did not get the cap as tight as it was when I started....here is the starting position of the cap:
I used a blunt chisel and hammer to loosen it, I'm sure there is a tool for this, but I don't have one. If you do this on a cold day, use a hair dryer or something to heat up the plastic so it won't be so brittle:
And here is the final position of the cover after I tightened it down, kept wacking it gently (if there is such a thing), I thought I over tightened it myself, but now that I look at the pictures, I see it is less tight.
The part number for the gasket is 944 201 327 00 and it's about $10.
Here is a picture of the backside of the cap:
Here is the whole unit, it's skewed, so when you take it out of the tank, it comes up about an inch, then you have to skew it to get it the rest of the way out. It is skewed towards the center of the tank.
And to recap my smell/fix:
- On hot days, I would get the fuel smell in the cabin. Using my nose, I could tell it was coming from the back of the car, near the little vents where the hatch glass is adjacent to the glass. Worse when the tank was full, not so bad when below 1/4 tank. Once the smell came in, it would come in driving down the road. Sniff test from the front vents with the AC on, no fuel smell, coming from the back.
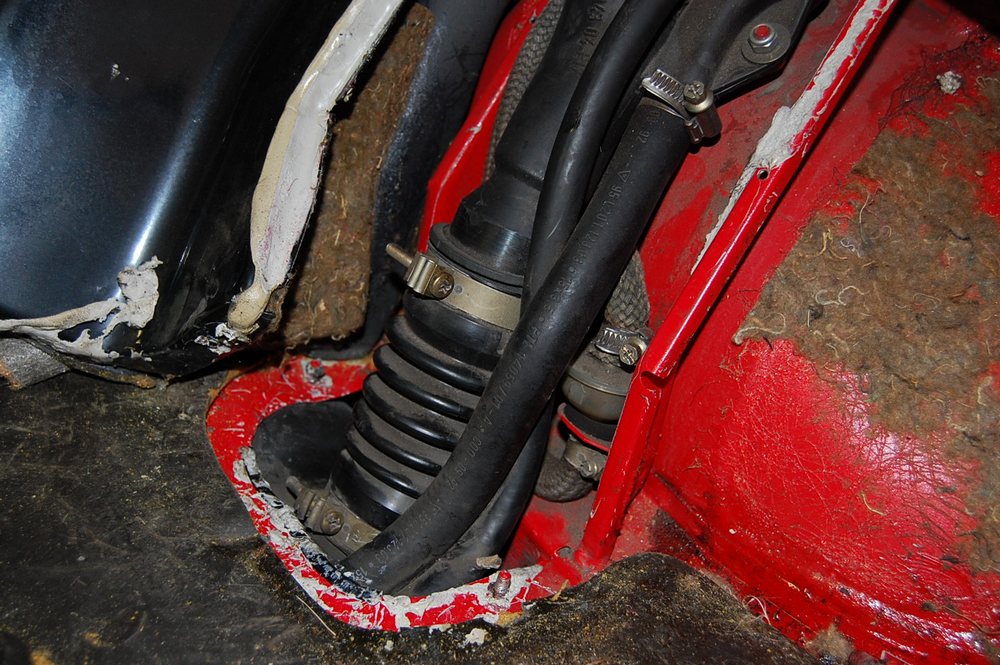
- Disassembled fuel fill neck, inspected everything, could not find anything cut or ripped.
- This lead me to believe that it was the gasket, replaced it, and all is well for now.
Hope this helps others.
Keywords: vapor, gas, 968, 944, tank
 11-21-2013, 10:13 AM
#2
Rennlist Member
Thread Starter
Here is a post I made when I was troubleshooting the problem. So this came in time before post number 1 above, but this might be of help to others. I suggest that you take the cover for the sending unit off (it's under the carpet in the back under the horse hair looking thing) and bring a bottle of water with you to the gas station, you could just pour it on the filler area and look for bubbles as you fill the tank up. The tank has a 2" or so stand pipe, so water won't get in it.
--------------going back in time----------------
I am presently troubleshooting my fuel smell in the cabin....it got really bad on hot days, with the tank more than half full, and driving it hard and left turns. I saved pictures of tanks off ebay, and studied them.
I put everything back together after the stereo install, and found there were no issues (or so I thought) with the filler hose and connections:
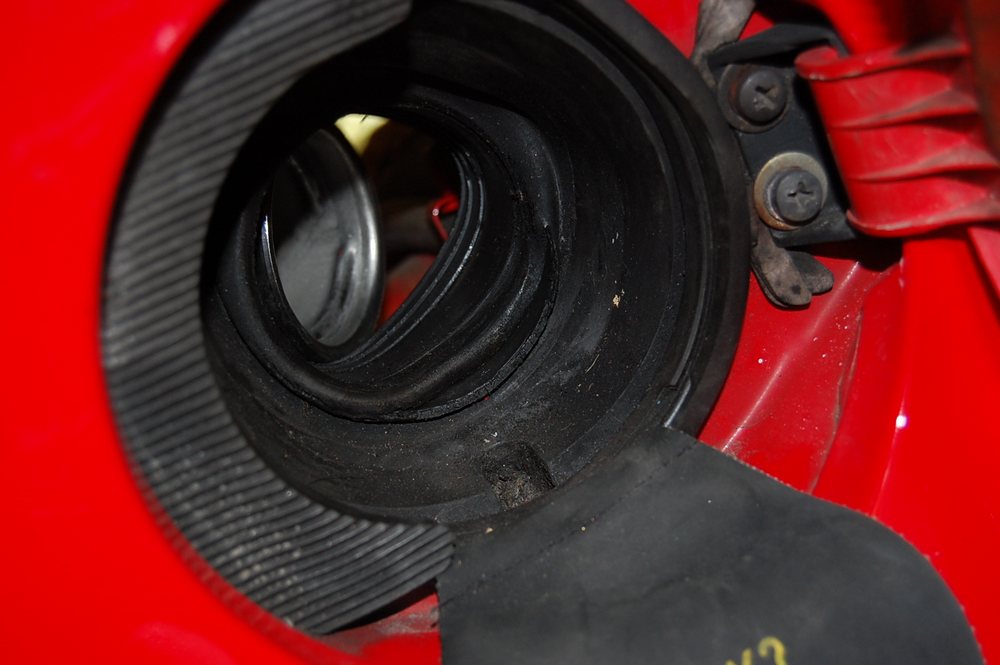
I did find a rip in the neck of rubber stopper, bought a used one, and replaced it:
Last night I went to go put gas in the car, as I still had the gas smell, funny (okay, not so funny) thing happened.....I took off the cover for the fuel sending unit and started inspecting....went to the gas station and put in about 10 gallons, had my camera with me....the glass in the back was open....but I wasn't watching it, I was trying to listen for any type of noises I might here, gurgling, etc.
Here is the tank before leaving:
Here it is after putting 10 gallons in:
Oh!!! Maybe I found the source of the leak!
So I swiped my credit card again and started adding more gas so I could watch it.....and I could see little bubbles coming out of the liquid, like it was coming from the tank venting out past the gasket....
Then......OMG.....there is gas leaking on the ground!! WTF? Where did that come from?
Turned the pump off, and saw gas leaking, but it stopped as soon as I stopped filling the tank. Drove carefully home the 1 mile or so, and then dove back into the car.
I inspected under the car, could see that the gas was leaking from the top of the tank....but I KNOW it did not do it before. Tore it apart, and then found when I put the filler tube back on the tank, it was fully on the neck on the inboard side, but not on the outboard side. So the gas was just spilling out of there once the tank got full. I fixed it.
In the end, I think the gas you see around the sending unit just flowed over from neck, but it provided a great clue as I saw the tiny bubbles once I was filling it the second time. Would be a good test for anybody, just bring some water to the gas station with you, fill up the area around the sending unit with water, then fill the tank while inspecting for bubbles. If you see them, you have a bad gasket most likely.
Have a gasket on order and will replace it this upcoming week. With the cover off for the tank sending unit, I basically get no gas smell in the car, I believe because air is flowing from the cabin, past the leaking component and not back into the cabin.
--------------going back in time----------------
I am presently troubleshooting my fuel smell in the cabin....it got really bad on hot days, with the tank more than half full, and driving it hard and left turns. I saved pictures of tanks off ebay, and studied them.
I put everything back together after the stereo install, and found there were no issues (or so I thought) with the filler hose and connections:
I did find a rip in the neck of rubber stopper, bought a used one, and replaced it:
Last night I went to go put gas in the car, as I still had the gas smell, funny (okay, not so funny) thing happened.....I took off the cover for the fuel sending unit and started inspecting....went to the gas station and put in about 10 gallons, had my camera with me....the glass in the back was open....but I wasn't watching it, I was trying to listen for any type of noises I might here, gurgling, etc.
Here is the tank before leaving:
Here it is after putting 10 gallons in:
Oh!!! Maybe I found the source of the leak!
So I swiped my credit card again and started adding more gas so I could watch it.....and I could see little bubbles coming out of the liquid, like it was coming from the tank venting out past the gasket....
Then......OMG.....there is gas leaking on the ground!! WTF? Where did that come from?
Turned the pump off, and saw gas leaking, but it stopped as soon as I stopped filling the tank. Drove carefully home the 1 mile or so, and then dove back into the car.
I inspected under the car, could see that the gas was leaking from the top of the tank....but I KNOW it did not do it before. Tore it apart, and then found when I put the filler tube back on the tank, it was fully on the neck on the inboard side, but not on the outboard side. So the gas was just spilling out of there once the tank got full. I fixed it.
In the end, I think the gas you see around the sending unit just flowed over from neck, but it provided a great clue as I saw the tiny bubbles once I was filling it the second time. Would be a good test for anybody, just bring some water to the gas station with you, fill up the area around the sending unit with water, then fill the tank while inspecting for bubbles. If you see them, you have a bad gasket most likely.
Have a gasket on order and will replace it this upcoming week. With the cover off for the tank sending unit, I basically get no gas smell in the car, I believe because air is flowing from the cabin, past the leaking component and not back into the cabin.
11-21-2013, 10:53 AM
#3
Rennlist Member
Great stuff and fantastic photos. But one thing I don't understand. If you've been following this issue for as long as i have you have heard many report that the problem largely occurs when the gas tank is full. If the gasket is letting fumes escape then why would that happen mostly when the tank is full? Pressure?
11-21-2013, 11:01 AM
#4
Rennlist Member
Thread Starter
That's a good question. I believe there is two things that are needed. The first is for the fuel in the tank to splash up to the top of the tank, this wets the surface and allows the fuel to more easily vaporize when air is escaping from the tank due to a differential pressure.
I don't know if this is right or not, but if you had a large volume of fuel and small volume of air, would a change in fuel tank temperature and contents (from being parked in a garage to parking it in an open lot on a sunny day) create a higher pressure in that volume of air vs. having a small amount of fuel and large volume of air? I'm thinking it would. But I could be wrong.
I don't know if this is right or not, but if you had a large volume of fuel and small volume of air, would a change in fuel tank temperature and contents (from being parked in a garage to parking it in an open lot on a sunny day) create a higher pressure in that volume of air vs. having a small amount of fuel and large volume of air? I'm thinking it would. But I could be wrong.
11-21-2013, 01:12 PM
#5
Thanks for another Fantastically detailed write up Paul! I had a brief gas smell in my 928 during a DE a couple months ago for about 30-60 minutes. Was very pronounced while it was there, but hasn't come back. Had already replaced the fuel filter & pump; fuel lines; & the "Y" connector a 928 has that can cause a smell. I will keep this in mind if mine comes back again. Thanks again!
11-21-2013, 01:18 PM
#6
Mine was during the last session after two days(8 sessions) at the DE. Tank was half full, temps were moderate, but not hot. Noticed it especially when on a long sweeping left turn, and when idling after the session. Smell test under the hood & all around the car couldn't pin point any specific source. After filling up an hour later & on the two hour drive home, nothing. Nothing since. I know its a 928 & not the 968, but similar in a noticeable cabin fuel smell. Again, thanks for giving me something to consider for my 928 & to keep an eye out for in my 968.
Trending Topics
11-21-2013, 03:33 PM
#8
Racer

Join Date: Jun 2011
Location: Portland, Or.
Posts: 290
Likes: 0
Received 0 Likes
on
0 Posts
Great DIY. When I have a chance, I may add some info on my issues which were different, and my fix which seems to be working. But, I think I need to clean the carpets in the back. I think they have some permanent smell from years of fuel setting in the well around the sender.
Anyway, thought I'd add some constructive comments. I initially used a similar hammer/side of a chisel punch to loosen/tighten the large nut that holds the sending unit in the tank. But after seeing some info elsewhere, which raised the risk of a spark from the punch/hammer, I switched to the slip joint pliers this last time I took the sender out. The risk of a spark might be quite low, but why take the chance. Even with a half tank the fuel was just inches below the opening. I was a little freaked out the first time I pulled the sender when, almost full, the fuel was no more than an half inch below the opening. This time when I pulled it, I also had a lid I could put over the opening (minimize risk of dropping a hose clamp in there, and less fire risk too). I have a large pair of slip joints (like you have in the photo above with the blue handle grips). I was able to expand them all the way out and use each jaw on one of the tabs on opposite sides of the nut. Since this left the handles wide spread, I was able to get a lot of torque on the pliers to get the unit quite tight.
Anyway, thought I'd add some constructive comments. I initially used a similar hammer/side of a chisel punch to loosen/tighten the large nut that holds the sending unit in the tank. But after seeing some info elsewhere, which raised the risk of a spark from the punch/hammer, I switched to the slip joint pliers this last time I took the sender out. The risk of a spark might be quite low, but why take the chance. Even with a half tank the fuel was just inches below the opening. I was a little freaked out the first time I pulled the sender when, almost full, the fuel was no more than an half inch below the opening. This time when I pulled it, I also had a lid I could put over the opening (minimize risk of dropping a hose clamp in there, and less fire risk too). I have a large pair of slip joints (like you have in the photo above with the blue handle grips). I was able to expand them all the way out and use each jaw on one of the tabs on opposite sides of the nut. Since this left the handles wide spread, I was able to get a lot of torque on the pliers to get the unit quite tight.
11-21-2013, 03:48 PM
#9
Rennlist Member
Thread Starter
I think the idea of using the slip joint pliers if you have them is better than using a chisel. And I have a set that are HUGE, just got a little light headed from the fuel vapors I guess....
11-21-2013, 07:12 PM
#11
Racer
Join Date: Jun 2011
Location: Portland, Or.
Posts: 290
Likes: 0
Received 0 Likes
on
0 Posts
I also plan to post here first. It's too difficult to have real dialog on the other site. None of us knows it all; there isn't only one right way to do things; open dialog allows/supports/encourages exchange of knowledge and ideas. That is all too often squelched on the other site by attitudes of those that should be encouraging the exchange.
11-21-2013, 09:54 PM
#13
OkRider
Rennlist Member
Rennlist Member
Very nice write up.  I did something similar, but only to the filler area. I think mines fixed, but I can't smell well enough to know for sure.
I did something similar, but only to the filler area. I think mines fixed, but I can't smell well enough to know for sure.


