
TJ's Intro, Build Thread, & Questions
 04-10-2016, 09:54 PM
#1
Rennlist Member
Thread Starter
Good evening Rennlist,
I've been lurking (and saving) for a half a decade or so, but it brings me great pleasure to finally have a reason to post and a way to contribute. Saturday I purchased my first 911, something I've been saving for since I joined in 2010, but of course as my savings grew, so did the market for these wonderful cars.
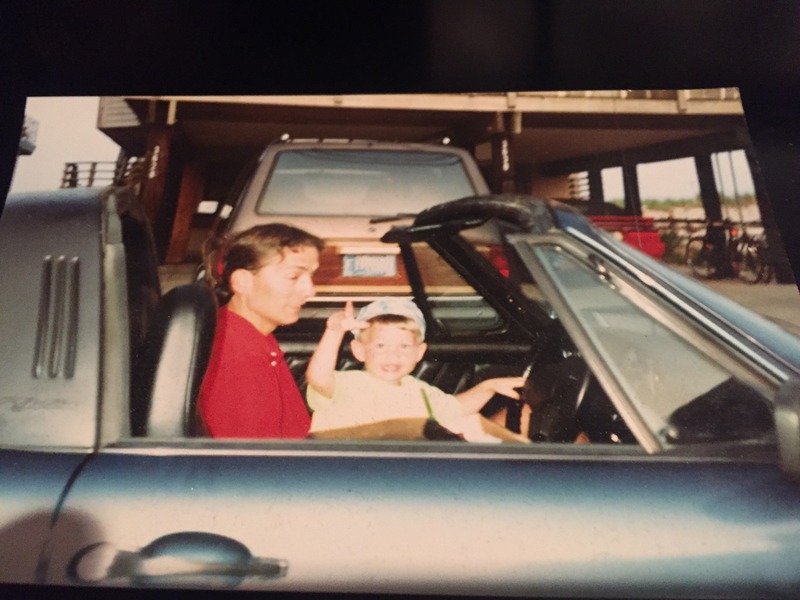
I'm not exactly new to the world Porsches. My father has been driving aircooled 911's for 25 years. Below is a picture that hangs over my desk, myself as a kid in the early 90's in my fathers first Porsche, a 76 Targa. I've been fortunate to rack up a few miles on his current Protomotive 993 C4 cab with a pair of GT28's (my avatar), and soon I'll be able to drive next to him in my new-to-me '91 C2 Coupe.
After searching across the country and getting PPI's as far away as Dallas (thanks to Mayo Performance by the way, they saved me a LOT of money), I found a C2 a short bike ride from the house I grew up in outside Philadelphia.
The car was purchased by its previous owner 3 years ago when he pulled the motor immediately for a reseal, which never happened. I picked up the car with the rear end disassembled, trailered it home, and my engine builder was kind enough to meet me at his shop so I could drop off the motor for a full rebuild, which is currently in the planning stages. I bought it as-is with "no maintenance records" but was extremely pleased to find the maintenance log fully stamped all the way up to about 4k miles ago since new, along with the original window sticker. Hopefully more pleasant surprises on the way.
Less talk, more pictures:
Father and son, circa 1990-something.
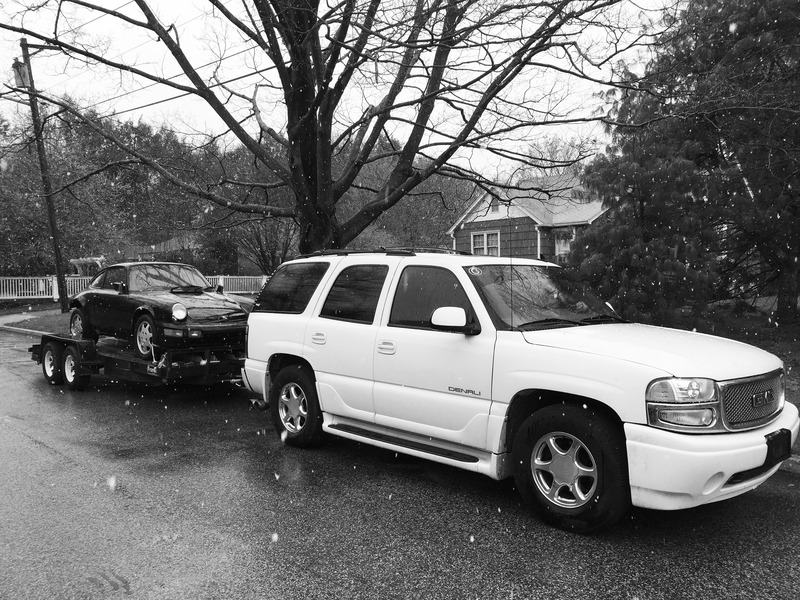
Picking her up in the snow.
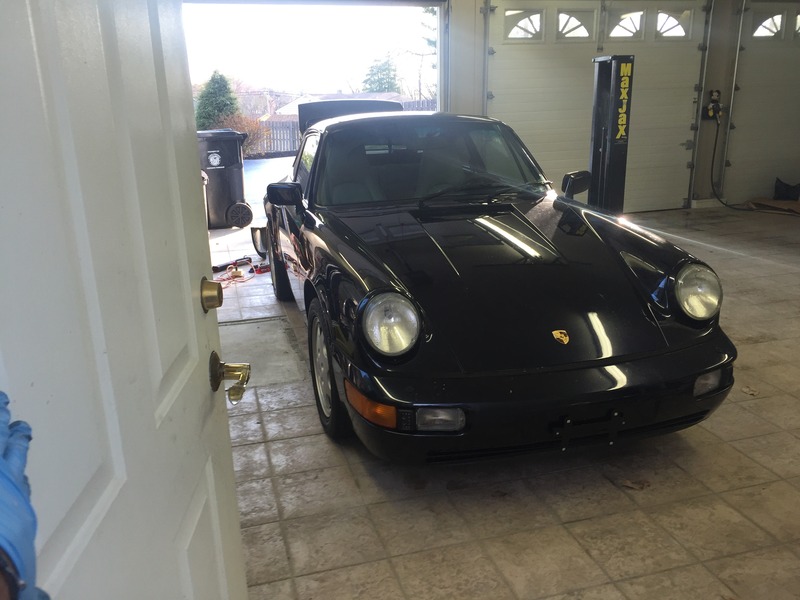
Home safe.
 [/URL]
I've been lurking (and saving) for a half a decade or so, but it brings me great pleasure to finally have a reason to post and a way to contribute. Saturday I purchased my first 911, something I've been saving for since I joined in 2010, but of course as my savings grew, so did the market for these wonderful cars.
I'm not exactly new to the world Porsches. My father has been driving aircooled 911's for 25 years. Below is a picture that hangs over my desk, myself as a kid in the early 90's in my fathers first Porsche, a 76 Targa. I've been fortunate to rack up a few miles on his current Protomotive 993 C4 cab with a pair of GT28's (my avatar), and soon I'll be able to drive next to him in my new-to-me '91 C2 Coupe.
After searching across the country and getting PPI's as far away as Dallas (thanks to Mayo Performance by the way, they saved me a LOT of money), I found a C2 a short bike ride from the house I grew up in outside Philadelphia.
The car was purchased by its previous owner 3 years ago when he pulled the motor immediately for a reseal, which never happened. I picked up the car with the rear end disassembled, trailered it home, and my engine builder was kind enough to meet me at his shop so I could drop off the motor for a full rebuild, which is currently in the planning stages. I bought it as-is with "no maintenance records" but was extremely pleased to find the maintenance log fully stamped all the way up to about 4k miles ago since new, along with the original window sticker. Hopefully more pleasant surprises on the way.
Less talk, more pictures:
Father and son, circa 1990-something.
Picking her up in the snow.
Home safe.
[/URL]

The following 2 users liked this post by tjb616:
993Porsche (06-30-2023),
r13420 (01-29-2021)
04-10-2016, 10:10 PM
#3
Rennlist Member
Thread Starter
So, I have at least 2 months before the motor is done, so it's time to dig in.
On the short list:
Clean everything.
Brakes.
Tires, maybe wheels (the D90's are a lot better looking in person than I had always taken them for in pictures.)
Clean and pressure test oil lines and cooler.
Lots of new seals and clips.
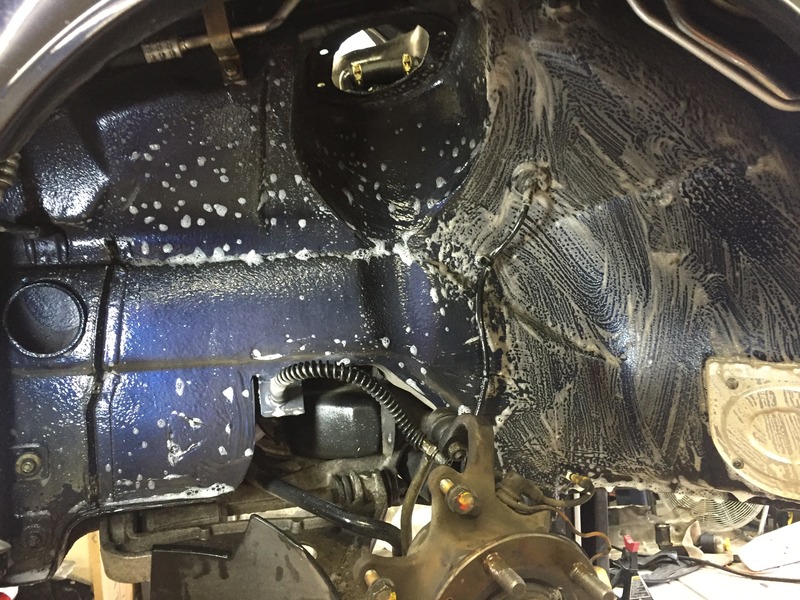
Ok the list isn't that short, I could keep going all night. On the table first while I wait for parts, is to clean up the engine bay. I started today.
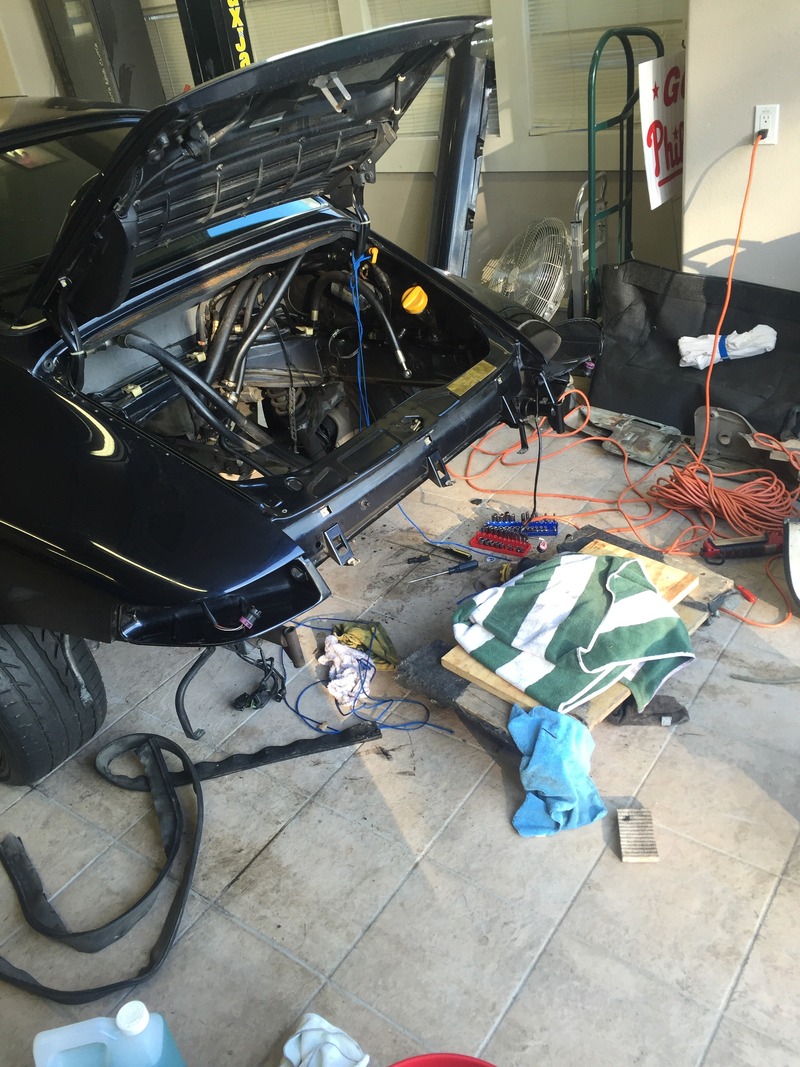
A couple questions:
1. What's the best source for the engine bay seal (seen bottom left in the above pic) that goes around the outside edge of the bay? Mine isn't terrible and they're not cheap, (design911 in the UK has them for a couple hundred bucks), but it is a bit dry and I'd like to replace it. EDIT: Found a few US based retailers with better prices, any remake brands I should avoid?
2. Im using some left over simple green along with APC and microfiber towels. Other than the obvious (distributor, fuses, end of harness connectors) is there anything I should avoid with degreaser?
3. These little plastic wiring harness tie-downs (seen in the last pic), before I risk breaking them all to remove them, is there a source for replacements? If so I'll order all new ones and not worry about popping these off. EDIT: Thanks jpar!
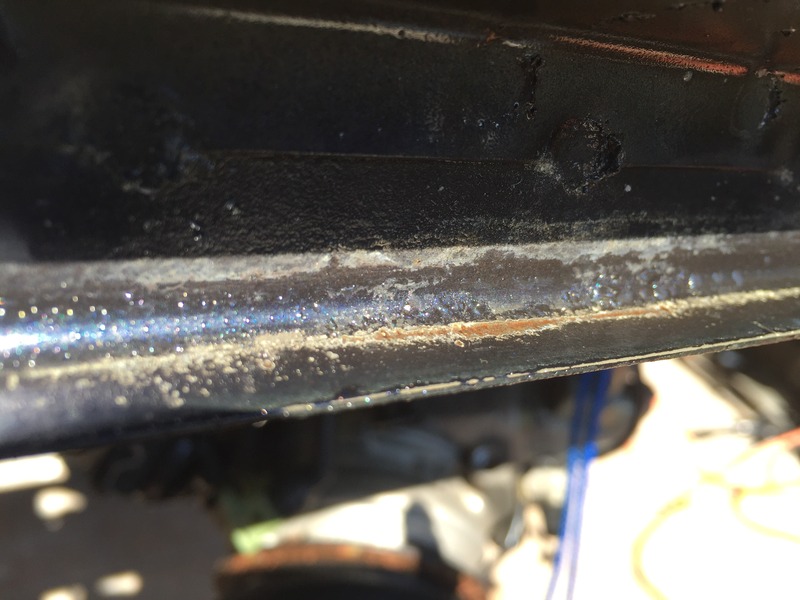
4. I found this little bit of rust bubbling on the sheet metal behind the tail lights, is this common? An immediate concern? Anything simple I should do to address it if not?
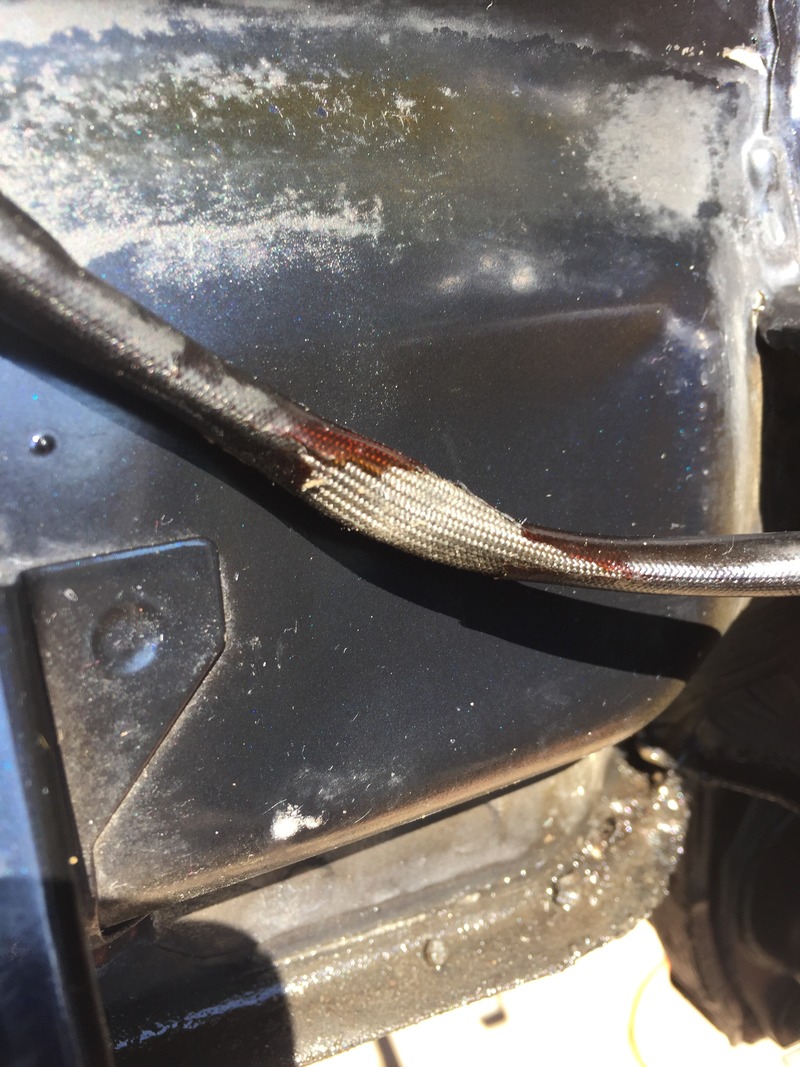
5. A bunch of these wires (tail light harness pictured) have the plastic coating flaking off. It appears to be braided underneath, but it still worries me. What's standard operating procedure for addressing this?
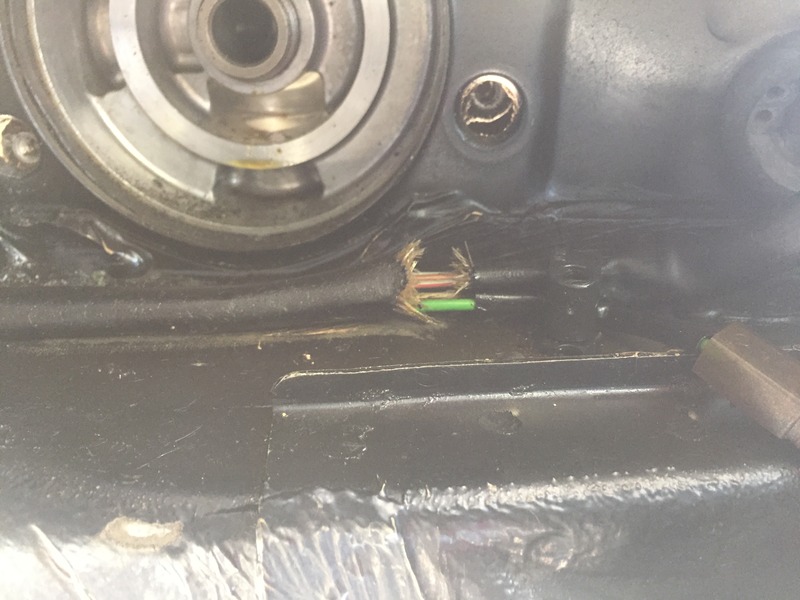
6. The only real rip in the harness cover. The wires all appear to be fine, but is there a better way to address this than harness tape? EDIT: Ordered Tesa tape.
7. Any tips for removing the engine bay fuse box to clean behind it? There doesn't appear to be a lot of slack in the wiring.
Any other first-time 911/964 advice is of course welcome. Thanks!
On the short list:
Clean everything.
Brakes.
Tires, maybe wheels (the D90's are a lot better looking in person than I had always taken them for in pictures.)
Clean and pressure test oil lines and cooler.
Lots of new seals and clips.
Ok the list isn't that short, I could keep going all night. On the table first while I wait for parts, is to clean up the engine bay. I started today.
A couple questions:
1. What's the best source for the engine bay seal (seen bottom left in the above pic) that goes around the outside edge of the bay? Mine isn't terrible and they're not cheap, (design911 in the UK has them for a couple hundred bucks), but it is a bit dry and I'd like to replace it. EDIT: Found a few US based retailers with better prices, any remake brands I should avoid?
2. Im using some left over simple green along with APC and microfiber towels. Other than the obvious (distributor, fuses, end of harness connectors) is there anything I should avoid with degreaser?
3. These little plastic wiring harness tie-downs (seen in the last pic), before I risk breaking them all to remove them, is there a source for replacements? If so I'll order all new ones and not worry about popping these off. EDIT: Thanks jpar!
4. I found this little bit of rust bubbling on the sheet metal behind the tail lights, is this common? An immediate concern? Anything simple I should do to address it if not?
5. A bunch of these wires (tail light harness pictured) have the plastic coating flaking off. It appears to be braided underneath, but it still worries me. What's standard operating procedure for addressing this?
6. The only real rip in the harness cover. The wires all appear to be fine, but is there a better way to address this than harness tape? EDIT: Ordered Tesa tape.
7. Any tips for removing the engine bay fuse box to clean behind it? There doesn't appear to be a lot of slack in the wiring.
Any other first-time 911/964 advice is of course welcome. Thanks!
Last edited by tjb616; 04-13-2016 at 12:07 AM.
04-10-2016, 10:15 PM
#4
Rennlist Member
Thread Starter
 04-10-2016, 10:45 PM
#5
Rennlist Member
Thread Starter
EDIT: Ordered the GKN kits and LiquiMoly grease.
Last question for tonight, I have at least 1 torn CV boot and I plan on cleaning and replacing them all.
Are the GKN kits acceptable? Is there a better option vs the OEM $75ea kits?
What grease is recommended? Supplied with the rebuild kit? OEM? Upgraded?
Thanks again in advance!
Last question for tonight, I have at least 1 torn CV boot and I plan on cleaning and replacing them all.
Are the GKN kits acceptable? Is there a better option vs the OEM $75ea kits?
What grease is recommended? Supplied with the rebuild kit? OEM? Upgraded?
Thanks again in advance!
Last edited by tjb616; 04-12-2016 at 11:53 AM.
Trending Topics
04-11-2016, 06:06 PM
#8
Banned

I bought two of these and 2 OEM CV Boots. They're practically identical and my wrench was more than happy to install both without trying to upsell me to the OEM's.
The grease comes in the boxes. I think he charged me $100 or 150 to install all 4.
The grease comes in the boxes. I think he charged me $100 or 150 to install all 4.
Last question for tonight, I have at least 1 torn CV boot and I plan on cleaning and replacing them all.
Are the GKN kits acceptable? Is there a better option vs the OEM $75ea kits?
What grease is recommended? Supplied with the rebuild kit? OEM? Upgraded?
Thanks again in advance!
Are the GKN kits acceptable? Is there a better option vs the OEM $75ea kits?
What grease is recommended? Supplied with the rebuild kit? OEM? Upgraded?
Thanks again in advance!
04-12-2016, 11:54 AM
#9
Rennlist Member
Thread Starter
Thanks, I grabbed GKN kits and Liqui Moly grease.
Still looking for a source for those harness tie-downs in the engine bay, haven't been able to dig up a part number.
Still looking for a source for those harness tie-downs in the engine bay, haven't been able to dig up a part number.
04-12-2016, 03:58 PM
#10
04-12-2016, 11:58 PM
#11
Rennlist Member
Thread Starter
 04-16-2016, 07:15 PM
#12
Rennlist Member
Thread Starter
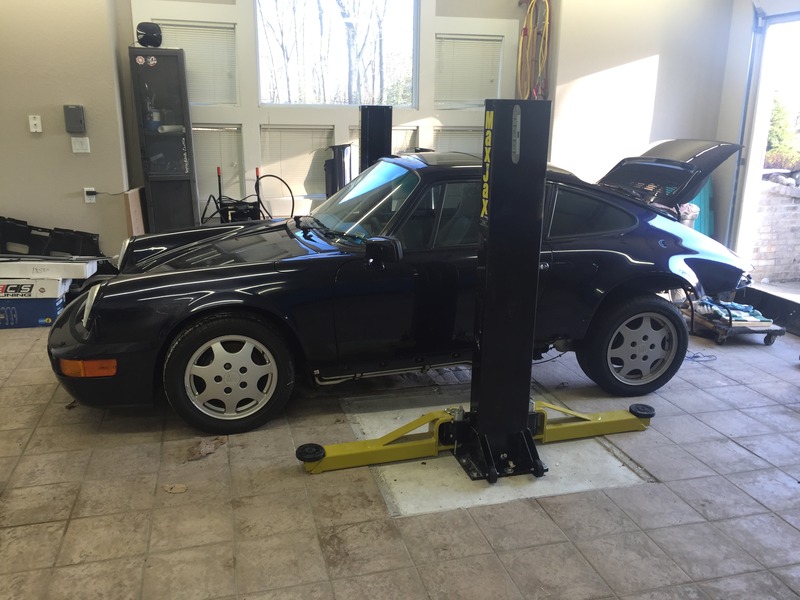
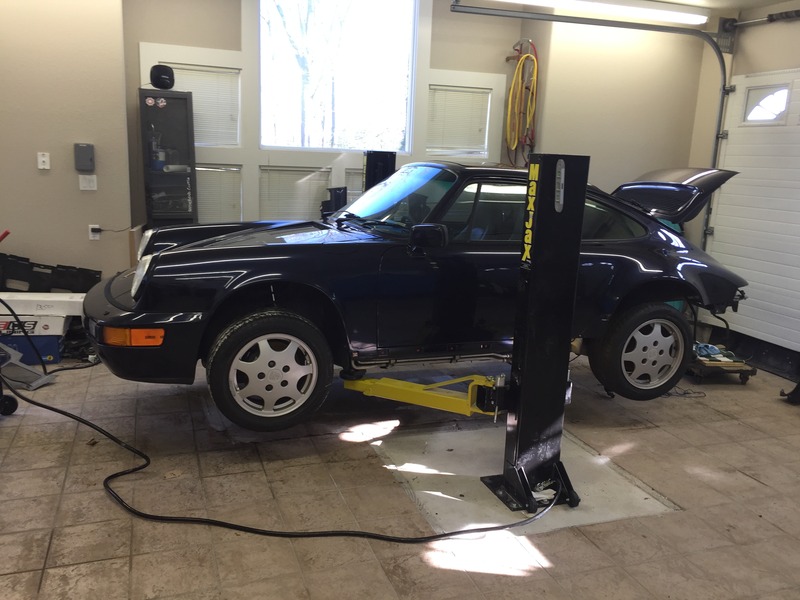
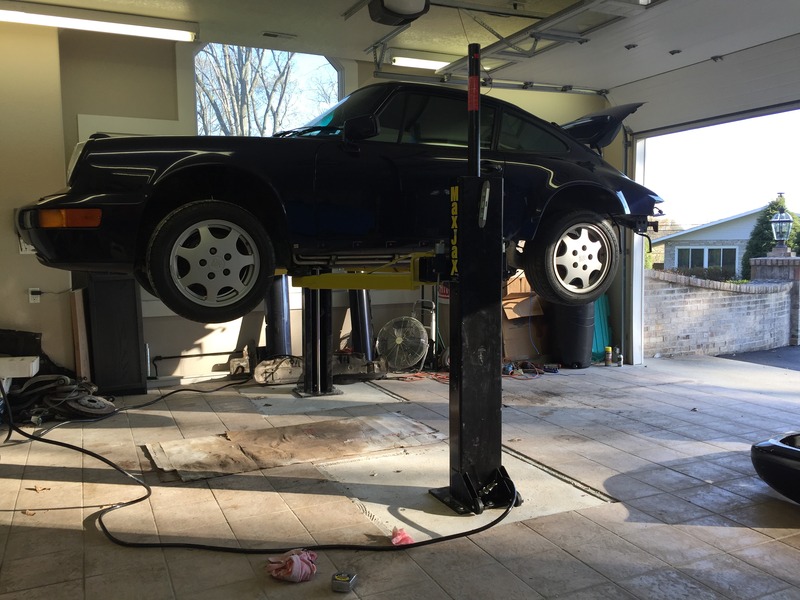
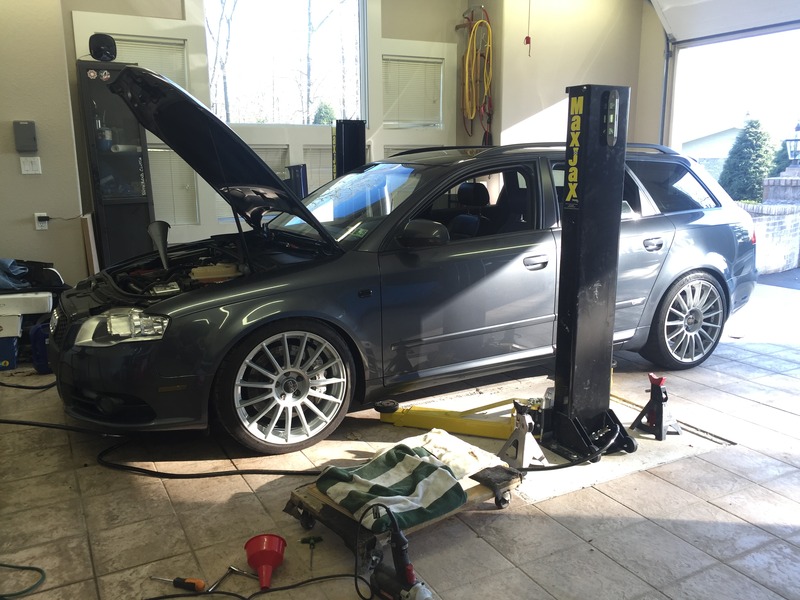
Parts! First round showed up. Most just maintenance items, nothing exciting. I did finally find the guts to take the MaxJax to the upper limit. It was actually very solid all the way up and down.
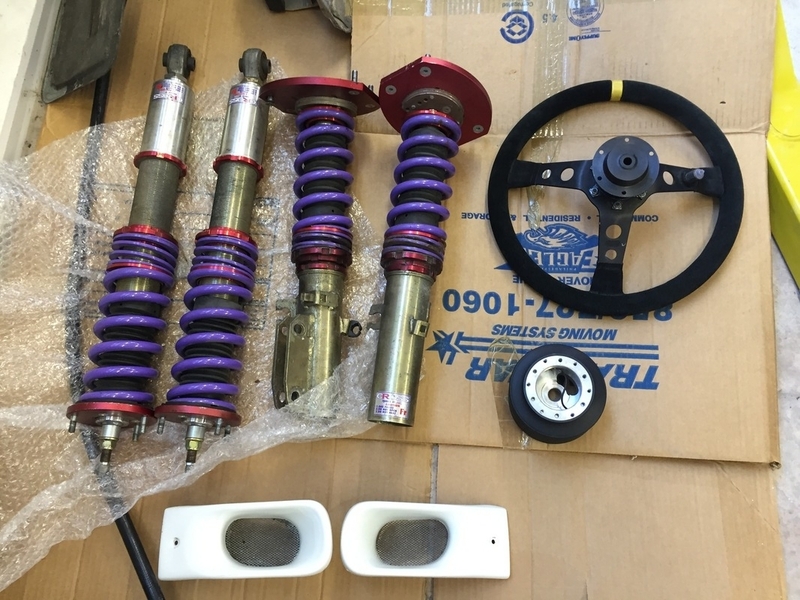
I had a great day at Hershey today. It wasn't my first year attending, but it was my first year parts shopping. I grabbed some JIC coilovers, a Mod 7 Momo with a quick release and a hub, and some brake ducts. I'm going to put in a call to a few shops to get quotes on rebuilding those coils (great condition but unknown hours, track use), but more likely than not that will wait for winter when I do the rest of the bushings, links, etc.
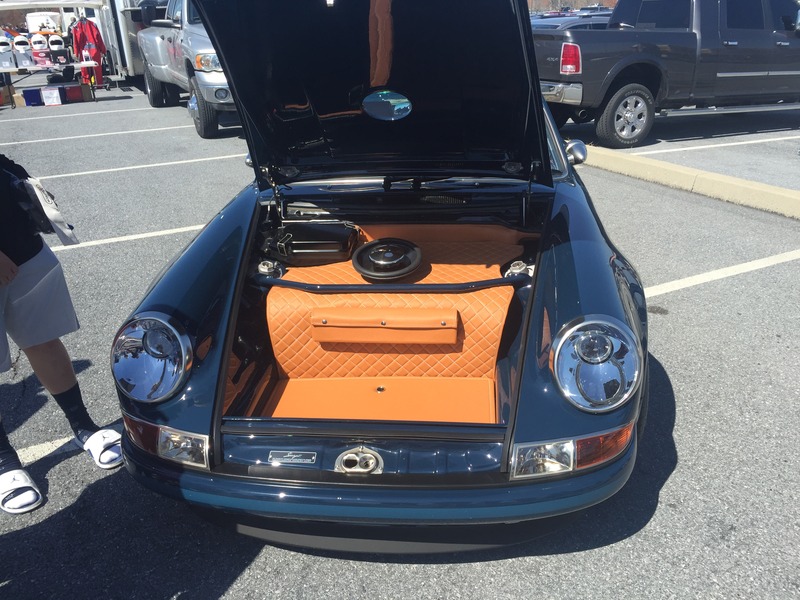
And speaking of Hershey, it was the first time I got to lay eyes on one of these... Sorry I couldn't get a better picture, it was swarmed with people all day. I assume most will identify it just by the frunk shot
I had a great day at Hershey today. It wasn't my first year attending, but it was my first year parts shopping. I grabbed some JIC coilovers, a Mod 7 Momo with a quick release and a hub, and some brake ducts. I'm going to put in a call to a few shops to get quotes on rebuilding those coils (great condition but unknown hours, track use), but more likely than not that will wait for winter when I do the rest of the bushings, links, etc.
And speaking of Hershey, it was the first time I got to lay eyes on one of these... Sorry I couldn't get a better picture, it was swarmed with people all day. I assume most will identify it just by the frunk shot
Last edited by tjb616; 05-23-2016 at 10:42 PM.
04-17-2016, 10:49 PM
#13
Rennlist Member
Thread Starter
Well, after shopping all day yesterday for the Porsche, today turned into a full afternoon of attending to the daily drivers. This car has been laying low for winter while I rack up miles on my older Audi. It was a bit of an opportunity buy from a long time PCA member. Today she took her first drive of 2016. A fun, well set-up car by someone who spends more time driving their GT3 than they ever did this, for which I'm grateful.
05-02-2016, 08:08 PM
#14
Rennlist Member
Thread Starter
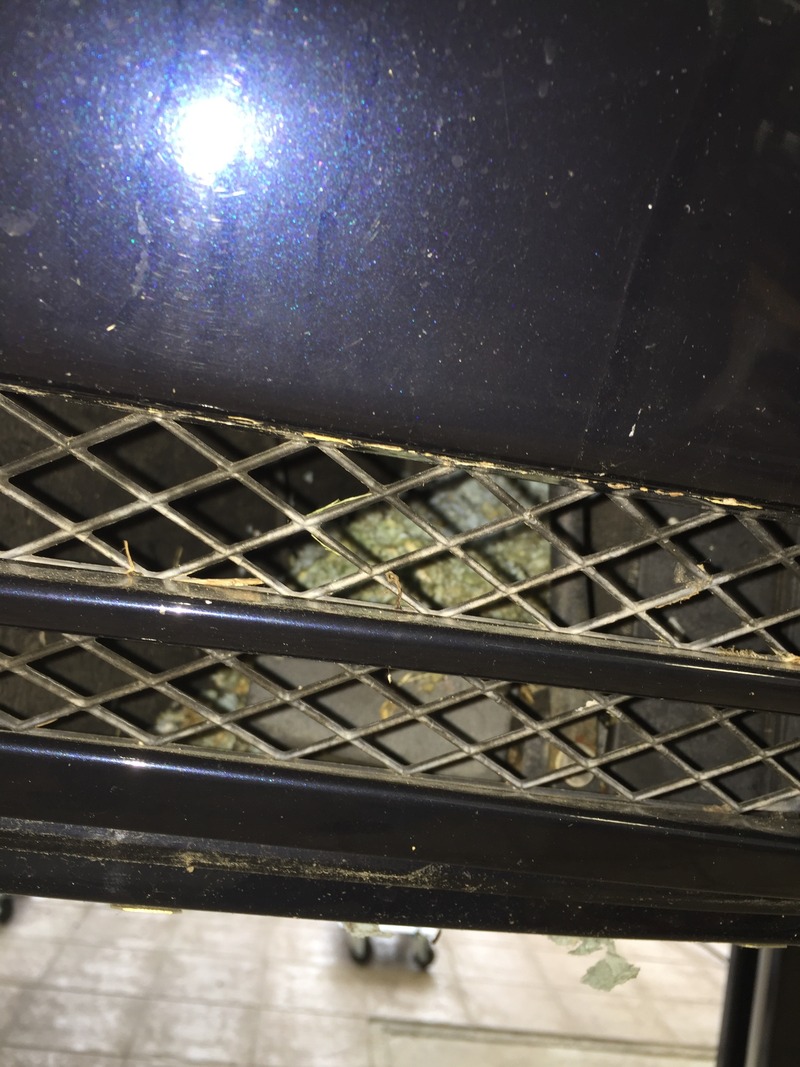
Got some time in the garage this weekend. Nothing terribly exciting to report. I pulled the front bumper and found something made a little home in the lower passenger grill area. Fortunately no wiring loom damage from the former residents that I could see.
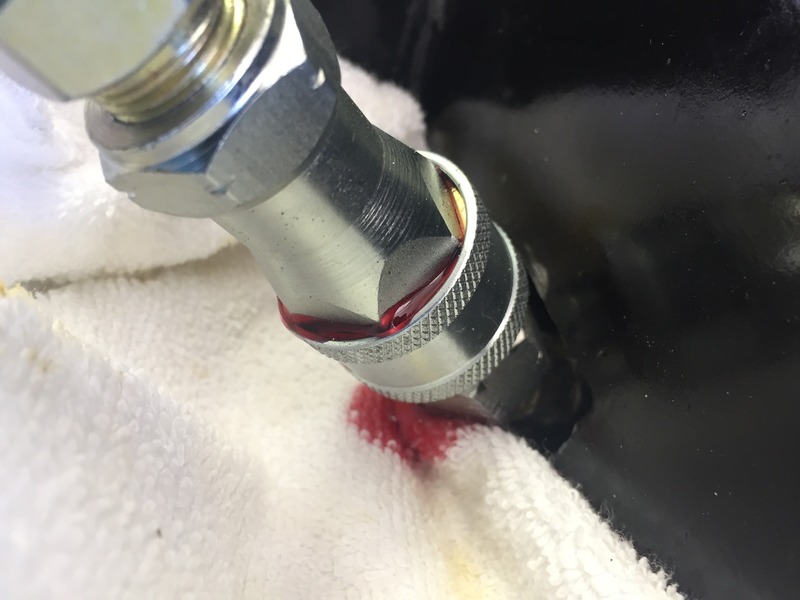
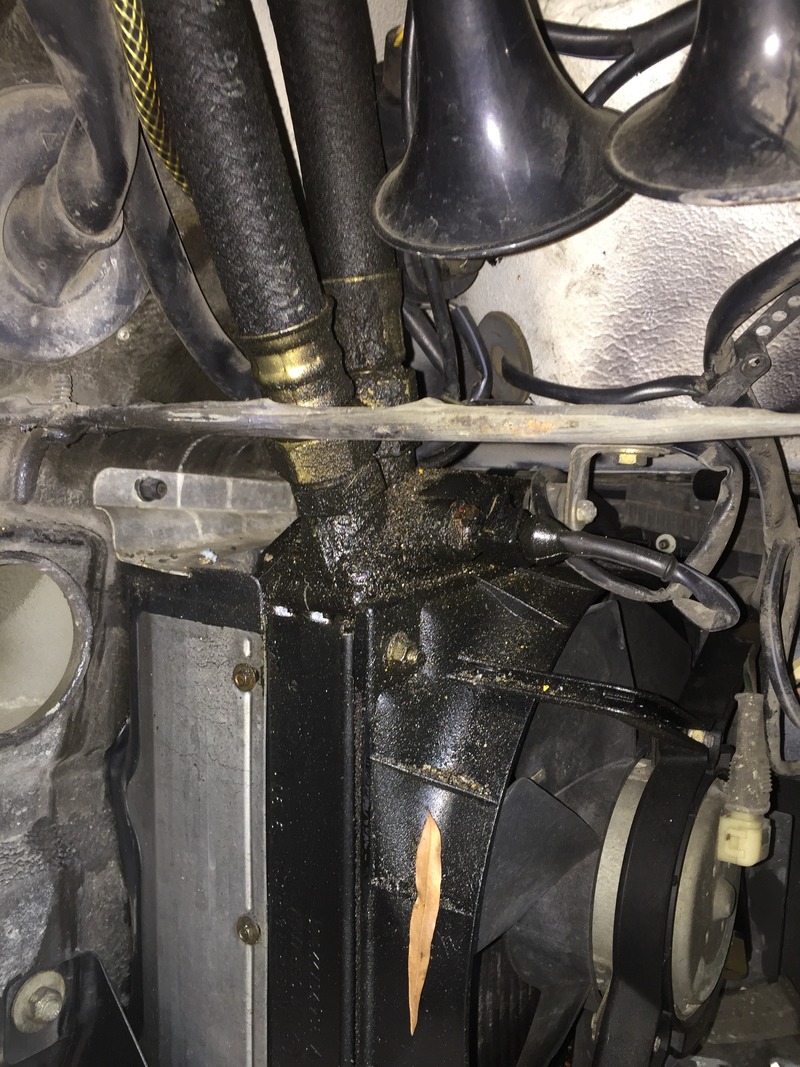
The goal, apart from cleaning, was to pull the oil cooler to have it cleaned and pressure tested. I'm glad I did, because it was leaking badly at the fittings for the lines. It looks like the fitting on the soft line is leaking above the threads, therefore the question arises, can you replace the soft line in the front fender well without replacing the hard line under the rockers? Their joining looked fairly permanent (not threaded.) If so, I'll have the hard line cleaned and tested as well and replace the soft line and fittings. At this point, I think I'm going to pull the oil tank and have it sent along with the oil cooler, and replace some, or all, of the connections in the rear fender arch.
I noticed the residual oil on the belly pan under the cooler, so I wasn't terribly surprised when I saw this..
05-23-2016, 10:41 PM
#15
Rennlist Member
Thread Starter
Well, lots of progress but Im afraid not much to look at.
Since my last update, I've pulled the entire front body apart including the liners, bumper cover, bumper beam, etc and detailed the body including the fender wells.

I pulled the front struts and brakes, but had to delay reassembly because I'm waiting on new strut top gaskets.
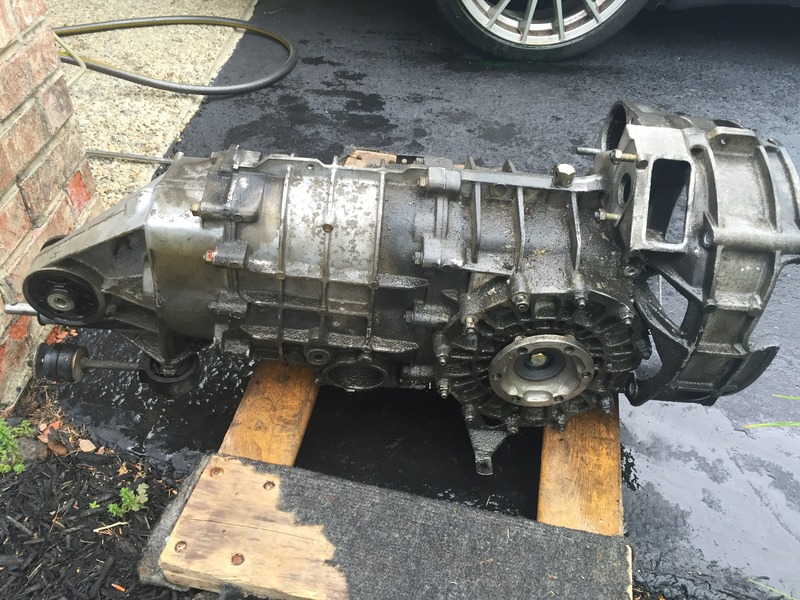
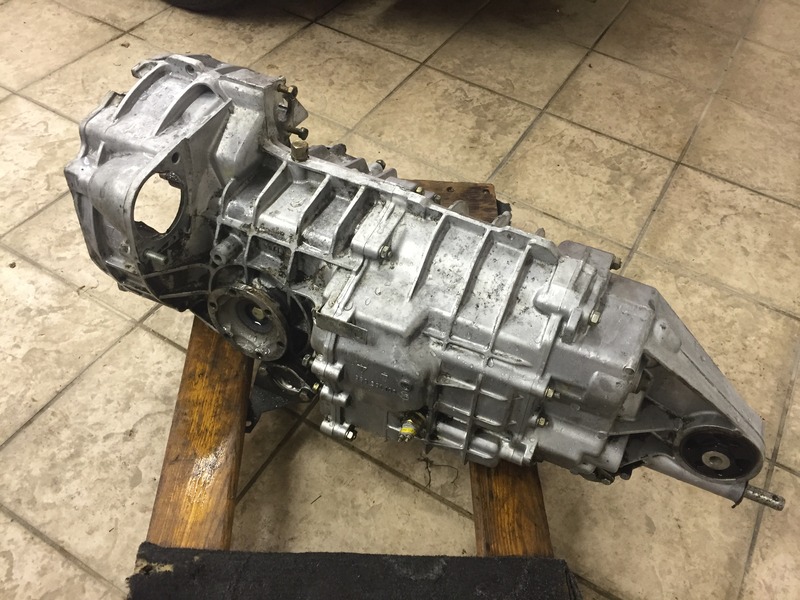
Moving on to the back, I got all of the oil lines and the oil tank out of the car. Dropped off the oil tank and oil cooler to get professionally cleaned and pressure tested. I'm awaiting a quote for all new t-stat to cooler lines and a t-stat to oil filter housing line from my engine builder. I'll more likely be ordering parts to have the soft parts of the lines rebuilt from ERP.
I picked up the trans, heat exchangers, and mufflers from the engine builder. They will all be getting a fresh polish along with a cat delete and cup pipe courtesy of Skip here on the forums, who I highly recommend as a seller.
Just after starting:
After one round of APC, Sonax, and a pressure washer, another 2 or 3 sessions of detail work left to go. Motul going inside after she is cleaned up. Still trying to decide which forward mount bushing to go with, I'm leaning toward the Powerflex middle stiffness.
I installed the rear coilovers (only bolt that has really fought me was the pass side lower strut to trailing arm bolt.) There isn't a rear strut gasket in the PET since the strut top is rubber, but Im considering making one similar to the front since I have billet strut tops going in. If anyone has done similar to avoid the metal on metal contact, Id be interested to hear what you used. The template is simple enough, the material I will have to source.
Anyway, while working on the rear end I came to the conclusion that I absolutely need spring plate bushings (already ordered EPR rebuild kit), and wheel bearings (ordering momentarily.) This begs the question, should I just suck it up, order rear control arm bushings (the forward ones) and remove the whole thing and take them to a shop to have everything pressed in? Or leave the rear control arm bushings as is (they look fine) and buy a wheel bearing tool and install that and the spring plates on the car.... I think I'll get a progress report from the engine builder to see where the bill stands and decide if I want to spend another $500-$1k to complete the rear end with some Powerflex or ERP trailing arm bushings.
What else? I ordered a ton of gaskets and seals. Not much to look at until they go on the car.
In the middle of rebuilding the axles with new boots and grease. Haven't decided if I want to take the axles to a shop to have the outter joints pressed off for a more complete clean. That will likely happen if I decide to pull the rear trailing arms and take them to get new bushings pressed in. Truth is, given the condition of the boots, I'm half concerned they're going to need to be replaced completely anyway once the car is driving due to wear and lack of maintenance. We shall see...
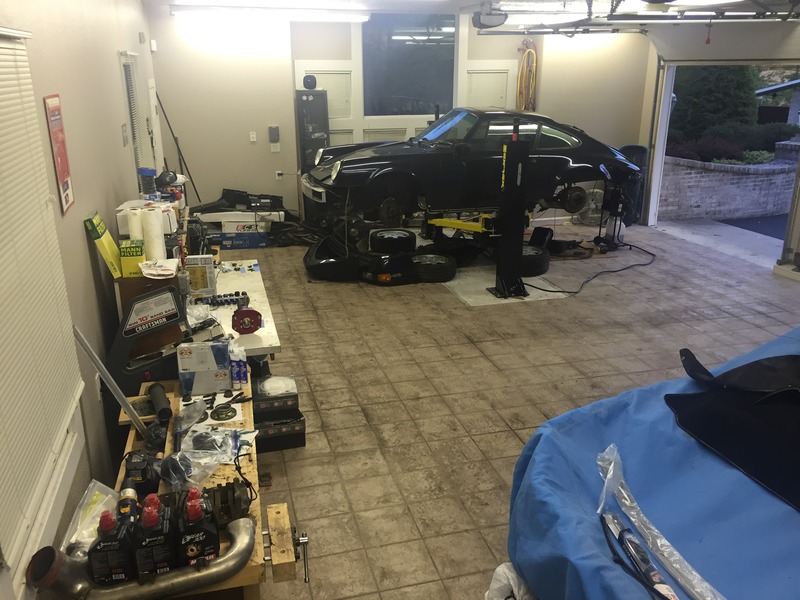
The complete mess I made of the garage...
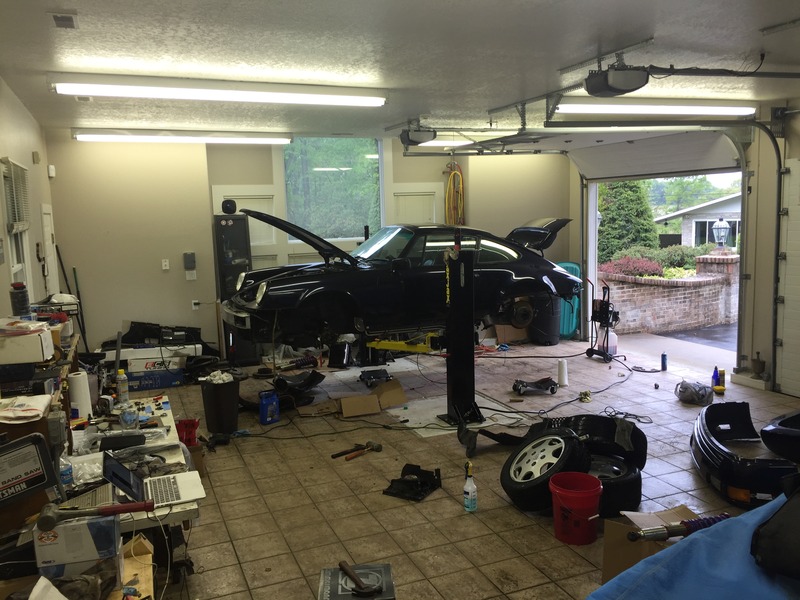
All cleaned up and waiting for the next go around...
Only question standing is about washers on a rear coilover install... should there be one on either side of the monoball? Just one on the outside between the bolt and the joint? I'm sure searching will yelid an answer, but hey I'm already probably a thousand words in, might as well keep typing.
TL/DR: Little bit done, lots to go. Hopefully more visually appealing progress in the near future. Thanks for reading.
-TJ
Since my last update, I've pulled the entire front body apart including the liners, bumper cover, bumper beam, etc and detailed the body including the fender wells.
I pulled the front struts and brakes, but had to delay reassembly because I'm waiting on new strut top gaskets.
Moving on to the back, I got all of the oil lines and the oil tank out of the car. Dropped off the oil tank and oil cooler to get professionally cleaned and pressure tested. I'm awaiting a quote for all new t-stat to cooler lines and a t-stat to oil filter housing line from my engine builder. I'll more likely be ordering parts to have the soft parts of the lines rebuilt from ERP.
I picked up the trans, heat exchangers, and mufflers from the engine builder. They will all be getting a fresh polish along with a cat delete and cup pipe courtesy of Skip here on the forums, who I highly recommend as a seller.
Just after starting:
After one round of APC, Sonax, and a pressure washer, another 2 or 3 sessions of detail work left to go. Motul going inside after she is cleaned up. Still trying to decide which forward mount bushing to go with, I'm leaning toward the Powerflex middle stiffness.
I installed the rear coilovers (only bolt that has really fought me was the pass side lower strut to trailing arm bolt.) There isn't a rear strut gasket in the PET since the strut top is rubber, but Im considering making one similar to the front since I have billet strut tops going in. If anyone has done similar to avoid the metal on metal contact, Id be interested to hear what you used. The template is simple enough, the material I will have to source.
Anyway, while working on the rear end I came to the conclusion that I absolutely need spring plate bushings (already ordered EPR rebuild kit), and wheel bearings (ordering momentarily.) This begs the question, should I just suck it up, order rear control arm bushings (the forward ones) and remove the whole thing and take them to a shop to have everything pressed in? Or leave the rear control arm bushings as is (they look fine) and buy a wheel bearing tool and install that and the spring plates on the car.... I think I'll get a progress report from the engine builder to see where the bill stands and decide if I want to spend another $500-$1k to complete the rear end with some Powerflex or ERP trailing arm bushings.
What else? I ordered a ton of gaskets and seals. Not much to look at until they go on the car.
In the middle of rebuilding the axles with new boots and grease. Haven't decided if I want to take the axles to a shop to have the outter joints pressed off for a more complete clean. That will likely happen if I decide to pull the rear trailing arms and take them to get new bushings pressed in. Truth is, given the condition of the boots, I'm half concerned they're going to need to be replaced completely anyway once the car is driving due to wear and lack of maintenance. We shall see...
The complete mess I made of the garage...
All cleaned up and waiting for the next go around...
Only question standing is about washers on a rear coilover install... should there be one on either side of the monoball? Just one on the outside between the bolt and the joint? I'm sure searching will yelid an answer, but hey I'm already probably a thousand words in, might as well keep typing.
TL/DR: Little bit done, lots to go. Hopefully more visually appealing progress in the near future. Thanks for reading.
-TJ