
1990 C4 Engine Rebuild - DIY


 10-28-2014, 06:56 PM
#18
Rennlist Member
Thread Starter
And so the acquisition of special tools begins...
I really, really wanted to order the Hazet 606/5 set with 19mm, 17mm, 13mm, and 10mm ratcheting wrenches but got a much better deal at Sears.com and picked up Craftsman 19, 13, and 10mm ratcheting wrenches. I needed the 19mm one for removel of the drive shaft bolts done in the interior of the car and can think of several spots where 10 and 13mm would come in handy for general maintenance.
Also got these from Nick's list:
8. 13mm flex/u-joint 3/8" sockets. For the heat exchanger nuts (the only way to get to some of them)
9. 8mm ⅜” drive 5.5” long allen/hex socket for heat exchanger barrel nuts.
10-28-2014, 10:49 PM
#19
Pro
Join Date: Oct 2012
Location: Brockville, On, Canada
Posts: 536
Likes: 0
Received 2 Likes
on
2 Posts
Would love to help with the slave but mine came out ok. Although it looks like this: 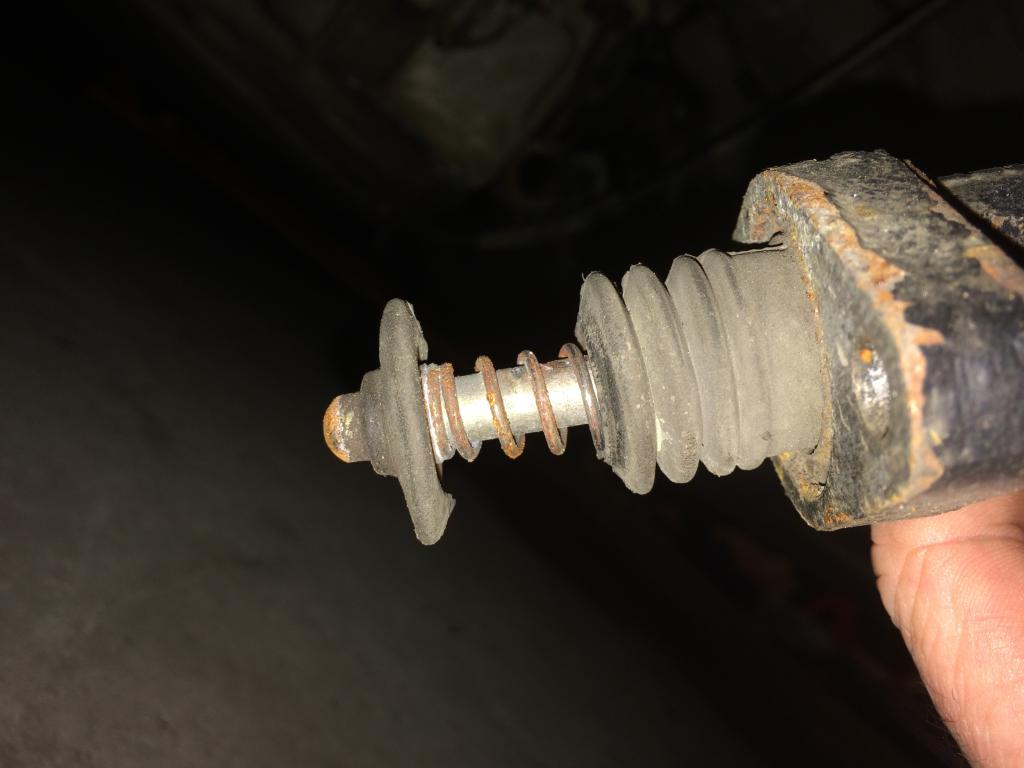 New slave or just replace the boot? Sorry for the hijack... Definitely have a review of my "Low oil pressure causing concern" thread. I bought some tools but no special tools yet. The M16 1.5 bolt on the pulley worked great and I don't mind shipping to you. I found that large crescent wrenches were better on the oil lines than the 32mm and 36mm wrenches. Good luck and keep posting. I'm splitting the case Monday.
 New slave or just replace the boot? Sorry for the hijack... Definitely have a review of my "Low oil pressure causing concern" thread. I bought some tools but no special tools yet. The M16 1.5 bolt on the pulley worked great and I don't mind shipping to you. I found that large crescent wrenches were better on the oil lines than the 32mm and 36mm wrenches. Good luck and keep posting. I'm splitting the case Monday.
Last edited by pi5tolpete; 10-29-2014 at 08:13 AM.
10-29-2014, 12:05 AM
#21
Rennlist Member
Thread Starter
Here is the custom plate that you need to make when you drop a C4 engine. A buddy of mine at work who has a full CNC mill in his garage quickly made this for me. Simple to make with a drill press and a hack saw and some steel from your local big box hardware store.
11-24-2014, 08:07 PM
#22
Rennlist Member
Thread Starter
I got started again on my engine drop. This time I disconnected the throttle cable at the engine. This is how you do that part. Again, I used Adrian Streather's book at Garrett's posts as my main guides.
One tip is to lift and hold the half shafts up and out of the way prior to the engine drop starting. I didn't do my right side one so well and it snagged during the drop.
One tip is to lift and hold the half shafts up and out of the way prior to the engine drop starting. I didn't do my right side one so well and it snagged during the drop.
Last edited by RicardoD; 11-24-2014 at 08:29 PM.
11-24-2014, 08:10 PM
#23
Rennlist Member
Thread Starter
Success on my second engine drop. C4 with the extra hydraulics made things a bit more interesting. But I didn't break anything. Just went very slow and kept checking around the engine to make sure nothing snagged. Having a 1000lb lift table cart made things so much easier this time. Money very well spent at Harbor Freight.
11-25-2014, 01:55 PM
#25
11-25-2014, 04:07 PM
#26
Rennlist Member
Hey Ricardo this is my exact library of info too  incredible amount of knowledge
i goy most of my main parts through Steve Weiner also. I also had him rebuild my heads, they turned out great
check out the Redtek site in the UK great tips here too on timing
http://www.redtek.co.uk/videos/
Now if i could only keep my garage clean
keep us posted
Glenn
incredible amount of knowledgei goy most of my main parts through Steve Weiner also. I also had him rebuild my heads, they turned out great
check out the Redtek site in the UK great tips here too on timing
http://www.redtek.co.uk/videos/
Now if i could only keep my garage clean
keep us posted
Glenn
11-25-2014, 04:31 PM
#27
Rennlist Member
Thread Starter
Ok guys, got the trans and engine undocked and somehow my engine is floating on my DIY engine stand.
11-25-2014, 04:46 PM
#28
Race Car
Where is the rust on that motor...I'm having cleanliness envy...
I'm having a little leak on the diff slave after having replaced the seals w the 9m kit. If you happen to rebuild reseal yours, please post some pics. I'd love to see the process and insides again...can't imagine I got it wrong...
I'm having a little leak on the diff slave after having replaced the seals w the 9m kit. If you happen to rebuild reseal yours, please post some pics. I'd love to see the process and insides again...can't imagine I got it wrong...
11-25-2014, 04:50 PM
#29
Rennlist Member
Thread Starter
Love 911s from the Pacific Northwest of the USA. Not too much sun and no salt. Engine is just oily and dirty. This car is from Portland, Oregon.
11-25-2014, 04:52 PM
#30

Looks great!. I'd leave that lift in place for a few days...just in case. My over spec weight Sealy stand buckled on day 2 after looking good when lowering the weight onto it. Luckily I caught it before things got less than fun. YMMV