
I'm in the motor now
 04-29-2014, 12:50 PM
#16
IHI KING!
Rennlist Member
Rennlist Member
Join Date: Aug 2001
Location: Nashua, New Hampshire, USA
Posts: 13,384
Received 222 Likes
on
176 Posts
Nice job on the CHT socket.
As for color suggestion? I went with the satin black on my car but I prefer the stock look.
As for removing the gaskets? Can the machine shop remove them for you when they are redoing the valves/valve guides?
As for color suggestion? I went with the satin black on my car but I prefer the stock look.
As for removing the gaskets? Can the machine shop remove them for you when they are redoing the valves/valve guides?
 04-29-2014, 01:18 PM
#17
Three Wheelin'
Thread Starter
I'm thinking light grey/silver for the tin to brighten up the area. Keeping the rest of the bits in their original utilitarian colors.
04-30-2014, 08:33 AM
#19
Nordschleife Master
I had pitted camshafts too. My indy replaced them with 930 cams. They didn't have to get these from Porsche and were therefore less expensive. They said that the cams are exactly the same. Your pic seems to confirm this.
04-30-2014, 07:30 PM
#20
Three Wheelin'
Thread Starter
That's a surprising cross-reference. I talked to John Dougherty at drcamshafts.com yesterday and he's going to take care of the bad lobe and check the cams out along with the rockers and shafts. No indication of oil leaking past the rocker shafts, but RSR rocker seals seem like a good bet?
Dropped off the engine tin, valve covers, and fan for powder coating today. I'm covering everything in a plain, stock-looking, flat silver. That should add a little light into the dark recesses of the engine bay.
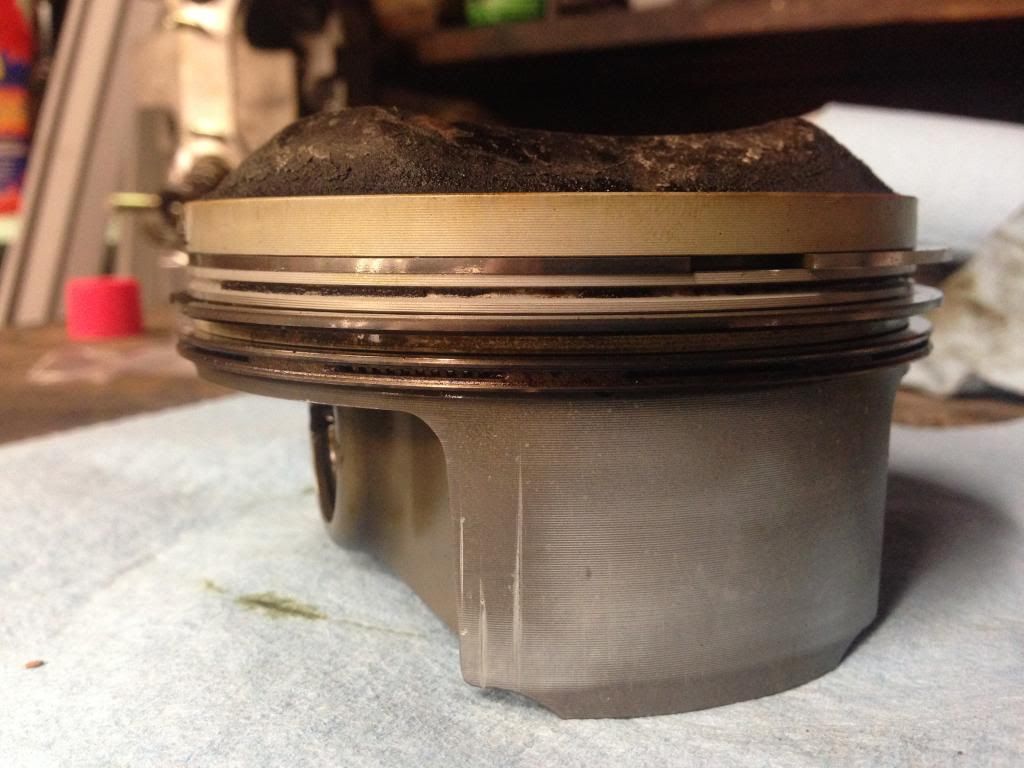
P&C's came off last night. Fairly uneventful. A few pistons have some scoring down the skirts. No corresponding marks in the cylinders. This one is enough to catch my fingernail on. Should I leave it as-is? You an also see some carbon deposits that made their way into the groove between the top and middle compression rings.
I soaked one of the piston crowns with penetrating oil and managed to get all of the burnt deposits off with some elbow grease. Some of the thickest deposits are probably 1mm thick! Is the compression ratio going to be lower post-cleaning? Seems like an immense amount of deposits.
Is it worth weight matching the pistons/pins/circlips? Anyone weighed theirs to find out how close they are from the factory? Though I don't see where any material could be taken off if one was a little off?
Plan is to leave the cylinders be and just re-ring the pistons. Cylinder cross-hatch/hone looks excellent.
I spun off one of the nuts on a leaking case through-bolt. Fishing the seal out was pretty easy with a dental pick. I'm thinking that I won't disturb the case seal if I replace the through-bolt seal, then torque the nut back up, one at a time. Sound like a plan? Or wishful thinking? It looks like 3 seals are leaking. The one nut that I removed had a puddle of oil behind it.
Dropped off the engine tin, valve covers, and fan for powder coating today. I'm covering everything in a plain, stock-looking, flat silver. That should add a little light into the dark recesses of the engine bay.
P&C's came off last night. Fairly uneventful. A few pistons have some scoring down the skirts. No corresponding marks in the cylinders. This one is enough to catch my fingernail on. Should I leave it as-is? You an also see some carbon deposits that made their way into the groove between the top and middle compression rings.

I soaked one of the piston crowns with penetrating oil and managed to get all of the burnt deposits off with some elbow grease. Some of the thickest deposits are probably 1mm thick! Is the compression ratio going to be lower post-cleaning?
Seems like an immense amount of deposits.Is it worth weight matching the pistons/pins/circlips? Anyone weighed theirs to find out how close they are from the factory? Though I don't see where any material could be taken off if one was a little off?
Plan is to leave the cylinders be and just re-ring the pistons. Cylinder cross-hatch/hone looks excellent.
I spun off one of the nuts on a leaking case through-bolt. Fishing the seal out was pretty easy with a dental pick. I'm thinking that I won't disturb the case seal if I replace the through-bolt seal, then torque the nut back up, one at a time. Sound like a plan? Or wishful thinking? It looks like 3 seals are leaking. The one nut that I removed had a puddle of oil behind it.
04-30-2014, 08:47 PM
#21
IHI KING!
Rennlist Member
Rennlist Member
Join Date: Aug 2001
Location: Nashua, New Hampshire, USA
Posts: 13,384
Received 222 Likes
on
176 Posts
I installed RSR rocker seals on my engine. I felt they were good insurance.
As for the case through bolts, that sounds like a reasonable approach to me.
Sorry, I don't know about the piston scuff. I suspect its fine but defer to those more knowledgeable.
As for the case through bolts, that sounds like a reasonable approach to me.
Sorry, I don't know about the piston scuff. I suspect its fine but defer to those more knowledgeable.
05-05-2014, 05:40 PM
#22
Three Wheelin'
Thread Starter
Nothing too exciting lately. Just waiting for parts to come in the mail and cleaning/prep work. Good news is that the heads didn't require any new valves, only seals and guides.
I'm amazed at the carbon coating on the pistons. Easily 1mm thick. The best remover ended up being a chemical gel paint stripper + 24 hours + brass brush. What a difference. Pistons will all get a thorough bath after this.
I did find some evidence of debris(?) scarring the crowns. I noticed some random scratches, dings, and rub marks on the tops of two pistons. All superficial, at least.
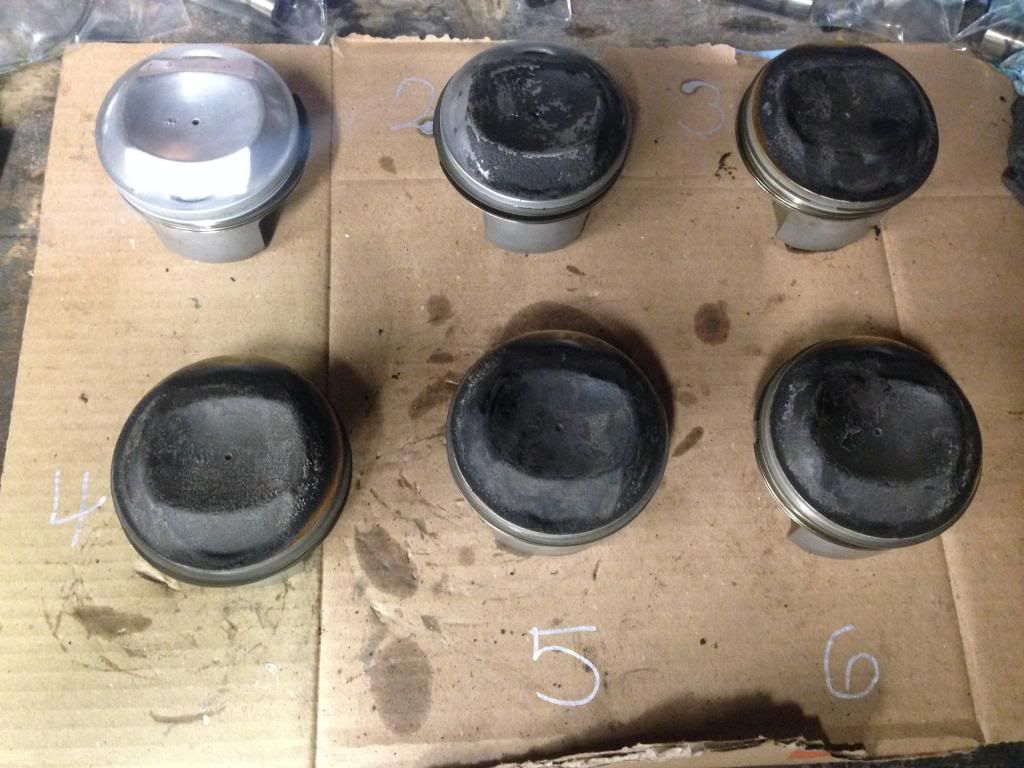
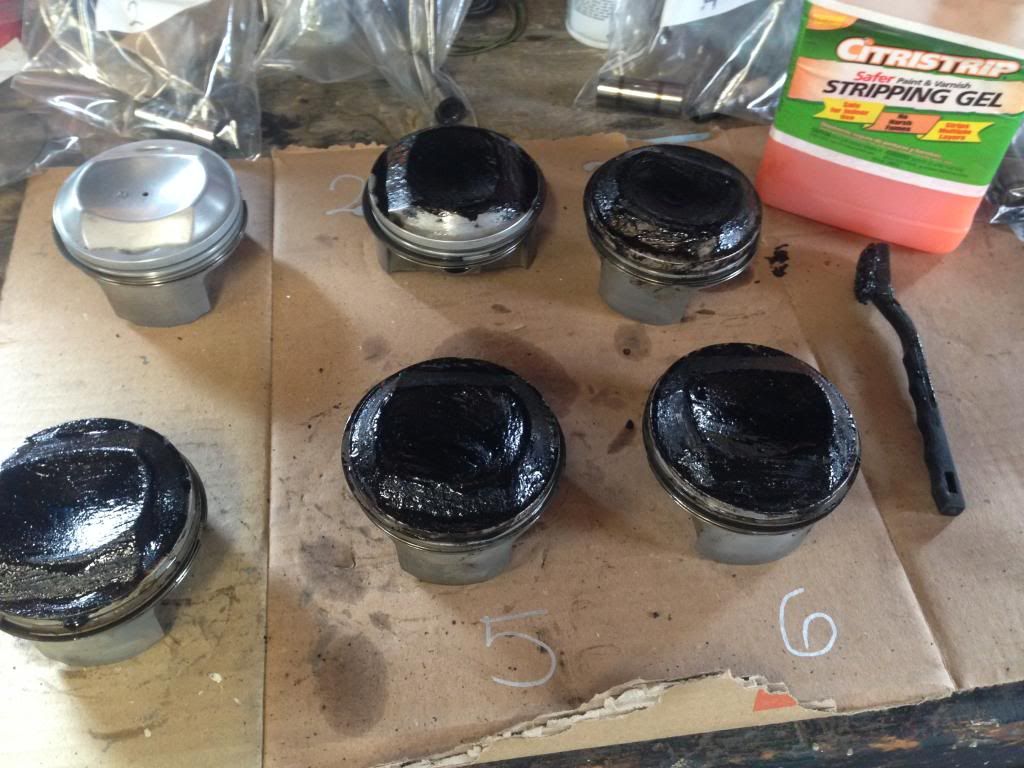
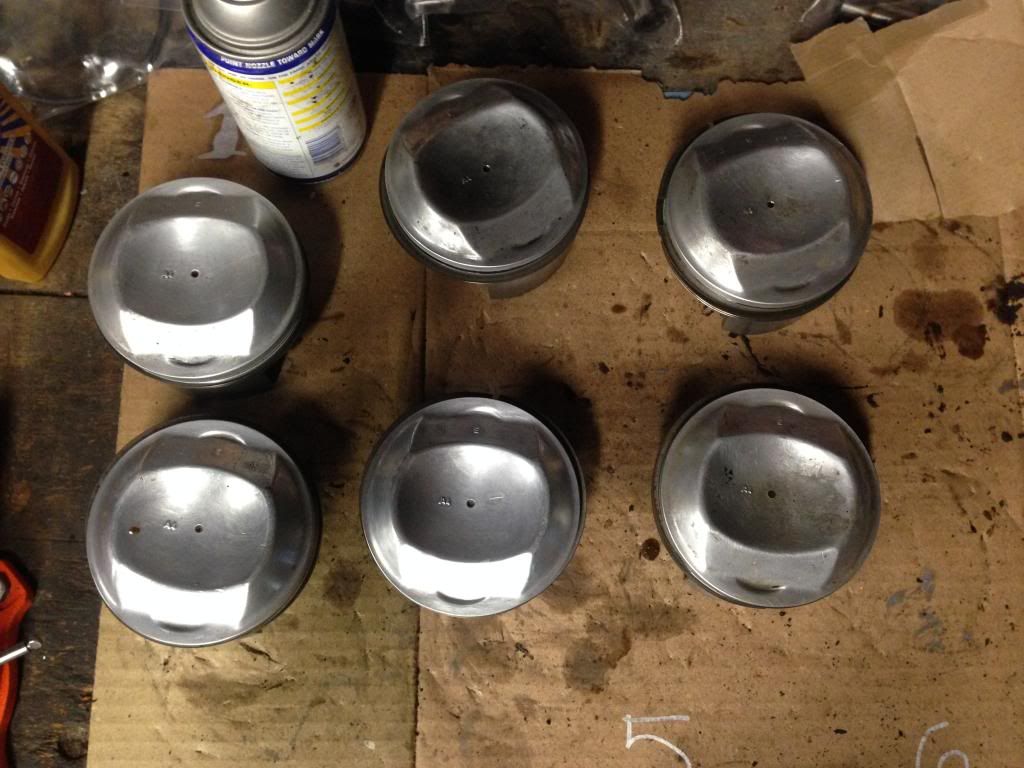


 05-05-2014, 06:42 PM
#23
Race Car
Nick...just a head up. I am about to do plugs and wires...and the Bosch FR5DTC plugs are out of stock everywhere and have been for a long time. So if you haven't started looking yet, you may want to look around a locate them so something small like this doesn't hold you up at the end...
I found a guy on eBay in the UK today and bought them there. Strange that nobody in the states seems to have them.
Also, on a funny note, autohauz sells them for 3.30 dollars, pelican is approx 5, and me local dealership parts department is, ready,,,,13 dollars per plug! Which is why they continue to get exactly zero business from me...
05-05-2014, 07:33 PM
#24
Three Wheelin'
Thread Starter
Thanks for that!
And now... break-in regiment?
There's a big sale on Valvoline 4-stroke conventional/dino motorcycle oil at my local parts shop. The sale makes it cheaper than anything else on the shelf. High zddp, and a conventional dino oil, so why not? As I poke around, the old non-detergent 30wt rule appears to no longer be the way to go as those oils have no zddp or any other additives. And the fancy "break-in oils" seem a little silly when 30 quarts are required within 500 miles.
Break-in plan:
- Fill with dino oil. 30 minutes varying the idle between 2500-3000rpm with dino oil to break in the newly ground cams/rockers.
- Change oil/filter. Fill with dino oil. 500 miles, below 4000rpm and 75% throttle, always varying rpm, plenty of good acceleration and engine braking to seat the new rings.
- Change oil/filter. Fill with dino oil. Now it's autocross time, wot and redline.
- 1,500 miles rings are seated, change oil/filter and switch to normal synthetic oil change schedule.
06-12-2014, 05:56 PM
#25
Three Wheelin'
Thread Starter
Okay, after a walkabout, it's back to engine work. Pistons are now much improved. Here is the before/after for weights, completely bare. Of course, the heaviest (#1) and lightest (#4) were paired together from the factory...
(grams)
#1. 474.0 470.1
#2. 471.8 470.0
#3. 471.8 470.0
#4. 469.8 469.8
#5. 470.9 470.0
#6. 470.0 469.8
Perhaps a bit overboard on that one, but it's an easy process to dremel a gram of aluminum from the underside of the piston. The wrist pins all measured in at exactly 132.0grams. Circlips at 1.5grams. The original 4.2gram weight imbalance is not exactly tiny. I probably don't want to know what the rod balance is like, and I'm not willing to pull them off just for balance sake. I gave the crowns a mirror polish too, just for bragging rights.
Long delay due to my sweet 14.5 year old "pup" passing this month, which put a number of things on hold. My hairy navigator is greatly missed.
 06-25-2014, 03:56 PM
#26
Three Wheelin'
Thread Starter
New through bolt o-rings installed. I did these one at a time so as not to upset the case seal. Used the much-maligned blue silicone o-rings, which were the same as the originals, coated them with DC Molykote 55, and used the marker cap trick to slip them over the through bolt threads. Easy.
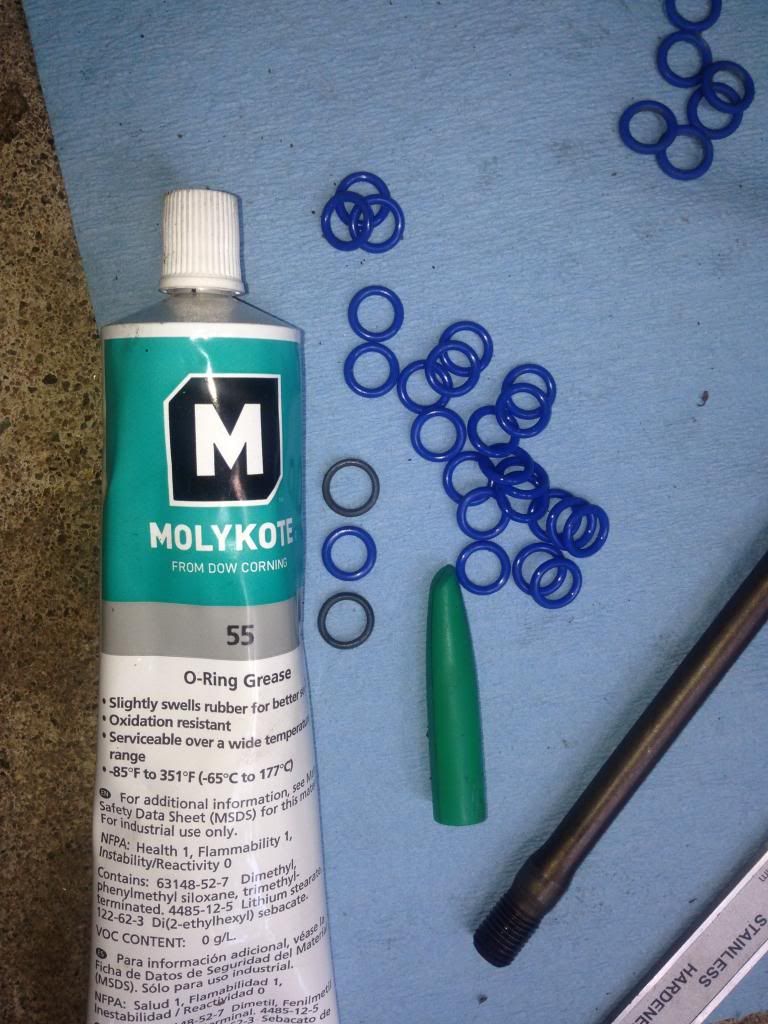
Interestingly: two of the original o-rings came out with tears in them. It looked like they were torn during the original installation. I bought a few extras and with the molykote, they wouldn't tear even when scraped over the bolt threads. Without molykote they would definitely tear.
Old through bolt o-rings measured >1mm larger outer diameter than the new ones, and >0.5mm larger inner diameter. A bit stretched.
I found some crusty gunk inside the case passageway for the top front through bolt at the #4 cylinder. The gunk was non-ferrous and looked a lot like the carbon gunk that I removed from the piston crowns. I carefully cleaned out the passageway with some long q-tips and made sure not to push any of the gunk into the oil passages.
Okay, gratuitous shiny p&c photo:
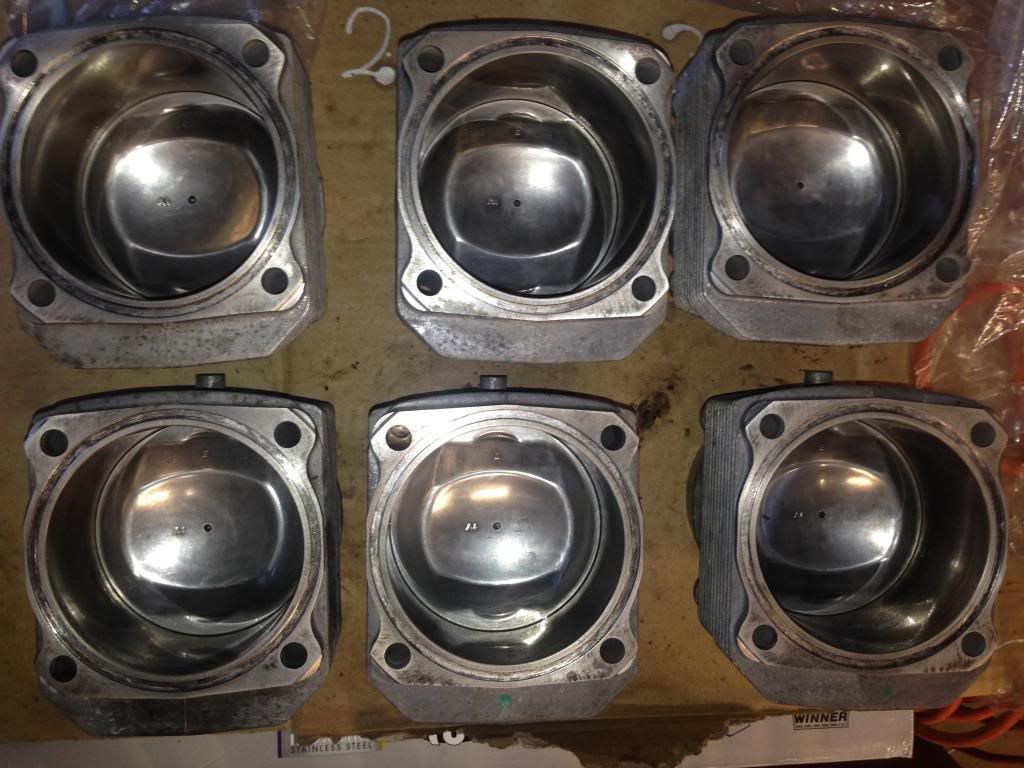
I haven't seen a lot of 3.6L tech measurements floating around the 'net, so here is something to add to the ether. My p&c are height group 5 and diameter group 3. Which should put them at 100.021 +-0.007mm. I didn't give my bore gauge an absolute calibration and it's only accurate to 0.0006mm. These are the differences between cylinders, in mm:
cylinder diameter @ 56mm depth
#1 +0.006 -0.026(top of cyl) +0.016(bottom of cyl)
#2 +0.000
#3 +0.006
#4 +0.000
#5 +0.000
#6 +0.000
I had heard that these cylinders are tapered but haven't seen any measurements. Anybody know if a total taper of about 0.04mm sounds right?
Next up is the measurement of the new Goetze ring gaps. Measured these at 53.5mm down the cylinder (depth that using the piston to push them in amounted to). Internet wisdom says that 0.2-0.6mm is in the good range. These will be a tighter at the top of the cylinder, but they're so loose in general that there's no need to worry about them getting too tight.
cylinder oil middle top (in mm)
#1 .330 .432 .432
#2 .406 .406 .432
#3 .406 .432 .381
#4 .432 .457 .457
#5 .432 .432 .432
#5 >.635 .559 .533 old rings
#6 .432 .483 .432
Note the gap on the old rings that I measured for cylinder #5. My feeler gauges max out at 0.635mm.
06-26-2014, 09:23 PM
#27
Three Wheelin'
Thread Starter
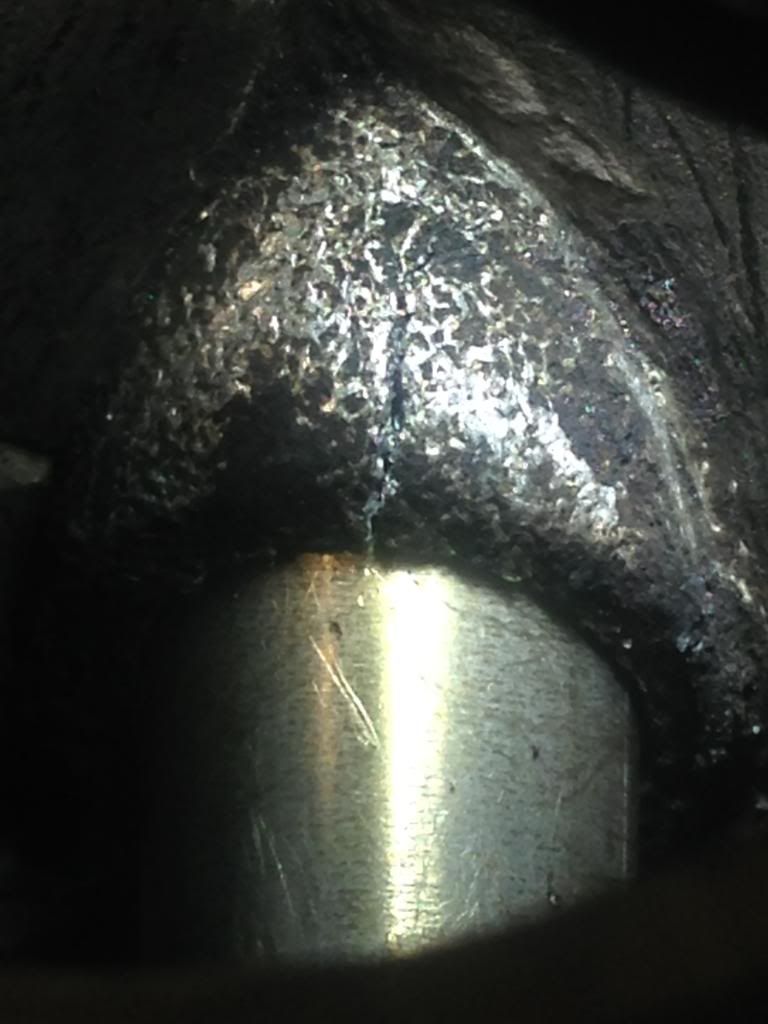
P&C are on the case. I grabbed the first head to slip on and just now took a closer look at them. I'm surprised to find such a lip on the exhaust valve seat. Is it worth having these blended into the port? The intake is perfectly smooth. Visible to the left of the valve in the first photo. Second photo you can see a good crack in the ceramic liner. I've been told not to worry about the ceramic liners coming apart, though it looks pretty unsettling.
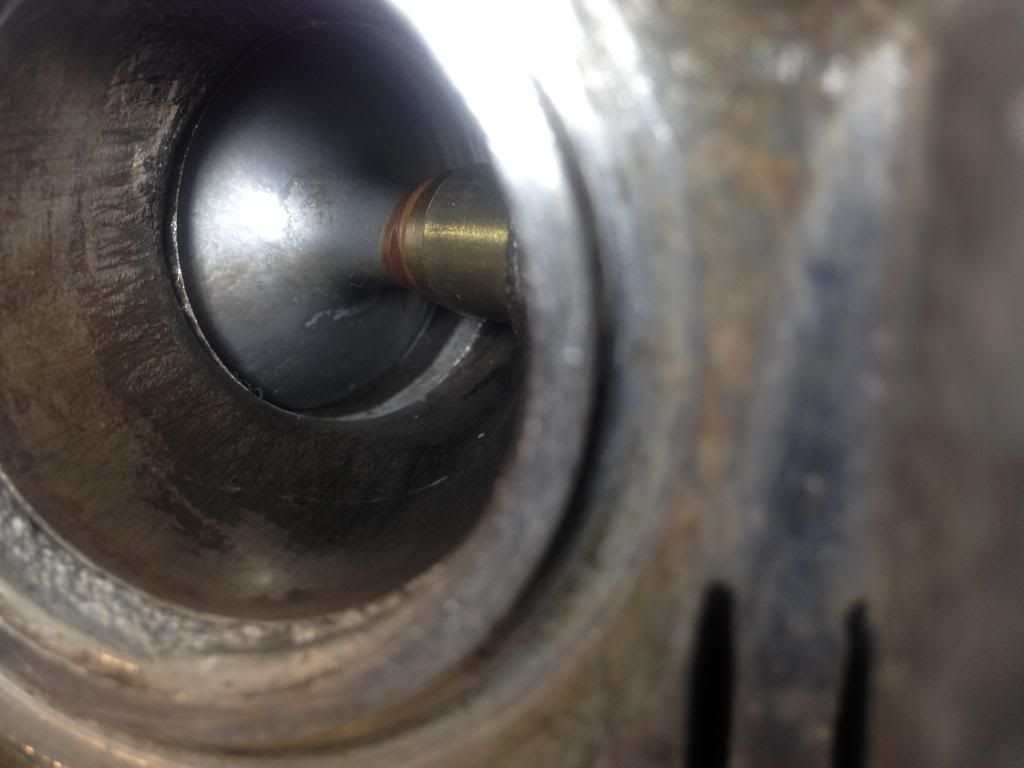
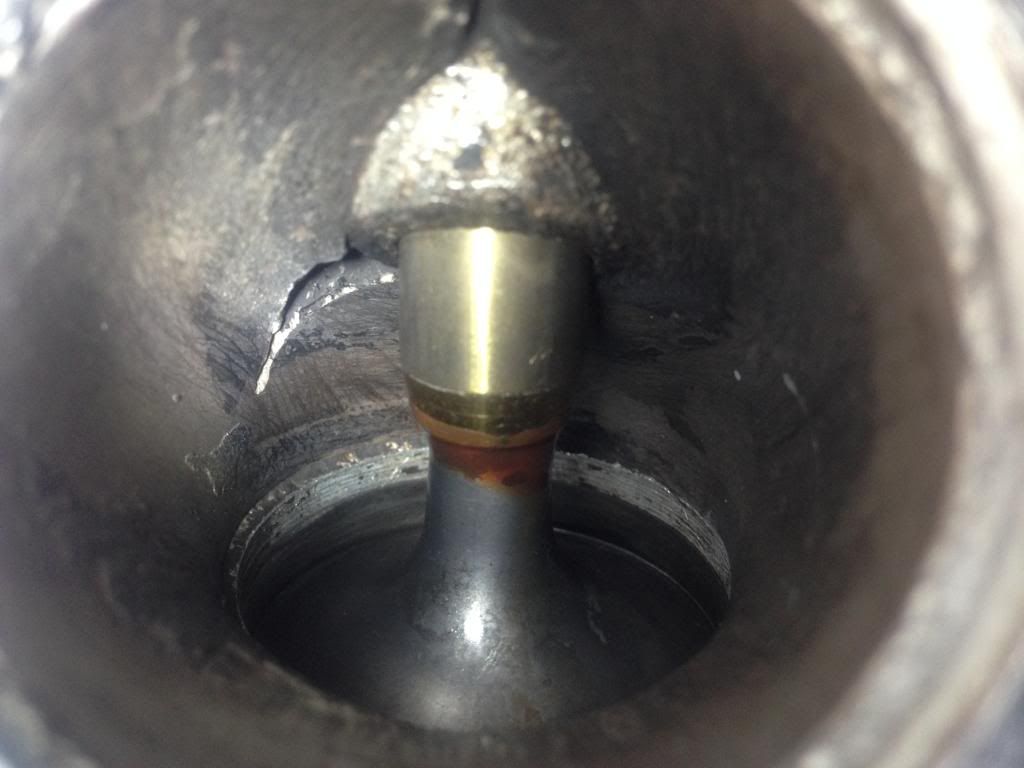
!! Just caught this. I believe that this crack is in the aluminum casting, right? I see a similar crack in one of the other heads. Botched valve guide replacement?


!! Just caught this. I believe that this crack is in the aluminum casting, right? I see a similar crack in one of the other heads. Botched valve guide replacement?

Last edited by -nick; 06-26-2014 at 10:08 PM.
 06-27-2014, 12:16 AM
#29
Racer

Join Date: May 2005
Location: SF Bay Area
Posts: 298
Likes: 0
Received 0 Likes
on
0 Posts
Wow. I know those are pretty close up shots but they look pretty scary to me. I'm no expert but kinda makes me wonder what causes those since mine has about the same miles as yours.
Very much appreciate for chronicling your progress. Definitely subscribed!
Very much appreciate for chronicling your progress. Definitely subscribed!
06-27-2014, 11:17 AM
#30
Three Wheelin'
Thread Starter
Good tip Feral, I just started a thread at Pelican. http://forums.pelicanparts.com/911-e...ml#post8136974
Ceramic liner cracks don't appear to be an issue. I even came across a Porsche TSB that it can be ignored. The valve guide boss crack is most certainly from the shop who replaced the guides...
Ceramic liner cracks don't appear to be an issue. I even came across a Porsche TSB that it can be ignored. The valve guide boss crack is most certainly from the shop who replaced the guides...