
DiY 964 to 993 complete HVAC swap
 10-26-2011, 05:30 PM
#1
Track Day
Thread Starter
Join Date: Jan 2007
Posts: 19
Likes: 0
Received 0 Likes
on
0 Posts
How to replace the Porsche 964 HVAC system with a 993 HVAC system
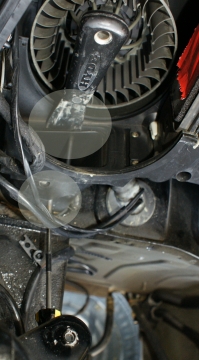
Pictured below is a 964 AC "suitcase"

You should replace the small right hand drain with the larger and much loss prone to plug up 993 part.
A little history
Porsche introduced the 964 in 1989. It was the most extensive redesign of the venerable 911 since it’s introduction back in 1965 and was 85% new as compared to its predecessor, the Carrera 3.2.
The heating, ventilation and air conditioning system (HVAC) in all earlier models had been in effect an-add on. Porsche fully integrated it into the design of the new 964, and the result was a significant improvement in performance, something that had become requisite for a modern automobile in its price class.
Other changes followed, with the 1993 964 Porsche replaced the R12 Freon refrigerant with the more ozone friendly R134a, and when the 993 replaced the 964 several additional improvements were incorporated into its system most notably cabin air filters.
My story
Two years ago I was on a Memorial Day trip from my home in Los Angeles to Merced to visit the Castle AF base museum in my 1992 C2 Targa, when I suddenly heard a high pitched squeal coming from the engine compartment. It took me a couple of seconds to guess that it might be the A/C drive belt, so I punched the A/C OFF button on the CCU (Climate Control Unit) and the noise stopped immediately. I pulled off Highway 99 at the next rest stop and got out to have a look under the rear lid. When I popped the top, smoke was wafting from the pulley and clutch assembly on the A/C compressor, and the black paint was thoroughly scorched. Well so much for air conditioning on this trip I thought, as I pulled the power lead from the clutch and tied it out of the way (to prevent a return performance just in case I hit the CCU ON button by accident).
The A/C had been deteriorating slowly over the course of the six years I had owned the car, and I knew that when I got back into town I was going to have to make a decision as to what my course of action was going to be now that the compressor had suffered a catastrophic failure. It had originally been my intention to swap out the R12 refrigerant in my ’92 964 system, but after the compressor failed I started researching the best way to accomplish the conversion I discovered several additional bits of information that led me to believe that a more extensive parts swap might in the long run be a better way to proceed.
Some A/C background
First of all the compressor lubrication oil, which during operation circulates freely through out the refrigeration circuit, is different in R134a systems (as in incompatible) with what was in my present R12 system. It pools in the bottom of the condenser and the evaporator, and unless these components are removed it cannot be fully removed. (It is possible to substitute Ester oil instead, which is compatible - See the Griffith website for more information)
Second Porsche updated both the evaporator, and the expansion valve in systems using R134a, and changed the rubber hose (from the designed to leak slightly) to a non-leak barrier type material as well.
Since I was going to have to pull the entire HVAC unit out of the car to replace the evaporator and the expansion valve, as well as replacing my bad compressor, and the receiver dryer unit and the hose material, and since the individual parts were going to add up to a substantial amount of money ($1000+ not including A/C shop labor to evacuate and recharge the my system with the newer refrigerant) I decided to look for an alternative.
My A/C experience level
As the owner of a number of not new imported cars over the years I had learned a lot about keeping their A/C systems alive. I knew that as a result of the Montreal Protocol after 1989 R12, a CFC refrigerant was to be replaced in all subsequent automotive applications with R134A, a HFC refrigerant, that does not contribute to global atmospheric ozone depletion. The problem as you may or may not know is that these two refrigerants are not interchangeable with one another. R12 was still available although by law it was now only to be sold in 20 lb or larger containers that require a license to purchase. (I have no idea what the current price per pound is but I bet it’s not cheap.) I set about finding out how to get such a license, and in the process decided to go back to school and take a full blown automotive HVAC (Heating, Ventilation and Air Conditioning) class at the Pierce College Adult School located near my home in Woodland Hills.
Why I decided what I decided
But I digress. After a lot of investigation, reading of web posts, Google searching, Porsche shop manual consultation, and conversations with various individuals about what my best course of action was going to be I finally decided that I would replace my current 964 R12 based A/C system with a later system out of a 1994 993 that used R134A. I knew that it wouldn’t be easy, but based my decision on the following key points.
First I would have a system that was designed by Porsche to be completely compatible with R134A, Second, although the 993 system is fundamentally the same as the 964 system (with the exception of rubber hoses, expansion valve, and evaporator core) it does incorporate some refinements, one of which I was attracted by was the addition of cabin air filters, and also a slight improvement in ease of access to components. This necessitated a redesign of the warm air path. On the 964 the mixing doors are located inside and at the bottom of the fan shrouds and the control servomotors are mounted on top of the ‘suitcase”. With the addition of the cabin air filters there was no way for a hinged door to open inside the fan housing so Porsche changed the mix doors and the servos to an in-line configuration and, located them behind driver and passenger foot well panels, replacing the section of flexible hose used on the 964. (This has nothing to do with performance but I liked it for purely ascetic reasons, although it does provide easier access to some of those troublesome servomotors in the event that one fails.)
There is a lot of DIY info related to working on both the 964, and later 993 systems available on the web to which I have included some links. Many of them go into great detail, so I won’t reproduce it here. I do have a few refinements that I would like to offer however.
Let’s do it
First in order to gain access to the A/C unit that contains the cabin fans, control servos and evaporator (sometimes referred to as the “suitcase”) located under the front cowl, it is necessary to remove the fuel tank. The recommended practice is to drive the car well past the point that the low fuel warning light comes on and then drain the remaining fuel from under the car when the fuel pump is disconnected. I offer the following alternative. After the fuel pump is lowered but before the hoses are disconnected, go into the engine compartment and disconnect the main fuel line at the point it connects to the FI distribution rail. (On the right side of the engine next to the fuel filter. Slide the nut back to expose the end of the supply pipe and fit a length of fuel line over the end that is long enough to reach a jerrycan positioned behind the rear of the car on the garage floor. When everything is secure so it won’t come loose or move around, slide back under the car and disconnect the power leads to the pump and then attach an external 12 VDC source such as a battery charger to the pump (just turning the ignition on will not run the pump). Being sure to observe proper polarity – brown is negative, turn on the 12 VDC source and pump the remaining fuel into the jerrycan. When the tank is empty you will hear a noticeable change in the sound from the pump and your jerrycan will contain about three gallons of fuel, and you will have avoided the potential experience of a high-octane bath.
You must also remove the fuse block, the firewall, the glove box, the radio, the CCU, and the tachometer, the refrigerant lines under the left fender, the cowl fresh air cover screen and the electrical plugs under the dash in order to pull the “suitcase”.
The next tip concerns removing the warm air elbows from the left and right fan housing inlets. The suitcase will not come out until this is done. They are located behind the carpeted panels on the right and left side of the driver and passenger foot wells respectively. They must be pulled down from the inside but they are retained by three plastic “bumps” that fit into holes in the blower housing inlets. (You can see one of them on the front of each the inlet.) The trick to releasing these retainers is to first remove the left and right fan housing covers.
View of the bottom of the unit showing locking holes for hot air elbows
 .
.
Then carefully so as not to crack the plastic slide a thin 1” bladed putty knife into the seam between the elbow and the back of the fan housing
 .
.
Next using a bent shaft screwdriver (I made my own using a propane torch) inserted to separate the front retainer you can pull the elbows down and out from inside the car. Once all this is removed you can first pull and lift the passenger side of the suitcase up and toward the front of the car. From the front, reach in and pull the left side air duct loose from the top, and thru the tachometer port, the right side air duct. Disconnect the electrical connectors from the underside of the dash behind the glove box, and carefully pull the entire wiring harness out after removing the rubber grommet sealing the top of the passenger foot well to the inside of the trunk. Once the unit clears the gusset attached to the passenger wheel well it will slide all the way out. Piece of cake right?
I had all the fixed components, cleaned of old oil inside and out and pressure tested by AirMec in Canoga Park, CA and they also replaced all the of rubber hose sections with barrier hose. One note of special importance, I replaced my compressor with one from a 993 that used R134a and the fittings were different those on the 964. I had intended to use the 993 lines that ran from the compressor to the fittings just outboard of the left wheel well. All was well until I began to reassemble the system. Try as I might there was just no way I could get them to fit. Come to find out that the 993 was widened about one inch on each side for the new suspension and the AC lines were just that much too long. The solution was to use the compressor end fittings from the 993 on one end of the rubber hoses and the 964 on the other end. (Be vary mindful of hose length. Porsche hose length is just long enough to allow full travel of the compressor on its mounting pedestal without being so long that they bow out into the heater blower housing.)
Also be sure to get all the parts from the donor car, including all lines, and hoses, condenser unit drain pipes (the driver side one on the 993 is now larger in diameter, colored white instead of black.) and the foot well ducts and servos. (Be sure all the servos on the unit you acquire are in working order – they’re very expensive $200+ new)
The only modification that I had to perform to my 964 was to enlarge the driver side hole for the A/C drain line. As noted above, the 993 unit uses a larger diameter tube, possibly because the old one had a tendency to get plugged up. I cut a piece of strap iron with a pilot hole for a hole saw already pre-drilled and clamped it under the platform the unit sits on, with the pilot hole right centered in the smaller diameter original hole. Also the plastic receiver that the lower end of the drain lines fiits into needs to have small modification - a narrow slot cut into the front hole to accommodate the key on the rubber valve/receiver for the forward drain pipe.
Cutting the enlarged hole
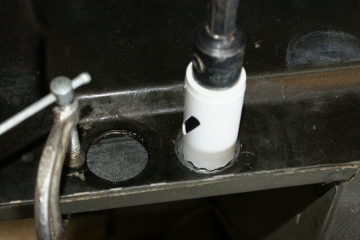
After the hole was cut showing the position of the arbor guide
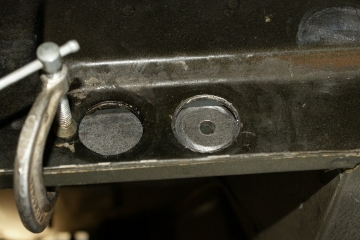
With part of the 993 drain lines in place.
 .
.
And finally
Porsche specs call for 840g of refrigerant R134a and 140 cc +/- 20 cc of ND 8 compressor oil (That is with a completely clean system - no oil in any component). Order the correct 993 A/C charging sticker and place it on the fan shroud in place of the old 964 sticker.
At this point you have 3 options.
1. Take the car to a shop and have them finish the work. However if the system leaks you will pay for them to find the problem.
2. Add the oil and evacuate the system yourself. Be sure to run the pump for a minimum of one half hour. Doing it this way will reveal most leaks but you have to have a vacuum pump and gauge set. This is the way I did it, and because I was very careful during assembly, after the pump was turned off the sealed system vacuum remained steady for 24 hours.
3. This option is available to a good AC shop. After evacuating the system charge to about 150 psi with dry nitrogen. This will definitely reveal any leaks, add oil, evacuate and charge
So that is it. You can expect the center outlet air temp to measure around 40 to 45 degrees F.
Performance should conform to this chart, at 2000 RPM, windows up, recirculate, fan on high, temp set to minimum.

Left side = center outlet air temp, bottom = outside ambient air temp
If it all works, give yourself a pat on the back for a job well done, and one that few owners, let alone bona fide Porsche shops have ever attempted.
Common myths dispelled:
The fuel can be removed from the tank easily by pumping it out rather than siphoning or draining from under the vehicle.
964/993 CCUs are interchangeable except that the 964 unit doesn’t have the 993 HI COOL function.
The 964 hot air elbows from the inside foot wells to the bottom of the fan housing can be removed without breaking them.
The 993 unit will function without the vacuum servo controlled cabin return louvers.
If you are careful you can reuse the paper and foil foot well warm air ducts.
And a little background information
Water contamination in the refrigeration circuit combines with the R12 to create acid that over time erodes metal parts in the evaporator and the condenser.
An oil and dust covered evaporator or condenser unit means that it is most likely holed thru and will have to be replaced. (That’s where your refrigerant charge has been going)
Over time it is possible for the electrical connectors to become tarnished resulting in poor or intermittent contact. I recently had a problem with the CCU face going dead for periods of time. In my case I fixed the it by using Radio Shack contact cleaner on the ribbon cable connector inside the unit between the face and the main pc board. (Apply sparingly. Also on the two main rear connectors which also makes removal and installation easier as well).
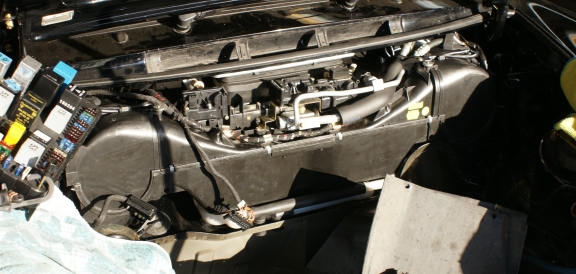
The "new" 993 unit in place
Some useful links:
993 A/C Evaporator / Expansion valve replace DIY
http://p-car.com/diy/ac/
Porsche Classic Original Parts Catalog - See Main Group 8 Body, Pages 351 to 368
http://www.porsche.com/usa/accessori...artscatalogue/
Porsche 964 HVAC servos
http://www.porsche964.co.uk/technical/servos.htm#3
Complete A/C diagnosis
https://rennlist.com/forums/993-foru...diagnosis.html
Modifications to HVAC from Model year 1995
https://rennlist.com/forums/993-foru...knowledge.html
Some interesting pictures of the 964 left and right blower motors
https://rennlist.com/forums/964-foru...nt-dash-3.html
CCU repairs
http://privat.bluezone.no/toreb2000/ccurepair.html
Los Angeles Porsche Dismantler
http://www.911pcar.com/
AirMec - A/C hose replacing
http://www.airpartsonline.com/
And last but not least
http://www.griffiths.com/
Pictured below is a 964 AC "suitcase"
You should replace the small right hand drain with the larger and much loss prone to plug up 993 part.
A little history
Porsche introduced the 964 in 1989. It was the most extensive redesign of the venerable 911 since it’s introduction back in 1965 and was 85% new as compared to its predecessor, the Carrera 3.2.
The heating, ventilation and air conditioning system (HVAC) in all earlier models had been in effect an-add on. Porsche fully integrated it into the design of the new 964, and the result was a significant improvement in performance, something that had become requisite for a modern automobile in its price class.
Other changes followed, with the 1993 964 Porsche replaced the R12 Freon refrigerant with the more ozone friendly R134a, and when the 993 replaced the 964 several additional improvements were incorporated into its system most notably cabin air filters.
My story
Two years ago I was on a Memorial Day trip from my home in Los Angeles to Merced to visit the Castle AF base museum in my 1992 C2 Targa, when I suddenly heard a high pitched squeal coming from the engine compartment. It took me a couple of seconds to guess that it might be the A/C drive belt, so I punched the A/C OFF button on the CCU (Climate Control Unit) and the noise stopped immediately. I pulled off Highway 99 at the next rest stop and got out to have a look under the rear lid. When I popped the top, smoke was wafting from the pulley and clutch assembly on the A/C compressor, and the black paint was thoroughly scorched. Well so much for air conditioning on this trip I thought, as I pulled the power lead from the clutch and tied it out of the way (to prevent a return performance just in case I hit the CCU ON button by accident).
The A/C had been deteriorating slowly over the course of the six years I had owned the car, and I knew that when I got back into town I was going to have to make a decision as to what my course of action was going to be now that the compressor had suffered a catastrophic failure. It had originally been my intention to swap out the R12 refrigerant in my ’92 964 system, but after the compressor failed I started researching the best way to accomplish the conversion I discovered several additional bits of information that led me to believe that a more extensive parts swap might in the long run be a better way to proceed.
Some A/C background
First of all the compressor lubrication oil, which during operation circulates freely through out the refrigeration circuit, is different in R134a systems (as in incompatible) with what was in my present R12 system. It pools in the bottom of the condenser and the evaporator, and unless these components are removed it cannot be fully removed. (It is possible to substitute Ester oil instead, which is compatible - See the Griffith website for more information)
Second Porsche updated both the evaporator, and the expansion valve in systems using R134a, and changed the rubber hose (from the designed to leak slightly) to a non-leak barrier type material as well.
Since I was going to have to pull the entire HVAC unit out of the car to replace the evaporator and the expansion valve, as well as replacing my bad compressor, and the receiver dryer unit and the hose material, and since the individual parts were going to add up to a substantial amount of money ($1000+ not including A/C shop labor to evacuate and recharge the my system with the newer refrigerant) I decided to look for an alternative.
My A/C experience level
As the owner of a number of not new imported cars over the years I had learned a lot about keeping their A/C systems alive. I knew that as a result of the Montreal Protocol after 1989 R12, a CFC refrigerant was to be replaced in all subsequent automotive applications with R134A, a HFC refrigerant, that does not contribute to global atmospheric ozone depletion. The problem as you may or may not know is that these two refrigerants are not interchangeable with one another. R12 was still available although by law it was now only to be sold in 20 lb or larger containers that require a license to purchase. (I have no idea what the current price per pound is but I bet it’s not cheap.) I set about finding out how to get such a license, and in the process decided to go back to school and take a full blown automotive HVAC (Heating, Ventilation and Air Conditioning) class at the Pierce College Adult School located near my home in Woodland Hills.
Why I decided what I decided
But I digress. After a lot of investigation, reading of web posts, Google searching, Porsche shop manual consultation, and conversations with various individuals about what my best course of action was going to be I finally decided that I would replace my current 964 R12 based A/C system with a later system out of a 1994 993 that used R134A. I knew that it wouldn’t be easy, but based my decision on the following key points.
First I would have a system that was designed by Porsche to be completely compatible with R134A, Second, although the 993 system is fundamentally the same as the 964 system (with the exception of rubber hoses, expansion valve, and evaporator core) it does incorporate some refinements, one of which I was attracted by was the addition of cabin air filters, and also a slight improvement in ease of access to components. This necessitated a redesign of the warm air path. On the 964 the mixing doors are located inside and at the bottom of the fan shrouds and the control servomotors are mounted on top of the ‘suitcase”. With the addition of the cabin air filters there was no way for a hinged door to open inside the fan housing so Porsche changed the mix doors and the servos to an in-line configuration and, located them behind driver and passenger foot well panels, replacing the section of flexible hose used on the 964. (This has nothing to do with performance but I liked it for purely ascetic reasons, although it does provide easier access to some of those troublesome servomotors in the event that one fails.)
There is a lot of DIY info related to working on both the 964, and later 993 systems available on the web to which I have included some links. Many of them go into great detail, so I won’t reproduce it here. I do have a few refinements that I would like to offer however.
Let’s do it
First in order to gain access to the A/C unit that contains the cabin fans, control servos and evaporator (sometimes referred to as the “suitcase”) located under the front cowl, it is necessary to remove the fuel tank. The recommended practice is to drive the car well past the point that the low fuel warning light comes on and then drain the remaining fuel from under the car when the fuel pump is disconnected. I offer the following alternative. After the fuel pump is lowered but before the hoses are disconnected, go into the engine compartment and disconnect the main fuel line at the point it connects to the FI distribution rail. (On the right side of the engine next to the fuel filter. Slide the nut back to expose the end of the supply pipe and fit a length of fuel line over the end that is long enough to reach a jerrycan positioned behind the rear of the car on the garage floor. When everything is secure so it won’t come loose or move around, slide back under the car and disconnect the power leads to the pump and then attach an external 12 VDC source such as a battery charger to the pump (just turning the ignition on will not run the pump). Being sure to observe proper polarity – brown is negative, turn on the 12 VDC source and pump the remaining fuel into the jerrycan. When the tank is empty you will hear a noticeable change in the sound from the pump and your jerrycan will contain about three gallons of fuel, and you will have avoided the potential experience of a high-octane bath.
You must also remove the fuse block, the firewall, the glove box, the radio, the CCU, and the tachometer, the refrigerant lines under the left fender, the cowl fresh air cover screen and the electrical plugs under the dash in order to pull the “suitcase”.
The next tip concerns removing the warm air elbows from the left and right fan housing inlets. The suitcase will not come out until this is done. They are located behind the carpeted panels on the right and left side of the driver and passenger foot wells respectively. They must be pulled down from the inside but they are retained by three plastic “bumps” that fit into holes in the blower housing inlets. (You can see one of them on the front of each the inlet.) The trick to releasing these retainers is to first remove the left and right fan housing covers.
View of the bottom of the unit showing locking holes for hot air elbows
Then carefully so as not to crack the plastic slide a thin 1” bladed putty knife into the seam between the elbow and the back of the fan housing
.Next using a bent shaft screwdriver (I made my own using a propane torch) inserted to separate the front retainer you can pull the elbows down and out from inside the car. Once all this is removed you can first pull and lift the passenger side of the suitcase up and toward the front of the car. From the front, reach in and pull the left side air duct loose from the top, and thru the tachometer port, the right side air duct. Disconnect the electrical connectors from the underside of the dash behind the glove box, and carefully pull the entire wiring harness out after removing the rubber grommet sealing the top of the passenger foot well to the inside of the trunk. Once the unit clears the gusset attached to the passenger wheel well it will slide all the way out. Piece of cake right?
I had all the fixed components, cleaned of old oil inside and out and pressure tested by AirMec in Canoga Park, CA and they also replaced all the of rubber hose sections with barrier hose. One note of special importance, I replaced my compressor with one from a 993 that used R134a and the fittings were different those on the 964. I had intended to use the 993 lines that ran from the compressor to the fittings just outboard of the left wheel well. All was well until I began to reassemble the system. Try as I might there was just no way I could get them to fit. Come to find out that the 993 was widened about one inch on each side for the new suspension and the AC lines were just that much too long. The solution was to use the compressor end fittings from the 993 on one end of the rubber hoses and the 964 on the other end. (Be vary mindful of hose length. Porsche hose length is just long enough to allow full travel of the compressor on its mounting pedestal without being so long that they bow out into the heater blower housing.)
Also be sure to get all the parts from the donor car, including all lines, and hoses, condenser unit drain pipes (the driver side one on the 993 is now larger in diameter, colored white instead of black.) and the foot well ducts and servos. (Be sure all the servos on the unit you acquire are in working order – they’re very expensive $200+ new)
The only modification that I had to perform to my 964 was to enlarge the driver side hole for the A/C drain line. As noted above, the 993 unit uses a larger diameter tube, possibly because the old one had a tendency to get plugged up. I cut a piece of strap iron with a pilot hole for a hole saw already pre-drilled and clamped it under the platform the unit sits on, with the pilot hole right centered in the smaller diameter original hole. Also the plastic receiver that the lower end of the drain lines fiits into needs to have small modification - a narrow slot cut into the front hole to accommodate the key on the rubber valve/receiver for the forward drain pipe.
Cutting the enlarged hole
After the hole was cut showing the position of the arbor guide
With part of the 993 drain lines in place.
. And finally
Porsche specs call for 840g of refrigerant R134a and 140 cc +/- 20 cc of ND 8 compressor oil (That is with a completely clean system - no oil in any component). Order the correct 993 A/C charging sticker and place it on the fan shroud in place of the old 964 sticker.
At this point you have 3 options.
1. Take the car to a shop and have them finish the work. However if the system leaks you will pay for them to find the problem.
2. Add the oil and evacuate the system yourself. Be sure to run the pump for a minimum of one half hour. Doing it this way will reveal most leaks but you have to have a vacuum pump and gauge set. This is the way I did it, and because I was very careful during assembly, after the pump was turned off the sealed system vacuum remained steady for 24 hours.
3. This option is available to a good AC shop. After evacuating the system charge to about 150 psi with dry nitrogen. This will definitely reveal any leaks, add oil, evacuate and charge
So that is it. You can expect the center outlet air temp to measure around 40 to 45 degrees F.
Performance should conform to this chart, at 2000 RPM, windows up, recirculate, fan on high, temp set to minimum.
Left side = center outlet air temp, bottom = outside ambient air temp
If it all works, give yourself a pat on the back for a job well done, and one that few owners, let alone bona fide Porsche shops have ever attempted.
Common myths dispelled:
The fuel can be removed from the tank easily by pumping it out rather than siphoning or draining from under the vehicle.
964/993 CCUs are interchangeable except that the 964 unit doesn’t have the 993 HI COOL function.
The 964 hot air elbows from the inside foot wells to the bottom of the fan housing can be removed without breaking them.
The 993 unit will function without the vacuum servo controlled cabin return louvers.
If you are careful you can reuse the paper and foil foot well warm air ducts.
And a little background information
Water contamination in the refrigeration circuit combines with the R12 to create acid that over time erodes metal parts in the evaporator and the condenser.
An oil and dust covered evaporator or condenser unit means that it is most likely holed thru and will have to be replaced. (That’s where your refrigerant charge has been going)
Over time it is possible for the electrical connectors to become tarnished resulting in poor or intermittent contact. I recently had a problem with the CCU face going dead for periods of time. In my case I fixed the it by using Radio Shack contact cleaner on the ribbon cable connector inside the unit between the face and the main pc board. (Apply sparingly. Also on the two main rear connectors which also makes removal and installation easier as well).
The "new" 993 unit in place
Some useful links:
993 A/C Evaporator / Expansion valve replace DIY
http://p-car.com/diy/ac/
Porsche Classic Original Parts Catalog - See Main Group 8 Body, Pages 351 to 368
http://www.porsche.com/usa/accessori...artscatalogue/
Porsche 964 HVAC servos
http://www.porsche964.co.uk/technical/servos.htm#3
Complete A/C diagnosis
https://rennlist.com/forums/993-foru...diagnosis.html
Modifications to HVAC from Model year 1995
https://rennlist.com/forums/993-foru...knowledge.html
Some interesting pictures of the 964 left and right blower motors
https://rennlist.com/forums/964-foru...nt-dash-3.html
CCU repairs
http://privat.bluezone.no/toreb2000/ccurepair.html
Los Angeles Porsche Dismantler
http://www.911pcar.com/
AirMec - A/C hose replacing
http://www.airpartsonline.com/
And last but not least
http://www.griffiths.com/
Last edited by johnbtrask; 12-09-2011 at 02:22 PM.

