
Alpine Stereo upgrade - cab
 07-29-2011, 02:40 PM
#1
Drifting
Thread Starter
At some point in the early 90s my car's stereo system was upgraded from stock-
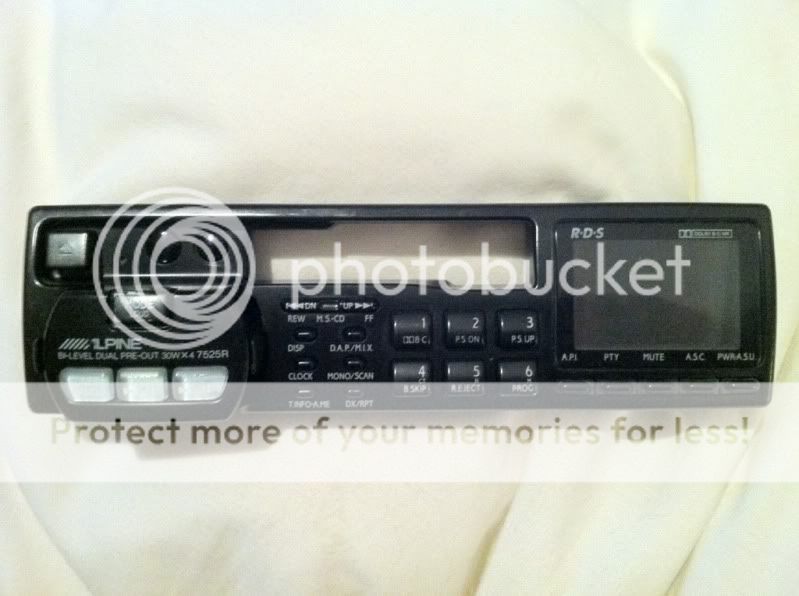
-Alpine 7525 Tuner/Casette with CD Changer integration - 30watts x 4 (doubtful)
-Alpine 5952Z 6 CD Changer in the trunk.
-MB Quarts all around.
-OEM Amp bypassed, but still in place, with power leads connected.
It was installed professionally and I had no problems with the fit and finish, other than they should have deleted the OEM amp properly.
I had two main issues.
- On a volume scale of 1-10, it would distort at 5-6 and that wasn't loud enough with the top down and cat/primary bypasses.
- It had a Radio/6CD/Cassette. That's it. No other input. The CD Changer took up 15% of the trunk.
For a couple of months I used a cassette to 1/8" plug adapter, but that had the audio limitations of a cassette and looked pretty silly.
It is 2011 and time for an update .
I went with another Alpine, CDE-126BT
Tuner & Single CD, capable of MP3s. WMA, AAC, CD-R…. etc.
Bluetooth for Phone
iPod/iPhone integration
1/8" input jack
USB input.
Dedicated subwoofer output, if I choose to add-on later.
This should cover it for the next 15 years I'm hoping.
Alpine also offers a small 45W x 4 plug and play head unit amp KTP-445 .
Would make for an easy replacement of the OEM amp, or so I thought. So the plan was using the same footprint, upgrade the head unit and amp and prepare to pony up for new speakers if it turned out the MB Quarts were toast. Nothing dramatic. I knew it was inevitable that there would be a true lack of bass without subwoofers, but I just wanted to crank tunes at 9 without distortion, and wanted to be able to use MP3 CDs and an iPod.
The removal was pretty straightforward. I disconnected the battery for the entire job.
I ran a 14 gauge positive wire with a 15A fuse from the battery, underneath the wire channel on the floor under the tire, up and to the right behind the ABS, into the cabin, under the dash and eventually under the passenger seat via a 'channel' along side the hump. This was the main Positive power for the Alpine Amp which powers the head unit due the plug and play configuration. I wasn't going to trust the existing OEM Amp's positive wire. The OEM Amp wire under the seat must be taped up as it's still hot. While I was messing with the battery, I pulled the battery and cleaned underneath, and touched up some scratches so that no primer was exposed. I also added a Battery Mat, which I figured couldn't hurt for $5.
The old unit slid right out of it's cage, and I was delighted to see that Alpine (and perhaps this is industry-wide) uses the same wire color combinations now as they did in 1993. When I snipped the wires, I was sure to leave 1/4 inch from the old Alpine's harness, to have a perfect mapping.
I also ripped out:
Alpine Head Unit <--> Alpine CD cable (Blue DIN)
Speaker wires that ran from the head unit to beneath the passenger's seat
gray DIN Cable from OEM Head Unit <----> OEM Amp (and damaged the passenger footwell heater hose !)
Wires behind the dash, you need to worry about:
- Green wire, right side. - Alarm contact from OEM radio. It must be well insulated, as a short to ground will drain your battery.
- Black wire that runs along antenna and connects to a white wire. This is the antenna amplifier and should be connected to the blue Alpine Wire, so the antenna amp is powered on when the radio is.
- Red / Black Always-On Positive This is connected to Alpine's Yellow wire and preserves the head-unit's clock and preset memory.
- Red Switched Positive. Connect to Alpine's Red.
So the amp is suppose to be plug in play. Insert the Amp's connector into the head-unit and insert the head unit's harness into the back of the amp.
Simple, right? Yes, if you plan to stick the amp in the glovebox or find room behind the dash. Since I wanted to place the amp under the passenger's seat like the original, I had two problems.
1) The 16 wire harness wasn't long enough to reach beneath the seat.
Neither Alpine nor eBay offer an extension patch cable.
2) Two of the wires that were to be tied into the end of the harness, which is now underneath the seat with the amp, are still behind the dash.
- Ignition-On positive
- Antenna Amp switch.
So I purchased 5 feet of high end 8-conductor 13 gauge speaker wire, and cut in half. I now had 2 1/2 feet of 16 conductors at $4 a foot, and a way to connect the head unit and the amp. Time to fire up the soldering gun. About 45 solder connections later, wrapped in electrical tape, then sealed with heat shrink wrap rubber,
I was able to run the cable along side the transmission hump. There is a channel cut out underneath the insulation.
I pulled out the old amp and wrapped the connector with a couple of laps of electrical tape. The positive lead is always-on!
For safety, I also taped up the power seat connector while I was working on it, to prevent FOD if something fell in there since it's always-on as well.
I got a good deal on Kicker 4" speakers for the rear, although I wasn't expecting much as they are only 4"
Glad I replaced them as the crossover on the original MB Quarts 4" 2-way (pictured) could easily have gotten tangled in the seatbelt or convertible top mechanism.
The rears are super easy to replace on a cab with just the four grille screws. You don't even need to take the carpeted panel off.
The rear original grilles were scratched up with silver lines from the metal peeking through. Before I re-installed with the Kickers, I gave a quick spray of Krylon Gloss black. I would have used flat or matte if I had it, but it still came out nice, although a little too shiny. Still much better than with half dozen scratches and nicks. Since I had the trunk apart, I also sanded down the battery clamp-down and gave it a quick gloss black spray. It's the little things.
The unit also comes with a microphone for the bluetooth hands free calling. I clipped it to the sun visor and was able to conceal the thin wire in the inside windshield moulding along the entire pillar. Haven't tried hands-free calling yet, but with a cab and the exhaust I don't expect much. I have an old classic iPod I have tucked inside the dashboard, to act as my 30GB MP3 server. The Alpine came with a standard ipod cable that charges so I never have to look at the iPod until I need to sync. Totally hidden away.
Got it all connected, and it sounds great! I can crank it to 9 on that same scale with no distortion, and it sings well above the exhaust noise.
Nothing fancy, or too flash, same footprint with the possibility to expand with a subwoofer in the future. It took a while due all the soldering but was worth it.
I've scanned the Alpine wiring diagram with the mapping to the Porsche wires. Hope this saves someone some time.
I did take a peek on the audio forum, but they were so far ahead of me, it was of no use. i.e.: How to hook up an iPad in my Cayenne so I can heat up my hot-tub on the drive home from work.
sidenote.
When ripping out the OEM Headunit <--> OEM Amp DIN cable, I damaged the passenger footwell heater hose. Got a new one (964-572-528-01) from Pelican quickly as always, that was much more sturdy. Too sturdy in fact to bend and mold to shape in order to accept the oblong heater connection underneath the dash. I could not for the life of me get it on and have it stay while I tightened it. I ended up trashing the end and slicing my fingers on the inside metal. I then ordered a genuine Porsche part from a local dealer for double the price, but had it in two days. The OEM ones still have a paper-like outer layer compared to the aftermarket tough plastic outer layer. Due to the paper outer layer, the OEM hose molded very easily and I had it on and clamped in 2 minutes.
*no affiliation with any manufacturers, suppliers etc
Last edited by Laker; 07-29-2011 at 10:20 PM.

The following users liked this post:
Pardonmypov (02-02-2022)
07-29-2011, 03:47 PM
#2
IHI KING!
Rennlist Member
Rennlist Member
Join Date: Aug 2001
Location: Nashua, New Hampshire, USA
Posts: 13,384
Received 221 Likes
on
175 Posts
Great write up! I'm thinking about a new stereo myself. I want one that I can hook up to my iPod. I was leaning towards an Alpine too. Many of the other brands stereos are too flashy for the 964 interior IMHO.
07-29-2011, 10:00 PM
#3
Drifting
Thread Starter
Six white/green button Alpines were the stuff back in the 80s and 90s... 
This one i got looks ok, doesn't stick out too badly.
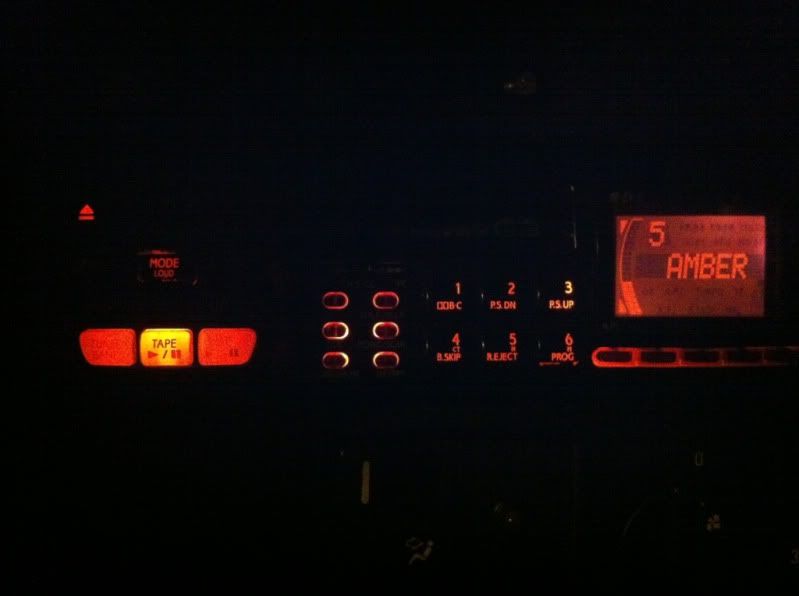
You can make the lights blue or red (80K Guards Red ) I'm sticking with blue
This one i got looks ok, doesn't stick out too badly.
You can make the lights blue or red (80K Guards Red
) I'm sticking with blue
07-31-2011, 10:10 AM
#5
Racer
Join Date: Nov 2010
Location: Annapolis, MD / Media, PA
Posts: 456
Likes: 0
Received 0 Likes
on
0 Posts
Do you have an hourly rate?
Nice work, it appears that you are very handy, all of the work you have done on your rig is the exact same work I need done on my car - except I get to pay for it ;-(
Nice work, it appears that you are very handy, all of the work you have done on your rig is the exact same work I need done on my car - except I get to pay for it ;-(
07-31-2011, 11:45 AM
#6
Three Wheelin'
Join Date: Jul 2007
Location: Helotes, TX
Posts: 1,307
Likes: 0
Received 0 Likes
on
0 Posts
I installed the blue led's that are available on eBay in the gauges and CCU and I realy like the overall look now. The blue instrument lights give the entire dash a cool, newer car look and match the blue lights in the Alpine.
07-31-2011, 12:18 PM
#7
Drifting
Thread Starter
I can dim the blue, and will do so and take another picture. I would be interested in seeing your updated LED dash. Done taking the car apart again until the winter. Car was out of commission for two weeks while I did the stereo and heater tubes. I was afraid driving it around would melt the OBD1 port.
half the fun is tinkering yourself. Paying to have anything done on a P-car is certainly not fun. So I try to keep that to a minimum.
$40 and everything in the first two photos is yours!
$40 and everything in the first two photos is yours!
Last edited by Laker; 07-31-2011 at 01:46 PM.
Trending Topics
10-29-2011, 01:51 PM
#8
4th Gear

Join Date: Oct 2011
Posts: 4
Likes: 0
Received 0 Likes
on
0 Posts
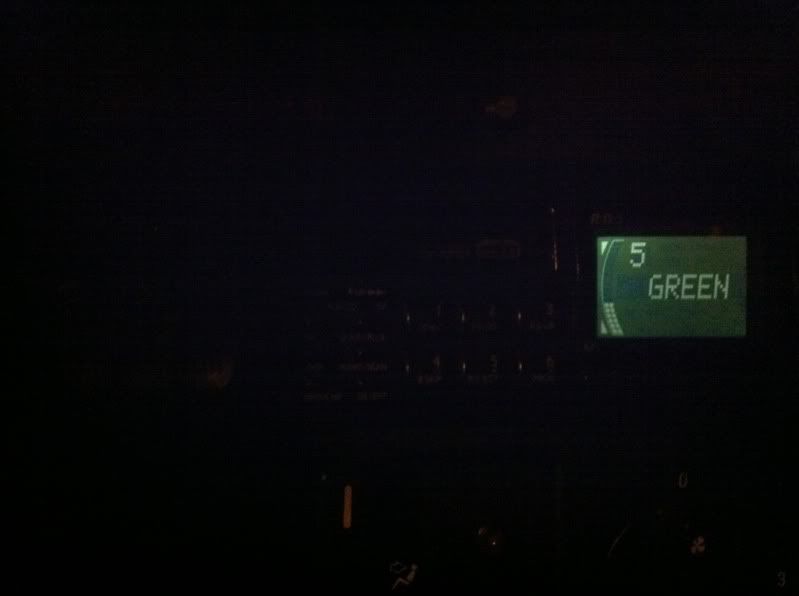
Sorry for the thread ressurect but I've just started using my Alpine 7525r head unit again and can't remember how to switch illumination from green to red. I can't seem to find any free manual downloads online.
Any help would be greatly appreciated.
Cheers , Doog.
Any help would be greatly appreciated.
Cheers , Doog.
10-31-2011, 05:48 PM
#10
4th Gear
Join Date: Oct 2011
Posts: 4
Likes: 0
Received 0 Likes
on
0 Posts
Thanks for speedy reply , appreciate it... but Yours must be slightly different to mine , that button doesn't seem to exist on my fascia. There's definitely a way of doing it though as I switched it from amber to green when I first bought it.
I've tried pressing all buttons individually then tried holding all buttons individually.... no joy
Thinking it may be a 2 button combo or something?!?!
This is the button layout on mine....
I've tried pressing all buttons individually then tried holding all buttons individually.... no joy
Thinking it may be a 2 button combo or something?!?!
This is the button layout on mine....
 11-02-2011, 03:21 PM
#13
4th Gear
Join Date: Oct 2011
Posts: 4
Likes: 0
Received 0 Likes
on
0 Posts
SORTED!!!!! 

Was standing in traffic on the way home from graft so started trying different button combo's....
Press and hold "disp" until screen displays "FM VOL HI" then press button 5 which brings "GREEN" up on the display , press it again and it changes to "AMBER" then press "disp" again to exit.
As an added bonus , the button illumination which was broken on green actually works on amber. Score!!
08-03-2014, 03:44 AM
#14
Rennlist Member
Just a note to this awesome thread that really helped me. The wiring in my 1991 C2 did not exactly match what Laker wrote up. Specifically battery and ignition (or key switch) were flipped in my car. So be sure and do a quick check on your car prior to hooking up.