
Heater Blower Motor - front/dash
 07-01-2005, 03:43 AM
#31
Addict
Rennlist Member
Rennlist Member
Join Date: Apr 2003
Location: Sweden
Posts: 506
Likes: 0
Received 0 Likes
on
0 Posts
Jeff post the pics to the DIY section also. I suppose that there will be others who will get the same problem. One of my blower is giving some strange sounds so....
 07-02-2005, 02:01 AM
#32
Race Car
Thread Starter
Well, what can I say, this wasn't a task for the faint of heart, although difficulty level was not that high...your PATIENCE level better be through the roof though!
I'll tell ya, I'll take my hood off in a HEARTBEAT if I have to dabble with the related assembly again, it made life MUCH easier and gave me SEVERAL angles of which to work from. I had some back pain that weekend, so removing the hood paid of two fold.
Here are some pics, 1st, the start of the project...the hood was removed and I took an audible "sigh" as I took this picture, just thinking about the mess I was about to get into:
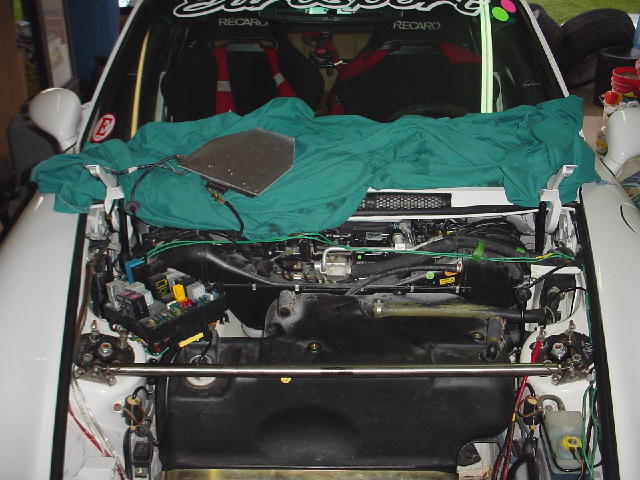
Here's what the firewall looks like:
I'll tell ya, I'll take my hood off in a HEARTBEAT if I have to dabble with the related assembly again, it made life MUCH easier and gave me SEVERAL angles of which to work from. I had some back pain that weekend, so removing the hood paid of two fold.
Here are some pics, 1st, the start of the project...the hood was removed and I took an audible "sigh" as I took this picture, just thinking about the mess I was about to get into:
Here's what the firewall looks like:
07-02-2005, 02:05 AM
#33
Race Car
Thread Starter
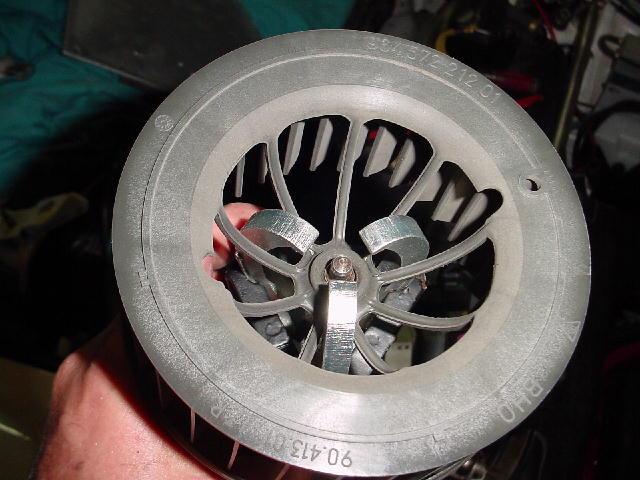
Alright, here's a few more pics, how 'bout taking a peek at each fan??
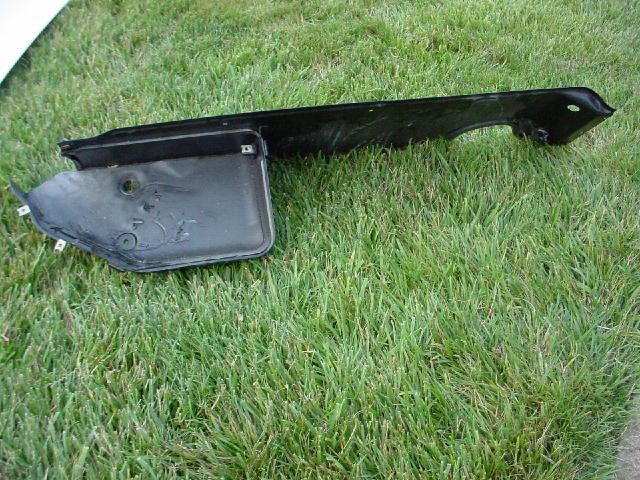
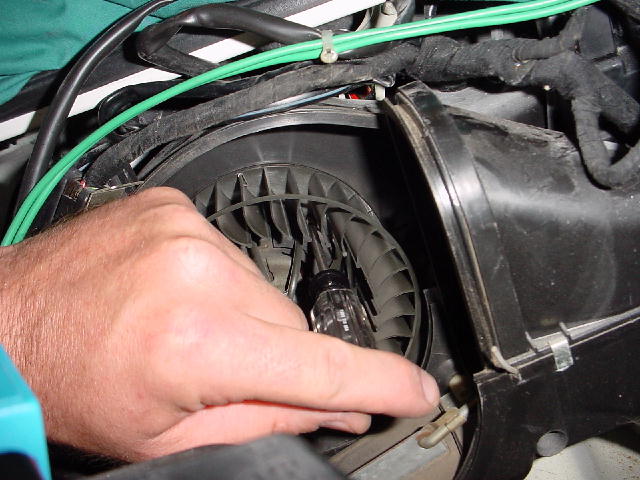
Here's the left fan assembly, once you unsnap the clips from the cover:
...and a peek at the right fan assembly:
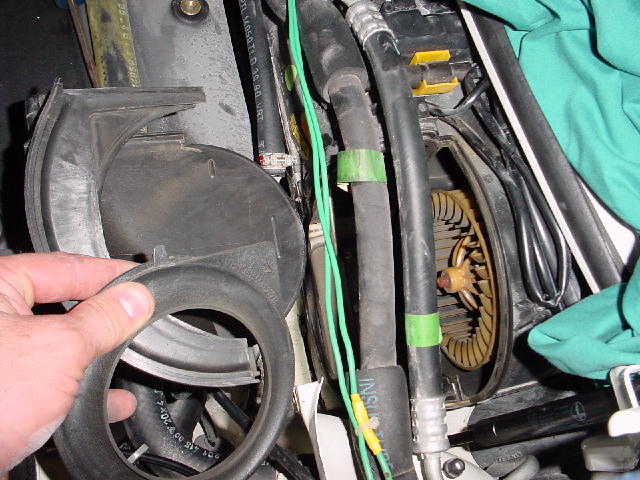
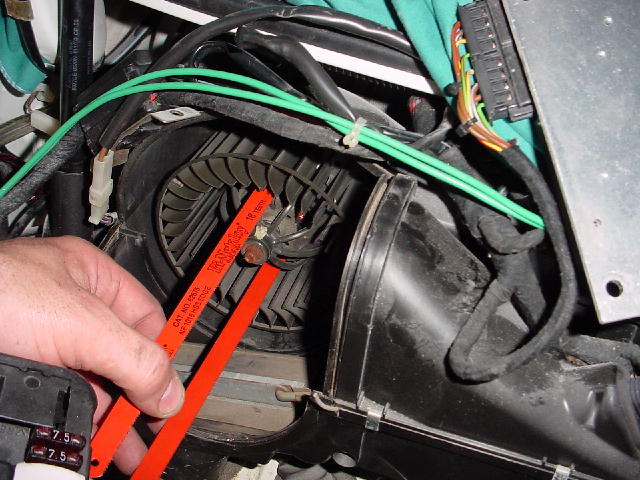
Here's a shot of me trying to remove the torx screws:
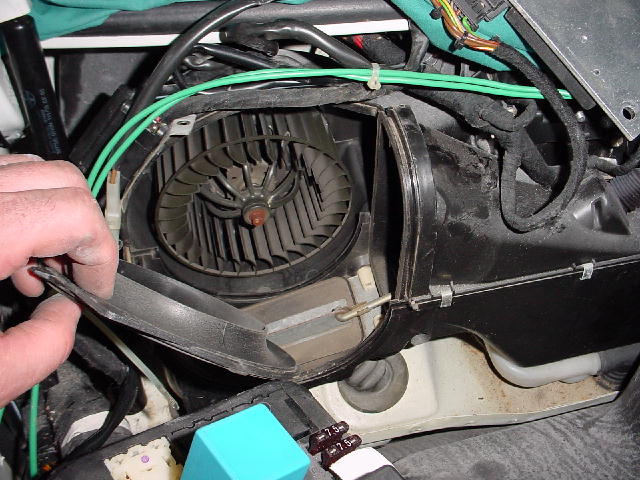
...and my home made P9512 fan motor puller! (2-piece set)
I'll post some pics of my ultra-secret squirrel cage pulling technique later this weekend, it's late!!
Here's the left fan assembly, once you unsnap the clips from the cover:
...and a peek at the right fan assembly:
Here's a shot of me trying to remove the torx screws:
...and my home made P9512 fan motor puller! (2-piece set)
I'll post some pics of my ultra-secret squirrel cage pulling technique later this weekend, it's late!!
07-04-2005, 07:47 PM
#34
Race Car
Thread Starter
OK, after MUCH discussion with my agent, we've decided that I MUCH reveal the "trick" to removing the squirrel cage off your fan assembly. The reason why I was so concerned to do so is because I had purchased a fan motor/squirrel cage assembly for the LEFT side of the car, and the one I needed to replace was on the RIGHT side, the squirrel cages are the reverse of one another when comparing left to right.
OK, so WHY didn't I just purchase one for the right side?? ...simple - $$$$$$.
There were two left side motors left at Vertex for $129, any future orders would be at the "new" Porsche prices - GRR ...of $380 or so.
I had it in my head that I was going to swap the squirrel cages and be done with it...but it wasn't that simple.
Anyway, here is a pic of me pulling the squirrel cage off, this pic was taken with the fan motor out of the car, I actually removed the cage with it installed in it's housing, in the car - just took this pic for illustration purposes.
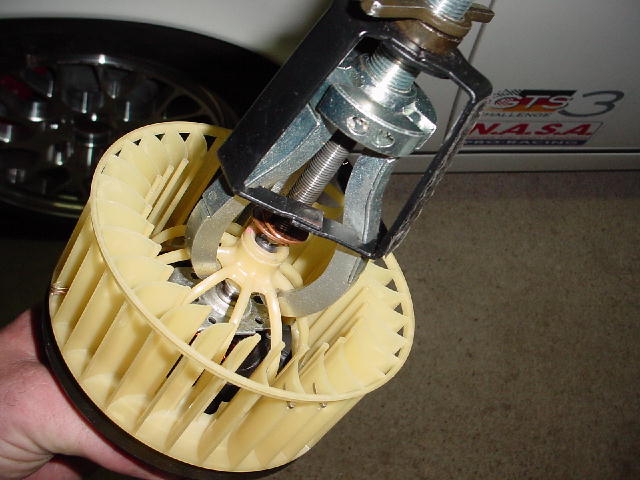
I had "borrowed" this puller from Autozone about a year ago when rebuilding the transmission in my Toyota Atlantic based racer...it came in handy to remove reverse and another gear from the mainshafts. I had to borrow it again to help a friend do his...so I went ahead and bought one - handy thing to have around, the "jaws" are snugged together by that outer ring/adjuster, makes it an invaluable tool!
Here's a pic of everything disassembled:
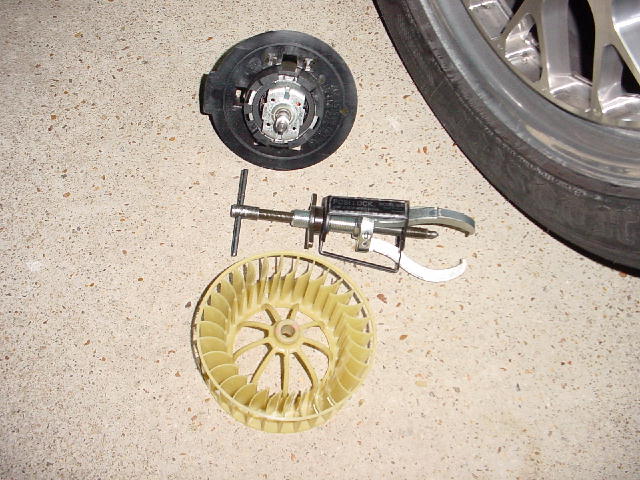
...and a pic at the rear of the squirrel cage, to illustrate how I got hold of the assembly without damaging it. The cage is plastic with a steel ferrul that appears as if it stays with the fan when you pull it off...it doesn't, stays on the shaft...if you've ever removed/replaced wheelstuds, it's fairly similar to that, the "splines" on the steel ferrul dig into the plastic as the splines on a wheelstud do in the holes of your wheelhubs to secure them in place.
I would imagine you could only pull these plastic squirrel cage fans one or twice and the centers would be chewed up/worn out.
Anyway...
More later, I'll show you WHY a fan motor that was intended for the left side of the fan housing will NOT fit in the right side...and MORE!
OK, so WHY didn't I just purchase one for the right side?? ...simple - $$$$$$.
There were two left side motors left at Vertex for $129, any future orders would be at the "new" Porsche prices - GRR
...of $380 or so.I had it in my head that I was going to swap the squirrel cages and be done with it...but it wasn't that simple.
Anyway, here is a pic of me pulling the squirrel cage off, this pic was taken with the fan motor out of the car, I actually removed the cage with it installed in it's housing, in the car - just took this pic for illustration purposes.
I had "borrowed" this puller from Autozone about a year ago when rebuilding the transmission in my Toyota Atlantic based racer...it came in handy to remove reverse and another gear from the mainshafts. I had to borrow it again to help a friend do his...so I went ahead and bought one - handy thing to have around, the "jaws" are snugged together by that outer ring/adjuster, makes it an invaluable tool!
Here's a pic of everything disassembled:
...and a pic at the rear of the squirrel cage, to illustrate how I got hold of the assembly without damaging it. The cage is plastic with a steel ferrul that appears as if it stays with the fan when you pull it off...it doesn't, stays on the shaft...if you've ever removed/replaced wheelstuds, it's fairly similar to that, the "splines" on the steel ferrul dig into the plastic as the splines on a wheelstud do in the holes of your wheelhubs to secure them in place.
I would imagine you could only pull these plastic squirrel cage fans one or twice and the centers would be chewed up/worn out.
Anyway...
More later, I'll show you WHY a fan motor that was intended for the left side of the fan housing will NOT fit in the right side...and MORE!
07-05-2005, 03:36 AM
#35
Addict
Rennlist Member
Rennlist Member
Join Date: Nov 2001
Location: Arizona, USA
Posts: 223
Likes: 0
Received 0 Likes
on
0 Posts
Jeff,
Looks like you're having a lot of fun! Almost as much fun as I had when I completely disassembled that part of the car to replace the evaporator coil.
Those pesky fans are a real bugger - I dread the day I have to replace mine, considering the astronomical cost.
Looks like you're having a lot of fun! Almost as much fun as I had when I completely disassembled that part of the car to replace the evaporator coil.
Those pesky fans are a real bugger - I dread the day I have to replace mine, considering the astronomical cost.
07-06-2005, 12:05 AM
#36
Race Car
Thread Starter
Yeah Rich, I remember walking into Eurosport one day and seeing you up in the front compartment of your RSA and I thought WTF?? 
That was quite the job you did...any chance that AC is still blowing cold from the charge you gave it prior to moving to AZ??
No doubt the DIY job you took control of was quite a bit more involved than this one...this one actually pissed me off at one point, which isn't easy to do anymore...once I got the blowtorch out, Stacy says I had this evil laugh she could hear from the kitchen part of the house.
PROBLEM SOLVED!
Anyway, here's the last set of pics, you probably are all bored with this by now, but here goes anyway:
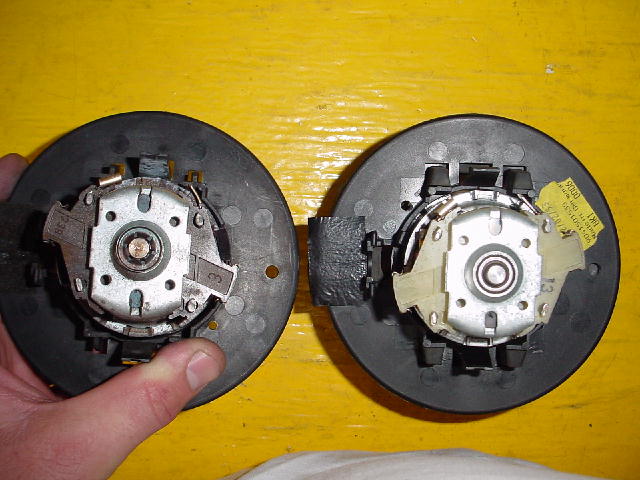
Here's a pic that defines why a left handed motor will NOT fit in the right hand housing, UNLESS YOU MODIFY the housing.
Notice the windings that stick out at 10 and 4 O'clock on the right hand side motor and how they are at 8 and 2 O'clock on the left side motor...this made it so the left handed motor would NOT fit in the right side housing...hence the need for a blowtorch and a sawblade to heat up for cutting slots.
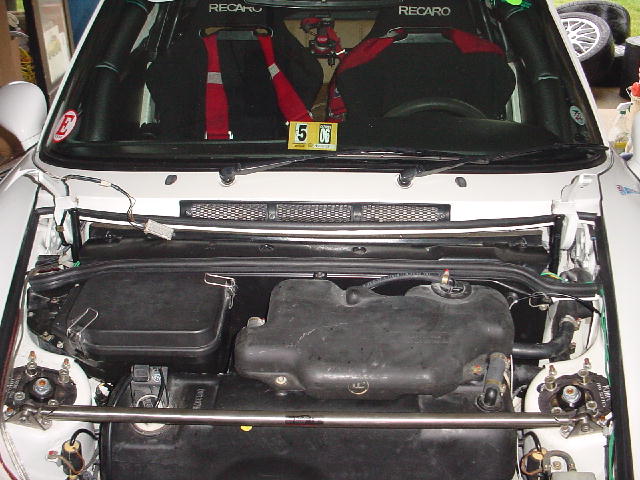
Here's a pic of the firewall going back in:

..and at last...FINAL assembly, sans hood:
FWIW, this was a SLOW job for me, it took an ENTIRE evening and then part of the next day, I wanted everything "just right"...even the new slots cut in the right side housing.
Like Jason suggested earlier in this post, if he had to do it all over again, it wouldn't take half as long. I have a habit of stopping along the way, quite often, to "oooh and aaah" (marvel) at how this machine was put together, some cheesy items while others state the incredible design/engineering that go into these beasts!
That was quite the job you did...any chance that AC is still blowing cold from the charge you gave it prior to moving to AZ??
No doubt the DIY job you took control of was quite a bit more involved than this one...this one actually pissed me off at one point, which isn't easy to do anymore...once I got the blowtorch out, Stacy says I had this evil laugh she could hear from the kitchen part of the house.
PROBLEM SOLVED!
Anyway, here's the last set of pics, you probably are all bored with this by now, but here goes anyway:
Here's a pic that defines why a left handed motor will NOT fit in the right hand housing, UNLESS YOU MODIFY the housing.
Notice the windings that stick out at 10 and 4 O'clock on the right hand side motor and how they are at 8 and 2 O'clock on the left side motor...this made it so the left handed motor would NOT fit in the right side housing...hence the need for a blowtorch and a sawblade to heat up for cutting slots.
Here's a pic of the firewall going back in:
..and at last...FINAL assembly, sans hood:
FWIW, this was a SLOW job for me, it took an ENTIRE evening and then part of the next day, I wanted everything "just right"...even the new slots cut in the right side housing.
Like Jason suggested earlier in this post, if he had to do it all over again, it wouldn't take half as long. I have a habit of stopping along the way, quite often, to "oooh and aaah" (marvel) at how this machine was put together, some cheesy items while others state the incredible design/engineering that go into these beasts!
07-06-2005, 12:50 AM
#37
Addict
Rennlist Member
Rennlist Member
Join Date: Nov 2001
Location: Arizona, USA
Posts: 223
Likes: 0
Received 0 Likes
on
0 Posts
Nice work!
My AC lasted for the drive from VA to AZ, which is all I really cared about. Shortly after I got here, the compressor blew the front seal, and the precious (R-12) went away.
Finally got around to replacing the compressor (which is about the only thing I haven't replaced in that system) and recharging it. It's been so damned hot here (106+) for the past month that if I do take the car out it's late in the evening or early in the morning. Middle of the day is just too hot for the AC to keep up.
Oh well, if that's the worst problem I have then life is pretty good, no?
07-11-2005, 08:47 PM
#38
Instructor
After reading the thread I decided to remove my two fans...it was much easier thanks to information and pics here! Now that I got the fans out I have determined they both seized up and then burnt out. I want and need to replace them but can not get myself to pay the $500+ for each one. Has anyone looked into having the motors rebuilt??? or found a similar cheaper motor that could be modified to fit (maybe volkswagon)? If all else fails I will call used parts places to see if I can get a decent one at a decent price.
Thanks again Jeff for taking the time to post the excellent DIY instructions!
Thanks again Jeff for taking the time to post the excellent DIY instructions!
07-17-2005, 01:39 AM
#39
Race Director
Thanks to all the contributors on this thread. I replaced both fans, and one servo today in about 6 hours.
The only regret is not reading the entire thread carefully, as my air bag light, and seat belt light are now on. Does anybody know how to turn them off.
All parts were replaced with used parts from our local porsche graveyard in California. $200 for the entire job!
The only regret is not reading the entire thread carefully, as my air bag light, and seat belt light are now on. Does anybody know how to turn them off.
All parts were replaced with used parts from our local porsche graveyard in California. $200 for the entire job!
12-01-2006, 08:38 PM
#40
Pro
Join Date: Jan 2005
Location: St. Albert, Alberta, Canada
Posts: 696
Likes: 0
Received 2 Likes
on
2 Posts
Resurrecting this thread (however briefly) because I just want to thank Jeff for his awesome photos. I am about to tackle this job this weekend because the driver (LH) side blower is seized. Without the pics and the write-up I don't think I would even attempt this...
I do have one question: where do the electrics hook up to the motor? Or will it become obvious once I get the motor out")
again, thanks to everyone on the forum for all their writeups
(can this thread be moved to the DIY section?)
Frank
I do have one question: where do the electrics hook up to the motor? Or will it become obvious once I get the motor out
again, thanks to everyone on the forum for all their writeups
(can this thread be moved to the DIY section?)
Frank
12-04-2006, 12:06 PM
#41
Advanced
Join Date: Mar 2006
Location: UK
Posts: 80
Likes: 0
Received 0 Likes
on
0 Posts
It will become very obvious when the motor is removed as the wires attach to the rear of the motor. Try to note where the grommit is located as this holds the wires in place when pushing the whole assembly back in. I have just lubricated both motor bearings after they seized and touch wood both are operating fine at the moment.
One more thing, when replacing the fire wall, make sure the groove that runs along the base of it is clear and not dented and all should slot home nicely.
Good luck
One more thing, when replacing the fire wall, make sure the groove that runs along the base of it is clear and not dented and all should slot home nicely.
Good luck
01-01-2007, 11:20 PM
#42
Pro
Join Date: Jan 2005
Location: St. Albert, Alberta, Canada
Posts: 696
Likes: 0
Received 2 Likes
on
2 Posts
Update on my fan progress....
I lubed the bushings like lew964 did and all was/is working relatively well. Except the drivers side (thats left side in Canada) starting making a helluva racket just before christmas. Boy the wife was pleased when I told her how much one of them cost!
anyways, finally pulled the cover off today and it appears that the bushing at the front of the assembly, right behind the squirrel cage, is shot and the wobble is what is making it noisy
I haven't pulled the motor out yet - time is not permitting, and I couldn't find the two torx screws Which brings up my next question - where exactly are those torx screws hidden? I notice in one Jeff's pictures of the backside of a cage there is one hole in it - do you stick the screwdriver through that hole to get at the screw? Or is it through one of the two cutouts on the inner ring (which is where i assume the "special tool" slides to release the two clips).
I lubed the bushings like lew964 did and all was/is working relatively well. Except the drivers side (thats left side in Canada) starting making a helluva racket just before christmas. Boy the wife was pleased when I told her how much one of them cost!
anyways, finally pulled the cover off today and it appears that the bushing at the front of the assembly, right behind the squirrel cage, is shot and the wobble is what is making it noisy
I haven't pulled the motor out yet - time is not permitting, and I couldn't find the two torx screws
Which brings up my next question - where exactly are those torx screws hidden? I notice in one Jeff's pictures of the backside of a cage there is one hole in it - do you stick the screwdriver through that hole to get at the screw? Or is it through one of the two cutouts on the inner ring (which is where i assume the "special tool" slides to release the two clips).
01-01-2007, 11:30 PM
#43
Addict
Rennlist Member
Rennlist Member
Join Date: Nov 2001
Location: Arizona, USA
Posts: 223
Likes: 0
Received 0 Likes
on
0 Posts
The torx screws will be found by rotating the fan. As you have alluded, the screws line up with the U-shaped cutouts on the inner ring. When one lines up, so will the other. Ensure you have a magnetic pickup handy - the screws can be a royal PITA.
01-02-2007, 01:07 AM
#44
Race Car
Thread Starter
Yeah, what Rich said...ROYAL PITA if you're not patient...and certainly have a magnet on hand.
I have a magnet that I stick to the shaft of a screwdriver or torxdriver when I fear dropping a screw, I'm sure there are better methods/tools, but it seems I NEVER plan for this type scenario so I have to "rig" something (the 'ol magnet) to get by. If I could just have presence of mind whenever I'm at Sears or talking to the Snap On dealer in the area.
I have a magnet that I stick to the shaft of a screwdriver or torxdriver when I fear dropping a screw, I'm sure there are better methods/tools, but it seems I NEVER plan for this type scenario so I have to "rig" something (the 'ol magnet) to get by. If I could just have presence of mind whenever I'm at Sears or talking to the Snap On dealer in the area.