DIY Oxygen Sensor Replacement
 06-05-2005, 11:46 PM
#1
Three Wheelin'
Thread Starter
Join Date: Oct 2002
Location: Pasadena, MD - Land of Taxes
Posts: 1,879
Likes: 0
Received 3 Likes
on
3 Posts
One of the things I did this past weekend was to change out my 02 sensor. It appeared to be the original and I think was part of my idle problem. Changing the sensor is actually very easy. All you need is a screwdriver to remove the blower tube, a 10mm socket to remove the fan housing and a crescent wrench or 22mm open end wrench to remove the sensor itself. You will also need to jack up the car and remove the driver's side rear wheel.
Before starting... Remove the negative terminal from your battery to let the DME reset. I would think you need to do this so the DME correctly reads your new 02 sensor.
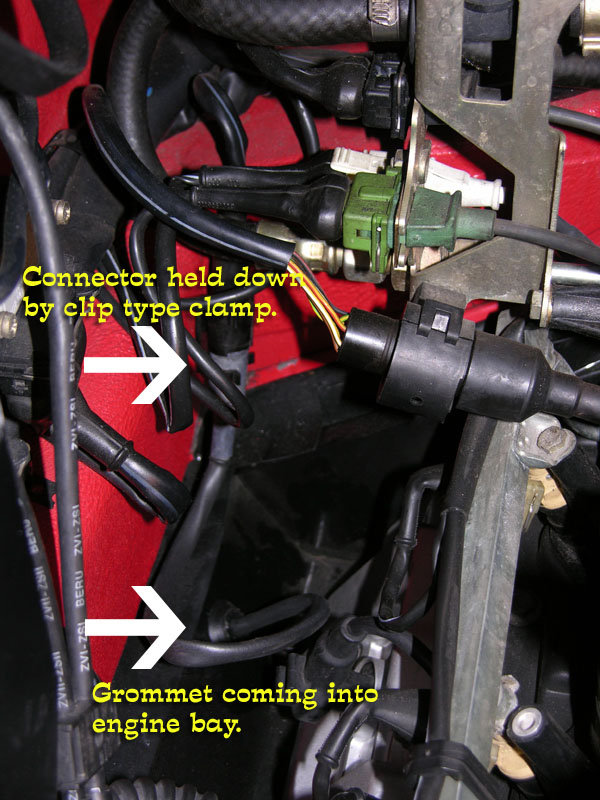
To start... You will need to get the blower motor out of the way in the left side of the engine compartment. This gives you access to the oxygen sensor connector and to the grommet that will need to be pushed into place.

Removing the blower is easy. Just use a screwdriver to loosen the hose clamps holding the blower tube in place... Then use your 10mm socket to remove the two bolts holding the blower in place. (The bolts are located in the 3 o'clock and 6 o'clock positions. I left my ratchet on the bottom one so you had some idea of where it is located.) Before removing the blower... Reach around to the side of the blower and pull the connector from the side of the blower housing. Then you can disconnect the blower wiring, remove the 2 bolts and then lift the blower out.
This shot shows where the oxygen sensor wiring comes into the engine bay and where it connects... Go ahead and pull the connector out from the clamp that securely holds it and disconnect the wiring.
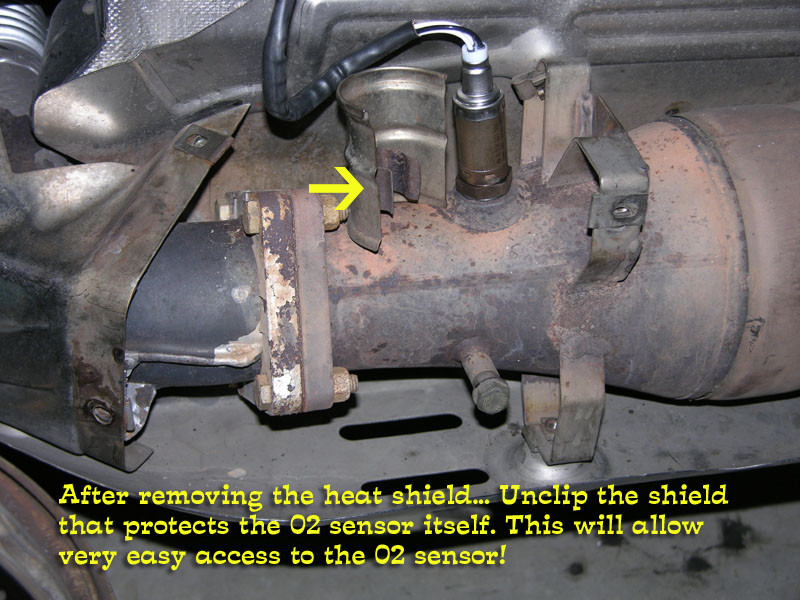
Now, if you haven't already, chock your front wheels, jack up your car and secure it with a jack stand (if you have them, I just left mine on my jack.) and remove your drivers side rear wheel. This will give you access to the heat shield that covers the 02 sensor. When I first saw it... I wasn't sure what to do. I remembered reading that the 02 sensor needs a special tool to remove it. I took a mirror and looked behind the little shield on the sensor itself. It was then I breathed a sign of relief, seeing that the shield just pops off! Just remove the four 10mm bolts and then you can pull the heat shield off. (The mirror is there to show you the image of the bolt you will need to remove underneath the heat shield.) You can then twist the shield that is snapped on the sensor itself. Twist it a few times to break it loose (it's liable to be rusted in place!) and then pop it off.

(I took this picture after I already installed the 02 sensor. The one in the picture is the new one already installed.)
Here's a shot of everything removed. You can see how easy it is to get to. The new 02 sensor should come with a plastic cap over the end of it to protect it and it should also have an anti seize compound already on the threads. (Mine came that way.) I bought mine from www.autopartsworld.com for only $98.14. It was recommended from someone else here on the forum. That is probably the least expensive place to buy it and it is a Bosch product so no splicing is involved.
Remove the old sensor and pull the grommet and wiring out through the hole. The hardest part of doing this whole job is seating the grommet back into place where it leads into the engine bay. I used both arms, my left to push the grommet into place and my right to pull the grommet and to try to pull the lip into place. It will eventually pop into place. Also... Don't tighten your new sensor too hard... Just snug it down. There is a crush washer on it already so you'll feel it snug down... Similar to a new spark plug.
When the new 02 sensor is in place just reassemble in the reverse order.
This is one of the easiest DIYs you could possibly do. You can make a big difference in how your engine performs and save yourself a lot of money in the process!
Before starting... Remove the negative terminal from your battery to let the DME reset. I would think you need to do this so the DME correctly reads your new 02 sensor.
To start... You will need to get the blower motor out of the way in the left side of the engine compartment. This gives you access to the oxygen sensor connector and to the grommet that will need to be pushed into place.
Removing the blower is easy. Just use a screwdriver to loosen the hose clamps holding the blower tube in place... Then use your 10mm socket to remove the two bolts holding the blower in place. (The bolts are located in the 3 o'clock and 6 o'clock positions. I left my ratchet on the bottom one so you had some idea of where it is located.) Before removing the blower... Reach around to the side of the blower and pull the connector from the side of the blower housing. Then you can disconnect the blower wiring, remove the 2 bolts and then lift the blower out.
This shot shows where the oxygen sensor wiring comes into the engine bay and where it connects... Go ahead and pull the connector out from the clamp that securely holds it and disconnect the wiring.
Now, if you haven't already, chock your front wheels, jack up your car and secure it with a jack stand (if you have them, I just left mine on my jack.) and remove your drivers side rear wheel. This will give you access to the heat shield that covers the 02 sensor. When I first saw it... I wasn't sure what to do. I remembered reading that the 02 sensor needs a special tool to remove it. I took a mirror and looked behind the little shield on the sensor itself. It was then I breathed a sign of relief, seeing that the shield just pops off! Just remove the four 10mm bolts and then you can pull the heat shield off. (The mirror is there to show you the image of the bolt you will need to remove underneath the heat shield.) You can then twist the shield that is snapped on the sensor itself. Twist it a few times to break it loose (it's liable to be rusted in place!) and then pop it off.
(I took this picture after I already installed the 02 sensor. The one in the picture is the new one already installed.)
Here's a shot of everything removed. You can see how easy it is to get to. The new 02 sensor should come with a plastic cap over the end of it to protect it and it should also have an anti seize compound already on the threads. (Mine came that way.) I bought mine from www.autopartsworld.com for only $98.14. It was recommended from someone else here on the forum. That is probably the least expensive place to buy it and it is a Bosch product so no splicing is involved.
Remove the old sensor and pull the grommet and wiring out through the hole. The hardest part of doing this whole job is seating the grommet back into place where it leads into the engine bay. I used both arms, my left to push the grommet into place and my right to pull the grommet and to try to pull the lip into place. It will eventually pop into place. Also... Don't tighten your new sensor too hard... Just snug it down. There is a crush washer on it already so you'll feel it snug down... Similar to a new spark plug.
When the new 02 sensor is in place just reassemble in the reverse order.
This is one of the easiest DIYs you could possibly do. You can make a big difference in how your engine performs and save yourself a lot of money in the process!

The following users liked this post:
TheAbeFroman (10-08-2021)
06-06-2005, 12:21 AM
#2
Professor of Pending Projects
Rennlist Member
Rennlist Member
Great write up!!! And yes, that is the lowest price I have seen... I got mine from Sunset Imports and it was 131.01 for the original part.
And yes, that is the lowest price I have seen... I got mine from Sunset Imports and it was 131.01 for the original part.
06-06-2005, 12:39 AM
#3
Technical Guru
Rennlist Member
Rennlist Member
Nice writeup! Could you check your O2 sensor heat shield for a part number of some sort? I don't have one and now that I know they exist I'd like to get one but I can't find it in PET.
Using rubbing alcohol as a lube will make this a LOT easier. This also works on low durometer plastics as well as rubber like the sleeve that is between the blower motor and hot air elbow.
The torque specification for the O2 sensor is 50 - 60Nm (37 - 44 ft-lb).
If you find that you need more torque (because of rust or a careless previous mechanics) or you've stripped the screw-head on the clamps, a 7mm socket will work just as good if not better than a screwdriver.
Originally Posted by Smokin
The hardest part of doing this whole job is seating the grommet back into place where it leads into the engine bay.
Originally Posted by Smokin
Don't tighten your new sensor too hard
If you find that you need more torque (because of rust or a careless previous mechanics) or you've stripped the screw-head on the clamps, a 7mm socket will work just as good if not better than a screwdriver.
06-06-2005, 12:49 AM
#4
Professor of Pending Projects
Rennlist Member
Rennlist Member
Originally Posted by JasonAndreas
Nice writeup! Could you check your O2 sensor heat shield for a part number of some sort? I don't have one and now that I know they exist I'd like to get one but I can't find it in PET...
06-06-2005, 09:17 AM
#5
Three Wheelin'
Thread Starter
Join Date: Oct 2002
Location: Pasadena, MD - Land of Taxes
Posts: 1,879
Likes: 0
Received 3 Likes
on
3 Posts
Originally Posted by hawk911
so Rick- did it fix your idle issue?
Jason... I didn't see any part numbers on the little shield for the 02 sensor...