
Blown 944 Hybrid Stroker DIY Guide
 01-20-2014, 10:12 PM
#1
Rennlist Member
Thread Starter
Seems like a couple times a week someone pm's me with a request for info, part numbers, etc. about Sid's Hybrid Stroker motor . After a conversation with Sid, we decided to start a thread to answer as many of these specific questions as possible and provide somewhat of a DIY guide.
The Hybrid Stroker concept has shown good results thus far but only a few have been built and a certain level of knowledge and skill is required. Hopefully this thread will help with some of the knowledge needed.
The basic concept of the Hybrid Stroker is to use an off-set grind on the crank that utilizes the Mitsubishi 4G63 journal size and rods. Because the rod journal size on the 4G63 is significantly smaller than the 944 journal, the off-set grind crank can add additional stroke.
The Hybrid Stroker has several potential advantages:
1) It can be a relatively inexpensive build. A basic 2.85L shortblock can be built for under $3500 if you build the motor yourself.
2) It can provide a path to increased performance. More volume with either more stroke or more bore (or both) are possible.
3) Because of the 4G63 journal size, superior, modern rod bearings can be used.
4) Previously unusable parts can be used, such as a scored 2.5L or 3L block, a damaged crank (say #2 bearing failure).
5) The design can be made to be non-interference. This means that if you loose a timing belt, the valves will not contact the pistons under any crank position.
6) The design can use ductile iron sleeves which eliminates the need for alusil components.
7) Block filler can be used to stabilize the cylinders in the 2.5L block providing a solid and cheap foundation for a high output motor.
8) The motor can be built quickly as it essentially uses off the shelf parts.
 01-20-2014, 10:13 PM
#2
Rennlist Member
Thread Starter
Design Concept:
The following example will go through developing a 2.85L design. The cool thing is that this could be done many different ways once you understand how things work.
I used a engine design calculator over at Eagle Rods:
Eagle Engine Calculator (see right side of the page)
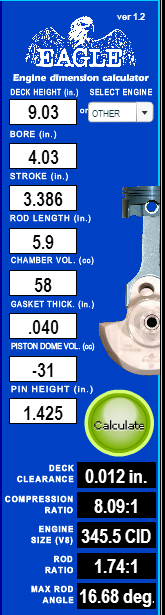
Deck Height - I believe the stock deck height is 9.050". I had the block decked to 9.030" after the sleeves were installed.
Bore - The cylinder bore size. Small Block Chevy standard bore is 4.000". I used oversize pistons at 4.030".
Stroke - With the off-set grind the stroke used was 3.386" (86mm) which is the max stroke of a 2.5L crank with G463 journal size.
Rod Length - G463 rod length is very close the the 944 rod length at 5.900"
Chamber Volume - Chamber volume is 56cc to 62cc on the stock 951 head. Make sure to account for any decking of the head.
Gasket Thickness - I used a 103 mm Cometic gasket that was 0.040" thick.
Piston Dome Volume - This depends on the piston you choose. With an inverted dome the number is negative.
Pin Height - This is also dependent on the piston you choose. (also known as compression height, ie at JE website)
In the 2.85L example above, the following components were used:
Rods: Eagle CRS5900MC3D (see here)
Pistons: JE 148750 (see here)
Note the calculator output:
Deck Clearance: Make sure you have adequate clearance. In this case there is 0.012" plus the gasket thickness which results in 0.052" clearance between the top of the piston and the head.
Compression Ratio: Target was 8.0:1 and got pretty close
Once you understand the basic framework, you can start looking at different stroke and piston combinations. Because the Small Block Chevy is so popular and so many variations, the piston choices are huge. Here is just a few choices available through JE for inverted domes:
http://www.jepistons.com/Catalogs/SR...0-400_inv.aspx
The following example will go through developing a 2.85L design. The cool thing is that this could be done many different ways once you understand how things work.
I used a engine design calculator over at Eagle Rods:
Eagle Engine Calculator (see right side of the page)
Deck Height - I believe the stock deck height is 9.050". I had the block decked to 9.030" after the sleeves were installed.
Bore - The cylinder bore size. Small Block Chevy standard bore is 4.000". I used oversize pistons at 4.030".
Stroke - With the off-set grind the stroke used was 3.386" (86mm) which is the max stroke of a 2.5L crank with G463 journal size.
Rod Length - G463 rod length is very close the the 944 rod length at 5.900"
Chamber Volume - Chamber volume is 56cc to 62cc on the stock 951 head. Make sure to account for any decking of the head.
Gasket Thickness - I used a 103 mm Cometic gasket that was 0.040" thick.
Piston Dome Volume - This depends on the piston you choose. With an inverted dome the number is negative.
Pin Height - This is also dependent on the piston you choose. (also known as compression height, ie at JE website)
In the 2.85L example above, the following components were used:
Rods: Eagle CRS5900MC3D (see here)
Pistons: JE 148750 (see here)
Note the calculator output:
Deck Clearance: Make sure you have adequate clearance. In this case there is 0.012" plus the gasket thickness which results in 0.052" clearance between the top of the piston and the head.
Compression Ratio: Target was 8.0:1 and got pretty close
Once you understand the basic framework, you can start looking at different stroke and piston combinations. Because the Small Block Chevy is so popular and so many variations, the piston choices are huge. Here is just a few choices available through JE for inverted domes:
http://www.jepistons.com/Catalogs/SR...0-400_inv.aspx
01-20-2014, 10:13 PM
#3
Rennlist Member
Thread Starter
Crank Preparation:
The figure below shows the concept of an off-set grind crank:

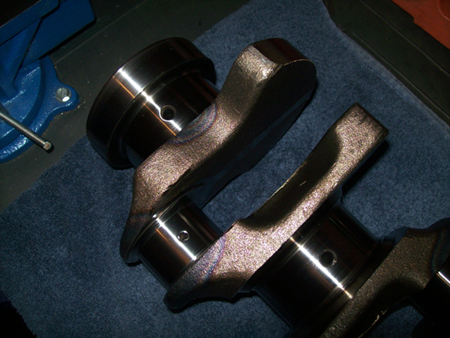
Not every machine shop is capable of doing an offset grind crank but they also are not that uncommon. I know a couple mechanics at Auto Atlanta and one of them is a great guy who builds 914's. I asked him what machine shop he uses for his personal stuff. My advice is ask the people who know these shops in your area. The guy he told me about made his name offset grinding VW cranks and also does quite a bit of 944 machining for local track cars. Finding the "right" machine shop is critical to your success. Do your homework and make a solid informed choice. I think MM does most of this stuff also so that may be a great option but would obviously involve shipping stuff.
Basic Dimensions:
Stock Crank Rod Journal Diameter: 51.98 mm (2.046")
Mitsu 4G63 Crank Rod Journal Dia.: 44.98 mm (1.771")
Stock 2.5L 944 Crank Stroke: 78.9 mm (3.106")
Stroke Potential = 78.9 mm + (51.98 mm - 44.98 mm) - 0.127mm (machine margin) = 85.77 mm
Machine Considerations and Thoughts:
The offset grind will cause the crank to bend in an "S" shape and it is very difficult to straighten on a press. An experienced crank guy can straighten the crank by relieving stress at the reduced journals (generally using an air chisel). The crank should be straightened to a max runout of 0.001". On my 3L crank my guy got the max runout to 0.0015" and everything has worked out fine. The factory spec for max runnout is over 0.003" and the offset ground crank is more flexible.
Another method to deal with the "S" shape bend is to turn the mains. This was my approach on my 2.85L crank but I had issues. First, I had to buy oversized main bearing which were expensive ($430) and hard to find. Secondly, my machinist made a mistake when turning the mains, they trued the thrust surfaces and forgot to polish the surfaces. This caused excessive wear of my thrust bearing on the 2.85L. Best approach is to find a crank guy who can properly straighten the crank and then the mains will not need to be turned.
I got smarter on the 3.1L crank (94.75 mm stroke) in that I had the machinist verify max runnout and journal sizes in my presence so I knew for certain the dimensions. I recommend this approach if you do not have the equipment to do the measurements yourself.
Make sure the crank gets nitride treatment to harden the surface of the rod journals after the offset grind. Keep in mind that max runnout and other critical dimensions need to be re-measured after nitride treatment.
The figure below shows the concept of an off-set grind crank:
Not every machine shop is capable of doing an offset grind crank but they also are not that uncommon. I know a couple mechanics at Auto Atlanta and one of them is a great guy who builds 914's. I asked him what machine shop he uses for his personal stuff. My advice is ask the people who know these shops in your area. The guy he told me about made his name offset grinding VW cranks and also does quite a bit of 944 machining for local track cars. Finding the "right" machine shop is critical to your success. Do your homework and make a solid informed choice. I think MM does most of this stuff also so that may be a great option but would obviously involve shipping stuff.
Basic Dimensions:
Stock Crank Rod Journal Diameter: 51.98 mm (2.046")
Mitsu 4G63 Crank Rod Journal Dia.: 44.98 mm (1.771")
Stock 2.5L 944 Crank Stroke: 78.9 mm (3.106")
Stroke Potential = 78.9 mm + (51.98 mm - 44.98 mm) - 0.127mm (machine margin) = 85.77 mm
Machine Considerations and Thoughts:
The offset grind will cause the crank to bend in an "S" shape and it is very difficult to straighten on a press. An experienced crank guy can straighten the crank by relieving stress at the reduced journals (generally using an air chisel). The crank should be straightened to a max runout of 0.001". On my 3L crank my guy got the max runout to 0.0015" and everything has worked out fine. The factory spec for max runnout is over 0.003" and the offset ground crank is more flexible.
Another method to deal with the "S" shape bend is to turn the mains. This was my approach on my 2.85L crank but I had issues. First, I had to buy oversized main bearing which were expensive ($430) and hard to find. Secondly, my machinist made a mistake when turning the mains, they trued the thrust surfaces and forgot to polish the surfaces. This caused excessive wear of my thrust bearing on the 2.85L. Best approach is to find a crank guy who can properly straighten the crank and then the mains will not need to be turned.
I got smarter on the 3.1L crank (94.75 mm stroke) in that I had the machinist verify max runnout and journal sizes in my presence so I knew for certain the dimensions. I recommend this approach if you do not have the equipment to do the measurements yourself.
Make sure the crank gets nitride treatment to harden the surface of the rod journals after the offset grind. Keep in mind that max runnout and other critical dimensions need to be re-measured after nitride treatment.
01-20-2014, 10:14 PM
#4
Rennlist Member
Thread Starter
Block Preparation:
Sid's original Hybrid Stroker concept was to use an inexpensive 2.5L block and partially fill the water jackets around the open deck with Moroso Block Filler. I personally think this provides an excellent platform for high power and these blocks are available in abundance. One could also use a 3L block which may provide additional benefits such as windage ports and raised water jacket floor.
Preparation steps:
1) Block Cleaning - I had my machine shop tank clean the block (cost was $100)
2) Additional cylinder water jacket surface cleaning - I used CLR and a small wire brush to prep the surface of the cylinder water jackets to promote filler adhesion. After brushing with CLR, I did a final clean with soap and hot water.
3) Fill the cylinder water jacket with block filler - After final cleaning, I used wet paper towels (highly technical) to block the hole to the oil filter housing and stuff the front water pump flow area (see pics). I decided to prevent water from entering the cavity within the oil filter housing to prevent oil/water mix in the event of a oil filter seal issue. The flow is very limited in that cavity and I cannot see it providing much cooling benefits and I have had no oil temp issues. The block filler I used was Moroso #710-35571 which cost $20. A 1 gallon container was plenty. I mixed it per container instructions poured it into the jacket area with a funnel. Make sure the block is level and mark the block filling height before filling. I then used a rubber mallet and essentially tapped on the block for about 30 minutes to work air out of the filler. Once the filler adequately set (about 12 hours) I pulled the paper towels out and cleaned up the surface of the filler around the water pump passage at the front of the block.
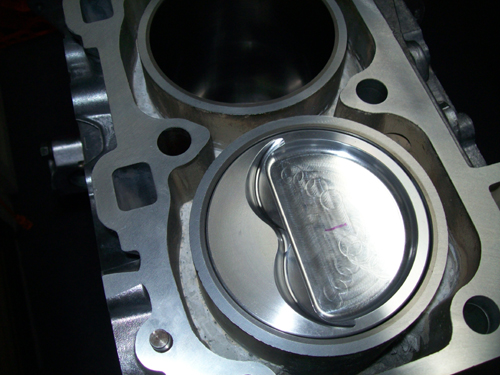
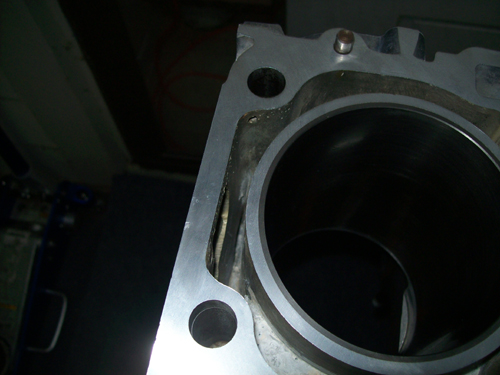
4) Install ductile iron sleeves - I relied on my machinist for this. Make sure your machinist knows what they are doing! My guy ordered and installed the ductile iron sleeves. Make sure the chamfer at the top of the sleeve is minimal (generally to aid in getting the rings in) as if it is too big it may cause head gasket sealing issues (mine was good but close). Also, a bit of aluminum block was exposed at the bottom of each cylinder and I used a Dremel to angle it away from the cylinder to prevent the piston skirt from contacting any aluminum (I was concerned about marring, not sure how valid this is but better safe than sorry). Also, I will discuss this more later but I followed Sid's recommendation to used a bit more piston to cylinder wall clearance (0.005" - 0.0055").
5) Deck the block - Again I relied on my machinist for this. Make sure to mention to your machinist that the surface finish of 50 RA or finer is required for a Cometic head gasket.
6) Final block cleaning - Once I got the block back from the machine shop, I cleaned it using soap and hot water. I used pipe cleaners to clean out all oil channels . I used white grease to coat the iron cylinders during cleaning with water. I then used an air hose to blow any water out of all channels.
Sid's original Hybrid Stroker concept was to use an inexpensive 2.5L block and partially fill the water jackets around the open deck with Moroso Block Filler. I personally think this provides an excellent platform for high power and these blocks are available in abundance. One could also use a 3L block which may provide additional benefits such as windage ports and raised water jacket floor.
Preparation steps:
1) Block Cleaning - I had my machine shop tank clean the block (cost was $100)
2) Additional cylinder water jacket surface cleaning - I used CLR and a small wire brush to prep the surface of the cylinder water jackets to promote filler adhesion. After brushing with CLR, I did a final clean with soap and hot water.
3) Fill the cylinder water jacket with block filler - After final cleaning, I used wet paper towels (highly technical) to block the hole to the oil filter housing and stuff the front water pump flow area (see pics). I decided to prevent water from entering the cavity within the oil filter housing to prevent oil/water mix in the event of a oil filter seal issue. The flow is very limited in that cavity and I cannot see it providing much cooling benefits and I have had no oil temp issues. The block filler I used was Moroso #710-35571 which cost $20. A 1 gallon container was plenty. I mixed it per container instructions poured it into the jacket area with a funnel. Make sure the block is level and mark the block filling height before filling. I then used a rubber mallet and essentially tapped on the block for about 30 minutes to work air out of the filler. Once the filler adequately set (about 12 hours) I pulled the paper towels out and cleaned up the surface of the filler around the water pump passage at the front of the block.
4) Install ductile iron sleeves - I relied on my machinist for this. Make sure your machinist knows what they are doing! My guy ordered and installed the ductile iron sleeves. Make sure the chamfer at the top of the sleeve is minimal (generally to aid in getting the rings in) as if it is too big it may cause head gasket sealing issues (mine was good but close). Also, a bit of aluminum block was exposed at the bottom of each cylinder and I used a Dremel to angle it away from the cylinder to prevent the piston skirt from contacting any aluminum (I was concerned about marring, not sure how valid this is but better safe than sorry). Also, I will discuss this more later but I followed Sid's recommendation to used a bit more piston to cylinder wall clearance (0.005" - 0.0055").
5) Deck the block - Again I relied on my machinist for this. Make sure to mention to your machinist that the surface finish of 50 RA or finer is required for a Cometic head gasket.
6) Final block cleaning - Once I got the block back from the machine shop, I cleaned it using soap and hot water. I used pipe cleaners to clean out all oil channels . I used white grease to coat the iron cylinders during cleaning with water. I then used an air hose to blow any water out of all channels.
01-20-2014, 10:14 PM
#5
Rennlist Member
Thread Starter
Assembly and Misc.
General Advice - If I could give one piece of advice about building a motor it would be about patience. BE PATIENT and take your time. If you are not sure about something stop until you are sure! Triple check everything! Every dimension, torque spec, part number, everything. If something is not right take the time to fix it. Hoping it will be ok is not an acceptable approach. How many motors have been destroyed because someone pressed on with a bad tune! Patience is mandatory.
Rod Bearings - Here is a link to the bearings that Sid and I used. We had them ceramic coated (dry film lubricant) which cost an additional $55. Modern Automotive Performance will do the coating for you if you specify them this way. Could go a lot of different ways here but I think this is a solid choice:
http://www.maperformance.com/acl-rac...m-4b1146h.html
Rings - I went with the JE rings that were reccomended by JE for the SRP pistons I purchased. Here is a link to the rings:
http://www.jepistons.com/Products/J100F8-4030-5.aspx
I gaped the rings using a ring gap grinder I purchased from Jegs:
http://www.jegs.com/i/JEGS+Performan...80514/10002/-1
I gaped the rings per JE recommendations for Street Moderate Turbo found here:
http://www.jepistons.com/PDFs/TechCo...instrc4032.pdf
Head Gasket - Use a Cometic MLS gasket. I purchased mine directly from Cometic for the 3.1L. Buying directly from Cometic is cheaper and you will get the latest revision. I used a 103mm (0.040" thick) but you can get different sizes and I believe you can even special order for just a bit more from Cometic:
http://www.shopengineparts.com/parts...model=944+2.5L
I sprayed mine with copper spray on the 3.1L and I am inclined to do this after quite a bit of research. I have nothing definitive about this except some people I trust said they had better overall success when prepping in this way.
Head Studs - I am cheap and do not like to spend money but building my motor on 25 year old head studs did not make sense to me. OEM studs would probably be fine but I went with ARP Head studs torqued to 87 ft-ibs. IIRC I torqued them, then let them sit overnight, then re-torqued again.
http://www.ebsracing.com/SearchItem....key=_3ZV173UDB
More to come...
01-21-2014, 01:41 AM
#7
Instructor
I must have been the other pm sender. Looking forward to reading it all!
edit: after it's done - it has to be a sticky.. or at least linked from the modifications thread..
edit: after it's done - it has to be a sticky.. or at least linked from the modifications thread..
Trending Topics
01-21-2014, 06:33 AM
#8
Rennlist Member
Great idea Shawn. Thanks to you and Sid for doing this.
01-21-2014, 10:46 AM
#13
Rennlist Member
This is already shaping up to be a gold mine. Thanks for putting this together, guys.
One request: in Post #2 you highlight the dimensions of the build you chose; can you also include the stock numbers for standard 951 components as a point of comparison?
Thanks!
Collin
One request: in Post #2 you highlight the dimensions of the build you chose; can you also include the stock numbers for standard 951 components as a point of comparison?
Thanks!
Collin
 01-21-2014, 01:01 PM
#15
Race Car
Thanks Shawn for documenting the build(s) and parts list. I am obviously not that great at detailed documentation. I tend to keep most of it in my head. It will help me too in regards to responding to messages.
Hopefully, we can make this as easy as possible for anyone looking to build one. I'll add suggestions as it goes and after you get the majority of info posted.
Thanks again!!
Hopefully, we can make this as easy as possible for anyone looking to build one. I'll add suggestions as it goes and after you get the majority of info posted.
Thanks again!!