
Tender Springs…. Oh, so tender...
 11-11-2008, 09:11 PM
#1
Pro
Thread Starter
Join Date: Jun 2005
Location: Napa Valley, CA
Posts: 589
Likes: 0
Received 0 Likes
on
0 Posts
For all of you out there with upgraded Koni Yellow shocks and stiffer coil over springs. Have you ever thought,
“Man I like how the car handles the twisties with the upgraded springs, but man this thing just feels way too primitive on the streets, I mean it handles the potholes and ruts like an old wild west chuck wagon. I mean, it’s a Porsche for crying out loud, shouldn’t it be a little more civilized?”
Well, that’s how I felt after driving around these Napa back roads with upgraded #350 front springs for over a year now. So I decided to experiment a little with a DIY dual spring package. Since I had already spend money on Koni Yellows, I decided to make to most of what I already had and try my luck coming up with a decent compromise. The end result has been more than satisfying…
Baseline: Koni Yellow struts, #350 x 10” front springs, and Paragon Pdts. adjustable ride height kit. Good street/track compromise? Not for me.
Upgrade: dual spring package: Eibach #150 x 2.5” tender spring, Hypercoil Stacked Spring Divider, Suspension Spring Specialists #350x 8” main spring, Koni Yellows set at ˝ turn from full soft. Got springs from PitstopUSA.com
2 Tender Springs = EIB 0175-250-0150 = $172
2 Spring Dividers = HY-18DS100 = $56
2 Main Springs = SSSD350 = $89
Sub Total = $317.00
Note: the stacked spring divider is too long on one side (the bottom side) and will interfere with the Koni Yellow strut and not allow full travel, therefore about 2 5/16” must be cut off, basically making the spring divider symmetrical.
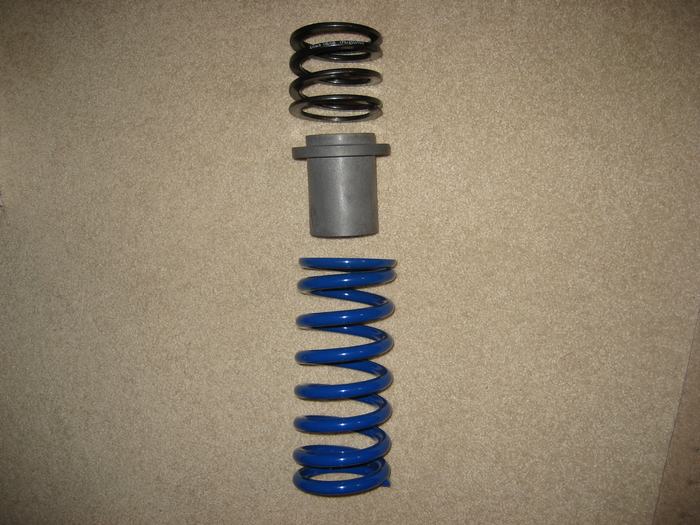
Stacked Dual Spring Combo
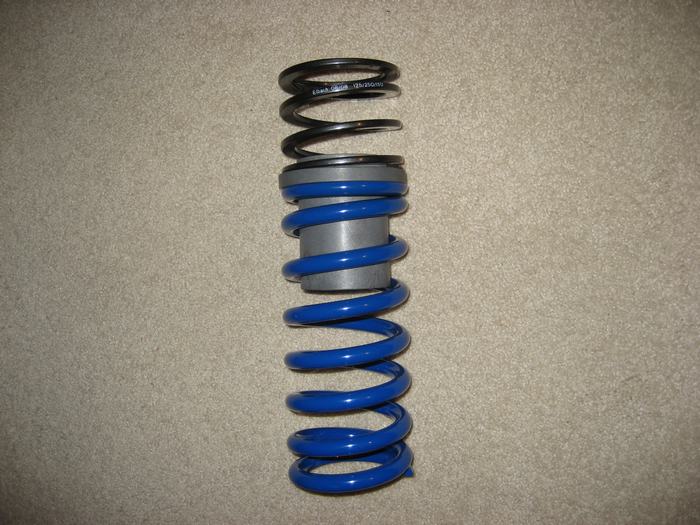
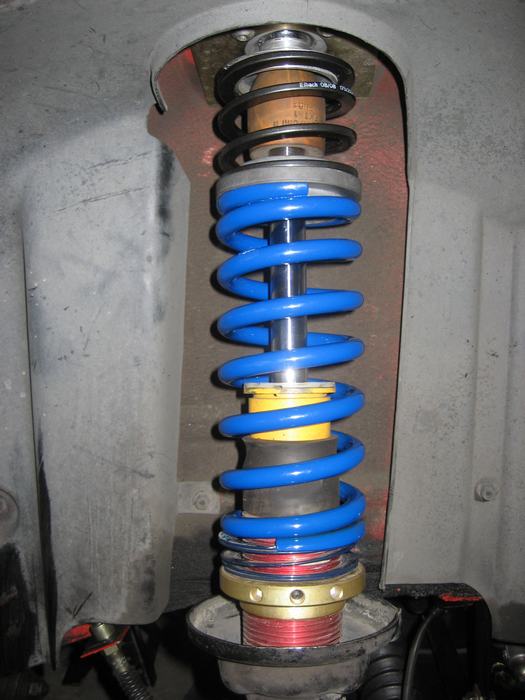
In the picture below, you can see the installed stacked spring divider after being cut 2 5/16” (approx. 59 mm)
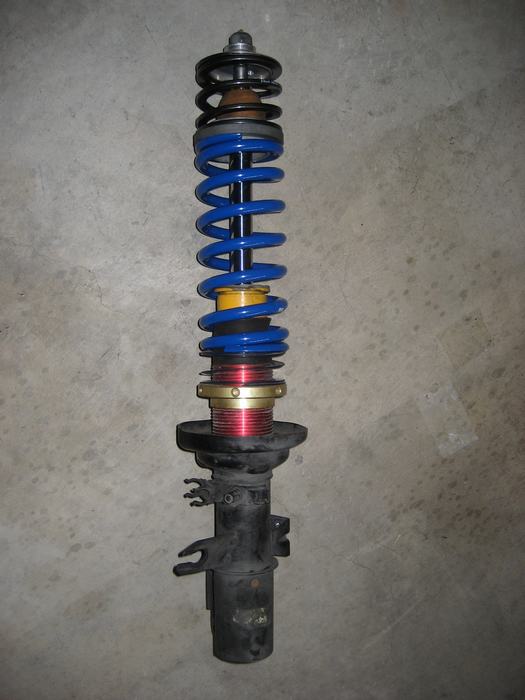
The final installed package. In this final picture, you can also see I’m using a third flat wire helper spring to help take up some of the slack in the spring system. Later on, after doing the final ride height adjustments, it turns out that the helper spring is not really necessary.
Driving Impressions:
Well, first I want to say that when the car sitting at rest, the tender springs are fully compressed. Since they are of the flat wire design, they are made so they can compress to full “coil bind” and are perfectly happy that way. So my initial thoughts were, “man, I should have gone with stiffer tenders”, but to my surprise…
I took the car out and it felt great. A very soft (yet very controlled) ride. I immediately went looking for potholes to test the new suspension, to my surprise, potholes were a non-issue, the ride is amazingly civilized. Next, the twisties… wow, firm, firm, hardly any body roll. I am one happy camper.
Now why does this work? Well, it later dawned on me that MOST street road irregularities, namely potholes, cause the suspension to first extend and then compress. Viola!!! There is the answer. Once the wheel drops into the pothole, now the tender spring gets a chance to extend. Next, as the wheel comes out of the pothole, spring compression occurs as a dual spring package the #350 main plus the #150 tender have a combined total #105 spring rate. That’s why the suspension is so supple. Recall, the combined spring rate constant is calculated as follows: 1/Cf = 1/C1 + 1/C2
Now the bad news, this spring combo works great for potholes, but speed bumps are another story. Because the tenders are fully compressed to begin with, when the suspension takes on a speed bump, the #350 spring does all the work, so yes, one is quickly reminded about how firm #350 springs really are. he, he, he…
Track time!!!
Slap on some hawk racing pads, set camber close to – 3 deg., set 1/16” toe out, Koni’s to 1 ˝ turns firm, and head to the track.
Went to the Porsches at the point event, i.e. Sears Point Raceway October 25 -26, 2008. The car behaved to my expectations. #350 front springs and 28 mm Torsion bars, are not necessarily spring rates for a track suspension, especially with a heavy 3,0000 lb street car, but the car is very obedient, I was able to toss it around to my liking, in the process I managed to pull off a very respectable consistent 2:01 sec. e.t. The Falken RT-615’s are now toast. Next year back to Toyos.
Next year,
I’ll experiment with stiffer springs at all four corners, but first I will need to upgrade those weak 1986 front spindles, hubs, and bearings to 1987’s. For the time being, I am really happy with what I have, a very good street/track compromise. And best of all, when I drive home from a track event, I can enjoy a very comfortable ride home.
YMMV
“Man I like how the car handles the twisties with the upgraded springs, but man this thing just feels way too primitive on the streets, I mean it handles the potholes and ruts like an old wild west chuck wagon. I mean, it’s a Porsche for crying out loud, shouldn’t it be a little more civilized?”
Well, that’s how I felt after driving around these Napa back roads with upgraded #350 front springs for over a year now. So I decided to experiment a little with a DIY dual spring package. Since I had already spend money on Koni Yellows, I decided to make to most of what I already had and try my luck coming up with a decent compromise. The end result has been more than satisfying…
Baseline: Koni Yellow struts, #350 x 10” front springs, and Paragon Pdts. adjustable ride height kit. Good street/track compromise? Not for me.
Upgrade: dual spring package: Eibach #150 x 2.5” tender spring, Hypercoil Stacked Spring Divider, Suspension Spring Specialists #350x 8” main spring, Koni Yellows set at ˝ turn from full soft. Got springs from PitstopUSA.com
2 Tender Springs = EIB 0175-250-0150 = $172
2 Spring Dividers = HY-18DS100 = $56
2 Main Springs = SSSD350 = $89
Sub Total = $317.00
Note: the stacked spring divider is too long on one side (the bottom side) and will interfere with the Koni Yellow strut and not allow full travel, therefore about 2 5/16” must be cut off, basically making the spring divider symmetrical.
Stacked Dual Spring Combo
In the picture below, you can see the installed stacked spring divider after being cut 2 5/16” (approx. 59 mm)
The final installed package. In this final picture, you can also see I’m using a third flat wire helper spring to help take up some of the slack in the spring system. Later on, after doing the final ride height adjustments, it turns out that the helper spring is not really necessary.
Driving Impressions:
Well, first I want to say that when the car sitting at rest, the tender springs are fully compressed. Since they are of the flat wire design, they are made so they can compress to full “coil bind” and are perfectly happy that way. So my initial thoughts were, “man, I should have gone with stiffer tenders”, but to my surprise…
I took the car out and it felt great. A very soft (yet very controlled) ride. I immediately went looking for potholes to test the new suspension, to my surprise, potholes were a non-issue, the ride is amazingly civilized. Next, the twisties… wow, firm, firm, hardly any body roll. I am one happy camper.
Now why does this work? Well, it later dawned on me that MOST street road irregularities, namely potholes, cause the suspension to first extend and then compress. Viola!!! There is the answer. Once the wheel drops into the pothole, now the tender spring gets a chance to extend. Next, as the wheel comes out of the pothole, spring compression occurs as a dual spring package the #350 main plus the #150 tender have a combined total #105 spring rate. That’s why the suspension is so supple. Recall, the combined spring rate constant is calculated as follows: 1/Cf = 1/C1 + 1/C2
Now the bad news, this spring combo works great for potholes, but speed bumps are another story. Because the tenders are fully compressed to begin with, when the suspension takes on a speed bump, the #350 spring does all the work, so yes, one is quickly reminded about how firm #350 springs really are. he, he, he…
Track time!!!
Slap on some hawk racing pads, set camber close to – 3 deg., set 1/16” toe out, Koni’s to 1 ˝ turns firm, and head to the track.
Went to the Porsches at the point event, i.e. Sears Point Raceway October 25 -26, 2008. The car behaved to my expectations. #350 front springs and 28 mm Torsion bars, are not necessarily spring rates for a track suspension, especially with a heavy 3,0000 lb street car, but the car is very obedient, I was able to toss it around to my liking, in the process I managed to pull off a very respectable consistent 2:01 sec. e.t. The Falken RT-615’s are now toast. Next year back to Toyos.
Next year,
I’ll experiment with stiffer springs at all four corners, but first I will need to upgrade those weak 1986 front spindles, hubs, and bearings to 1987’s. For the time being, I am really happy with what I have, a very good street/track compromise. And best of all, when I drive home from a track event, I can enjoy a very comfortable ride home.
YMMV
Last edited by Trucho-951; 11-12-2008 at 12:46 AM.
 11-11-2008, 11:17 PM
#6
Drifting

Join Date: May 2006
Location: Melbourne
Posts: 3,481
Likes: 0
Received 0 Likes
on
0 Posts
i think you can't achieve the same steep increase in rate with progressives .
I'm starting to wonder about dual progressives . Good write up and shed some light on something that been on my mind a while
I'm starting to wonder about dual progressives . Good write up and shed some light on something that been on my mind a while
Trending Topics
11-12-2008, 05:02 AM
#8
Nordschleife Master
Great idea and write-up! I've always thought the new but stock suspension on my 951 was a little too soft, even compared to my old na with bilsteins. I'm sure me adding 18s with the potholes around here is probably not the best idea and a tight suspension would make it even more risky but I have a feeling its already too soft and it might rub.
11-13-2008, 06:29 PM
#9
Pro
Thread Starter
Join Date: Jun 2005
Location: Napa Valley, CA
Posts: 589
Likes: 0
Received 0 Likes
on
0 Posts
example 250# - 550# progressive Tender spring
http://www.pitstopusa.com/detail.aspx?ID=60073
Description: With two spring rates, these are often used with a linear spring to create three spring rates for fine tuning suspension.