Rekeying 928 Locks Procedure by Wayne Strutt
 03-10-2012, 11:19 PM
#1
Rennlist Member
Thread Starter
Join Date: Sep 2007
Location: Ridgecrest, California
Posts: 1,363
Likes: 0
Received 143 Likes
on
28 Posts
Hello all,
I'm helping a fellow 928 Forum Member, Wayne Strutt, get this nice procedure posted to the forum. Wayne had contacted me for assistance and after several tries and technical difficulties, decided it was best for me to help post his procedure.
I thought Wayne did a great job on the picture quality and write up so wanted to make sure fellow members had a chance to use his procedure. Feel free to comment or ask questions of Wayne and I'm sure he'll jump right in. THANKS!
PORSCHE 928 LOCKS
HATCH LOCK REKEYING
Here is a tutorial I put together to help with lock rekeying. I have learned a great deal from this forum so maybe this small contribution many of you will find useful.
This is my experience rekeying my hatch lock. Since I did not have a key that would unlock the hatch I did as suggested on the 928 forum.
First, from inside the hatch, I drilled a �� hole in the body frame about �� down from the top edge of the hatch in line with the lock receiver. Then, with my shoulder pressing against the inside of the hatch glass, I pushed a screw driver through the hole and released the lock and opened the hatch.
For cars with keyed alarm if you look overhead you will see a number of cap retainers that hold the finish trim to the inside of the hatch. These are 2 piece. Use a thin screw driver and pry the centre cap straight out. The piece remaining can be removed using pliers to squeeze the split together and pull out of the hole. Now pull down the trim to reveal the alarm wire harness. Unplug the alarm wires.
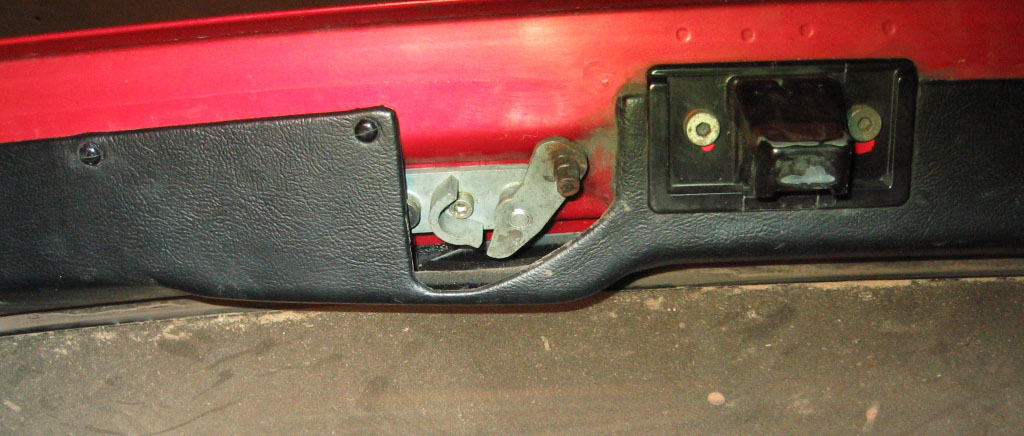
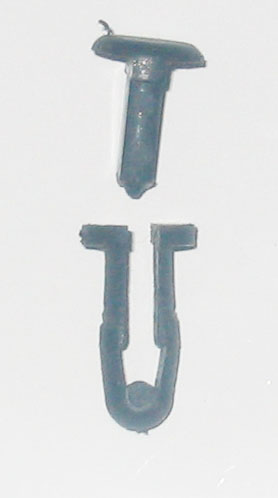
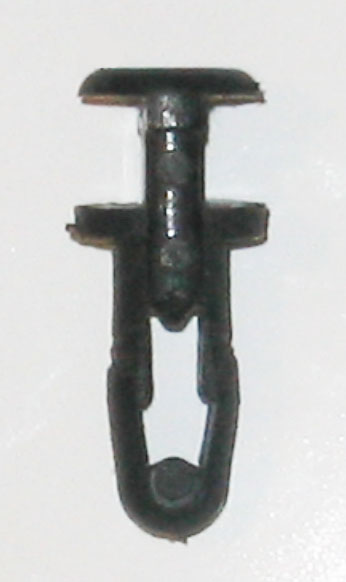
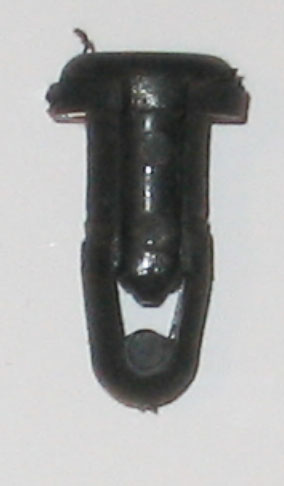
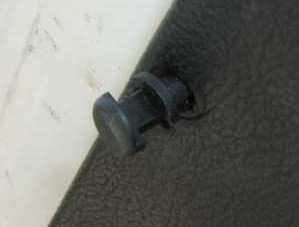
TRIM FASTENER
Using a 5 mm hex key allen socket unscrew the 2 , 10mm long hex drive capscrews that hold the lock bracket to the hatch door.
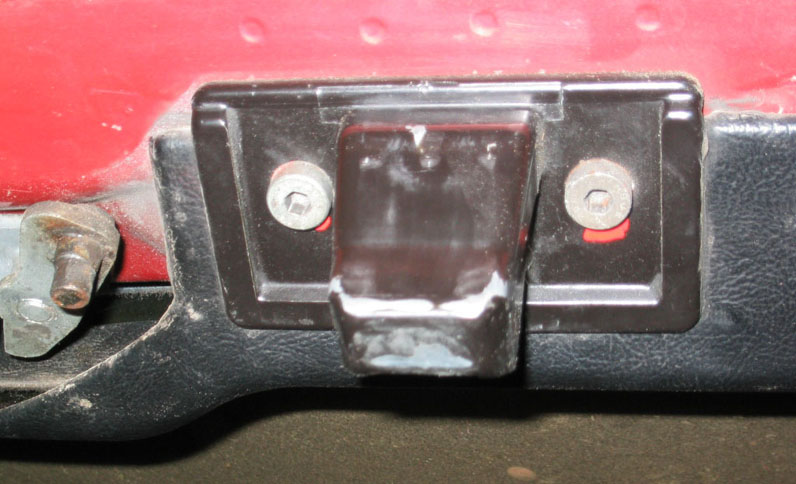
You now have in your hands a lock in a bracket (Alarm lock will have a wire with plug connector coming from it.) Go inside now. 9 below zero makes your body shake too much to handle the tiny parts from here on.
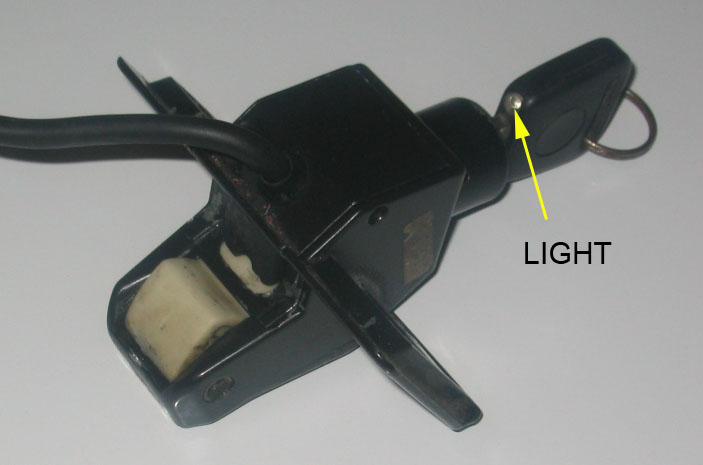
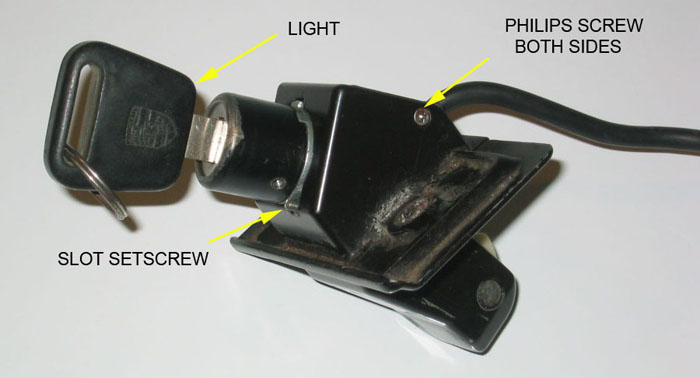
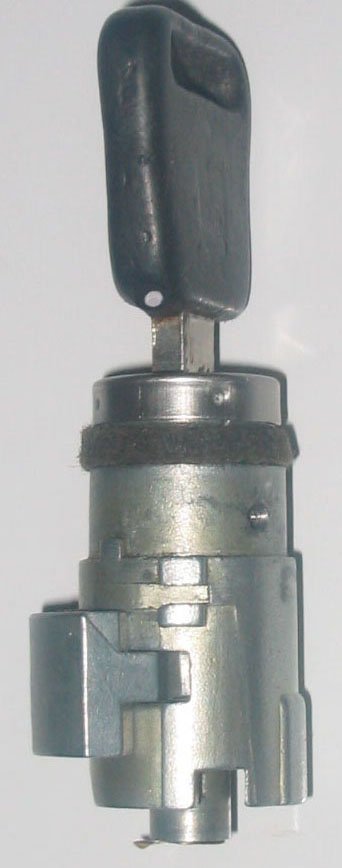
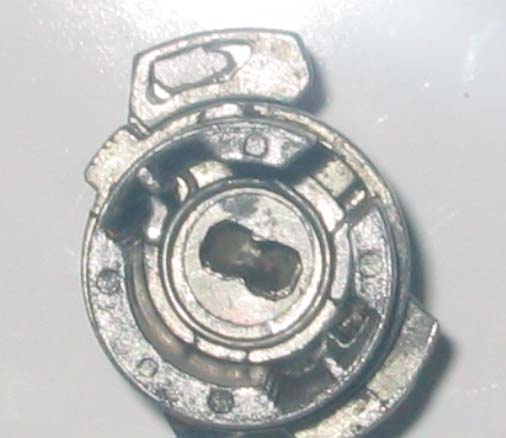
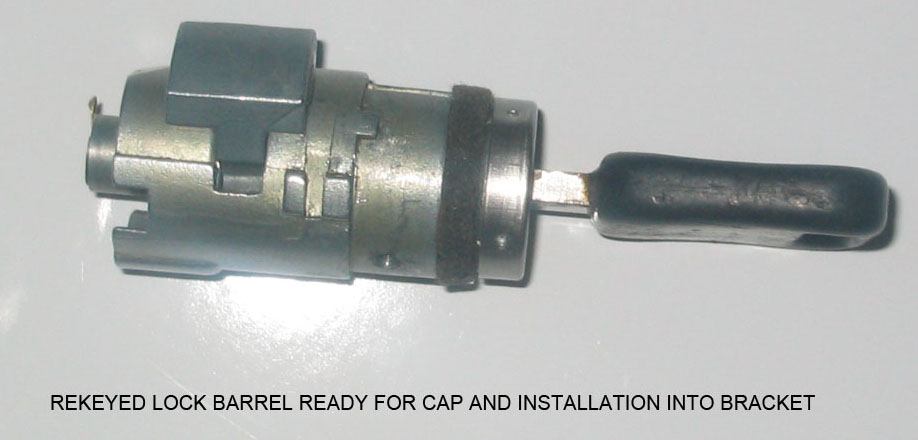
I have indicated the light for orientation as that would be the way you would normally insert the key.
Also from here you need:
a spring loaded Centre Punch,
A Drill
some Verrrry Sharp Drill Bits , 1/16� and 3/32� to get the cap off the Barrel
no 35 or 7/64� drill bit, for the 6-32 Tap ,
1 set of small Screw Drivers (Philips and Slot)
Cleaning Solution (paint thinners)
small paint Brush for cleaning
Tweezers
Masking Tape and
the largest Bedsheet you can find for when you drop one of the tiny springs .
and ���..Patience
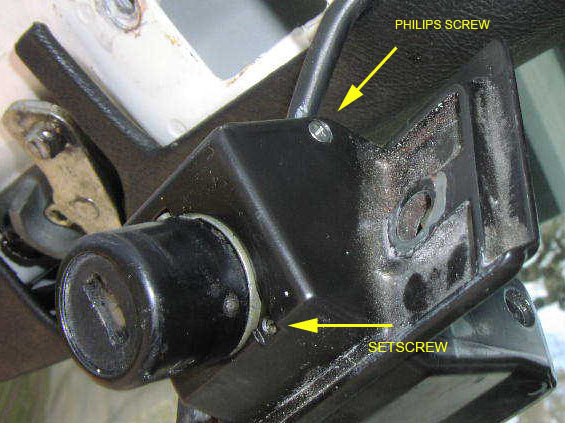
On the sides of the bracket are small flat head Philips drive screws. Remove these and separate the underside portion of the bracket from the main part. With an alarm just move it out of your way as the wires run through it.
If you have an alarm lock you will see a black plastic cap. Pry that off.
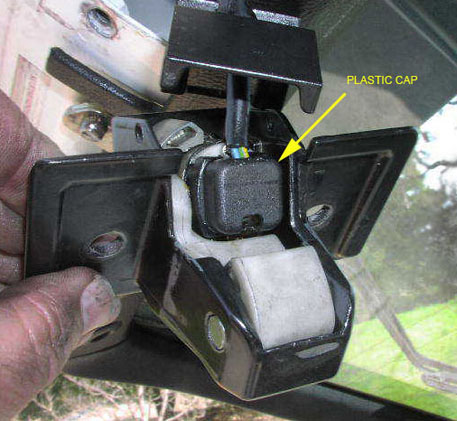
Remove the two small Philips screws that hold the plastic wire carrier to the barrel. Lift this off and you will see a copper contact finger. Remove the plate and rubber sealing gasket. Note and mark the position of the copper contact finger with the barrel, as it is important on reassembly that the contact finger moves from one copper contact to the other. The copper finger on the end is fragile.
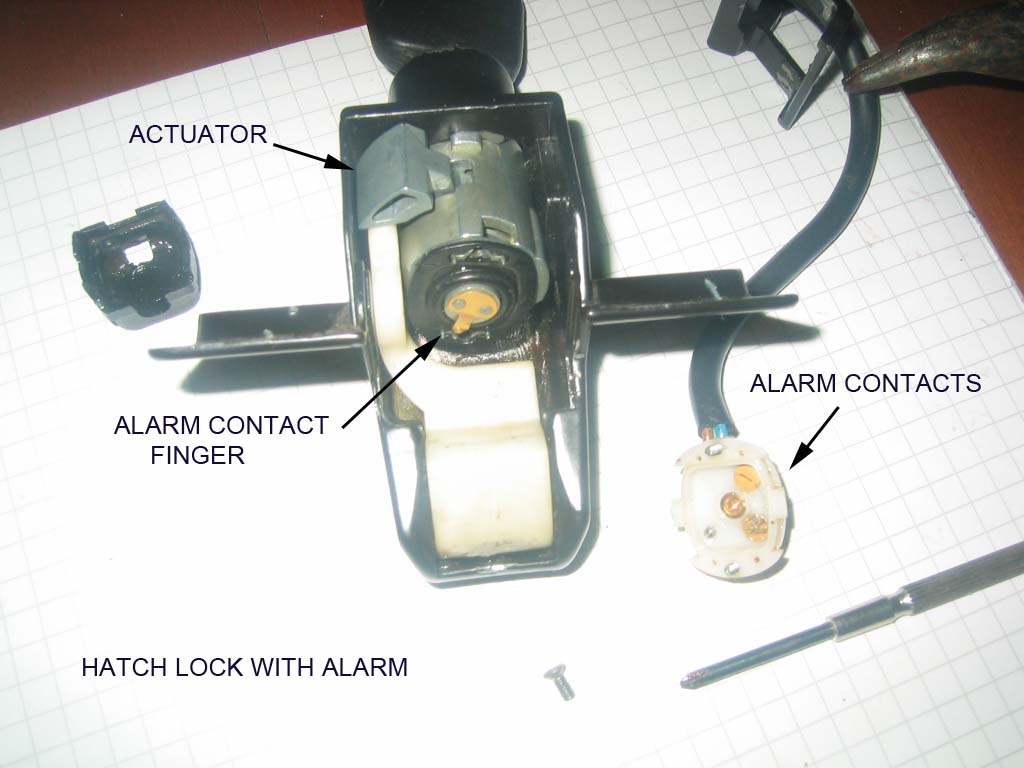
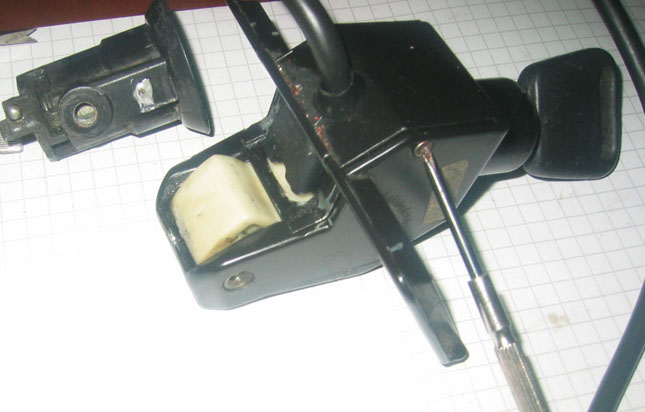
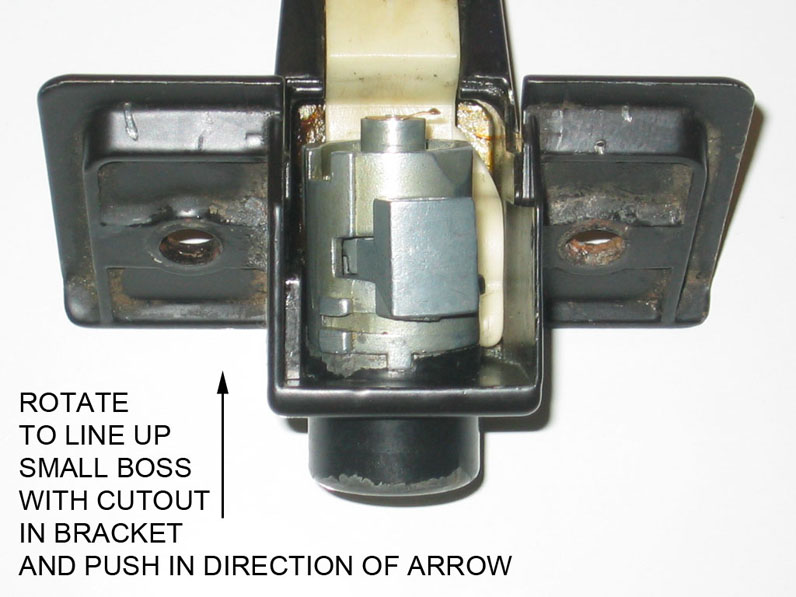
Now on the key entry side is a small flush slot head setscrew next to the barrel. Unscrew that to unlock and allow the barrel to rotate in the bracket counterclockwise. Line up the boss with the hole in the bracket. Push the barrel into the bracket to remove it from the bracket. Remember the copper contact. Hold the white plastic lever down to slide the barrel out without hitting the copper contact. The actuator on the side of the barrel will hinder this but it can be done.
Continued....
I'm helping a fellow 928 Forum Member, Wayne Strutt, get this nice procedure posted to the forum. Wayne had contacted me for assistance and after several tries and technical difficulties, decided it was best for me to help post his procedure.
I thought Wayne did a great job on the picture quality and write up so wanted to make sure fellow members had a chance to use his procedure. Feel free to comment or ask questions of Wayne and I'm sure he'll jump right in. THANKS!
PORSCHE 928 LOCKS
HATCH LOCK REKEYING
Here is a tutorial I put together to help with lock rekeying. I have learned a great deal from this forum so maybe this small contribution many of you will find useful.
This is my experience rekeying my hatch lock. Since I did not have a key that would unlock the hatch I did as suggested on the 928 forum.
First, from inside the hatch, I drilled a �� hole in the body frame about �� down from the top edge of the hatch in line with the lock receiver. Then, with my shoulder pressing against the inside of the hatch glass, I pushed a screw driver through the hole and released the lock and opened the hatch.
For cars with keyed alarm if you look overhead you will see a number of cap retainers that hold the finish trim to the inside of the hatch. These are 2 piece. Use a thin screw driver and pry the centre cap straight out. The piece remaining can be removed using pliers to squeeze the split together and pull out of the hole. Now pull down the trim to reveal the alarm wire harness. Unplug the alarm wires.
TRIM FASTENER
Using a 5 mm hex key allen socket unscrew the 2 , 10mm long hex drive capscrews that hold the lock bracket to the hatch door.
You now have in your hands a lock in a bracket (Alarm lock will have a wire with plug connector coming from it.) Go inside now. 9 below zero makes your body shake too much to handle the tiny parts from here on.
I have indicated the light for orientation as that would be the way you would normally insert the key.
Also from here you need:
a spring loaded Centre Punch,
A Drill
some Verrrry Sharp Drill Bits , 1/16� and 3/32� to get the cap off the Barrel
no 35 or 7/64� drill bit, for the 6-32 Tap ,
1 set of small Screw Drivers (Philips and Slot)
Cleaning Solution (paint thinners)
small paint Brush for cleaning
Tweezers
Masking Tape and
the largest Bedsheet you can find for when you drop one of the tiny springs .
and ���..Patience
On the sides of the bracket are small flat head Philips drive screws. Remove these and separate the underside portion of the bracket from the main part. With an alarm just move it out of your way as the wires run through it.
If you have an alarm lock you will see a black plastic cap. Pry that off.
Remove the two small Philips screws that hold the plastic wire carrier to the barrel. Lift this off and you will see a copper contact finger. Remove the plate and rubber sealing gasket. Note and mark the position of the copper contact finger with the barrel, as it is important on reassembly that the contact finger moves from one copper contact to the other. The copper finger on the end is fragile.
Now on the key entry side is a small flush slot head setscrew next to the barrel. Unscrew that to unlock and allow the barrel to rotate in the bracket counterclockwise. Line up the boss with the hole in the bracket. Push the barrel into the bracket to remove it from the bracket. Remember the copper contact. Hold the white plastic lever down to slide the barrel out without hitting the copper contact. The actuator on the side of the barrel will hinder this but it can be done.
Continued....

The following users liked this post:
English Bob (06-24-2022)
03-10-2012, 11:38 PM
#2
Rennlist Member
Thread Starter
Join Date: Sep 2007
Location: Ridgecrest, California
Posts: 1,363
Likes: 0
Received 143 Likes
on
28 Posts
The barrel will have to be drilled on both sides to get the cap off. Centre punch a starting point and drill with a 1/16” bit approximately 1/16” deep. Stay centered,the bit will want to wander to the softer diecast zinc alloy barrel. Then using a 3/32” bit drill to the same depth again. The cap is .05'' thick and the barrel is 1/8”- .125” thick at this point. However if you drill more than .175 ” deep you will hit the core and ruin the lock. Later what is left of the pins will just push out of the barrel.
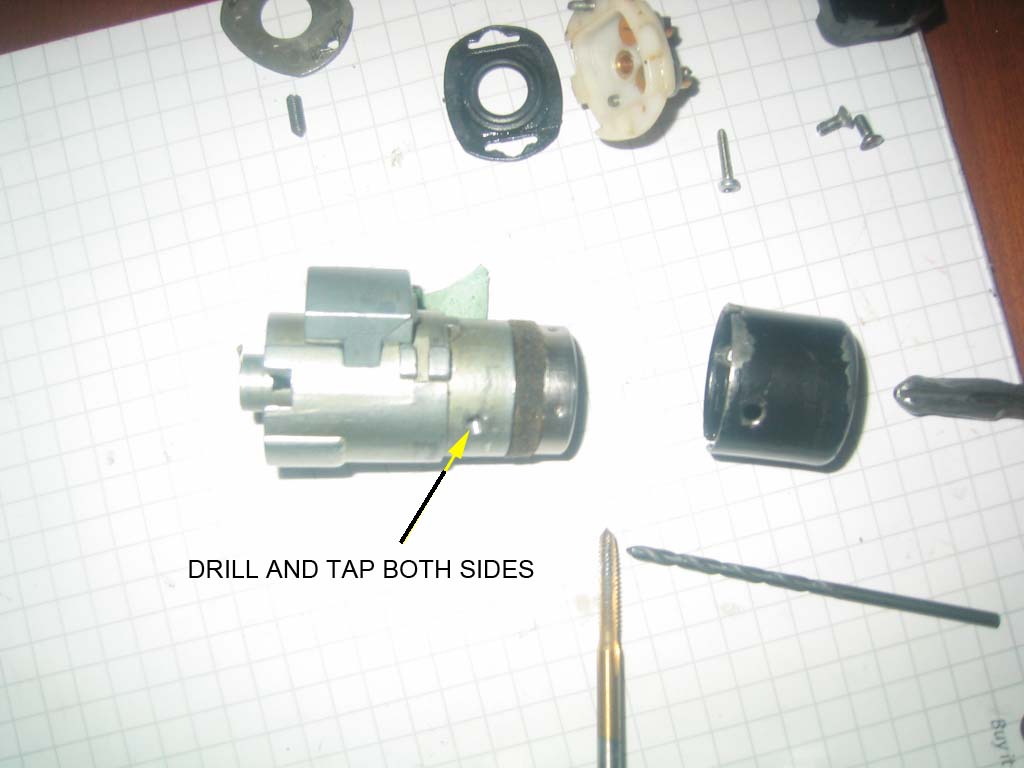
When you take the cap off make sure the core stays in the barrel. Use a thin blade and pry (ease), the cap off. Then REINSERT the key. I think the best way to restore the unfortunate need for drilling is to tap the barrel holes and install set screws or maybe cut off roll pins. But they only need to be about 3/32" to 1/8” long. Any longer and you will hit the core and prevent rotation.
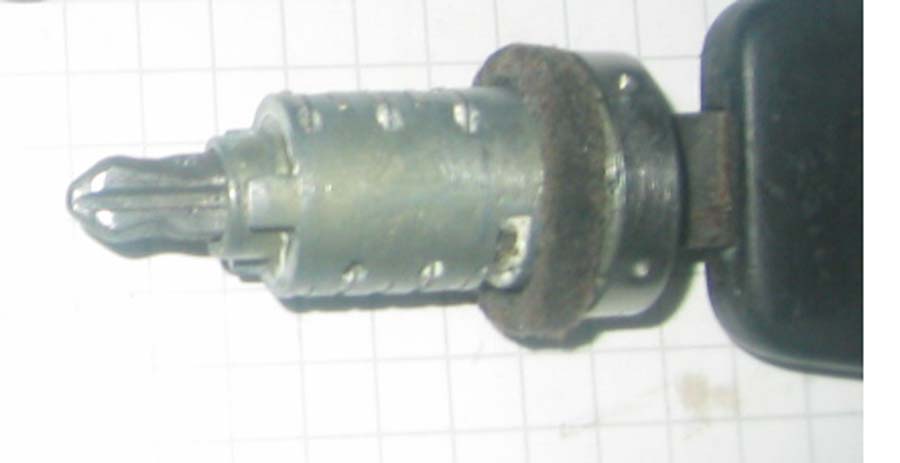
Vehicles with factory alarm will have a longer key, which adds 4 pins to the basic 10. When you take the core out of the barrel make sure you keep the key in it or everything will fall apart and you will have to find the small springs that are released. Hold the barrel vertically, key on top and pull the core up slowly out of the barrel. Place the core aside key still in it. and look inside the barrel. Observe inside the barrel the 2 ridges opposite each other.
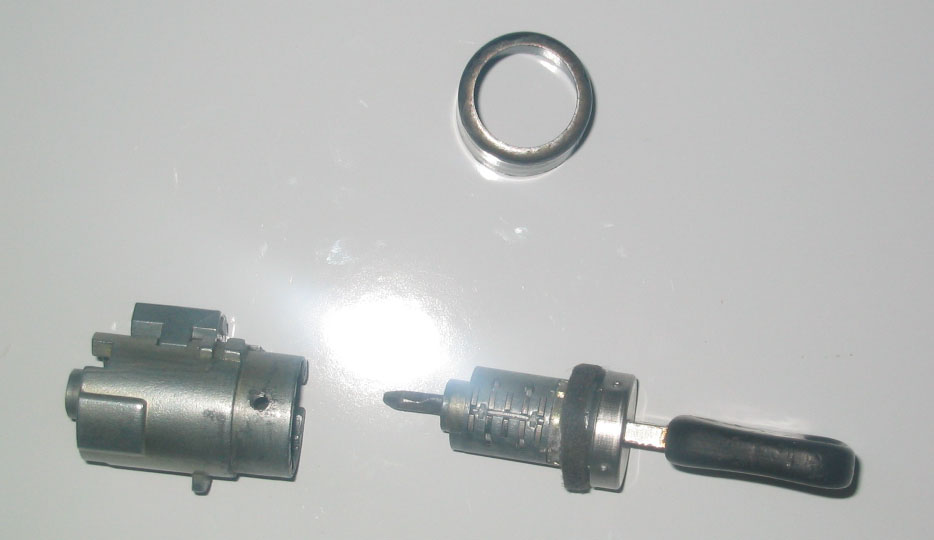
Do not let the actuator lever on the outside of the barrel move, or let the large spring that operates it come out. Observe and note where the ends of the spring are located as this spring returns (rotates) the actuator back to the lock engaged position. Slowly move the actuator and see how it works. Now this can be removed and cleaned. With the spring released the actuator will remove out the side of the barrel. The alarm core can now be dismantled for cleaning and rekeying.
Note the position of the core and barrel relationship, as the key will only operate the lock at a specific point. Mark the barrel (scribe a line in line with the key.) It is possible to install the core 180 degrees out of position.
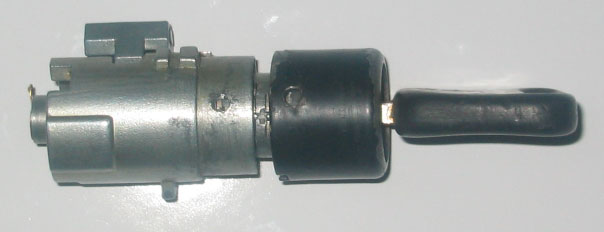
Barrel with alarm core, actuator, and spring
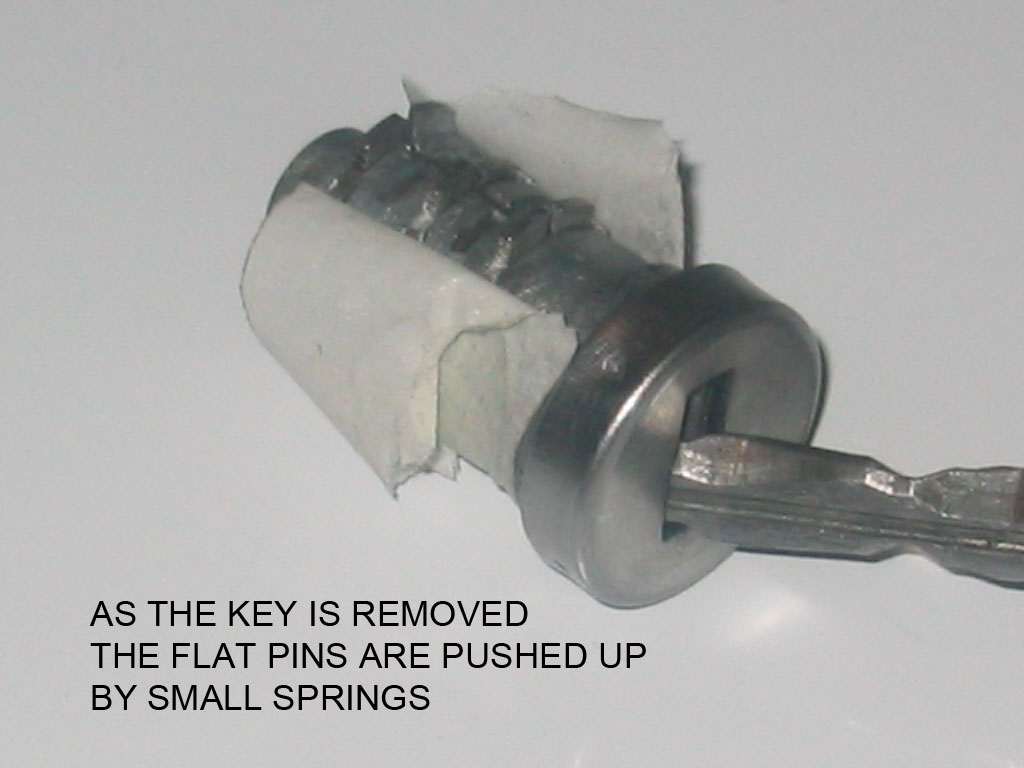
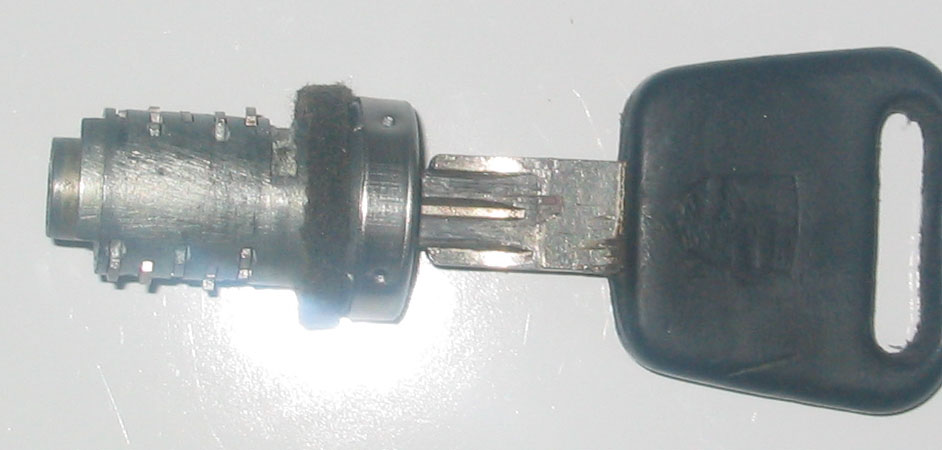
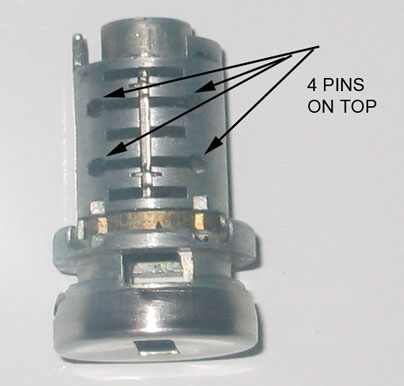
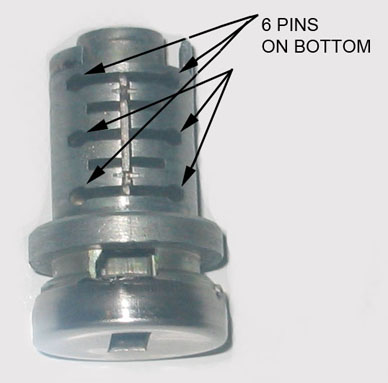
With the core and key assembly out of the barrel hold the core HORIZONTAL and, with the key handle VERTICAL. Wrap masking tape around the bottom half of the barrel. Slowly pull the key out of the lock core. Stop at �” and observe how the row of pins (as the springs push them up) form a groove. Remember above, inside the barrel the 2 ridges 180 degrees opposite each other. The pins will be located on each side of this ridge on reassembly, top and bottom.
Now (over the large bedsheet) remove the key, and, using tweezers remove the flat pins, or blades note the number (make a chart to record the location) . Below each blade pin is a very small spring. Do not lose them. There are 6 pins on the bottom and 4 on the top. With the one side empty turn the core over and remove the tape and repeat the pin removal noting again which number went where. The top has 4 pins the bottom 6 when lock is installed in hatch or door. Clean everything and reassemble with a wipe of light oil or lithium grease. If rekeying a lock start with everything clean and laid out. i.e. groups of pins according to numbers etc.
Back to the clean empty barrel: Push the remainder of the drilled pins out of the barrel. I chose to tap the threads 6-32 and use set screws from HD sku 2241200884. They are a bit long and need to be shortened. Buy extra it’s cheaper than the gas to go back for more.
When tapping the barrel ensure the cap is on so you tap both together. If you find an allen key that fits the screw let me know. Alternative: just thread the barrel, then on final assembly run the screw into the barrel, put the cap on and then back the screw out tight against the inside of the cap, locking it. I would use a drop of cyanoacrylate on the screws. The screws only hold the cap on .They do not hold the core in the barrel as is the case with the door locks. Deburr the inside of the barrel at the tapped holes.

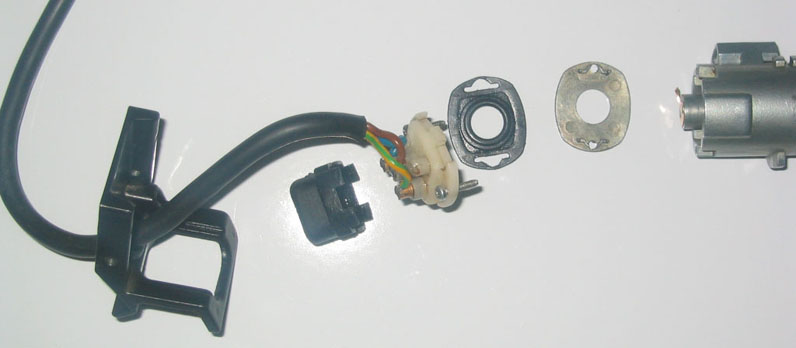
INDEX OF PARTS
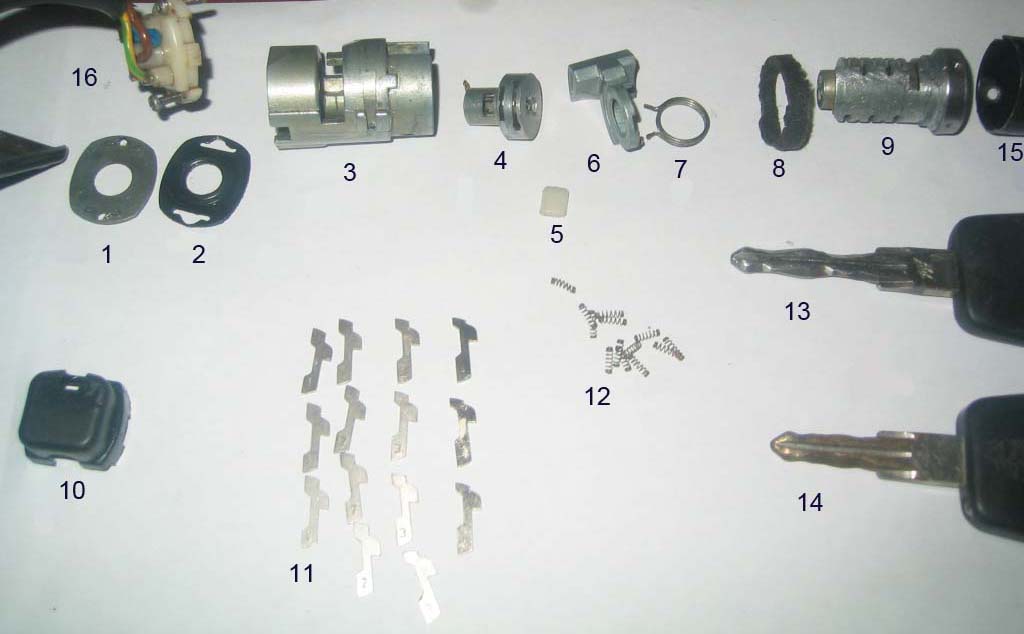
ITEM DESCRIPTION
1 Alarm contact isolation plate
2 Neoprene moisture seal
3 Lock barrel housing
4 Alarm core with contact finger
5 Nylon bearing
6 Actuator
7 Spring
8 Felt seal
9 Lock core
10 Alarm wire cover (plastic cap)
11 Flat pins( numbered 1 to 4)
12 Springs
13 Alarm key
14 Nonalarm key
15 Barrel cap
16 Alarm contact wire
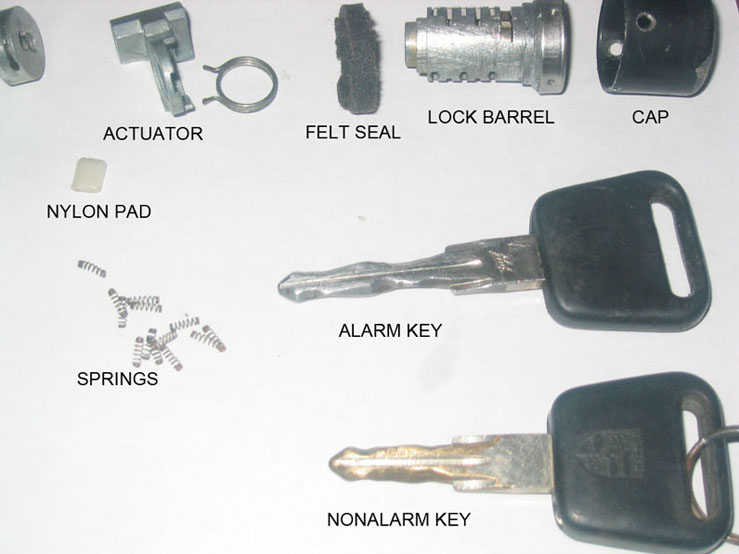
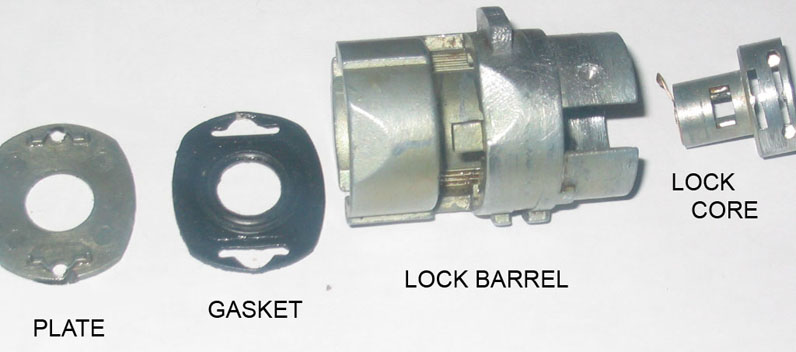
Additional pictures for reference only
REKEYING
Using tweezers place a spring and pin in the first hole then insert the key. If the pin is flush with the surface of the core, good, if on the side installed it sticks up (IS HIGH) go to the next Higher number, if too LOW the next LOWer number. When the one side is done place tape over the pins and turn the lock core over. Repeat the process noting which number pin went is in which slot on a chart. This chart will allow you to rekey the other locks to the same key much quicker.
If you have an alarm lock you will have 2 more pins on each side to deal with. The core for the alarm is done the same way but on reassembly must be installed first, separately from the main lock as the actuator goes in between. The key is used as well but you must put the main core on the key so that the alarm section is held at the correct position on the key for determining the correct alarm pins. In other words do not try to set pins for alarm section without the main core on the key Remember above how it was dismantled. The small alarm core with the copper tab must go in the correct way (pointing right) for the tab to touch the copper pins in the white nylon wire carrier when the key rotates it.
In summary : there are 4 different cut pins numbered , 1,2,3,4, plus no pin giving you 5 choices for each of the 10 main slots and 4 alarm slots.
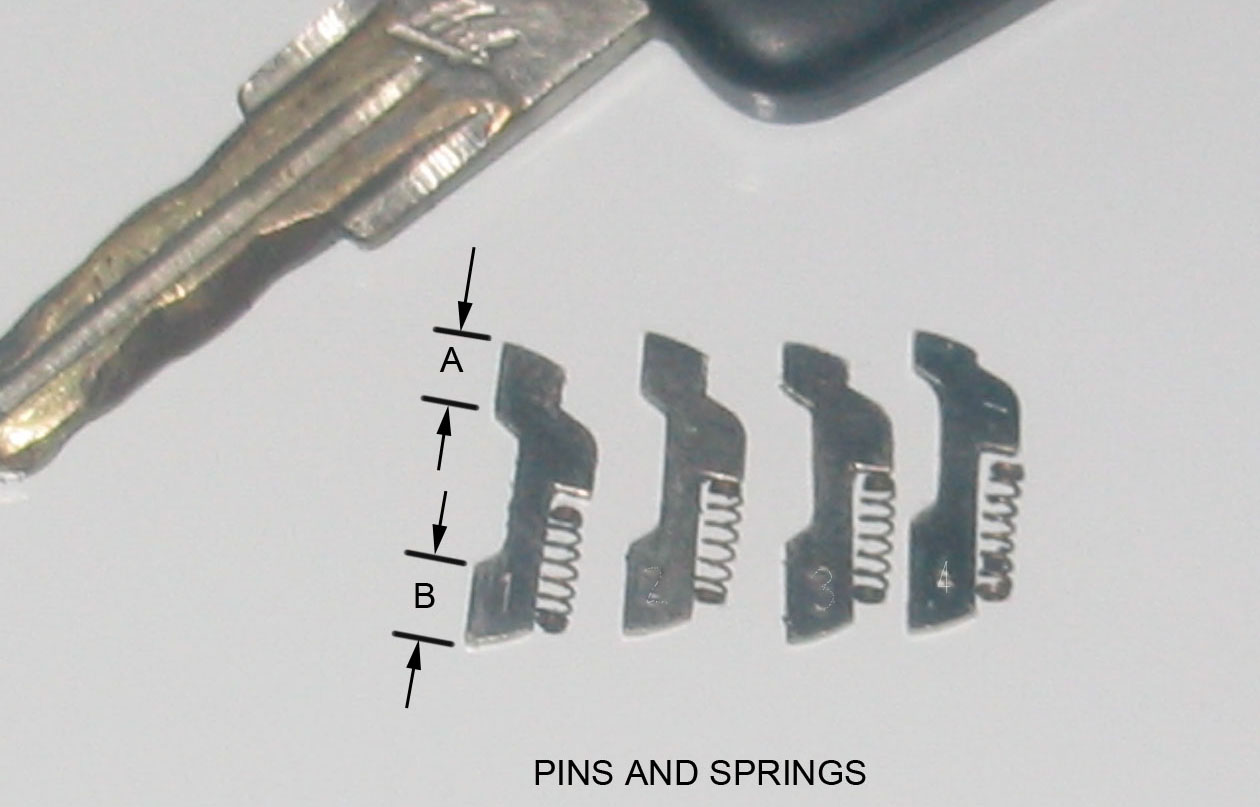
NOTICE HOW DIMENSIONS “A” AND “B” VARY FROM PIN NUMBER 1 TO 4
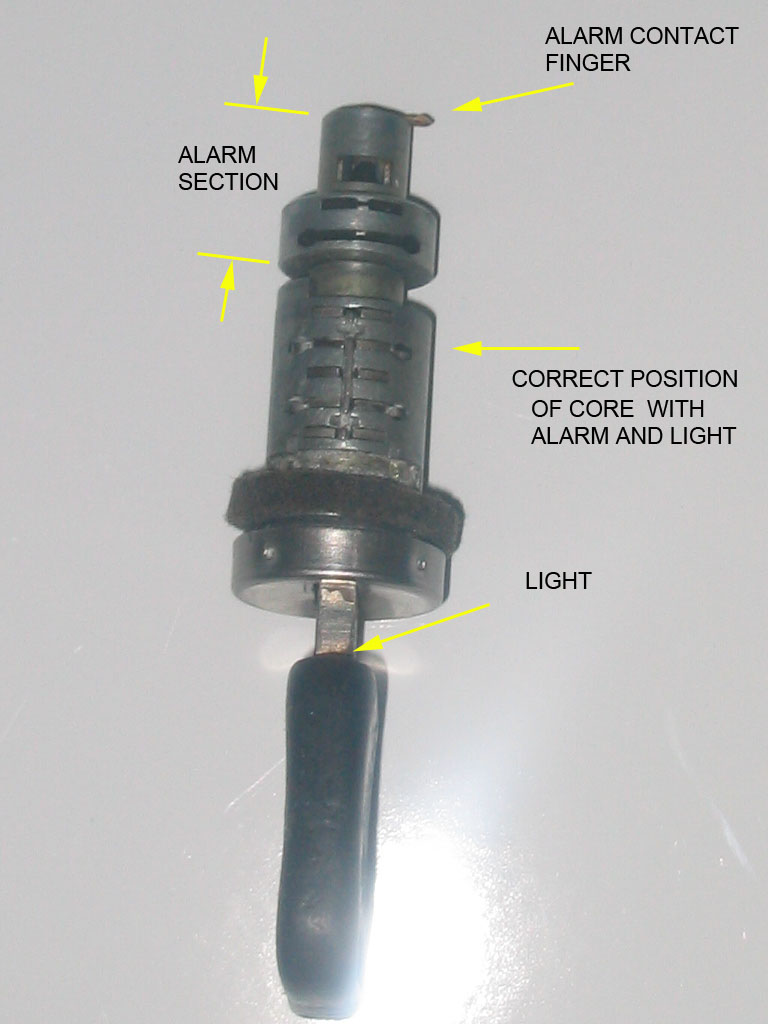
This is the correct position for setting alarm code pins.
Without main core on the key the alarm core will move closer to the key handle,
and will change what the correct alarm code pins need to be. It is possible to install the core 180 degrees wrong which is why I have stressed, key, core, and barrel orientation.
The main core has 4 pins on the top side as shown above,( light on top and alarm contact finger pointing right.) and 6 pins on the bottom. The alarm core has 2 pins top and bottom.
Continued....
When you take the cap off make sure the core stays in the barrel. Use a thin blade and pry (ease), the cap off. Then REINSERT the key. I think the best way to restore the unfortunate need for drilling is to tap the barrel holes and install set screws or maybe cut off roll pins. But they only need to be about 3/32" to 1/8” long. Any longer and you will hit the core and prevent rotation.
Vehicles with factory alarm will have a longer key, which adds 4 pins to the basic 10. When you take the core out of the barrel make sure you keep the key in it or everything will fall apart and you will have to find the small springs that are released. Hold the barrel vertically, key on top and pull the core up slowly out of the barrel. Place the core aside key still in it. and look inside the barrel. Observe inside the barrel the 2 ridges opposite each other.
Do not let the actuator lever on the outside of the barrel move, or let the large spring that operates it come out. Observe and note where the ends of the spring are located as this spring returns (rotates) the actuator back to the lock engaged position. Slowly move the actuator and see how it works. Now this can be removed and cleaned. With the spring released the actuator will remove out the side of the barrel. The alarm core can now be dismantled for cleaning and rekeying.
Note the position of the core and barrel relationship, as the key will only operate the lock at a specific point. Mark the barrel (scribe a line in line with the key.) It is possible to install the core 180 degrees out of position.
Barrel with alarm core, actuator, and spring
With the core and key assembly out of the barrel hold the core HORIZONTAL and, with the key handle VERTICAL. Wrap masking tape around the bottom half of the barrel. Slowly pull the key out of the lock core. Stop at �” and observe how the row of pins (as the springs push them up) form a groove. Remember above, inside the barrel the 2 ridges 180 degrees opposite each other. The pins will be located on each side of this ridge on reassembly, top and bottom.
Now (over the large bedsheet) remove the key, and, using tweezers remove the flat pins, or blades note the number (make a chart to record the location) . Below each blade pin is a very small spring. Do not lose them. There are 6 pins on the bottom and 4 on the top. With the one side empty turn the core over and remove the tape and repeat the pin removal noting again which number went where. The top has 4 pins the bottom 6 when lock is installed in hatch or door. Clean everything and reassemble with a wipe of light oil or lithium grease. If rekeying a lock start with everything clean and laid out. i.e. groups of pins according to numbers etc.
Back to the clean empty barrel: Push the remainder of the drilled pins out of the barrel. I chose to tap the threads 6-32 and use set screws from HD sku 2241200884. They are a bit long and need to be shortened. Buy extra it’s cheaper than the gas to go back for more.
When tapping the barrel ensure the cap is on so you tap both together. If you find an allen key that fits the screw let me know. Alternative: just thread the barrel, then on final assembly run the screw into the barrel, put the cap on and then back the screw out tight against the inside of the cap, locking it. I would use a drop of cyanoacrylate on the screws. The screws only hold the cap on .They do not hold the core in the barrel as is the case with the door locks. Deburr the inside of the barrel at the tapped holes.
INDEX OF PARTS
ITEM DESCRIPTION
1 Alarm contact isolation plate
2 Neoprene moisture seal
3 Lock barrel housing
4 Alarm core with contact finger
5 Nylon bearing
6 Actuator
7 Spring
8 Felt seal
9 Lock core
10 Alarm wire cover (plastic cap)
11 Flat pins( numbered 1 to 4)
12 Springs
13 Alarm key
14 Nonalarm key
15 Barrel cap
16 Alarm contact wire
Additional pictures for reference only
REKEYING
Using tweezers place a spring and pin in the first hole then insert the key. If the pin is flush with the surface of the core, good, if on the side installed it sticks up (IS HIGH) go to the next Higher number, if too LOW the next LOWer number. When the one side is done place tape over the pins and turn the lock core over. Repeat the process noting which number pin went is in which slot on a chart. This chart will allow you to rekey the other locks to the same key much quicker.
If you have an alarm lock you will have 2 more pins on each side to deal with. The core for the alarm is done the same way but on reassembly must be installed first, separately from the main lock as the actuator goes in between. The key is used as well but you must put the main core on the key so that the alarm section is held at the correct position on the key for determining the correct alarm pins. In other words do not try to set pins for alarm section without the main core on the key Remember above how it was dismantled. The small alarm core with the copper tab must go in the correct way (pointing right) for the tab to touch the copper pins in the white nylon wire carrier when the key rotates it.
In summary : there are 4 different cut pins numbered , 1,2,3,4, plus no pin giving you 5 choices for each of the 10 main slots and 4 alarm slots.
NOTICE HOW DIMENSIONS “A” AND “B” VARY FROM PIN NUMBER 1 TO 4
This is the correct position for setting alarm code pins.
Without main core on the key the alarm core will move closer to the key handle,
and will change what the correct alarm code pins need to be. It is possible to install the core 180 degrees wrong which is why I have stressed, key, core, and barrel orientation.
The main core has 4 pins on the top side as shown above,( light on top and alarm contact finger pointing right.) and 6 pins on the bottom. The alarm core has 2 pins top and bottom.
Continued....
The following users liked this post:
English Bob (06-24-2022)
03-10-2012, 11:51 PM
#3
Rennlist Member
Thread Starter
Join Date: Sep 2007
Location: Ridgecrest, California
Posts: 1,363
Likes: 0
Received 143 Likes
on
28 Posts
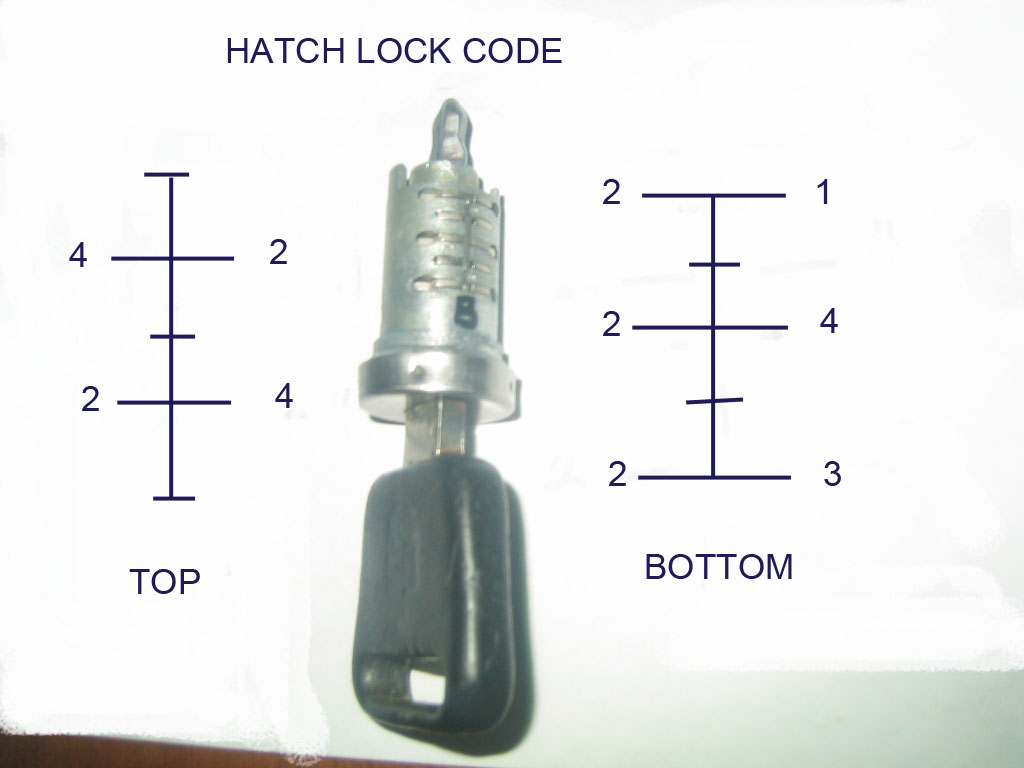
MAKE A CHART

Clean again and assemble the core beginning with the alarm core then the actuator and large spring then the main core, using lock lubricant or lithium grease.
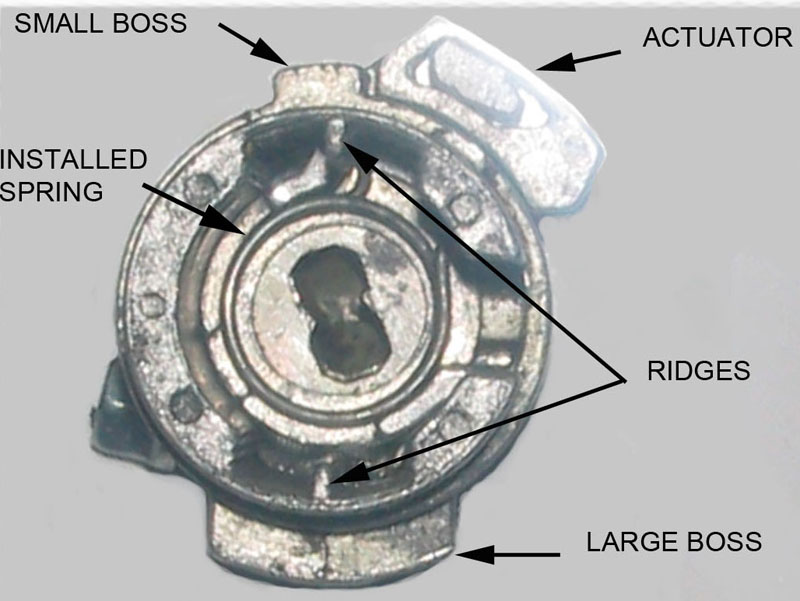
Remember the orientation of the barrel in the bracket, with the ridges and the groove created with pins. Hold the barrel with the casting boss that locks into the bracket, on top. The alarm core goes in with the contact tab pointing RIGHT. Use the key to insert this, then remove key. Without the key only gravity is holding it in so, the barrel must now remain vertical.
Slide the actuator in the side of the barrel. Hold it counterclockwise. You are now looking down into the barrel as you struggle with the spring. Amazing how such a simple part can take so long to install.
The actuator has a large flat radius base on which the spring sits. Do a trial fit to make sure you have the spring returning the actuator counterclockwise.
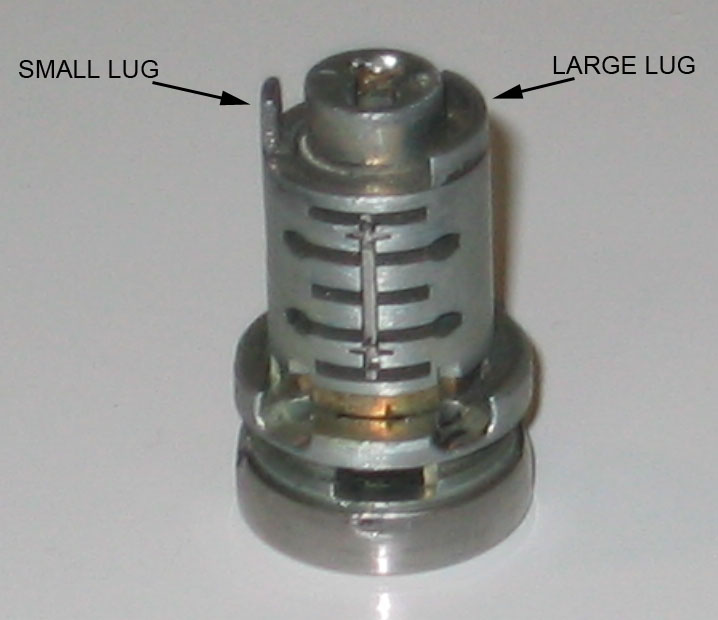
Holding the Barrel with the SMALL CASTING BOSS ON TOP, and THE KEY VERTICAL, LIGHT ON TOP, install the core so that the Small Lug is on the Left , and Large Lug is on the Right.
If horizontal the core will have 4 pins on top 6 on the bottom. This is how it should sit in the barrel and the actuator. The key turns clockwise to open so the core must fit into the actuator so that it will turn the required amount.
If the movement is smooth replace the cap and insert set screws. Install in bracket. Reassemble the other end of the alarm system. When installing the neoprene gasket and metal plate (items 1,and 2 in index of parts) put no strain on the copper finger. You will now have a lock that is ready to reinstall
On assembly I used dry lube p.t.f.e. spray on the pins and white lithium grease in the barrel... Good luck.
Throughout I have not used the term �tumbler �as nothing tumbles. The key is machined with a symmetrical wave pattern. It simply aligns different pins against the tension of small springs to permit the centre core to turn inside the barrel. When the key is removed the springs push the flat pins up, on each side of the top and bottom ridges preventing the core from rotating inside the barrel.
I would also advise against filing the edges of the flat pins as doing so, you will create a lock nearly impossible to duplicate. Rather leave them standard and omit both spring and pin if none fit. Recording the standard numbers (code) will allow future keys to be cut and locks to be rekeyed that will fit the rest of the car.
I would also like to acknowledge that some of the pictures and information used here was garnered from others on rennlist, I thank you. If you have any questions or find this vague or incorrect please contact me and I will make the necessary changes.
GAS CAP
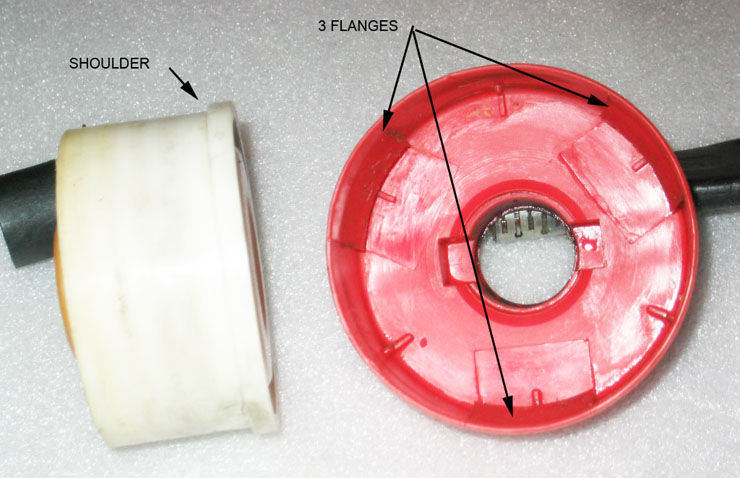
The Gas cap has no metal lock barrel retainer and will need no drilling. Inside the cap between the red and white sections are three molded plastic retaining flanges, (on the red part) that lock onto the shoulder of the white center section. Warm the red portion with hot water or a heat gun until the flanges are flexible, and, using three hands and 3 flat blades, CAREFULLY force back the tabs while pushing on the key to press the white section out of the red cover.
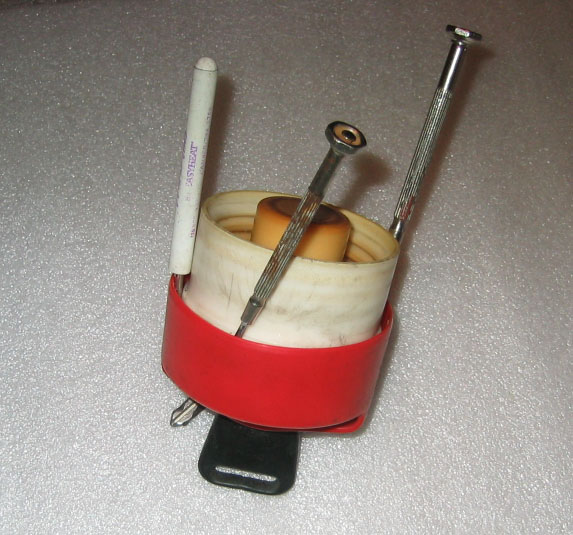
Now the black plastic lock barrel assembly can be removed from the white section, carefully as there is a white plastic ratchet pawl that is spring loaded inside the end of the black plastic barrel.
This locks or unlocks the outer red cap to the inner white section and makes the ratcheting sound when the locked cap is turned.
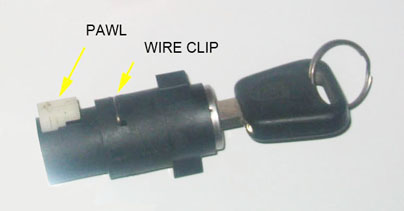
Just up from the spring loaded button is a wire clip inserted in the side of the black barrel which holds the core in place. Remove that with a small screwdriver.

Insert the key and pull the lock core out of the black housing.
Insert the key you want to use and rearrange the flat pins to suit as outlined above. Remember there is a tiny spring under the shoulder of each pin. Don't lose them. When pins are done lubricate, slide the core into the black barrel, and insert the wire locking clip.
On reassembly, you have to squeeze the spring loaded button to get the cam on the end of the black barrel to engage in a slot in the white section. When complete simply line up the black barrel rectangular body with the rectangular recess in the red outer cover and press the red cover back on and you are finished.
"Remember you don't own a Porsche 928, it owns you �. You�re just maintaining it for the next guy."
Clean again and assemble the core beginning with the alarm core then the actuator and large spring then the main core, using lock lubricant or lithium grease.
Remember the orientation of the barrel in the bracket, with the ridges and the groove created with pins. Hold the barrel with the casting boss that locks into the bracket, on top. The alarm core goes in with the contact tab pointing RIGHT. Use the key to insert this, then remove key. Without the key only gravity is holding it in so, the barrel must now remain vertical.
Slide the actuator in the side of the barrel. Hold it counterclockwise. You are now looking down into the barrel as you struggle with the spring. Amazing how such a simple part can take so long to install.
The actuator has a large flat radius base on which the spring sits. Do a trial fit to make sure you have the spring returning the actuator counterclockwise.
Holding the Barrel with the SMALL CASTING BOSS ON TOP, and THE KEY VERTICAL, LIGHT ON TOP, install the core so that the Small Lug is on the Left , and Large Lug is on the Right.
If horizontal the core will have 4 pins on top 6 on the bottom. This is how it should sit in the barrel and the actuator. The key turns clockwise to open so the core must fit into the actuator so that it will turn the required amount.
If the movement is smooth replace the cap and insert set screws. Install in bracket. Reassemble the other end of the alarm system. When installing the neoprene gasket and metal plate (items 1,and 2 in index of parts) put no strain on the copper finger. You will now have a lock that is ready to reinstall
On assembly I used dry lube p.t.f.e. spray on the pins and white lithium grease in the barrel... Good luck.
Throughout I have not used the term �tumbler �as nothing tumbles. The key is machined with a symmetrical wave pattern. It simply aligns different pins against the tension of small springs to permit the centre core to turn inside the barrel. When the key is removed the springs push the flat pins up, on each side of the top and bottom ridges preventing the core from rotating inside the barrel.
I would also advise against filing the edges of the flat pins as doing so, you will create a lock nearly impossible to duplicate. Rather leave them standard and omit both spring and pin if none fit. Recording the standard numbers (code) will allow future keys to be cut and locks to be rekeyed that will fit the rest of the car.
I would also like to acknowledge that some of the pictures and information used here was garnered from others on rennlist, I thank you. If you have any questions or find this vague or incorrect please contact me and I will make the necessary changes.
GAS CAP
The Gas cap has no metal lock barrel retainer and will need no drilling. Inside the cap between the red and white sections are three molded plastic retaining flanges, (on the red part) that lock onto the shoulder of the white center section. Warm the red portion with hot water or a heat gun until the flanges are flexible, and, using three hands and 3 flat blades, CAREFULLY force back the tabs while pushing on the key to press the white section out of the red cover.
Now the black plastic lock barrel assembly can be removed from the white section, carefully as there is a white plastic ratchet pawl that is spring loaded inside the end of the black plastic barrel.
This locks or unlocks the outer red cap to the inner white section and makes the ratcheting sound when the locked cap is turned.
Just up from the spring loaded button is a wire clip inserted in the side of the black barrel which holds the core in place. Remove that with a small screwdriver.
Insert the key and pull the lock core out of the black housing.
Insert the key you want to use and rearrange the flat pins to suit as outlined above. Remember there is a tiny spring under the shoulder of each pin. Don't lose them. When pins are done lubricate, slide the core into the black barrel, and insert the wire locking clip.
On reassembly, you have to squeeze the spring loaded button to get the cam on the end of the black barrel to engage in a slot in the white section. When complete simply line up the black barrel rectangular body with the rectangular recess in the red outer cover and press the red cover back on and you are finished.
"Remember you don't own a Porsche 928, it owns you �. You�re just maintaining it for the next guy."
03-11-2012, 01:54 AM
#6
Rest in Peace
Rennlist Member
Rennlist Member
I want whatever you are drinking because I am off in the desert pondering brakes, and you have done so many fantastic DIY's it is amazing!
Well done, again!
Well done, again!

Trending Topics
03-11-2012, 01:14 PM
#10
Inventor
Rennlist Member
Rennlist Member
Nice! My '86.5 5-speed has a different key for the hatch. Super annoying.
I've been thinking about doing this job after seeing these on eBay:
PORSCHE 928 TUMBLERS WAFERS & SPRINGS SET TO REKEY LOCK
I've been thinking about doing this job after seeing these on eBay:
PORSCHE 928 TUMBLERS WAFERS & SPRINGS SET TO REKEY LOCK
03-11-2012, 04:18 PM
#11
Rennlist Member
I've been thinking about doing this job after seeing these on eBay:
Dismantle a lock that your key does not fit and follow the instructions in my procedure. If you find that no pin wafer fits a particular position omit it and the spring. Try the local parts guys 928 Int., Pelican , 928srus,etc for sources or order from Keys for Classics in Australia. The latter can cut new keys as well. They may be able to cut just from the code you supply that you recorded on rekeying. Apparently a photo of the key will suffice as well.
Dismantle a lock that your key does not fit and follow the instructions in my procedure. If you find that no pin wafer fits a particular position omit it and the spring. Try the local parts guys 928 Int., Pelican , 928srus,etc for sources or order from Keys for Classics in Australia. The latter can cut new keys as well. They may be able to cut just from the code you supply that you recorded on rekeying. Apparently a photo of the key will suffice as well.
03-12-2012, 10:08 PM
#12

Hi Wayne
I have a locked rear glovebox - the one between the rear seats - with the keys lost by the PO. Do you or any members have any ideas on how to pick the lock or get into the box without destroying the lock or trim? Any advice welcome.
Kiwi928S4
1991 RHD
I have a locked rear glovebox - the one between the rear seats - with the keys lost by the PO. Do you or any members have any ideas on how to pick the lock or get into the box without destroying the lock or trim? Any advice welcome.
Kiwi928S4
1991 RHD
03-12-2012, 10:54 PM
#13
Rennlist Member

In the interest of piling resources together here are a couple of oldies, both with some pix also.
https://rennlist.com/forums/928-foru...larm-lock.html
The Anatomy of a Hatch Alarm Lock
https://rennlist.com/forums/928-foru...to-re-key.html
The Key was to Re-key
And a third. Unfortunately, this link is dead and I couldn't find my way back to it:
http://www.928.org.uk/resources/75-i...928-locks.html
Re-keying Porsche 928 Locks
Nick Carrington, Gareth Croeser, Jon Holdsworth, November 2002
03-12-2012, 11:06 PM
#14
Okay, tell me if I'm wrong with this theory. If I were to place a key into the lock barrel, and the keys stick out, couldn't you grind the teeth down to the point to where the key would turn? Wouldn't that help without having to take each key and spring out? I'm just asking, and have never taken a lock barrel out or worked with keys.
03-13-2012, 12:23 AM
#15
Nordschleife Master
And a third. Unfortunately, this link is dead and I couldn't find my way back to it:
http://www.928.org.uk/resources/75-i...928-locks.html
Re-keying Porsche 928 Locks
Nick Carrington, Gareth Croeser, Jon Holdsworth, November 2002
http://www.928.org.uk/resources/75-i...928-locks.html
Re-keying Porsche 928 Locks
Nick Carrington, Gareth Croeser, Jon Holdsworth, November 2002
link here:
http://www.928.org.uk/news/99-articl...928-locks.html

