When you click on links to various merchants on this site and make a purchase, this can result in this site earning a commission. Affiliate programs and affiliations include, but are not limited to, the eBay Partner Network.
10mm wrench.
10mm socket with a long extension is helpful but not necessary.
Remove the fender liners.
Loosen the Cruise control solenoid thingie (1 13mm nut on the bottom of the solenoid)
remove the 2 10mm screws on the bottom of the fender.
Move the Cruise control solenoid off the bracket that holds it. This will give you vision and access to the bottom 2 10 mm screws that hold the fender to the door jamb.
After you have those out, you can feel towards the center of the vacuum reservoir for the 10mm bolt that goes through the vacuum canister into the inner fender. remove that bolt and move the vacuum canister out of the way to get the top 10mm bolt that bolts into the door jamb.
There are 2 10 mm bolts with nuts that hold the fender to the front support. remove these.
Remove the side windshield trim.
Remove the windshield wipers
Remove the cowling
Remove all the 10mm bolts under the edge of the hood.
The fender should be loose except for a glue line approximately adjacent to where the 3 bolts were bolted into the door jamb. This glue line is somewhat pliable and you can just peel the fender back to remove it from the glue line.
It will take you about a half hour to do all this. It's really easy after the first time.
There are a couple of bolts at the rear (firewall side) lower inside edge of the fender that will be covered with rubberized body schutz that you will have to, first find, then scrap away the body schutz to get a socket on them.
Other than that, as John said, it's pretty much a matter of unbolting the old fender and bolting on the new one.
These are 10mm head on the nuts; the bolts are 6mm.
Reasonable instructions except for the time. The studs from the bumper cover into the fender can be very stubborn.
Glen is absolutely correct about bolt size. My bad.
I forgot about the bumper cover bolts since my bumper cover was already off. Easiest way to remove them is to remove the 2 allen head bolts that hold the headlight assembly to the headlight bar aseembly from underneath the headlight. Once you get that out of the way, there are six 8mm head nylock nuts that will unbolt the bumper cover from the fender. Use a deep socket and a long extension to make life easier.
Add 20 minutes for removal of these nuts after removing the headlight.
Last edited by soontobered84; 05-04-2016 at 12:35 PM.
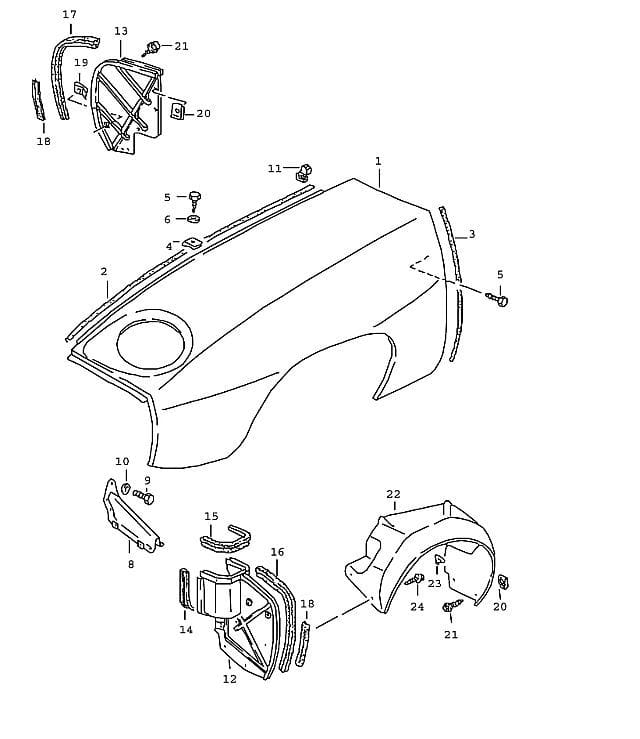
Thanks everyone for the feedback. I appreciate the level of detail some folks went to here but I wasn't sure if I needed items 2 and 3 from the graphic below....

 05-03-2016, 12:14 PM