When you click on links to various merchants on this site and make a purchase, this can result in this site earning a commission. Affiliate programs and affiliations include, but are not limited to, the eBay Partner Network.
Curt,
It's always fun when you get near then end of your job and then you have a crucial and tricky thing to deal with. I say this for you will encounter this when you've laid the manifold in place and now have to get the throttle cable around, and in the groove, of the pulley deep down in the valley.
Here's the way I approach it.
You have all electrical and vacuum connectors attached - check.
Now you can seat the manifold.
Reach in and get the throttle cable, and attach it to the ball on the throttle lever.
From the passenger side you'll do the 'splayed praying mantis' on your service cover with your right hand barely reaching in through the manifold feet to pull the attached cable torward the back. This will give the cable slack to fall down to the level of the throttle pulley. With your left hand you'll 'grasp' the cable with your right angle pick, point facing down. Tense it, and direct around the pulley so it gets 'in the groove'. Pull the tool towards you while it feeds into the rest of the groove. When you complete the circle, just lift the tool up and out - you're done. It'll all make sense once you're there doing it. I've attached a pic of the Craftsman pick and hooks that I have. Mine are older, and appear to be longer. If you don't have a set of these, get some. They come in real handy in may situations.
The good news is that you are close to the bottom of the pit. Now is the time for close inspection and decisions on what to replace.
Not much you can do about any carbon build up in the lower inlet tract other than use fuel system cleaners when operational.
On the inlet manifold itself you should make a decision whether to powder coat or leave as is. If the latter I recommend that you scrape the flaky coating on the inlet flange to leave clean bare metal that takes a black sheen as the corrosion forms a passive layer that as I can tells arrests further corrosion.
Also a good time to consider whether you want to upgrade the baffle in the filler neck [one of Stan's comments].
Looking at the state of the knock sensor I think you can safely assume both need replacing - the CPS may be another candidate [removing that can be a bit tricky.
The connector for the ISV is a right royal pain to get out and to get back in. I will get flamed for this but in the end I took the retaining clip out of the connector as a temporary measure about 5 years ago! I also purchased male and female connectors with a view to making an extension connector that can be undone from outside the manifold. Of course if I had the correct connector holding tool maybe not a problem!
You now need to check the hoses to see if they have gone mushy- press them and if they do not return to shape immediately they are toast which I suspect will be the case. The push in connectors on the inlet boot as Stan says will probably need to be replaced. when putting them back I seal mine with a fine smear of silicon RTV and pinch them in place with a jubilee clip [very light tension on the hub].
The connector for the ISV is a right royal pain to get out and to get back in. I will get flamed for this but in the end I took the retaining clip out of the connector as a temporary measure about 5 years ago! I also purchased male and female connectors with a view to making an extension connector that can be undone from outside the manifold. Of course if I had the correct connector holding tool maybe not a problem!
When i did intake job I did have the connector tool, bought mainly to remove the injector connectors. It made removing the ISV connector pretty easy. The only tricky part of the intake job in my memory was replacing the fuel rails with all the unions nice and square. When they line up properly you also know that the injectors are correctly seated in the manifold.
I slept well last night - no nightmares on the theme of "What have I done?" But one of the wonders of Dwayne's write-ups is that they do not end abruptly with "Assembly is the reverse of dis-assembly."
I took the hood off because 1) it really would be easier for my old stiff body which does not easily contort itself into the "splayed praying mantis" position, 2) my similarly aged eyes are challenged by poor lighting; the engine bay is much better lit without the hood, and 3) I have good intentions about replacing the under-hood insulation. It's only 1% of the job, anyway, and was a good use of my new cordless impact wrench. (The only other hood I've removed was for the Bugeye Sprite, for which a floor crane was not overkill.)
I plan to replace anything I can remove. All of the above. Powder coating. Replating the hardware, which I'm told is quite inexpensive. There are other things to do, too, such as finding the small coolant leak I left behind during last winter's TB/WP adventure.
Judging by all the oily muck, some better oil-air seperation device is certainly needed - Mr. Brown's is the one?
I see there are quite a few rubber fuel lines leading to the fuel cooler and back, and who knows where. Do I need to worry only about the one with the U? The rest are low pressure? I already have the kit from Roger, which I think includes the U. I also have good insurance, and a halon extinguisher.
I'm working on the aforementioned Bugeye Sprite at the same time. The garage is quite a shop of horrors. Its engine has only one sensor, a mercury-bulb coolant temperature probe.
I'll take the intake apart today, and perhaps put the Mity Vac on some of the vacuum lines - the line to the transmission is a "line of interest", as the FBI might say. Incidentally, my "seven-way" thing has only five ports.
Thanks for all the helpful comments. Keep an eye on me. Consider this a team effort.
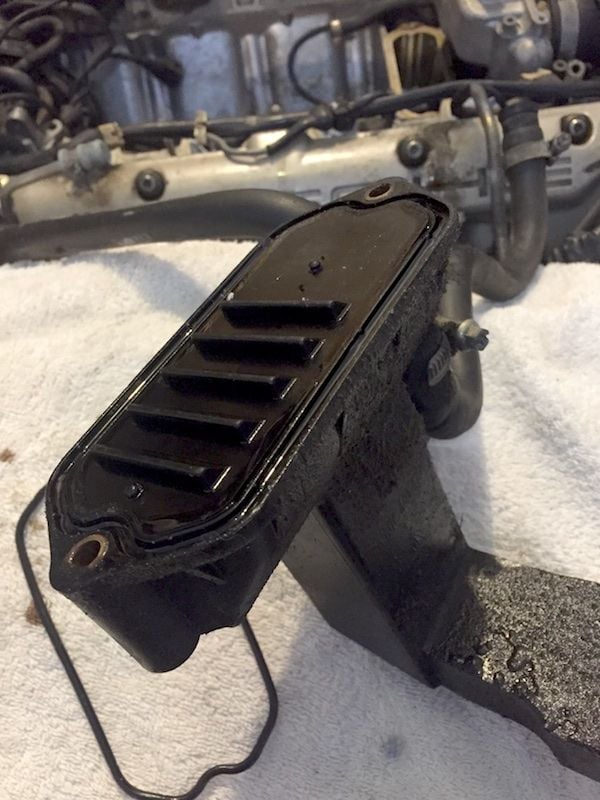
This is what happens to a flappy valve when owned by an English gentlemen who rarely got the engine over 2000 rpm:
I suspect it went 16 years without a call to duty. A little cleaning, and it's good. But I took it out to prepare for powder coating. If I recall, best practice is to leave the bearings in, to mask their seats, then replace them with new bearings, which are the same as throttle bearings.
I've seen the advice to replace all rubber and plastic bits. But I've encountered very few such parts on my car that show any sign of distress. I suspect it was generally kept away from heat and ozone, frequently driven, but never hard. I'm really thinking that it might be foolish to replace parts that are old but working fine with new parts that might possibly be DOA. [old fart mode]They don't make 'em like they used to, do they? [/old fart mode] The TPS and ISV are such parts. I'll have to look into the cost of the various special hoses and plastic bits.
Note how I managed to mangle the throttle arm with my "mechanic's forceps" - I had no trouble on the other end of the cable, but this end put up quite a fight, then suddenly popped right off. Never show a machine too much confidence.
I have a plastic oil filler neck, unlike Dwayne's. What's that mean? The hoses connecting to it have soft spots, the rare exception. The whole thing is an oily mess; I don't think it sealed well at the bottom - I think I've read something about this, perhaps even have the cure already in my new parts box - a regular gasket?
Still no signs of any vacuum leaks: no cracks, bulges, loose clamps, wayward gaskets, nothing. I'll remove the throttle plate next and look for a leak at the bearings.
Some earlier models of 928 had the steel filler neck, you have the S4 version and there are several sub versions of that believe it or not.
The hoses exposed to oil as in the breather system tend to go soggy, hoses exposed to fuel tend to go hard and brittle.
On the TPS you can test for conductivity just make sure you test across the correct pair of contacts- the middle one is the common earth [?]. The wide open throttle contact is from the ark and they are fickle with age as the internal soldered contact fractures- no contact no max power. The idle switch contact is not problematical generally speaking.
Taken a good look at the hoses attached to the ISV- my experience is that they are very robust. Put a pinky inside the ISV and try to roll the shuttle back and forth. It should be clean and should move freely without any stickyness.
Check the base of the filler neck for straightness. I use a bit of silicon RTV on the paper gasket.
Never seen my flappy crudded up like that one- urrgh! The motor only comes to life above3k rpm.
Fred - mine is an early S4 (oil squirter) and Dwayne's subject is also an S4. My oil filler neck had just the o-ring, which I'm recalling is the problem - I procured a nice thick gasket from Roger a year ago, but soon realized it was not an easy installation. I think I'll be installing Greg Brown's baffle, and whatever gasket, o-ring and Dreibond seems necessary.
... I've seen the advice to replace all rubber and plastic bits. But I've encountered very few such parts on my car that show any sign of distress...
... I have a plastic oil filler neck, unlike Dwayne's. What's that mean? The hoses connecting to it have soft spots, the rare exception. The whole thing is an oily mess; I don't think it sealed well at the bottom - I think I've read something about this, perhaps even have the cure already in my new parts box - a regular gasket?
... Still no signs of any vacuum leaks: no cracks, bulges, loose clamps, wayward gaskets, nothing. I'll remove the throttle plate next and look for a leak at the bearings.
I think the rule of thumb is, unless you want to go back in there anytime soon, replace it now while you have easy access. If you contact Roger, he has an Excel spreadsheet for a top-end refresh and you can pick and choose what you want--to include hoses, gaskets, ISV, etc.
I had Roger include the vacuum lines and boots, but the only one that really broke was the one to the transmission. That was a pita...
The plastic filler necks warp and then leak. You could retro fit an old school one, but then you'll probably have to do some mods for the hoses and caps. As example, here's what I did to mine.
I tested my TPS, Fred: all OK. I'm surprised to learn they just have two binary outputs, no analog position signal.
My oil filler neck is now clean, and I've given it a good look: not warped.
I've gotten Roger's spreadsheet (thanks for the tip, NoVector), modified it with a yes/no column, and found the "least non-stupid set". I think I can get away with a $1400 bill. We'll see.
I've seen conflicting information about the intake material, whether really magnesium or just aluminum. Feels pretty light, but I chipped off a tiny piece from a rough edge, hit it with a torch, and yes, indeed, it's magnesium.
My "garage" is actually the workroom in the back of my photography studio, but I don't do much of that anymore. The workroom has gotten pretty crowded, so the work has spilled into what is supposed to be the camera room.
I tested my TPS, Fred: all OK. I'm surprised to learn they just have two binary outputs, no analog position signal.
My oil filler neck is now clean, and I've given it a good look: not warped.
I've seen conflicting information about the intake material ..... indeed, it's magnesium.
Curt,
The engine management system only needs these two signals and arguably the WOT switch is not really needed. To qualify the latter statement that is only the case if one tunes the upper end of the cruise map accordingly which I did when I discovered that my throttle position switch of the day was not working -with ST2 it was a relatively easy workaround as the map cells that do the business when pushing on are relatively easy to identify and there are not too many of them at that.
Indeed the manifold is magnesium- no doubt about that- it is a very soft metal and the surface peens very easily so surface preparation has to be done very "softly softly" as it were.
Sealing the filler neck should not be an issue. Did you have any oil consumption issues whilst the motor was running? The S4 breather system s far from perfect but yours should be better than later models but that is another subject matter for discussion..
Stan - your turn to perform weird science! You have a client's car at hand?
Fred - my car uses no oil at all. I should probably not over-react to 28-year/100,000 mile oiliness, even if it did make my car unflappable. BTW: who is responsible for the cute name "flappy valve"? A clarinet player would have named it the "register key". I think of it as the thumb valve (the valve used to switch between the two sets of tubing within a double French horn).
The most expensive item on the list of potential new parts is the ISV. I'm sure quite a few fail from waxy yellow buildup, which I ought to be able to clean up very thoroughly. I've witnessed the proctological approach to cleaning them. What other failure modes are seen? It's not so much I want to save the money, it's my untrusting nature about new parts.
Gotta drain a little coolant, remove the water bridge, and get serious about the potential critical path items of powder coating, replating, and parts procurement. Oh - the valve covers must be liberated, too.
no customer cars to work on at the moment, so no mag tests.
but here is a thread that documents how that ISV works and how it can fail and still look brand new.
Fred - my car uses no oil at all. I should probably not over-react to 28-year/100,000 mile oiliness,
The most expensive item on the list of potential new parts is the ISV. I'm sure quite a few fail from waxy yellow buildup, which I ought to be able to clean up very thoroughly.
Curt,
If the car uses no oil then arguably why do anything? There does appear to be a threshold where oil consumption jumps from little to plenty- not sure where it is but somewhere around 3.5k rpm. Hands up all those who have oil consumption problems!
The ISV is a quirky item. Mine "failed" some 15 years ago. The idle was very "iffy". The main agents diagnosed ISV failure. Well they were right- sort of. This was when I said "bugger it" and decided to pull the inlet manifold myself for the first time. When I got to the ISV I found the port full of a carbon like dry powder and the shuttle was sticking. Cleaned it all out until the thing moved freely and after refurbing several items stuck it all back together. I reused the inlet rubbery gasket and that ISV is still going strong today some 15 years later. Of course it could go **** up any day but until it does it stays. By the way the ISV has a permanently open gap such that in theory it can maintain an idle even if it stops working correctly [i.e. no modulation]. It does sort of work more or less OK as I found out on the occasion I did not seat the connector correctly.
No idea who coined the term "flappy" but it surely rolls off the tongue better than the term "resonance butterfly flap".

 01-05-2016, 02:13 AM