When you click on links to various merchants on this site and make a purchase, this can result in this site earning a commission. Affiliate programs and affiliations include, but are not limited to, the eBay Partner Network.
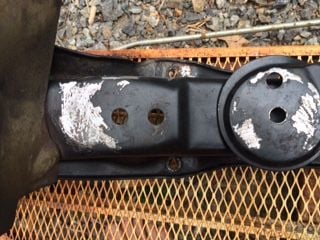
Not quite before and after - the next photo shows surface rust on the cross member. It only appears at the top and on one side (and on the mount fittings).
And to remove the rust I took to it with a newly purchased Dremel.
I only bought a Dremel because everyone else with a 928 has one!
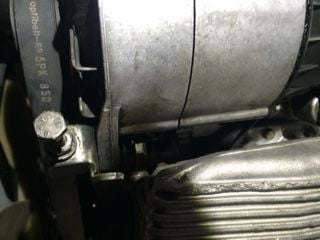
Now for some more practical detail. To get the sump/oil pan down there are some bolts positioned in places that only our crazy German engineers could dream up. Seemed to be too difficult to get to these bolts without removing strange belt driven device to the left of it (I'm going to call it an 'Alternator').
I should have expected to have to move it because that's what I'd recently read on Nichols (hat tip to TheDeputy). Moving the lower bolt to just swing it out of the way still seemed to produce too limited a space. So I decided to remove the whole thing. How hard can that be? Only two bolts.
Not so fast. Something is in the way.
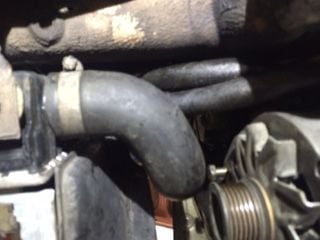
That's okay - I'll just remove the offending pipe.
You are kidding. Now my car's urinating on my garage floor!
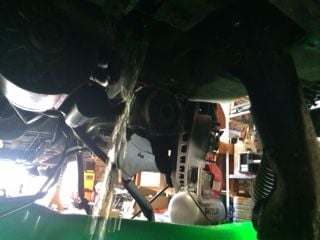
The 'after' shot now the 'alternator' has been removed:
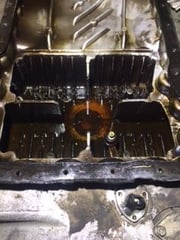
Grime from prior years is everywhere!
I am glad I removed it because now I have clear access to the two power steering lines I need to change. But that of course means that the high pressure hose that's been dropping ATF on the other side of the car is not a power steering hose. Automatic Transmission fluid doing Automatic Transmission things I presume. Given that will no doubt involve dropping the exhaust system I think I will leave that for another rabbit hole.
Please don't tell me I need to have the cross member out to replace the AT hoses that go from the Trans to the Radiator???
ATF is used for the power steering fluid in the car.
You could do the pre-emptive change out of the PS lines, but more commonly the ATF leak is from the steering rack.
No, you don't have to remove the cross member for the ATF lines that feed the radiator. Do a Search for this.
Also when you re-install the alternator you may want to have a small floor jack, or even a box so you can get that single large pivot bolt in by supporting the thing.
The majority of the oily residue on the front on my engine was from my power steering supply line, 97.005% anyway (the hose that runs from the reservoir to the pump). No amount of clamp tightening would stop the leak, replacing the hose was the only route. It was amazing how this one leak coated everything with oil. The oil would run down the backside of the pump, onto the cooling fan of the alternator and get picked up by the belts after that. Power steering fluid was even on top of the A/C compressor and beyond.
While doing the timing belt and water pump I cleaned everything up and just tighten the hose clamps...since I didn't have a new hose. And I kept getting an oily residue on everything. Changed the hose and it's been clean as a whistle ever since.
Also, if you are this far along with the anti-freeze draining...you might as well drain the whole block and fill with new stuff. Especially, if you have never changed it before. There are two plugs on the rear of the block, one on each side that have to be removed to do this. They can be a bit of any issue, though mine weren't, and some folks have really struggled with them. Just be sure to soak them with penetrating oil and only use a 6-point socket or wrench for removal of the plugs.
****If the plugs give you any type of serious resistance...STOP...and do not destory the hex portion of the plug...STOP...and ask further questions about removal and you can go from there. Sometimes a small amount of heat or some other action may be neceassary for removal.****
Once you get them loose, don't totally remove them or you will have a mess like no other. Just loosen them enough so there becomes a stead drip...and leave a drain pan under each side for a day or two...and when you come back they should be totally drained enough to finish removing the plug...without taking an anti-freeze bath. Just be sure to anti-seize the threads of the plugs before reinstalling.
Good luck, and you are making great headway on one/two/three of the more difficult jobs on these cars. Happy New Year to you, too.
Thanks Brian. Engine coolant flush hasn't caused much drama at all. Previously disconnecting the radiator hose probably 'helped'. I'm interested in your preferred anti-sieze. Edd China (wheeler dealers) seems to use copper grease every where. I also have lithium grease on hand.
The sump plug on the other hand came out radio but only wants to go in a short way by fingers. I'm waiting to get the whole pan off before having a proper look and getting in all the way in.
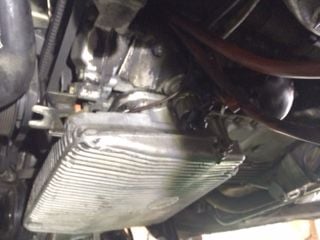
The oil pan is mostly down but the electronic oil sender unit at the front is stuck on - so the pan is only half way down before family duties called!
Okay - I'm no longer stumped on the sump. The oil pan is off - but not without a breakage.
The oil sender unit I referred to above (actually an Oil Level Switch) according to the WSM (see http://jenniskens.livedsl.nl/Technic...7/MyTip781.htm for some more background) has a hard plastic shield that has deteriorated over the years. Knowing how it's constructed and deteriorated I still don't see how I couldn't have broken it.
I have pictures! but due to a problem with my phone I can't upload them just yet!
[Oh - in the previous post I meant to say 'the sump plug came out easily' - but my phone autocorrected it].
Be very very careful putting the engine block anti freeze plugs back in. It's very easy and very common to over torque them.
IIRC, the torque spec in the WSM is too high. I don't remember details, like the actual torque you are supposed to use, but one of the real experts should chime in at some time.
Hmmm. I can see this has been a major issue for some. Looks like there has been a bunch of stuff on Rennlist about different types of anti-seize and for every recommendation someone else saying that it will corrode with aluminium. Terrific! See for instance https://rennlist.com/forums/928-foru...itability.html
Unless anyone else has any better ideas I'm going to look a bit more into the Marine variety...
Tutorial: Motor Mounts, Steering Rack, Oil Sump/pan Gasket removal
This ‘tutorial’ runs through the steps I’ve taken to get to each of the items noted in the title. On the whole I’ve followed the steps in John Pirtle’s http://members.rennlist.com/pirtle/svc.html Motor Mounts page but here I note where I’ve done things differently (mainly to change the oil sump/pan gasket) and to explain a few items that I didn’t initially understand. I use John’s numbering system throughout.
Pre Step 1
I built an engine lift like many that can be found on the net:
I was already confused at this point because I noticed people were using different spots in the engine bay to raise the motor. There are actually two lifting points built into the engine, one at the front right and one at the rear left.
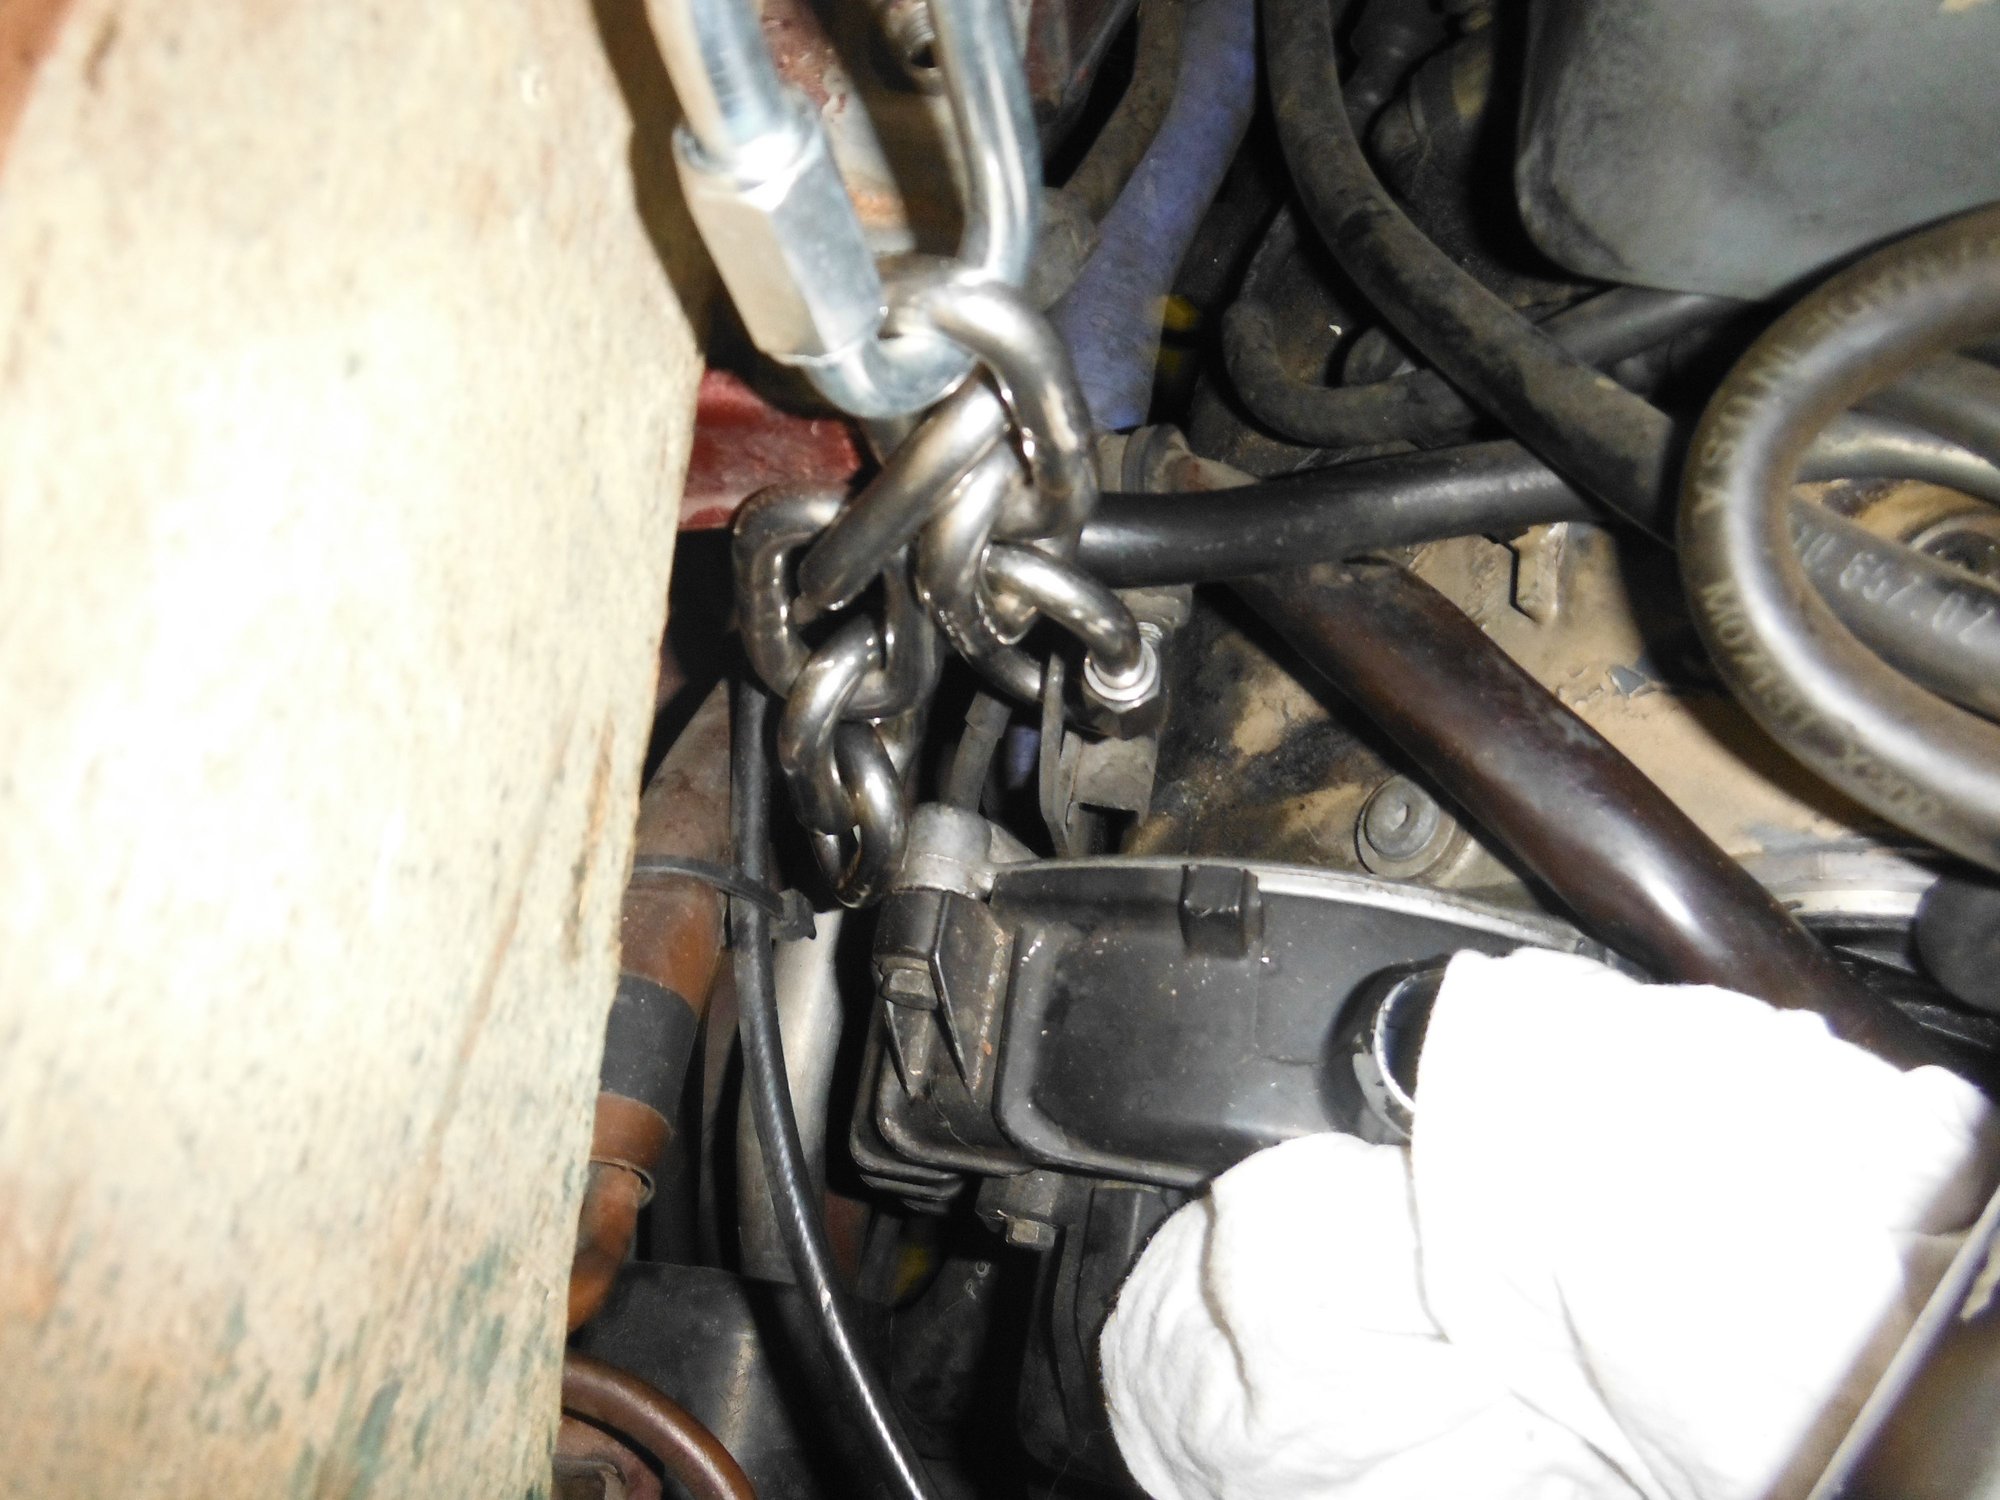
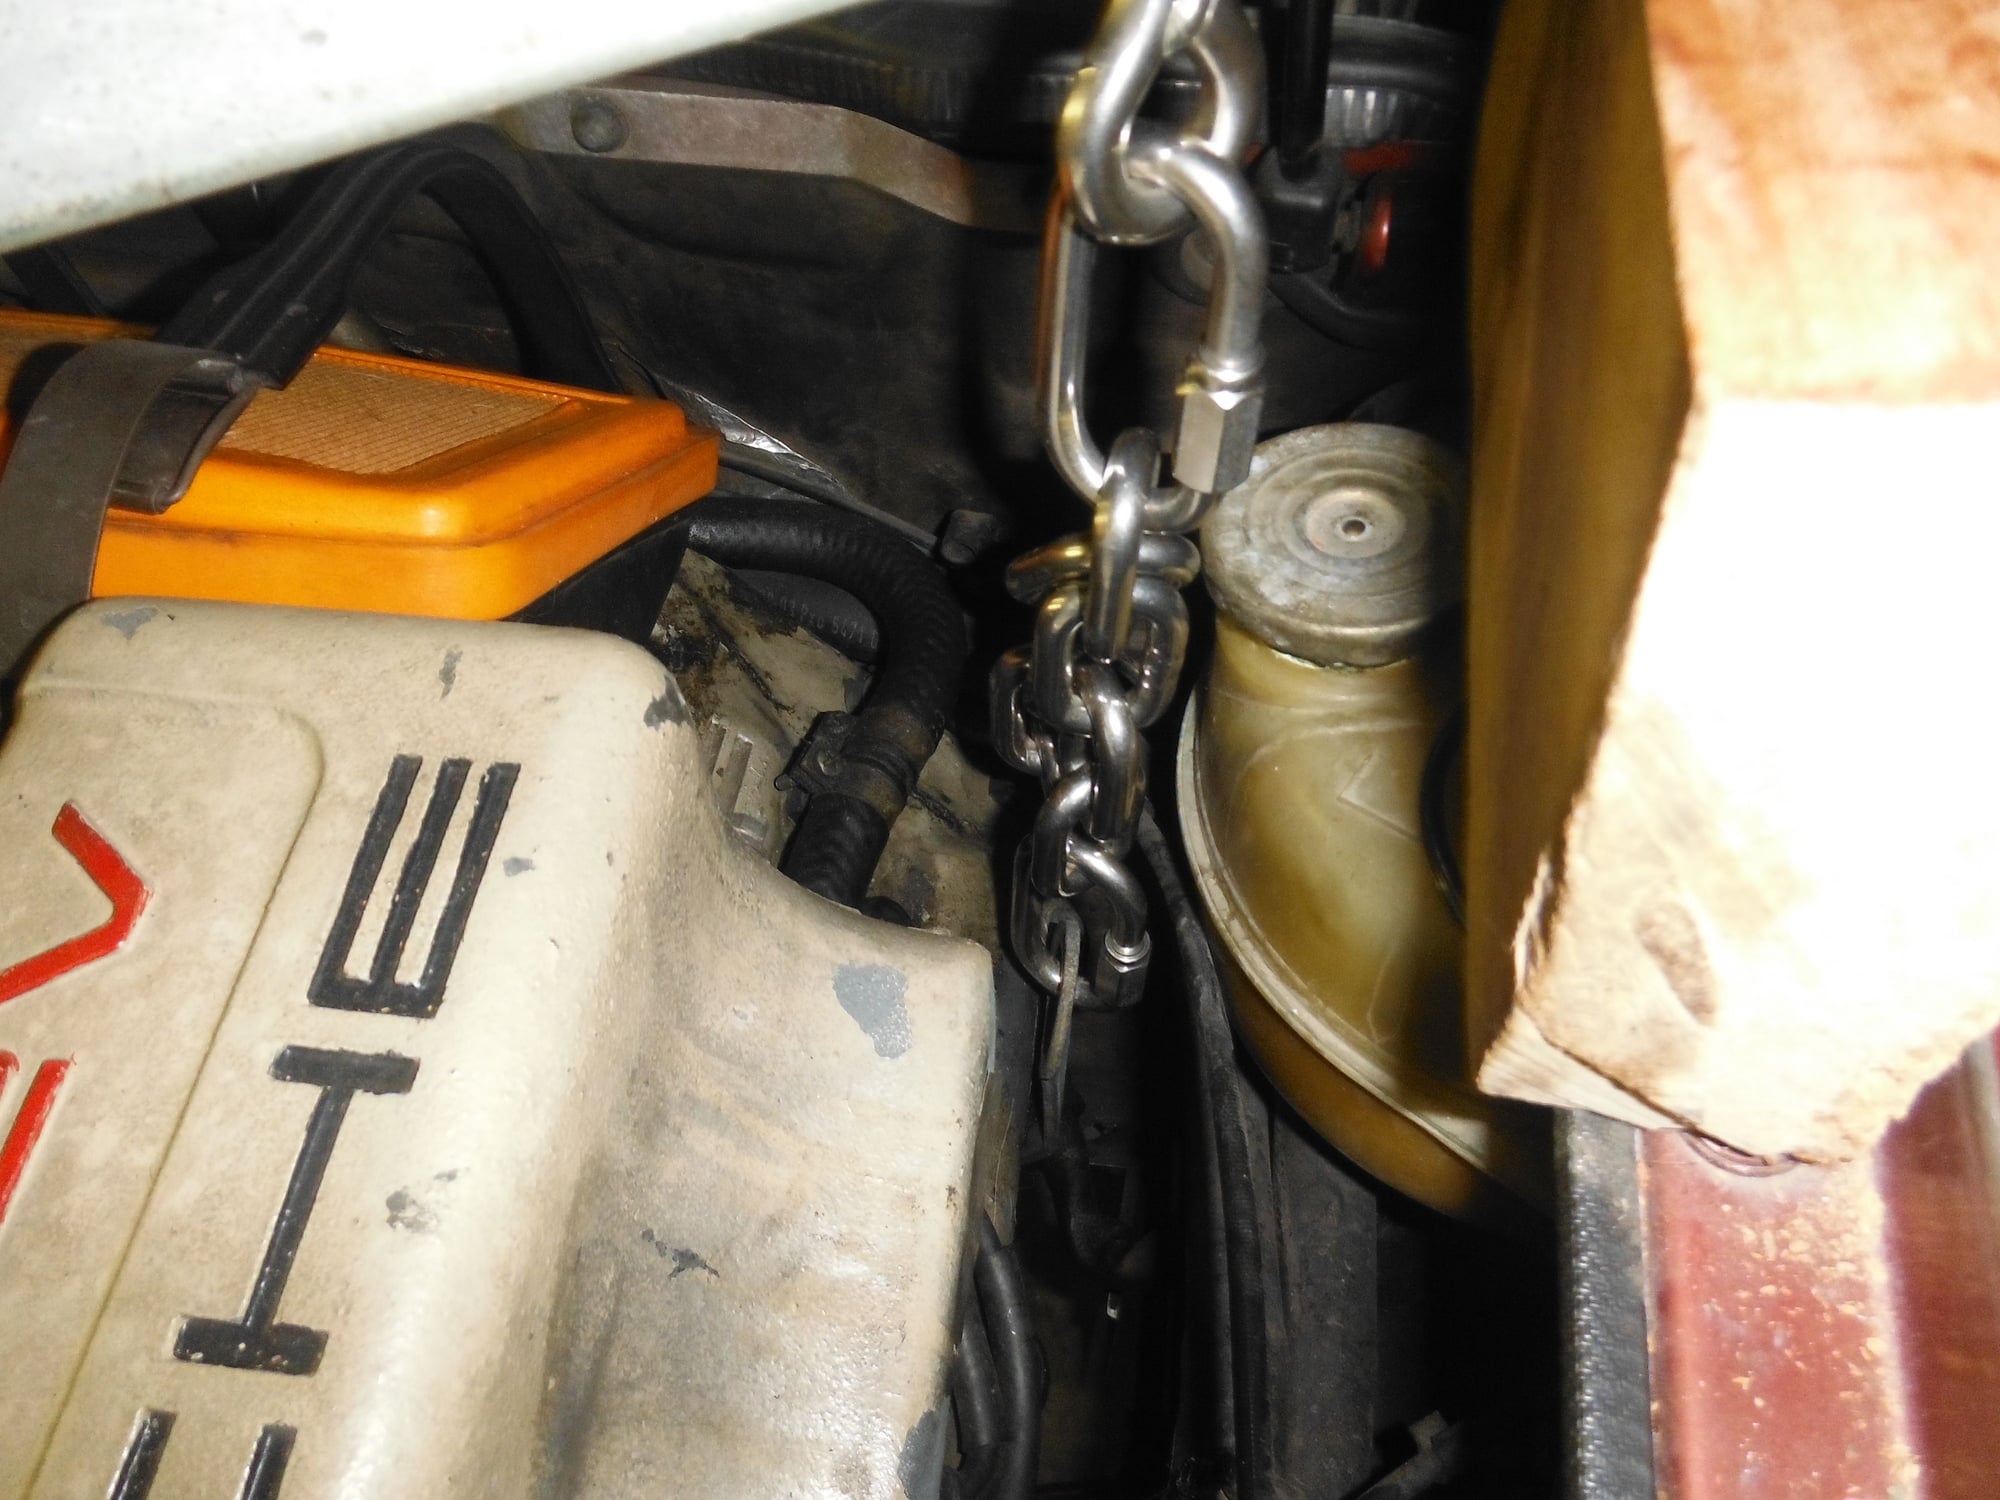
Pics below showing lifting points attached to the chain:
Front Left lift point
Rear right lift point
In the pic above you will also note the radiator cap. Might be a good idea to loosen it before you lift the engine (assuming you change your coolant at the same time).
And to reiterate much of what you’ll read elsewhere. This lift is ultimately keeping the engine off you when you’re under the car. Make sure you use fittings that have a working load limit (WLL) well above the engine’s weight. I believe the engine is about 260kg but it also has some other heavy items hanging off it. Don’t forget that the breaking point of say chain is at least 3x the WLL and it’s lifted at two points. I ended up using WLL’s of at least 300kg.
Steps 1 – 4 are the same as John’s
Step 5. I’ve read somewhere to put a wide oil catching bucket under the sump plug. I’d suggest either buying a bucket as wide as the car (eg a plastic kiddies pool) or putting the bucket at least a yard to the right of the sump plug.
Steps 6 – 12 are the same as Johns.
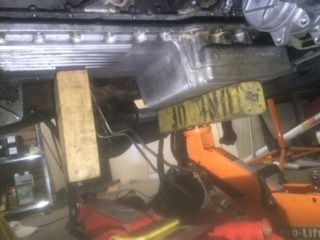
Step 13. The allen wrench idea just didn’t work for me. I could use a socket set on one of them but for the rest I had to use a box end wrench/spanner. At one point the cars middle kingdom absorbed one of my spanners and I only got it back when I finally took off the cross member. The power steering lines that you can see really get in your way. They are bolted on to the left side of the engine bay (half way up). Removing this bolt and perhaps even disconnecting them from the steering rack altogether would give you much more room.
Step 14 is same as John’s.
Step 15. Before pulling the steering rack down I should have disconnected the tie rod end from its knuckle on both sides. http://www.nichols.nu/tip701.htm . Pulling it down first only distorts the angles and makes removing the passenger side much harder if you are going to eventually remove it anyway.
Step 16 to 18 are the same as John’s
Step 19 is unnecessary if you have a lift in place.
Step 20 to 25 are the same as John’s.
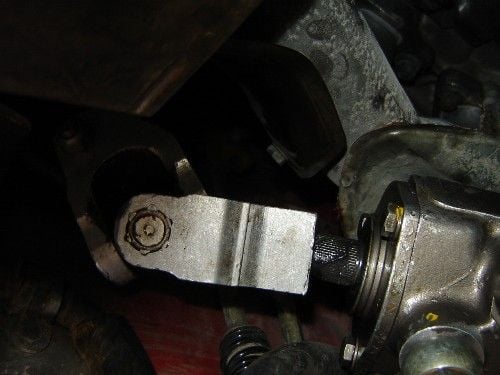
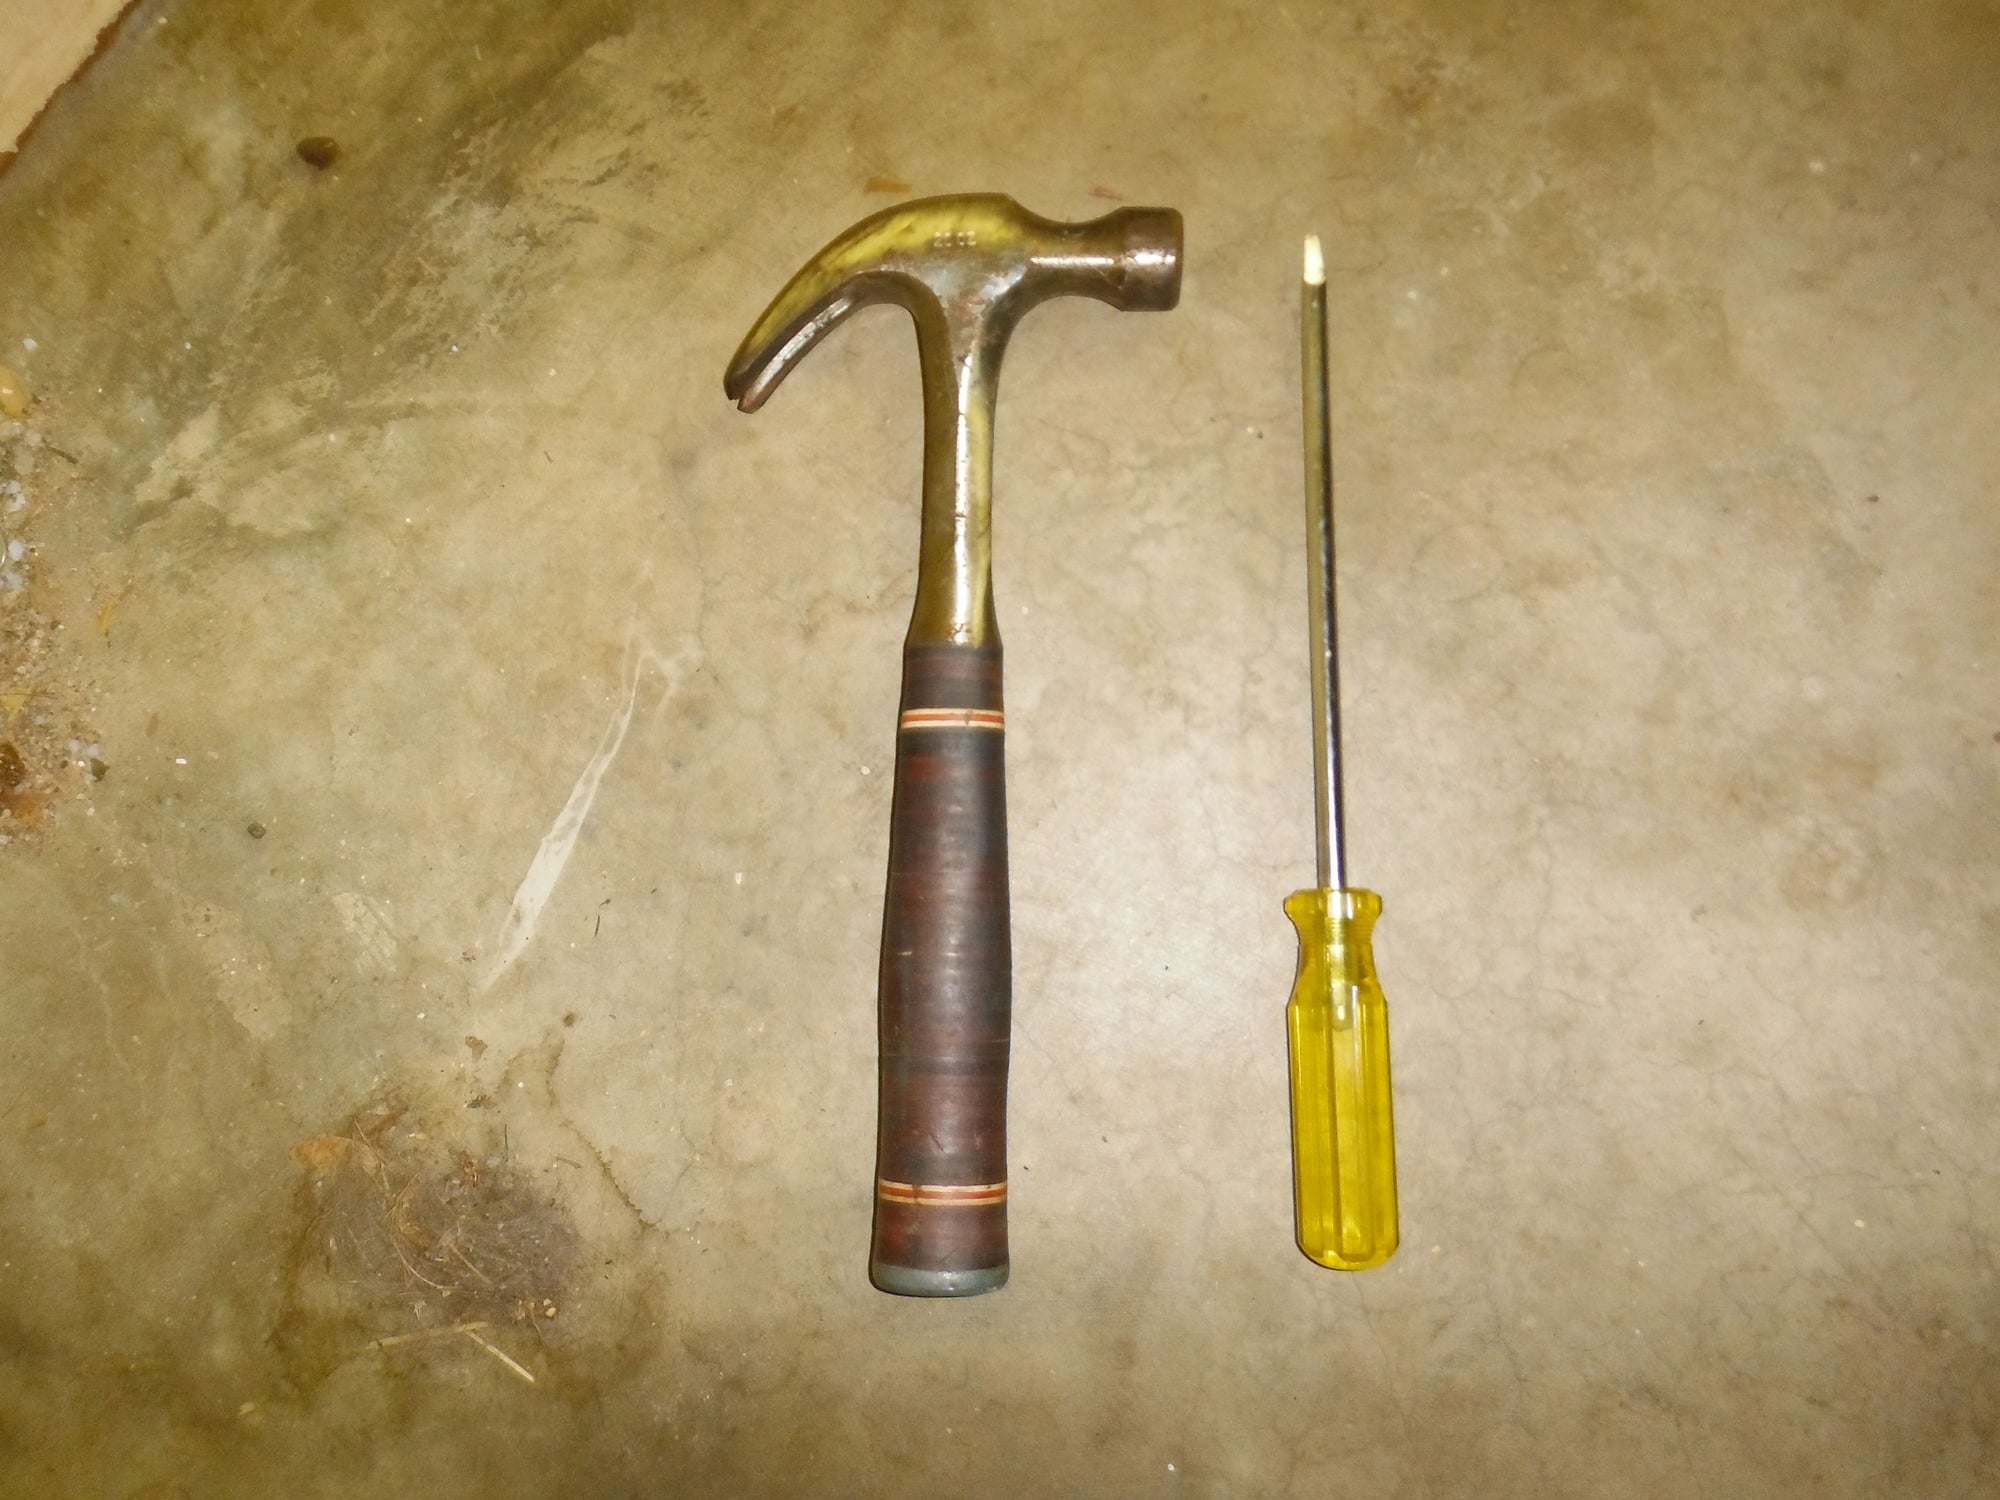
Step 26. Removing the steering rack from steering column requires a bit of force. I used a hammer and a large (and therefore wide) flat head screwdriver to open up a wedge. You should also mark where the two connect before separating the rack from the column.
Step 27 – You’re kidding. I took a lot more breaks than just this one!
Step 28 – Instead of ‘snugging’ these bolts you can start removing the oil pan if you wish to change the gasket (and give it a clean). I doubt mine had been cleaned in a long while…
To remove the pan you will first need to unbolt the starter motor and probably the alternator (see earlier discussion on these). With great patience you can remove all the 10mm bolts holding the pan on. Even with a little bit of residual oil in it the pan is pretty light (5kg?) but I still used two trolley jacks to let it half way down first. This should give you better access to the oil level switch. It should just pull straight UP to remove.
Step 29. I had no idea how John used a vise when I started this. I tried all sorts of crazy things before figuring it out! You first need take the mount along with its housing over to a vise. Use the vice to grip the housing and then use a breaker bar + extender pipe to unbolt it.
You should now be in a good position to work on all the elements you’ve taken off (oilpan/steering rack, cross member etc).
You're getting there...slow and steady wins the race in jobs like this. Nothing wrong with taking breaks either, good time to think out your next move.
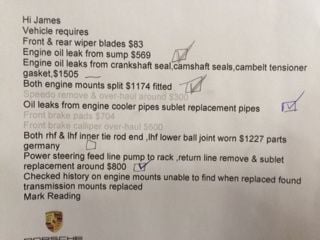
Lots done on car now. Up to stage 36 of John Pirtle's Motor Mount instructions which means, new oilpan gasket is in, new engine mounts are in, and the cross member is in. Also had Enzed recondition oil cooler and power steering pipes.
Very appreciative of JohnP's notes. Indeed the hammer was my friend. Also thanks to TheDeputy and MainePorsche for your support thus far!
Will post more detail and pictures later - but it's just hit beer o'clock and I'm knackered.
Good to see another Aussie delivered 86 5.0 here. I am doing an intake refresh at the moment and have done all the plating and powder coating. It's a rare thing the Oz 86 5.0. According to well informed sources here (on Rennlist) only 150 made in RHD.
The rest of those projects listed will be a piece of cake, in comparison to what you've just accomplished.
Brian.
That's good to hear, and I want to believe you. The lower ball joint has me a little worried. I'm yet to properly do my research for it but I don't think I'll find anything as 'colour by numbers' as what John P's prepared for the Motor Mounts. I've been spoiled!
Originally Posted by DeWolf
Good to see another Aussie delivered 86 5.0 here. I am doing an intake refresh at the moment and have done all the plating and powder coating. It's a rare thing the Oz 86 5.0. According to well informed sources here (on Rennlist) only 150 made in RHD.
Hi DeWolf. Good to hear from you. I'm yet to completely work out what I want to do with the car - including the potential to ruin its shot for show car status. Not sure if its 'rarity' will be a help or a hinderance in the end. That will be a timely conversation once I've got the Roadworthy done. I will definitely be keen to find out more on your intake refresh as that's on my list of things to do. How hard are you finding it?


 12-31-2015, 03:43 AM