
timing belt change out and WP replacement
 11-22-2015, 07:52 PM
#16
Rennlist Member
thanks!
what is the cam bolt torque?? it was kind of loose.. spec in the manual shows 45nm,but that's only 36ftlbs.?? the write up with pictures shows 47ftllbs?
most importantly, what Is the shoulder bolt torque on the 84 style pump for the tensioner??????
used the spec In the little manual book of 65nm or 47ftbls...for the cam bolt... and just used the blanket 30ftlbs for all M10 bolts in the manual, on the tensioner arm bolt.
Last edited by mark kibort; 11-22-2015 at 10:52 PM.
 11-23-2015, 01:20 PM
#18
Rennlist Member
Job all done in about 4 hours, but took more time because I lost a water pump bolt that tried to escape  finaly found that . and was searcing the manuals for the torque values for the tensioner shoulder bolt (which I never found ) and the cam bolts. cam bolts were In the little manual at 47tf-lbs but wonder what the shoulder bolt is? M10 bolts are generically 30ftls (40nm) but its a big socket head on a smaller M8 (I think) bolt thread. (which the manual says to be torqued at 20nm, which is 14ftlbs ) anyone know what its supposed to be torqued at?
anyway, all the plullies looked great. no wear to be seen. cam belt looked good too.
interesting though.... the cam positions vs the timing marks are always off a little which I don't think is a problem as I timed it that way with the cams. However with the new belt, its closer to the marks which means the cams have changed position relative to TDC. Now I wish I had the porken tool to measure cam timing. anyway, water pump on and torqued to the 7ftbs and set the belt tension to about 5.2 as it will stretch a little as a note , the tension was a little on the loose side when I checked before disassembly. just under 4.0...... could that be because the water pump bearing was going. I don't know .... I hadn't checked the tension in a while (maybe since last racing season). anyway, I used both the kemph tool and the Porsche 9201 tool. amazing how close to the 9201 the tool is.
finaly found that . and was searcing the manuals for the torque values for the tensioner shoulder bolt (which I never found ) and the cam bolts. cam bolts were In the little manual at 47tf-lbs but wonder what the shoulder bolt is? M10 bolts are generically 30ftls (40nm) but its a big socket head on a smaller M8 (I think) bolt thread. (which the manual says to be torqued at 20nm, which is 14ftlbs ) anyone know what its supposed to be torqued at?anyway, all the plullies looked great. no wear to be seen. cam belt looked good too.
interesting though.... the cam positions vs the timing marks are always off a little which I don't think is a problem as I timed it that way with the cams. However with the new belt, its closer to the marks which means the cams have changed position relative to TDC. Now I wish I had the porken tool to measure cam timing. anyway, water pump on and torqued to the 7ftbs and set the belt tension to about 5.2 as it will stretch a little as a note , the tension was a little on the loose side when I checked before disassembly. just under 4.0...... could that be because the water pump bearing was going. I don't know .... I hadn't checked the tension in a while (maybe since last racing season). anyway, I used both the kemph tool and the Porsche 9201 tool. amazing how close to the 9201 the tool is.
11-23-2015, 02:52 PM
#19
Three Wheelin'
Job all done in about 4 hours, but took more time because I lost a water pump bolt that tried to escape finaly found that . and was searcing the manuals for the torque values for the tensioner shoulder bolt (which I never found ) and the cam bolts. cam bolts were In the little manual at 47tf-lbs but wonder what the shoulder bolt is? M10 bolts are generically 30ftls (40nm) but its a big socket head on a smaller M8 (I think) bolt thread. (which the manual says to be torqued at 20nm, which is 14ftlbs ) anyone know what its supposed to be torqued at?
anyway, all the plullies looked great. no wear to be seen. cam belt looked good too.
interesting though.... the cam positions vs the timing marks are always off a little which I don't think is a problem as I timed it that way with the cams. However with the new belt, its closer to the marks which means the cams have changed position relative to TDC. Now I wish I had the porken tool to measure cam timing. anyway, water pump on and torqued to the 7ftbs and set the belt tension to about 5.2 as it will stretch a little as a note , the tension was a little on the loose side when I checked before disassembly. just under 4.0...... could that be because the water pump bearing was going. I don't know .... I hadn't checked the tension in a while (maybe since last racing season). anyway, I used both the kemph tool and the Porsche 9201 tool. amazing how close to the 9201 the tool is.
finaly found that . and was searcing the manuals for the torque values for the tensioner shoulder bolt (which I never found ) and the cam bolts. cam bolts were In the little manual at 47tf-lbs but wonder what the shoulder bolt is? M10 bolts are generically 30ftls (40nm) but its a big socket head on a smaller M8 (I think) bolt thread. (which the manual says to be torqued at 20nm, which is 14ftlbs ) anyone know what its supposed to be torqued at?anyway, all the plullies looked great. no wear to be seen. cam belt looked good too.
interesting though.... the cam positions vs the timing marks are always off a little which I don't think is a problem as I timed it that way with the cams. However with the new belt, its closer to the marks which means the cams have changed position relative to TDC. Now I wish I had the porken tool to measure cam timing. anyway, water pump on and torqued to the 7ftbs and set the belt tension to about 5.2 as it will stretch a little as a note , the tension was a little on the loose side when I checked before disassembly. just under 4.0...... could that be because the water pump bearing was going. I don't know .... I hadn't checked the tension in a while (maybe since last racing season). anyway, I used both the kemph tool and the Porsche 9201 tool. amazing how close to the 9201 the tool is.
11-23-2015, 04:00 PM
#20
Rennlist Member
The feedback I got on the shoulder bolt was to torque to standard M8 value as overtorquing is the assumed cause of most shoulder bolt failures. Also the threads should get a generous helping of anti-sieze - my shoulder bolt was VERY corroded when removed and visibly bent though not to the point of inducing belt tracking issues.
11-23-2015, 04:33 PM
#21
Rennlist Member
a few pics of the pulllies.. the timing alignment before and after and a comparison for the 9201 tool vs the Kempf tool
what the heck is this round tube thing'ie that came out of the bottom of the radiator? no clue!
what the heck is this round tube thing'ie that came out of the bottom of the radiator? no clue!
11-23-2015, 05:18 PM
#22
Three Wheelin'
I had the opposite problem, neither Bill or I was sure on the torque value so we left it at snug for later then obviously forgot about it - I ended up going back in to fix it but I had several weeks into the job at that point so a few extra hours of tear down and reassembly didn't bother me all that much, YMMV.
11-25-2015, 01:39 PM
#26
Archive Gatekeeper
Rennlist Member
Rennlist Member
Yes, it's a flow director:
https://rennlist.com/forums/928-foru...-radiator.html
Good time to have done the belt, yours was working towards walking off the front of the gears. Lots o' fuzz on the belt cover- where was it rubbing?
https://rennlist.com/forums/928-foru...-radiator.html
Good time to have done the belt, yours was working towards walking off the front of the gears. Lots o' fuzz on the belt cover- where was it rubbing?
11-25-2015, 02:14 PM
#28
Rennlist Member
Yes, it's a flow director:
https://rennlist.com/forums/928-foru...-radiator.html
Good time to have done the belt, yours was working towards walking off the front of the gears. Lots o' fuzz on the belt cover- where was it rubbing?
https://rennlist.com/forums/928-foru...-radiator.html
Good time to have done the belt, yours was working towards walking off the front of the gears. Lots o' fuzz on the belt cover- where was it rubbing?

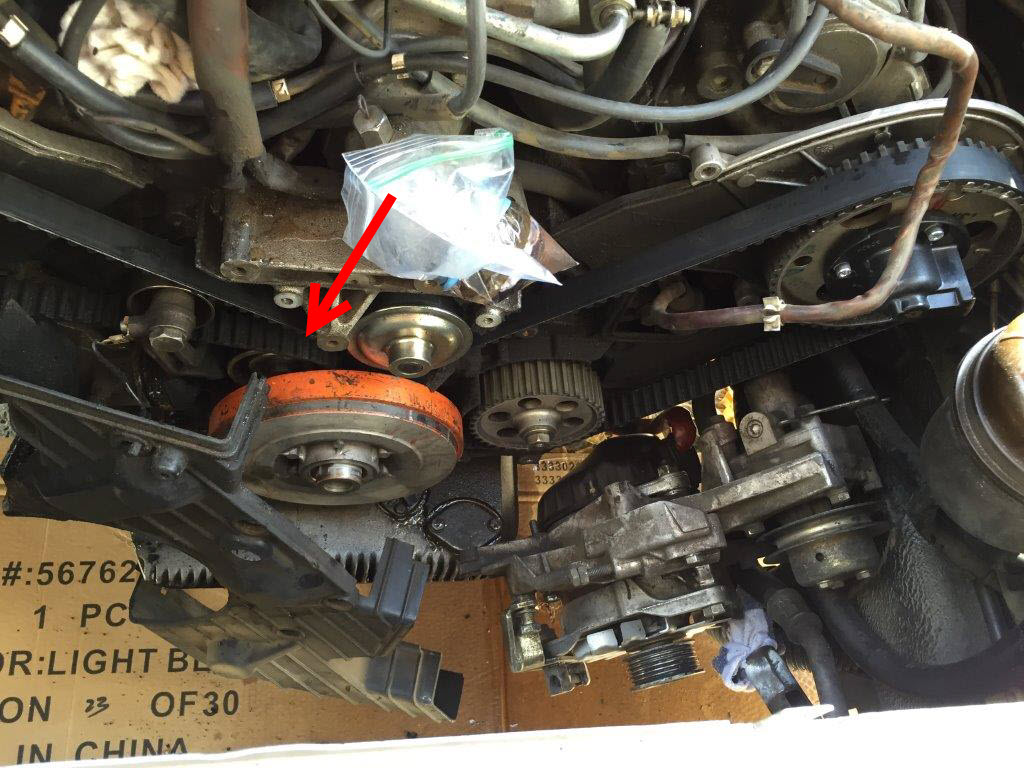
In MK's "before" pics, have a look at the tensioner roller-- it is hiding under the belt (arrow) and "aft" of where it should be-- i.e. towards the block. I think that would tend to walk the belt forward, away from the block. It looks to me like the belt is hard against the WP pulley flange, and maybe also the crank-pulley flange.
That is the an early (pre-87) tensioner arrangement with a shoulder-bolt and not the shaft and brace of the '87+ cars. It looks to me like the shoulder-bolt is bent, or maybe just worn bushings, as Bill mentions.
The belt tension was also quite low, only 4.1 on the 9201 gauge. How could the warning light not have been going off??
Of course maybe the Conti belt, early tensioner arrangement, no oil in the tensioner and a loose belt is a magic combination that just happens to work. Certainly with 10^4 racing miles something is working. Or maybe it is just a testimonial to how forgiving these motors really are...
 11-25-2015, 04:43 PM
#29
Rennlist Member
Yes, it's a flow director:
https://rennlist.com/forums/928-foru...-radiator.html
Good time to have done the belt, yours was working towards walking off the front of the gears. Lots o' fuzz on the belt cover- where was it rubbing?
https://rennlist.com/forums/928-foru...-radiator.html
Good time to have done the belt, yours was working towards walking off the front of the gears. Lots o' fuzz on the belt cover- where was it rubbing?
as far as belt position, actually, this is the look the motor has had since i first got it 15 years ago. always right to the edge of the pulleys. probably a result of the alignment of the old style tensioner roller arm and the S4 tensioner
i know the bent sholder bolt.. i had one break just going to 14ftlbs before i realized how valuable they are and how they should be changed at every water pump change. however, this time i left it in as it looked that good
Seems a shame to make a mess out of Mark Thornton's thread but a bit late to worry about that
In MK's "before" pics, have a look at the tensioner roller-- it is hiding under the belt (arrow) and "aft" of where it should be-- i.e. towards the block. I think that would tend to walk the belt forward, away from the block. It looks to me like the belt is hard against the WP pulley flange, and maybe also the crank-pulley flange.
That is the an early (pre-87) tensioner arrangement with a shoulder-bolt and not the shaft and brace of the '87+ cars. It looks to me like the shoulder-bolt is bent, or maybe just worn bushings, as Bill mentions.
The belt tension was also quite low, only 4.1 on the 9201 gauge. How could the warning light not have been going off??
Of course maybe the Conti belt, early tensioner arrangement, no oil in the tensioner and a loose belt is a magic combination that just happens to work. Certainly with 10^4 racing miles something is working. Or maybe it is just a testimonial to how forgiving these motors really are...
Attachment 994853
the conti belt has been on the car for 8 years and has stretched a little over those years while racing near 100 track/race days! warning light didnt go on as its been flightly since day one so its disconnected. the wire broke recently. (external wire). oil in the tensioner doesnt do anything but lube the internals , protect the components from rusting and distribute heat upon warm up) i just have a little oil in there, not much.. when i filled from the start, it all leaked out the front seal and made a mess after races. so, i stopped filling it 10 years ago, and put 1/4 of the oil in on the rebuild. seems to work fine.
I dont like or keep a loose belt, that was too long between checking intervals. shame on me! usually 2 times a season is enough to make sure its tight.
11-25-2015, 06:29 PM
#30
Addict
Lifetime Rennlist
Member
Lifetime Rennlist
Member
The flow director goes into the upper inlet on the right side of the radiator to push hot coolant down the side tank so there is flow across all the radiator. I believe that Mark installed some used end tanks before and probably put a right side tank upside down on the left side....and left in the flow director which would then have been a flow restrictor...

