When you click on links to various merchants on this site and make a purchase, this can result in this site earning a commission. Affiliate programs and affiliations include, but are not limited to, the eBay Partner Network.
OK. I'm at a complete standstill. For the life of me, I cannot get that bolt off. I've PB'ed it more times than I can count, gave some taps on the bolt in the hope that it would help the PB penetrate a bit and nada.
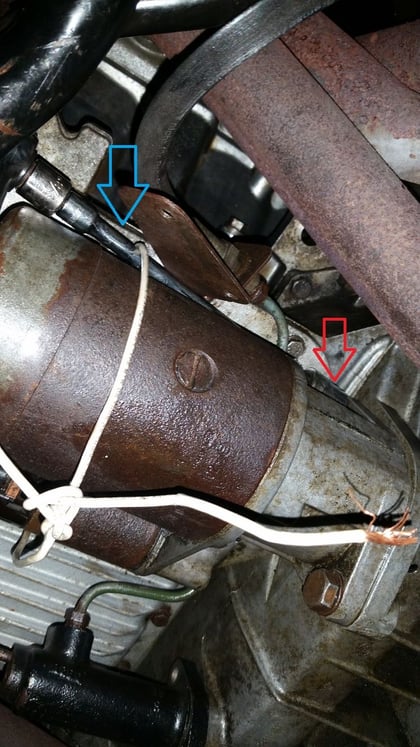
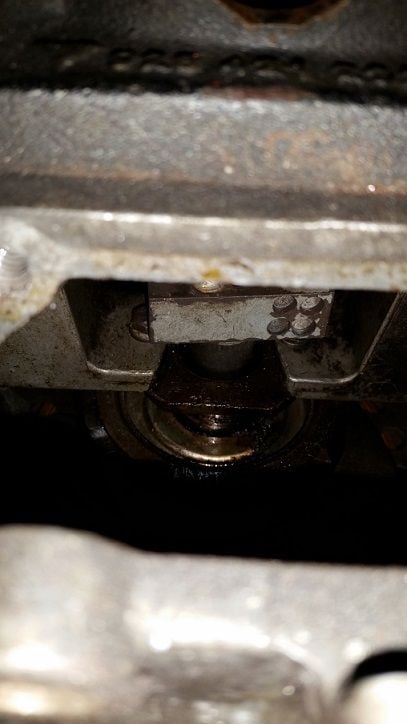
I got an 1/4" extension that allows the socket wrench to sit nicely in the gap at the front of the starter, and was using the white wire in the attached picture, anchored with a long screw driver, to keep it from torquing out.
There are a five options that I see here:
1. Complete remove the headers and the exhaust. Really not looking forward to that, and would probably punt on it.
2. Apply some heat to the bolt with a butane torch. But, I'm not certain as to how that would play with the OP, the starter and everything else that's around there.
3. There's an open hole in the OP where I've got the blue arrow (socket is at the red arrow). I was considering that I could put a bolt or a screwdriver in it, which would anchor the extension from torquing outward, but I don't want to F-up the OP either.
4. Just keep applying PB, let it sit, tap the bolt, try again, apply more PB, tap the bolt, let it set, apply, lather, rinse, repeat.
5. Throw in the towel and put it down as a future project (I don't want to quit, though).
Any other thoughts? I really want to do the front pinch bolts and do the job right, but things just aren't cooperating.
That's good to know. Thanks. Was afraid I might mess up the the starter going that route.
I'm done with work on the car tonight, but will try tomorrow.
At a minimum, dropping the housing a bit might give me a bit more clearance to get to the stubborn bolt off with an open wrench, and that might get me some clearance to get the bellhousing off.
Dave - if I were on the sunny side of the globe right now, I'd buy you a pint of Coopers, Hop Hog or whatever you might drink.
Curiosity got the best of me, so I went up and gave one more go at it. Didn't get it totally removed, but have a new plan of attack.
Got the 6 bellhousing bolts off. Starter is bumping against sway bar, so need to remove that. I'm hoping I'll be able to get the bellhousing out once that's done. If not, will need to get the starter off (which I do have access to the bolt now...still can't get it off, though). And if not then - might need to remove all the OP bolts at the front, as they seem to be in the way a bit.
Regardless - much farther along than I was 60 mins ago, so thanks for the tip!
Good for you ... I'll go and have a small triple bourbon right now to celebrate
Now you can get better access to that starter bolt head, try putting a ring spanner on it (assuming it's hex head like the other one), and whack the end with a wooden mallet or block of wood.
Just got back from vacation with the fam down in Myrtle Beach (crappy weather, but man are there some roads on that trip that would be fun to drive with the shark) and figured I would close this one out.
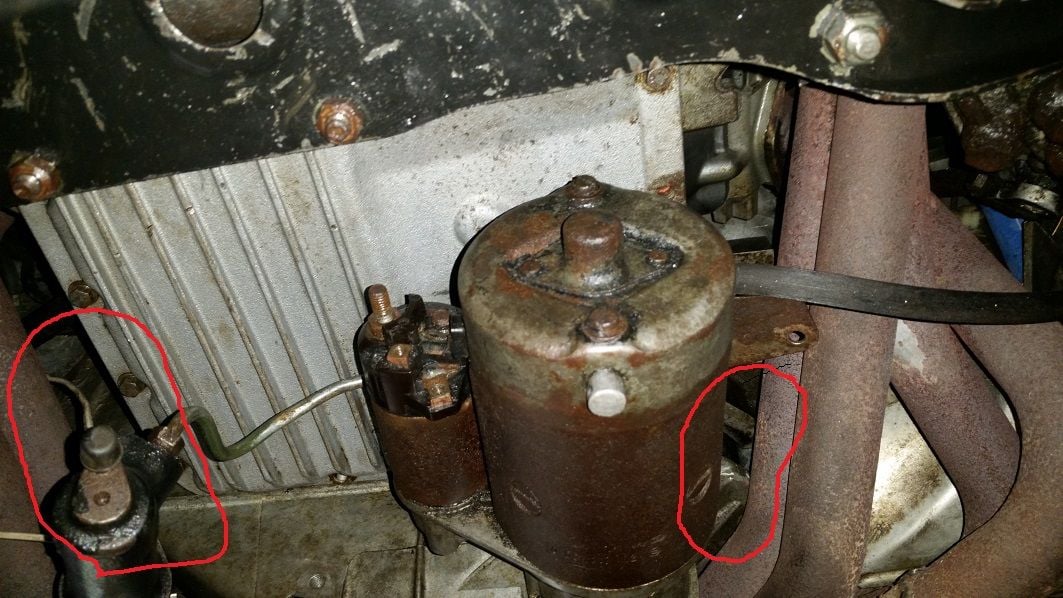
And in doing so, I've found why the starter has been so difficult -
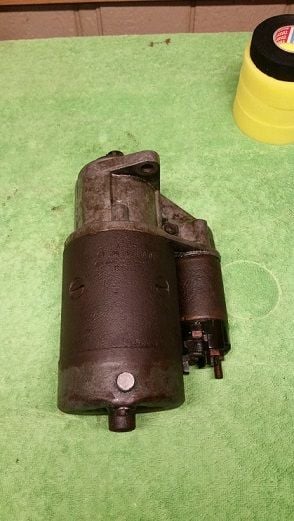
The PO or PPO swapped the mounting bolts for the starter with one of the mounting bolts for the sway bar. Joe was onto something when he questioned me having hex versus him having Allen.
There isn't enough clearance between the starter and the hex bolt to get a ring spanner or open wrench onto the bolt. Argh.
Going to drop the sway bar downward to see if that gives me enough room to get the starter and bellhousing out in one piece, and will work to separate them once on the bench.
The sway bar to drop link bolts are hella tight, so I'm calling it a night for now.
And just for good measure - I've got new mounting bolts for each coming from Roger, so at least when I'm done I will know everything is back in fresh and in the right place.
I'm no longer of the opinion that I can get the bellhousing off without removing, or at least lowering a bit, the exhaust.
I'm not certain if I have an aftermarket on mine, but I don't think I'll ever have enough room to slide it out as-is.
The rear of the BH, where it is the widest, looks like it will always bump up against the exhaust in the red areas in the pic below. I *might* be able to wiggle it out if I were to remove the OP and the steering rack, but I don't think I'm quite ready for that.
As a result, I tried jimmying the front clamp & shaft backward with the front inspection hole, but it doesn't seem to be budging. I could apply more force to it, but since you said it should be floating I wasn't sure if that was a good idea.
Can I jimmy the rear clamp rearward a bit with the Pinch Bolt loosened, then replace it from there?
In the meantime, back to the starter bolt I go.
*Edit*
Minor victory...got the starter off, with a nice goose egg forming on my forearm from when the bolt released
Looks like MSDS headers? In which case I'm pretty sure you need to remove the headers to get the bell housing off.
I can recall a few other rennlisters taking the headers off and replacing them with stock manifolds because of that issue (or at least replacing them with '85/86 32V stainless manifolds, which flow better than the early cast-iron ones).
Thinking back to the PO, I think you might be right. I'm pretty sure he had that in his sig.
He gave me another set that he had purchased and never installed (I need to dig them out of the crawlspace), and I'd go ahead and take the time to do it, but the welding that was done on the exhaust system prevents me from only removing the headers and installing the new ones (which might give me the clearance I need).
Regardless - not the time for me to do it given my current experience and budget, so I'll stick to trying to remove pinch bolts for now (with key word being "trying").
Hello,
Tools to remove broken bolts and studs are commonly call "easy outs" but the job is not easy. You need an assortment of good tools to do the job. Get a new bolt if you haven't already and get a proper size of remover and a good quality one at that. The headless bolt will have to be drilled to the corresponding size of the remover. Using a center punch and a hammer pound a dimple in the center of the bolt. Using a powerful drill, preferably a corded-low RPM 1/2 inch chuck drill, and a new drill bit carefully and slowly drill straight into the bolt. Looking at the new bolt and remover you can judge how deep to drill. Go as far as the threads and the tool and bolt length will allow. Blow or clean out any shavings and insert the tool, turning it counter-clockwise. It will bottom out and then if you continue to turn it it should start to back out the broken bolt.
Thanks
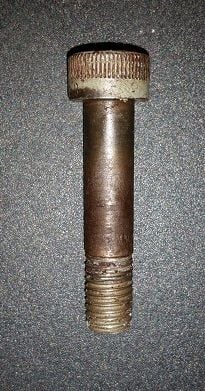
Finally got the rear bolt off. No rust, no wear on the threads. All good. Had a bit of play with the clamp with the bolt loosened and that was enough to get it out and get the new one in. Just need to torque it back to 66, and inspection cover goes back on.
Since I can't get the lower bellhousing off, is it at least worth replacing the rearward-clamp bolt via the inspection hole near the bellhousing, on the TT? Any potential harm in doing it?
I would still love to figure out how to get the shaft a bit more towards the back just so I have it right. I tried nudging the front clamp a bit rearward again (not too much though) and didn't get any play in it.
Finally got the rear bolt off. No rust, no wear on the threads. All good. Had a bit of play with the clamp with the bolt loosened and that was enough to get it out and get the new one in......
That's a really good sign Ryan
The fact that you don't have wear on the thread or spline marks means it was not as far forward as it can potentially go. When it gets to jamming the bolt, the shank will have spline marks (which it hasn't got), and the thread will get damaged as you wind it out (which hasn't happened). The fact that you could move the clamp back a little, indicates the drag forward had happened with the clamp, but it hadn't reached the limit of the shaft groove ... so total slide forward was only 2 - 3 mm, or about half the potential maximum before the bolt jams and gets damaged, along with the splines.
It isn't easy to push the shaft rearwards, because it has to slide in the TT bearing shaft guides. It does take a bit of force. If you can get it back a few mm (2 - 3), that would be good, but I don't think it's the end of the world if you can't.
Before you put the new bolt in, push the clamp forward so you can have a look at the base of the splits/cuts on the input shaft of the gearbox, to be sure there's not the start of any cracks. Then work it back onto the input shaft so it's centred as best you can on the bolt groove in the shaft, and the bolt cutout in the input shaft. Blast the bolt hole out with some carb cleaner, then fit new bolt and torque to 66 ft/lbs.
It would obviously be better to go through the whole procedure, but if you can't get the cover off, then replacing and torquing the bolts you can get at, is way better that doing nothing. So ... yes, I would replace the one front bolt you can access.

 07-29-2015, 01:01 AM