When you click on links to various merchants on this site and make a purchase, this can result in this site earning a commission. Affiliate programs and affiliations include, but are not limited to, the eBay Partner Network.
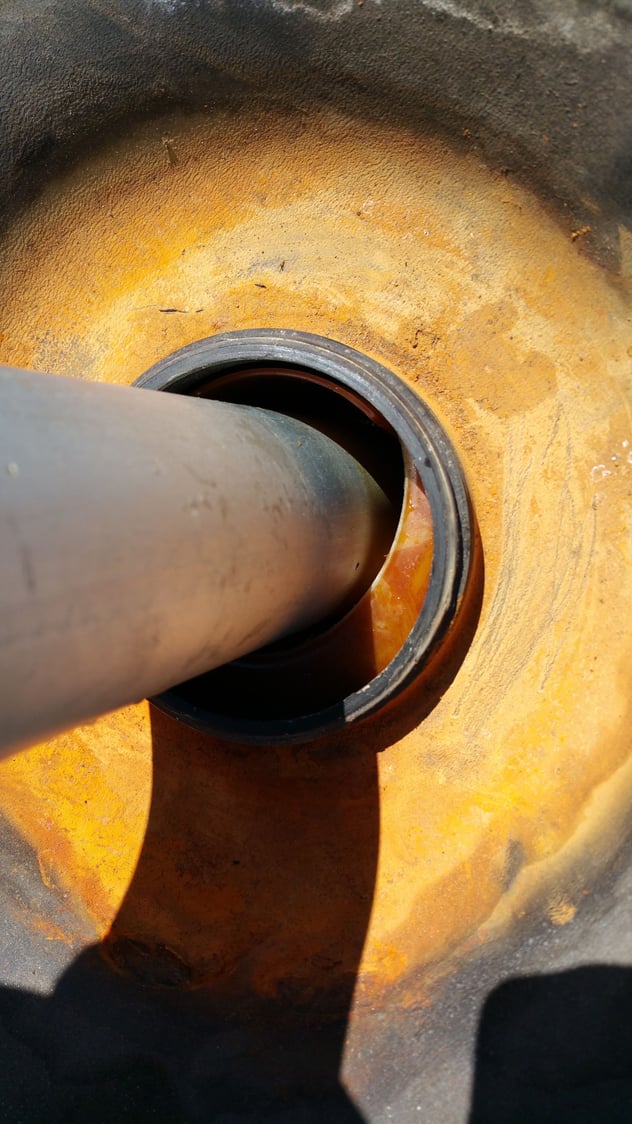
This is the connection about 6 inches outboard of the fuel level sending unit.<br/><br/>I dropped the tank today to possibly fix a small leak in the bottom of the tank. Something told me to drop it and check everything. Im sure i can repair the crack on thr bottom, but this tear concerns me. Can this piece be replaced or 'patched'?<br/><br/>All opinions welcome. I really would like to salvage this tank, cant afford a new or used one at the moment. The cheapest quote for a used tank I got was abiut $400.
I removed the cap for the sending unit and I thought it slide right out... Not the case, there seems to be a plastic ring that is stuck between the bottom of the sending unit and the where it slides out of. Make sense?
Am I missing something? I was expecting to find a couple of screws where an intank pump or screen would be. The plastic screen came right out of the filling spout when I began to rinse the inside of the tank.
Is that plastic orange ring just inside the tank supposed to be loose? Its preventing the sending unit from being pulled out of the tank as well.
The ring is seal for the screw on cap that holds the gauge sender in place. There is a weir in the bottom of the tank to ensure there is fuel at the pump pick up, and it regularly gets picked up by the bottom of the sender unit. You should be able to disengage the sender with some wriggling - it has a cup on the bottom facing up that snags on the weir edges - look up sharkskin pages on sender so you know whats down there.
jp 83 Euro S AT 56k
The in-tank pump (if installed) is at the rear of the tank, just forward of the exterior pump, as will the pickup screen (if no in-tank pump). Be careful to avoid pulling the screw-in adapter out of the tank.
Got the sending unit free from the ring and looked insidr and noticed the housing for the filter had come ajar...
Does that ring thread into the top of that housing? Does that housing just simply seat and the threaded filter holds it in place?
I'm more worried about that hose connection up top with the tear in it. Looks like its torn through the metal as well. Might have to try to seal that somehow, it doesn't look replaceable.
Can this piece be replaced or 'patched'?<br/><br/>All opinions welcome. I really would like to salvage this tank, cant afford a new or used one at the moment. The cheapest quote for a used tank I got was abiut $400.[/I]
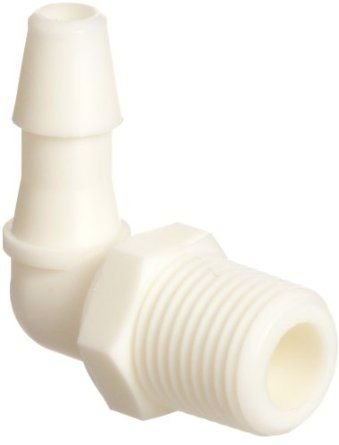
Hmm.. I haven't tried it, but to repair that cracked hose fitting, off the top of my head, I'd try somthing like this:
1. Buy a nylon 90-degree barb to NPT in a size which fits the hose (nylon is fuel-safe)
2. Cut off the cracked fitting leaving a good size stub (for stability)
3. Drill and tap the stub to the required NPT size
4. Coat threads with fuel-safe epoxy and screw in the barb, and secure with more epoxy both inside and outside the tank (to add lateral-load support)
This is the kind of fitting I mean:
You'll need to measure the NPT thread dimensions to make sure you can fit it within the lower part of the old fitting, which is preferable to the wall of the tank itself, for thickness and stability reasons.
If the correct-sized hose barb means the NPT part is too large an OD to drill/tap, I'd consider turning down the NPT end and re-threading it with a die to make it narrower.
If you try the above, take pics and post about it
Great call. Sounds pretty feasible. I'm way more optimistic about this tank now. Do you have any suggestions for an epoxy? Tons of debate about which compounds actually hold up to fuel is daunting. I'm wondering if the same epoxy may be my solution to the "3/4 crack below the tank?
JB Weld is actually gasoline safe, but it has issues with ethanol-blended fuel softening it, so for many geographies its not workable (works ok here in Oz - where ethanol must be labelled clearly, and fuel without ethanol is easy to get). Alternatives from various car forums for ethanol fuel friendly epoxies include this stuff:
Which is apparently the same as Miller / Stephenson 907, in different packaging. But thats based on a quick web search so you'll need to do your own research to make an informed choice. I do know someone locally who used JB Weld to fix a spun metal insert in the base of the tank (insert came out completely with the old in-tank pump) and they've had no leaks in the last 5 years since it was done - but again we have no ethanol in the fuel (unless you specifically choose to buy it).
For the crack on the bottom, the only repair worth it IMO is plastic welding. IIRC, someone here posted pics of such a repair a few years ago? or maybe it was over at pelican?
I haven't done a Fuel Tank, but have had great success with other parts like Radiator Shrouds and Washer Tanks.
The only way it works is to correctly ID the Plastic, and than use the correct filler and welding Temp for that plastic.
a. Polyethylene (PE)
b. Polypropylene (PP) – clear in color (this is what the 928's Washer Tank is made from)
c. Acrylonitrile Butadiene Styrene (A.B.S.) – black in color (928 Fan Shroud is close to this)
d. Polyvinyl Chloride (PVC) – white or gray in color
e. Polyurethane (TPUR)
Identifying different types of plastic. Looking at the color is a good place to start when identifying plastics but it will not always hold true.
Sometimes polyurethane can be colored black and mistaken for ABS. Burning a small piece of the plastic that needs to be welded can be used to identify the material. Looking at the color of the flame, the smoke, the burning process, and the smell can help you determine the type of plastic.
a. Polyethylene – No smoke, blue flame, and a candle wax odor.
b. Polypropylene – No smoke, orange flame, acid odor
c. Acrylonitrile Butadiene Styrene – Black sooty smoke hangs in the air, sweet odor
d. Polyvinyl Chloride – Self-extinguishing, will not flame
e. Polyurethane – Black smoke, sputtering effect
a. Polyethylene – 575oF
b. Polypropylene – 550oF
c. Acrylonitrile Butadiene Styrene – 500oF
d. Polyvinyl Chloride – 525oF
e. Polyurethane – 575oF
Man, lots of great suggestions here. Thanks all. This afternoon I want to pick up a plastic welding kit for the bottom. Before cutting off the connection on top and putting a vinyl barb in there, I may see if I can seal that gouge in the line with the plastic welder. Probability for success = low, but if it fails I didn't lose out on much and I'll cut it. Wish me luck, I'll report back tonight or tomorrow.
the tanks crack because of flexing caused by 10 - 15 gallons of fuel sloshing around in the tank. That is 60 - 90 lbs moving about. Trying to patch or glue is seldom very successful because of that flexing and how poorly most glues epoxy etc. adhere to the plastic tank.
Plastic welding does seem to work BUT BIG BUT it requires a very good weld with sufficient penetration to restore the strength of the plastic to withstand all that flexing. It is NOT enough just to seal the crack on the outside....so it looks ok and does not leak right now.
I gave the welding a whirl. Overall I think it went ok. I cleaned the hell out of the area, lightly sanded it and put a generous amount of the plastic in the weld. It felt like iron achieved good penetration. The crack was about a half inch.

 05-25-2015, 05:58 PM