
Water bridge removal stalled - need help
 03-14-2015, 12:33 AM
#1
Drifting
Thread Starter
I've been following Dwayne's water bridge/oil filler seals and gaskets guide. All has gone smoothly, including the easy 3 of the 4 water bridge 6 mm hex bolts. But the driver's side rear bolt (almost hidden under the front intake runner) is not cooperating. I was not able to get a hex key straight on as Dwayne describes. I was able to get it on straight coming in from the side and putting the short leg of the hex key on the bolt (avoiding interference with the water bridge), but can't get the leverage to move it. I've done a little damage the hex bolt, but have not stripped it - and decided to stop before I do.
I'm thinking it's time for heat (propane torch), but I'm concerned about vulnerable things in the vicinity - wires, vacuum line, rubber seals at the base of the intake, etc. Oh...and I'm also concerned about gasoline still in the lines (front hose and pressure regulator are already removed) near an open flame.
I'm considering backing out and putting everything back together and waiting for summer and possibly doing a complete top end refresh and return to the water bridge when the intake is removed.
It seems the remaining hex would have come out just as easily had I been able to use the breaker bar with 8 inch extension and 6 mm hex socket. The challenge of removal seems to be more due to the difficult access to the remaining bolt.
Any suggestions?
 03-14-2015, 01:58 AM
#2
Rennlist Member
That bolt is the worst to get out. I had a terrible time, and the head broke off. I did eventually get it out with vice grips, and freeze spray (provides the opposite of heat from a torch - it's in a can and freezes the area very quickly, allowing the different metals to contract at different rates).
Anyway, the easiest thing to do would be to cut the water bridge in half, then attack the screw much easier. Water bridges are plentiful used from our regular vendors. Others have ended up doing this.
Anyway, the easiest thing to do would be to cut the water bridge in half, then attack the screw much easier. Water bridges are plentiful used from our regular vendors. Others have ended up doing this.
03-14-2015, 09:40 AM
#3
Rennlist Member
I used a colbalt drill bit to drill the head off the hex. The waterbridge wont come off however until the rest of the bolt is removed. I was lucky and the bolt was not seized so I was able to cut a slot in the top of the remaining bolt and remove it with a screwdriver.
03-14-2015, 09:55 AM
#4
Rennlist Member
Join Date: Oct 2005
Location: Gatineau, Qu�bec, Canada
Posts: 5,136
Received 1,206 Likes
on
467 Posts
That bolt (driver's side rear) is very hard to get to with the intake in place.
If it was never removed, it can be quite stiff.
I removed mine last spring and this one was the worst. I didn't brake anything but it was very tight.
The intake was removed when I did that.
I would wait until the intake is removed to do this job.
Way more space to work on this bolt.
And with the intake in place, if you break that bolt, you'll need to remove it anyway.
But that's me.
Why not doing the intake job now?
Not a bad job after all.
I've done that twice. The second time I removed it was to fix an oil filler neck leak.
Just asking.
03-14-2015, 10:41 AM
#5
Three Wheelin'
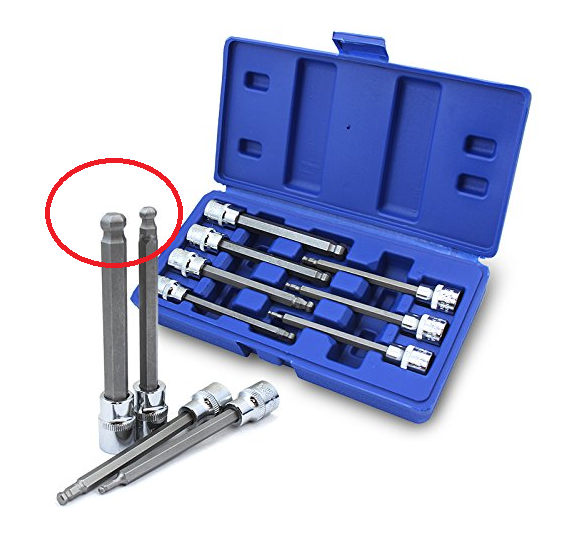
You need this ball head allen wrench set. Providing you haven't damaged and rounded the bolt head, with the ball design you don't have to be fully vertical. The long skinny body clears the obstructions and the 3/8 drive allows a socket drive.
I have taken mine out a few times successfully to fix the friggin oil leaks every 3 or 4 years from the oil filler neck. Actually its leaking again. However, this time I'm plastering Hondabond HT on both sides of the o-ring as suggested here.
Good luck
I have taken mine out a few times successfully to fix the friggin oil leaks every 3 or 4 years from the oil filler neck. Actually its leaking again. However, this time I'm plastering Hondabond HT on both sides of the o-ring as suggested here.
Good luck
03-14-2015, 10:42 AM
#6
Drifting
Thread Starter
Bertrand -
Thanks very much. After posting I got the feeling I'd pretty much answered my own question. However, I've had another question in the back of my mind - Is that bolt commonly more stubborn than the other bolts? Based on responses, especially your experience with the intake out, it appears the bolt is often difficult.
I noticed an oily mess is growing under the fuel rails and around the intake gasket. The round rubber seals beneath the intake bolt umbrella caps are squished out and soft. I immediately started to think it's time to do the whole shebang and order an intake refresh kit.
I recently finished installing new trans mounts in response to vibration after doing motor mounts. Now that there is plenty of clearance in back I really want to find out if I've solved the vibration problem. So I'll put it all back together, fill up the cooling system, take it for a drive -- and if the vibration is gone I'll keep driving it until June. I have 2.5 months off in summer to do the top end refresh, including cam cover seal kit.
The water bridge wasn't leaking steadily (not at all since summer of 2014). Last winter it leaked at the base (large O-ring at the block) when it got really cold (Polar Vortex) - only at start up, not in warmer weather or when the engine was warm. Obviously, cold weather contraction was the cause. I started down this rabbit hole mainly to replace the leaking gasket at the base of the oil filler neck...it's making a mess.
I've been trying convince myself the paint is in great shape on the cam covers and intake, but it's a slippery slope and powder coating seems inevitable at this point -- especially because the hex key has scraped a bit of paint off the intake runner. The flaking will only grow. Oh well. I have a friend who does powder coating.