
Help Needed - Retractable Headlight Motor Removal
 10-20-2014, 08:49 PM
#1
Pro
Thread Starter
My headlights have been over rotating when they are retracted. At first the problem happened every 5-8 on/off cycles but now is occurring almost every time. When they over retract the lever mechanism rotates into a A/C side edge of the condenser before it stops. Unfortunately, this has left a hole on one of the condenser U-pipes on the side. Looks like it is repairable.
I've combed through the WSMs and searched but haven't found a how to R & R the Retractable Headlight Motor. I read one article that the electrical contacts have degraded and left what sounds like "conductive dust" in the housing which lets the motor over rotate.
All advice on how to get the motor out and what the actual repair procedure is welcome.
Thanks
Last edited by NC928S4; 10-28-2014 at 10:33 AM. Reason: Problem is back
 10-20-2014, 11:49 PM
#2
Pro
Join Date: Dec 2010
Location: Palgrave, Ontario, Canada
Posts: 700
Likes: 0
Received 2 Likes
on
2 Posts
In an '89 the motor rotates one way to raise the lights and another to lower them. The top and bottom postions are sensed by rotating contacts in an electric postion sensor that is part of the drive gearbox to which the motor is bolted.
You can try cleaning those contacts. Removing the motor and gearbox assembly is not hard. Be careful to note exactly where they were bolted as the holes allow some lateral adjustment and watch for the circle clips that secure the drive arm as they break easily - you may want to replace them with a safer style that Roger sells.
However, for some of us there was an electrical issue caused by the wrong relay for daytime running lights - not likely your issue since this is for '90 and younger.
Regardless, Alan made a stainless steel shield to protect the condenser. Good for next time...
10-22-2014, 06:59 PM
#3
Pro
Thread Starter
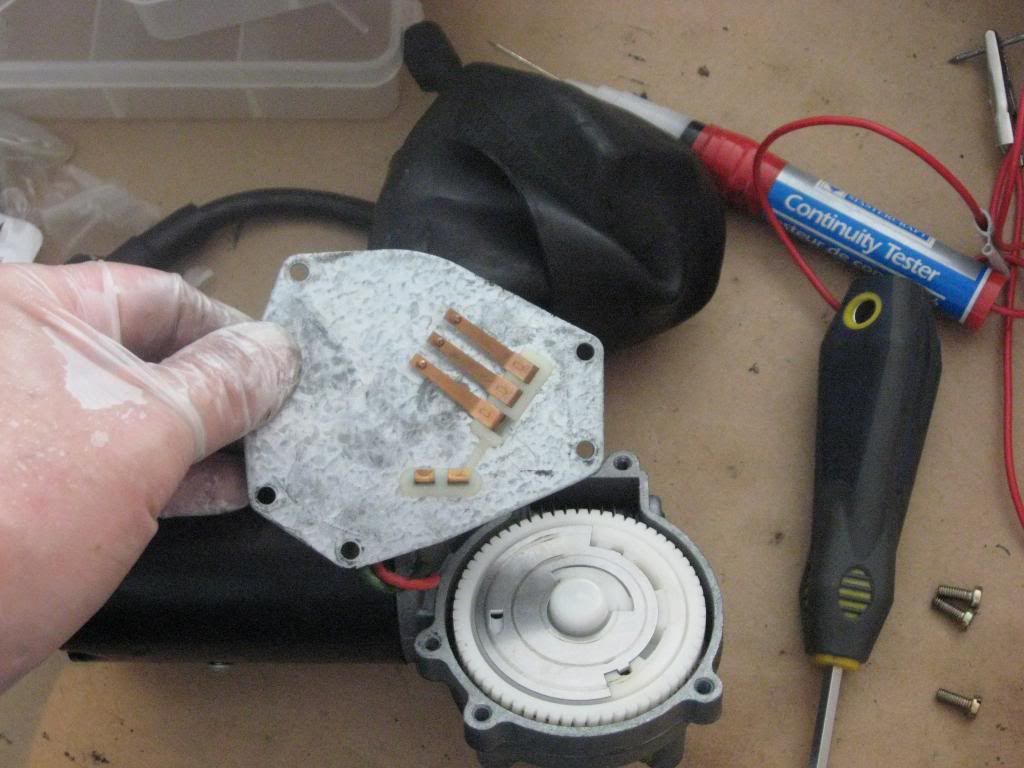
Thanks Martin - I removed the assembly and opened the assembly as shown in your picture. There was some wear but the contact surfaces looked relatively clean. The copper fingers and contacts looked almost new. I cleaned and "deoxited" all surfaces and put things back together. Nothing much looked wrong but now the assembly is completely clean.
Now I need to calibrate the raise /lower positions so the lights raise and lower to the proper position. I definitely moved the worm gear which spins the shaft that rotates the levers so I knew I had recalibrate positions.
I decided to cycle the lights up and down to get the electrical contact surfaces correctly positioned. The circle clips connecting the lever bars all look good and I removed nut that attaches the first bar to the shaft. With the Lights manually raised up and the light switch on I re-attached the bar to the shaft.
Unfortunately, when I turn lights off the lights lower and then over rotate to a slightly raised position. Turning the lights back on raises the lights but not completely.
Before I fiddle some more with positioning is there a known calibration procedure to get this right. Almost lost a finger when the lights seem to get to some position where they raise up automatically when manually rotating the ****.
Thanks
10-22-2014, 07:57 PM
#4
Pro
Join Date: Dec 2010
Location: Palgrave, Ontario, Canada
Posts: 700
Likes: 0
Received 2 Likes
on
2 Posts
Obviously the critical setting is to have the lights fully raised when on. Once you get that right then the down position should also be correct, but it is not as critical. IIRC, there are actually stops under the headlight pods that define the down position. Each pod is connected in a way that the bar drives it up but it can disconnect at the bottom. To see what I mean, you will find that you can lift each pod from the down position manually by pulling it up at the back/top - they essentially flop down to the rest stops.
If the sensors are working properly now then the gearbox shaft should rotate to exactly the same positions each time the headlights are turned on or off, so what I did was:
1. Turn on the ignition, turn on the headlight to raise them, then turn off the ignition and then the lights - the headlights should stay raised.
2. Disconnect battery (preferred) or remove headlight relay in the interest of saving your fingers - sorry I should have warned you about the motor's tendency to suddenly start moving
3. Remove and reset the arm on the gearbox shaft in a position that drives the headlamp bar to the top of its arc
4. Reconnect battery or relay and test
10-22-2014, 08:43 PM
#5
Pro
Thread Starter
Hmm, I did a bunch of 53 Relay replacements a few months back and also did a complete Deoxit pass on all relays and fuses. I wonder if I caused the problem during this repair.
I pulled the Relay Diagram from 928Intl but I don't see anything other than XXIII-XXIV 89-95 Combination Headlamp 928.618.107.04.
Is this the correct relay? Thanks for your advice. I'll be digging in tomorrow.
I pulled the Relay Diagram from 928Intl but I don't see anything other than XXIII-XXIV 89-95 Combination Headlamp 928.618.107.04.
Is this the correct relay? Thanks for your advice. I'll be digging in tomorrow.
10-22-2014, 09:21 PM
#6
Pro
Join Date: Dec 2010
Location: Palgrave, Ontario, Canada
Posts: 700
Likes: 0
Received 2 Likes
on
2 Posts
Hmm, I did a bunch of 53 Relay replacements a few months back and also did a complete Deoxit pass on all relays and fuses. I wonder if I caused the problem during this repair.
I pulled the Relay Diagram from 928Intl but I don't see anything other than XXIII-XXIV 89-95 Combination Headlamp 928.618.107.04.
Is this the correct relay? Thanks for your advice. I'll be digging in tomorrow.
I pulled the Relay Diagram from 928Intl but I don't see anything other than XXIII-XXIV 89-95 Combination Headlamp 928.618.107.04.
Is this the correct relay? Thanks for your advice. I'll be digging in tomorrow.
The combination relay is involved in positioning (and illuminating) the lights. Your p/n is correct, but if one of the terminals that manages the signal from the position sensor is dirty you could get the effect you observed.
10-23-2014, 10:36 AM
#7
Pro
Thread Starter
I guess I don't understand the mechanism. I thought circular contact plate and the copper fingers controlled the stop and start positions. Where are sensors that sense the actual position? In the headlight area? I'm surprised this vintage of car would have sensors.
What role doe the relay play? Does it reverse polarity to change rotation direction for up & down? Does it turn power off when it detects high current when electric motor reaches a stop point(up or down)?
Sorry for all the questions but this mechanism seems to be worse than the rear hatch gizmo?
What role doe the relay play? Does it reverse polarity to change rotation direction for up & down? Does it turn power off when it detects high current when electric motor reaches a stop point(up or down)?
Sorry for all the questions but this mechanism seems to be worse than the rear hatch gizmo?
Trending Topics
10-23-2014, 11:51 AM
#8
Pro
Join Date: Dec 2010
Location: Palgrave, Ontario, Canada
Posts: 700
Likes: 0
Received 2 Likes
on
2 Posts
Sorry to confuse - I was referring to the copper plate and fingers as you call them as the position sensors.
I am not an expert on the electrics - hopefully Alan can jump in. But I believe there is quite a bit of logic built in to the relay given that it has so many contacts and is a double relay. Clearly the behaviour of the lights changes according to quite a number of factors. The polarity to the motor has to be reversed to reverse the motor as you suggest, but the current is not maintained constantly, but rather for a short period of time in response to changes in the switch and light.
I am not an expert on the electrics - hopefully Alan can jump in. But I believe there is quite a bit of logic built in to the relay given that it has so many contacts and is a double relay. Clearly the behaviour of the lights changes according to quite a number of factors. The polarity to the motor has to be reversed to reverse the motor as you suggest, but the current is not maintained constantly, but rather for a short period of time in response to changes in the switch and light.
10-23-2014, 12:24 PM
#9
Electron Wrangler
Lifetime Rennlist
Member
Lifetime Rennlist
Member
The tracks in the headlight motor are the only position sensors. Obviously they are indirect - they control the amount of rotation of the motor upwards & downwards - the actual position of the headlamp pods is dependant on the adjustment of the linkages (motor mount position, articulated lever arm and drive bar to pod spline mount). Assuming the latter one(s) was correct before and haven't moved its all about the motor position & articulated lever arm.
There are essentially two feedback tracks on the motor. One is used for up and one for down. When the lights are off & ignition on the motor is powered to rotate downwards if the pods are up, the down track tells that the pods are up. The track has & maintains connectivity until it reaches the 'down park' position where the track ends, connectivity is broken and the motor stops. The upward direction is only triggered when the ignition is on and the lights are switched to headlight position (2 of 0-2). The up track has & maintains connectivity from the down position all the way up to the up position where the track stops and connectivity is broken.
Internal to the HL relay there are 4 relays - 2 are used for this as a reversing drive for the motor* - plus one for HL on/off switching and one for high/low beam switching. The motor drive logic is not very intuitive for most - but is actually really quite simple.
If the motor is badly misaligned the drive can still be trying to rotate when it is NOT in a parked position - in this case the motor is powered and stalled - and can burn out quite easily if left like this (and take your battery to an early grave too).
BTW Martin is on the right track - you need to get the up position correct - but don't lift the pods themselves rotate the drive bar to the correct fully up position.
With the linkages disconnected - have the motor drive to its up position - then turn off the ignition (disconnect battery for good measure) - attach the linkages and adjust (motor position) for snug fit against the pod up-stops.
*NB only S4 & later motors reverse - earlier motors rotate in the same direction for up & down - so up is half a cycle and down is the other half cycle - otherwise the operation is similar - these early headlight relays only have a single motor relay - adjustment is a little more tricky. These two types are not at all compatible.
Alan
10-23-2014, 07:16 PM
#10
Pro
Thread Starter
Thanks Martin & Alan. The information you provided was invaluable in fixing my headlight situation. I did need to adjust the down position for the bar that attaches to the spline. I assumed the default position was a straight vertical orientation which was incorrect. The correct position was approximately 25 degrees clockwise from vertical(towards the condenser). This worked out to be the best location for top and bottom stops. It took multiple attempts to get it just right.
WARNING: Each try required a battery disconnect which is CRITICAL because the motor WILL move on its own when certain positions are sensed when manually rotating the headlight position. If you value your fingers keep this in mind.
Adjusting the location of the motor assembly was also required so that the connecting bars could be located without tension. There are 3 bolts and one is typically not accessible when the bar is located in the correct position. This means you must eye ball the correct position then manually rotate the motor to reach the bolt, then rotate back to the correct position and then tighten the bolt on the spline.
I believe the root cause of this was a loose bolt on the spline. When I removed it, the knurled spline was slightly polished which I think caused the misalignment. Before I re-attached the bar to the spline I took a triangular file to the shaft surface of the bar to encourage friction and also hit the spline with a wire brush to remove metal flakes from the knurled area on the spline.
Fun, fun, fun but my lights are back to full function.
10-28-2014, 10:32 AM
#12
Pro
Thread Starter
Arg! Problem is back. After a few On/Off cycles the lights Over Retracted again. I have now ruled out electric motor, sensor and alignment as culprits. Is a flaky Relay a possible cause?
10-28-2014, 12:42 PM
#13
Electron Wrangler
Lifetime Rennlist
Member
Lifetime Rennlist
Member
What do you mean by "over retracted" How?
Is the photo supposed to be meaningful? It looks under retracted to me...
Not sure what issue you are trying to solve exactly
Alan
Is the photo supposed to be meaningful? It looks under retracted to me...
Not sure what issue you are trying to solve exactly
Alan
10-28-2014, 12:45 PM
#14
Rennlist Member
You could get one of my CondesRSafe plates to prevent damage from happening again. I developed this after I had the same issue with a DRL relay was installed.
10-28-2014, 02:06 PM
#15
Pro
Thread Starter
Sorry picture is hard to see. When I say over retracted I mean that when turning lights Off, the headlight goes all the way down and then levers continue rotating past the bottom which then causes the light to raise slightly. The lights stop in this slightly up position when the lever crashes into the A/C condenser.
On the last adjustment, I disconnected the circ clip connected lever and ran the lights a few cycles on and off to make sure the motor and sensors were in proper positions. I then re-attached the lever and everything worked as expected for 6-8 on/off cycles. Then the system seems to lose track of where it is and when turning off the lights the motor rotates past the previous dead bottom and then crashes into the condenser.
The first picture below shows the lever hitting the condenser. The second shows the position when headlights are in correct lowered position.
Thx

