
Driver (& Pass) Door Handle Hinge Replacement - How To w/ Photos (long)
 01-20-2013, 02:50 AM
#1
Electron Wrangler
Lifetime Rennlist
Member
Lifetime Rennlist
Member
Thread Starter
Before Christmas my driver's door handle hinge broke - resulting in an inability to open the door from outside, still locks & unlocks fine and opens from inside - but its a bit embarassing having to open the passenger door - open the drivers window and then walk around and reach through the window to get in... (glad I have the ROW window config...).
BTW the door handle feels almost normal (just a little bit less spring tension) - if your handle is really loose feeling or floppy on one end this is a different issue - likely either loose handle screws - or a broken handle part.
Changing this hinge out is a real PITA (& back..) - here are some follow-along notes with photos to help if you have to go down this path. If you have good tools and all the equipment you need allow about 3-4 hours.
There are good descriptions elsewhere of how to get the door inner cover off - so follow those, if you've never done it before don't wing it - it isn't that obvious, you could break something.
Do stock up on panel fasteners: 433 867 299A - White 823 867 299 - Black. But it doesn't really matter which you get. These are generic parts lookf for them at good Ace hardware or local upholstry stores - pretty widely available (and much cheaper if you buy generic in bulk).
Some will break for sure, get some before you start - also get a small upholstry pry tool - its the best way to get them out - behind the panel pry on the fastener skirt not the panel... easy enough.
Of course you also need the handle hinge :
Driver side (LHD): 928.537.063.04
Passenger side (LHD) 928.537.064.04
This project is basically the same either side, but the pictures are drivers side.
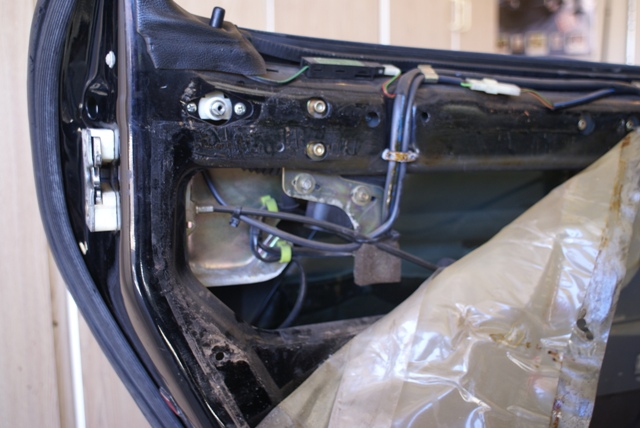
With the inner door exposed peel back the plastic skin panel at the rear top to expose the lock area:
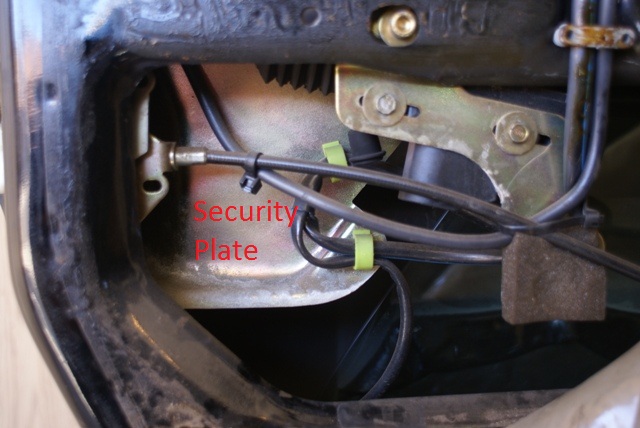
Security Plate - must be removed:
Remove two easy access screws:
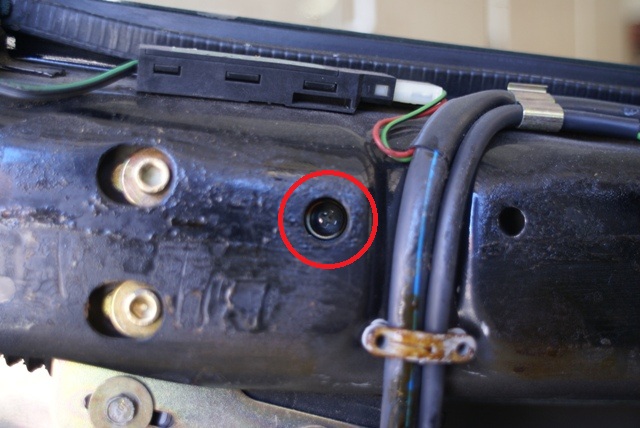

With the window up - loosen (do not remove) the bolt behind the bottom left of the security plate - Look underneath. The plate can rotate forward from under the bolt... This one was extremely awkward...took me 15 minutes to figure out what size it was (here's 15 minutes back... its a 13mm head). Looking at it via a mirror - the head looked bigger than it was... and I only had one 13mm open ended wrench.. the one in the 928 tool kit (...first time for everything)

Remove the cable clips - use regular pliers to pinch the plastic behind the panel to release.
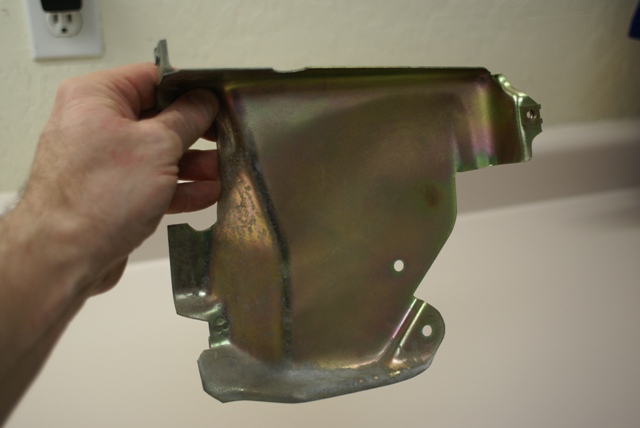
Here is the plate out of the car: (you can remove it with the window up - just). Be careful moving the window when the plate is loose
The front in the installed orientation:
From the Rear:
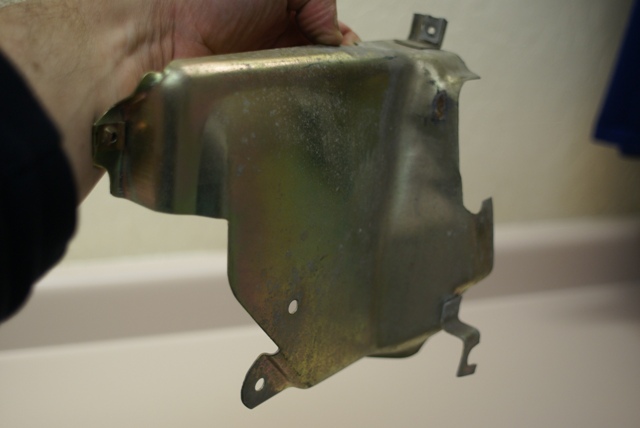
Showing the rear hook that goes on the bolt head:

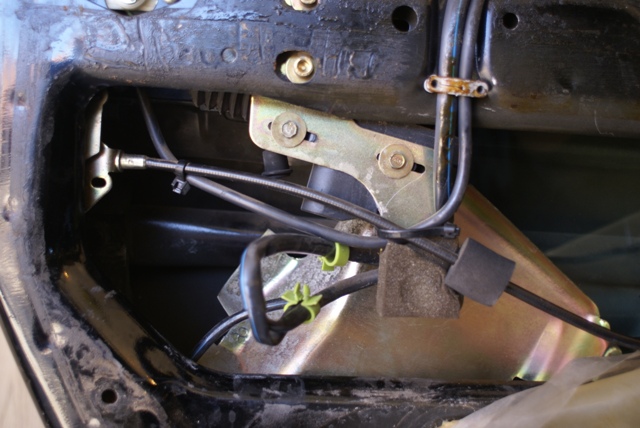
Wind the window down
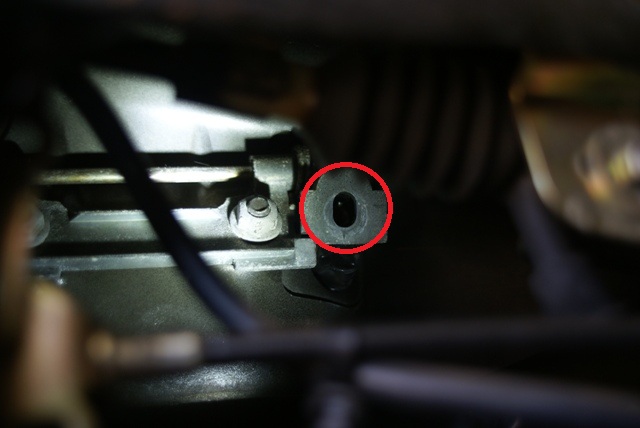
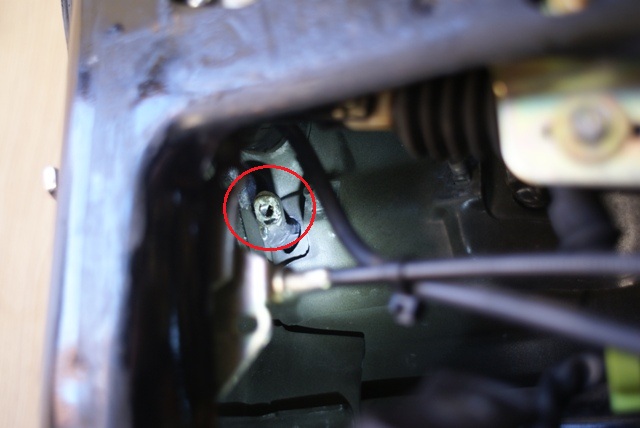
You can now see the hinge - here are the rightmost 3 of the 4 fasteners:
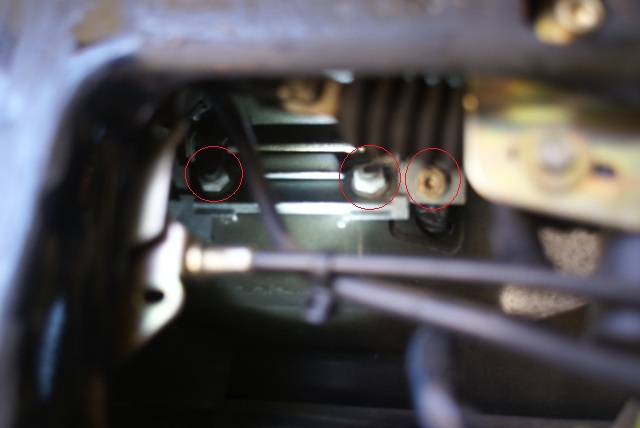
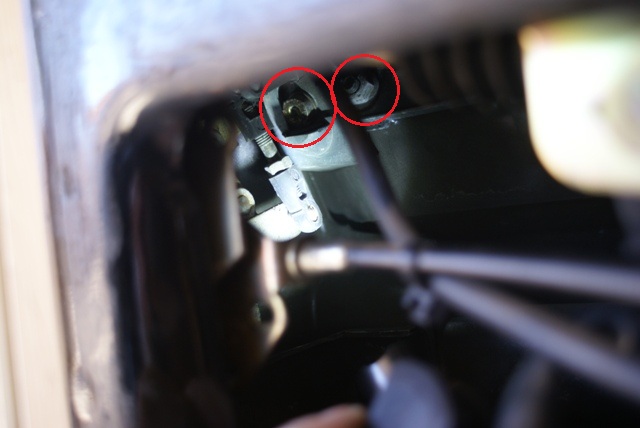
The outside pair are allen head machine bolts that connect to the handle part, the inside 2 are 10mm nuts that fasten the hinge to the door via captive bolts on the door. Here are the left most 2 of 4:
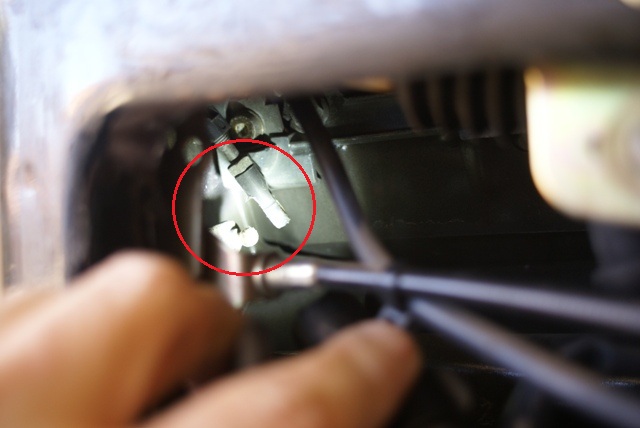
Remove the swivel adjustable link - the bottom is easiest to remove - use a medium flat blade screwdriver to pop it off:
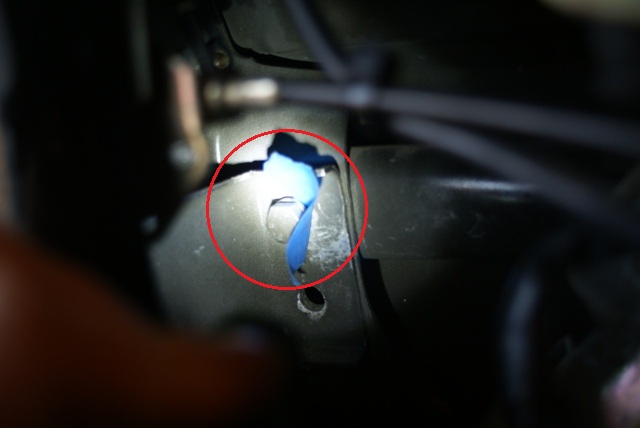
Tape the handle to the car so it cant fall off:

Remove the handle (outer) connections first (the right side is easy - straight shot):
Its easiest if you lubricate all these just after you break them free - that way you can do more work with your fingers - room for tools is very tight...
The left side is much more challenging:

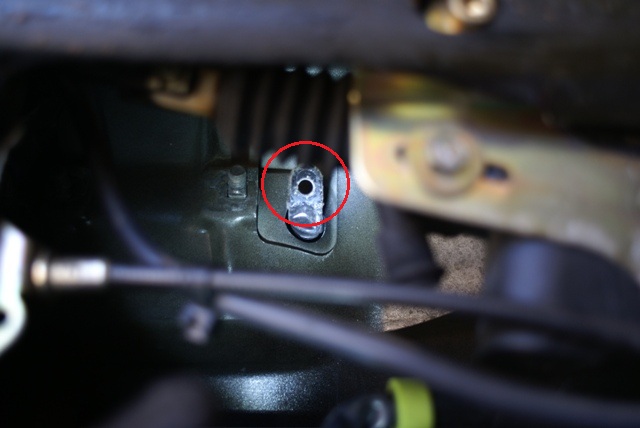
Then remove the hinge - the 10mm nuts are easier (still fiddly). This hinge is broken in the typical - weak spot - position:
Here are the handle ends in situ:
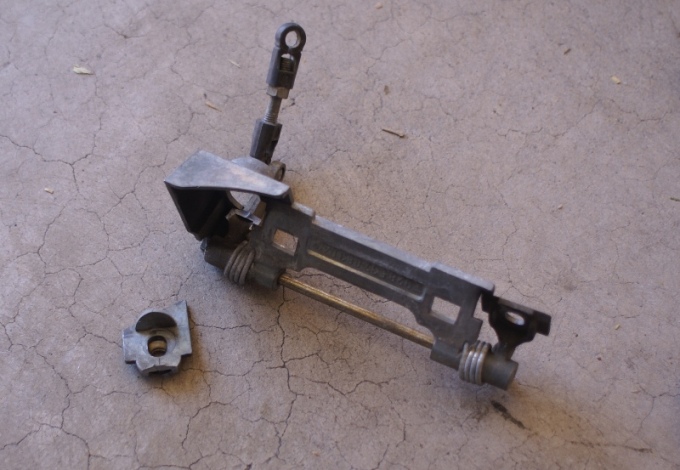
Replacement parts:
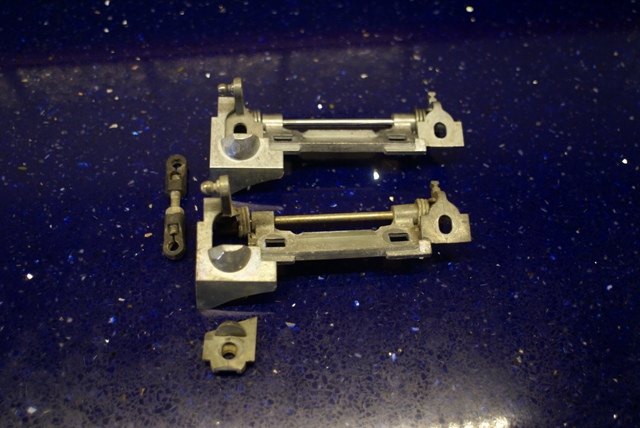
Heres the handle removed from its natural habitat:

Reassembly is the opposite flow - Generally I found reassembly to be quicker (everything was clean and lubed and moved much more easily
The only part harder than dissassembly was getting the security plate back in. It barely fits so its awkward anyway - and the bolt behind the plate has a washer under it - this is a horrible choice - getting the plate back under it is very difficult...
Porsche should have just used a bolt with a flanged head...
Anyway as a solution I taped the washer to the head (slightly) with masking tape and used the tape as a "ramp" to get the plate's flage under the bolt/washer - helped a lot.
Many have left the security plate out - I can see why now...
Great to be able to just open the door again
Alan
BTW the door handle feels almost normal (just a little bit less spring tension) - if your handle is really loose feeling or floppy on one end this is a different issue - likely either loose handle screws - or a broken handle part.
Changing this hinge out is a real PITA (& back..) - here are some follow-along notes with photos to help if you have to go down this path. If you have good tools and all the equipment you need allow about 3-4 hours.
There are good descriptions elsewhere of how to get the door inner cover off - so follow those, if you've never done it before don't wing it - it isn't that obvious, you could break something.
Do stock up on panel fasteners: 433 867 299A - White 823 867 299 - Black. But it doesn't really matter which you get. These are generic parts lookf for them at good Ace hardware or local upholstry stores - pretty widely available (and much cheaper if you buy generic in bulk).
Some will break for sure, get some before you start - also get a small upholstry pry tool - its the best way to get them out - behind the panel pry on the fastener skirt not the panel... easy enough.
Of course you also need the handle hinge :
Driver side (LHD): 928.537.063.04
Passenger side (LHD) 928.537.064.04
This project is basically the same either side, but the pictures are drivers side.
With the inner door exposed peel back the plastic skin panel at the rear top to expose the lock area:
Security Plate - must be removed:
Remove two easy access screws:
With the window up - loosen (do not remove) the bolt behind the bottom left of the security plate - Look underneath. The plate can rotate forward from under the bolt... This one was extremely awkward...took me 15 minutes to figure out what size it was (here's 15 minutes back... its a 13mm head). Looking at it via a mirror - the head looked bigger than it was... and I only had one 13mm open ended wrench.. the one in the 928 tool kit (...first time for everything)
Remove the cable clips - use regular pliers to pinch the plastic behind the panel to release.
Here is the plate out of the car: (you can remove it with the window up - just). Be careful moving the window when the plate is loose
The front in the installed orientation:
From the Rear:
Showing the rear hook that goes on the bolt head:
Wind the window down
You can now see the hinge - here are the rightmost 3 of the 4 fasteners:
The outside pair are allen head machine bolts that connect to the handle part, the inside 2 are 10mm nuts that fasten the hinge to the door via captive bolts on the door. Here are the left most 2 of 4:
Remove the swivel adjustable link - the bottom is easiest to remove - use a medium flat blade screwdriver to pop it off:
Tape the handle to the car so it cant fall off:
Remove the handle (outer) connections first (the right side is easy - straight shot):
Its easiest if you lubricate all these just after you break them free - that way you can do more work with your fingers - room for tools is very tight...
The left side is much more challenging:
Then remove the hinge - the 10mm nuts are easier (still fiddly). This hinge is broken in the typical - weak spot - position:
Here are the handle ends in situ:
Replacement parts:
Heres the handle removed from its natural habitat:
Reassembly is the opposite flow - Generally I found reassembly to be quicker (everything was clean and lubed and moved much more easily
The only part harder than dissassembly was getting the security plate back in. It barely fits so its awkward anyway - and the bolt behind the plate has a washer under it - this is a horrible choice - getting the plate back under it is very difficult...
Porsche should have just used a bolt with a flanged head...
Anyway as a solution I taped the washer to the head (slightly) with masking tape and used the tape as a "ramp" to get the plate's flage under the bolt/washer - helped a lot.
Many have left the security plate out - I can see why now...
Great to be able to just open the door again
Alan
Last edited by Alan; 01-20-2013 at 05:18 PM.
 01-20-2013, 09:54 AM
#2
Three Wheelin'
Join Date: May 2007
Location: Newcastle upon Tyne. England
Posts: 1,365
Received 71 Likes
on
40 Posts
Did this PITA job two years ago, and looking at your pics it looks a lot easier than my UK RHD car.., there is pressed sheet metal covering the whole area where yours is (totally different inner door skin) , so in reality I was working completely blind.. you can.t even see the A/T plate.
H,mm different doors.., for different shores ???
Ken
80 928 S
5 Speed
UK
H,mm different doors.., for different shores ???
Ken
80 928 S
5 Speed
UK
01-20-2013, 11:12 AM
#3
Drifting
Great write up Alan...I have done both doors on my car but will have more to replace soon. It is a tight fit in there and those with big hands...even worse. I have rather small hands and that helps.
01-20-2013, 11:19 AM
#4
Electron Wrangler
Lifetime Rennlist
Member
Lifetime Rennlist
Member
Thread Starter
Probably the same across shores but different by years... I have no idea when the change happened but maybe someone can chime in? Actually now I think about it - I wonder if the side protection beam is different for ROW cars - that might change this...
This was really a pain, but turns out I had all the tools needed - but some tools I thought would be good just didn't fit.
I also stocked up on sound insulation panels (second skin) and door panel reinforcements (928 Intl)so those will also go in before its all done (mostly completed now).
Alan
This was really a pain, but turns out I had all the tools needed - but some tools I thought would be good just didn't fit.
I also stocked up on sound insulation panels (second skin) and door panel reinforcements (928 Intl)so those will also go in before its all done (mostly completed now).
Alan
01-20-2013, 11:23 AM
#5
Rennlist Member
Great pic's. Alan! That's not easy with black cars, light just get absorbed or turned into nasty reflections.
And many thanks for the writeup, I've filed it away, I am sure it will come in handy!

And many thanks for the writeup, I've filed it away, I am sure it will come in handy!
01-20-2013, 11:24 AM
#6
Team Owner
Nice writeup Alan, and great pictures.
I would add a few ideas to your post.
before removing the hinge plate,
tape the door handle into position and leave it there, Use Blue tape as Alan has done.
I put tape longways so the handle wont move,
this way, it will not require any adjustment when the new hinge is installed.
The tape holds the door handle in place.
Just make sure the handle is centered in the handle cutout prior to taping it.
After installing the new hinge, spray lube the door striker/latch mechanism from inside the door.
Use good quality oil not WD40,
this should let the mechanism work with less effort thus lessening the chance of breaking the new hinge.
Make sure to adjust the small tierod so the handle opens the latch sooner rather than later.
This will lessen the chance of snapping the new part
To open the door lift the handle till the door unlatches then without pulling up any further on the handle, open the door by pulling outwards on the handle instead of up.
After replacing one of these hinges you will be more cognizant of how you open the door
This may seem silly but it will lessen the amount of strain placed on your new hinge plate.
Alan Thanks again for taking the time to post these great pictures and writeup
Ken it would be interesting to see the cover that your talking about,
I would think that the theft covers are similar, and you may not have realized it could be removed to swap out the hinge on the right door.
But hey I have never seen the inside of a RHD car door, so maybe you can teach us something.
Trending Topics
01-20-2013, 11:51 AM
#8
Electron Wrangler
Lifetime Rennlist
Member
Lifetime Rennlist
Member
Thread Starter
You'll note no tools are depicted, I didn't have any hands left or room available to do the "Dwayne style shots"
Aside from my intent to help others with the same ailment, (I had a write up that helped a bit - but no pictures - so when it says "undo the 2 screws" you don't know which ones...) I know that I will almost certainly need to do my passenger side at some point later... and with memory being what it is...

I think I could shave about 45mins off next time...
Alan
01-20-2013, 12:09 PM
#9
Three Wheelin'
Join Date: May 2007
Location: Newcastle upon Tyne. England
Posts: 1,365
Received 71 Likes
on
40 Posts
Nice writeup Alan, and great pictures.
I would add a few ideas to your post.
before removing the hinge plate,
tape the door handle into position and leave it there, Use Blue tape as Alan has done.
I put tape longways so the handle wont move,
this way, it will not require any adjustment when the new hinge is installed.
The tape holds the door handle in place.
Just make sure the handle is centered in the handle cutout prior to taping it.
After installing the new hinge, spray lube the door striker/latch mechanism from inside the door.
Use good quality oil not WD40,
this should let the mechanism work with less effort thus lessening the chance of breaking the new hinge.
Make sure to adjust the small tierod so the handle opens the latch sooner rather than later.
This will lessen the chance of snapping the new part
To open the door lift the handle till the door unlatches then without pulling up any further on the handle, open the door by pulling outwards on the handle instead of up.
After replacing one of these hinges you will be more cognizant of how you open the door
This may seem silly but it will lessen the amount of strain placed on your new hinge plate.
Alan Thanks again for taking the time to post these great pictures and writeup
Ken it would be interesting to see the cover that your talking about,
I would think that the theft covers are similar, and you may not have realized it could be removed to swap out the hinge on the right door.
But hey I have never seen the inside of a RHD car door, so maybe you can teach us something.
I would add a few ideas to your post.
before removing the hinge plate,
tape the door handle into position and leave it there, Use Blue tape as Alan has done.
I put tape longways so the handle wont move,
this way, it will not require any adjustment when the new hinge is installed.
The tape holds the door handle in place.
Just make sure the handle is centered in the handle cutout prior to taping it.
After installing the new hinge, spray lube the door striker/latch mechanism from inside the door.
Use good quality oil not WD40,
this should let the mechanism work with less effort thus lessening the chance of breaking the new hinge.
Make sure to adjust the small tierod so the handle opens the latch sooner rather than later.
This will lessen the chance of snapping the new part
To open the door lift the handle till the door unlatches then without pulling up any further on the handle, open the door by pulling outwards on the handle instead of up.
After replacing one of these hinges you will be more cognizant of how you open the door
This may seem silly but it will lessen the amount of strain placed on your new hinge plate.
Alan Thanks again for taking the time to post these great pictures and writeup
Ken it would be interesting to see the cover that your talking about,
I would think that the theft covers are similar, and you may not have realized it could be removed to swap out the hinge on the right door.
But hey I have never seen the inside of a RHD car door, so maybe you can teach us something.
Ken
80 928 S
5 Speed
UK
01-21-2013, 03:24 PM
#10
Electron Wrangler
Lifetime Rennlist
Member
Lifetime Rennlist
Member
Thread Starter
... Before removing the hinge plate,
tape the door handle into position and leave it there, Use Blue tape as Alan has done.
I put tape longways so the handle wont move,
this way, it will not require any adjustment when the new hinge is installed.
The tape holds the door handle in place.
Just make sure the handle is centered in the handle cutout prior to taping it.
Alan
01-21-2013, 04:19 PM
#12
I did this more than a year ago and it took about 3 hours. Not bad actually on an 86. Same setup. Getting the plate back up was rather easy but I guess we had beginner's luck. Putting back the panels was the hard part, some of them wouldn't lock in place. Ended it up getting them all fitted upon retracing what we screwed in was wrong.
01-21-2013, 04:23 PM
#13
Electron Wrangler
Lifetime Rennlist
Member
Lifetime Rennlist
Member
Thread Starter
I have about 125K, ~daily use for last 12 years - nowhere near as much before that...
Alan
Last edited by Alan; 01-21-2013 at 05:18 PM.
01-21-2013, 04:50 PM
#14
Addict
Lifetime Rennlist
Member
Lifetime Rennlist
Member
Yes, I did this - 3 turns is all it takes to remove the slack and now the door opens on the early part of the upswing so there is less stress on the hinge.
01-21-2013, 11:28 PM
#15
Electron Wrangler
Lifetime Rennlist
Member
Lifetime Rennlist
Member
Thread Starter
BTW - I think the worst thing you can do to the hinge is to raise the handle up high and then just release it so it snaps back - you can hear the metalic clunk... I know this has happened to mine on a couple of occasions when my fingers just slipped off the handle - avoid this...!
If you can (lift it less - Stan's point - and) gently release it you will prolong its life...
I don't recall this preceding the actual break - but its possible it starts off a stress fracture that takes time to propagate...
Alan
If you can (lift it less - Stan's point - and) gently release it you will prolong its life...
I don't recall this preceding the actual break - but its possible it starts off a stress fracture that takes time to propagate...
Alan