
Ott Fender Flare Install - Pic Intensive
 11-18-2008, 03:52 AM
#1
Rennlist Member
Thread Starter
A huge thanks to Ken Osage for kicking my tail in gear to get this project done. He graciously gave his time, tools, and shop space to get this project cranked out. Also thanks to John Davis for his assistance and expertise as well. John was kind enough to handle the grind work on the first flare to show me how it needs to go, handled a lot of the detail work and was key when it came to doing the actual body work. Tom Middleton also came out and helped with the bodywork and sanding, and helping with removing panels, etc. We worked Wednesday and Thursday evening, took Friday off, and then on Saturday and Sunday. All told, I think we had three five hour days and one three hour day, so about 18 hours.
Oh and another thing. Louie provides a very nice 20+ page instruction manual on how to put these things on, but being typical men in a serious man cave, we never looked at it. So Louie if you read this, sorry if we messed up somewhere. I can say that I'm very happy with your product, and am indebted to Ken, John, and Tom for their gracious generosity of their time. It was truly a group effort, and would have taken me months to do this on my own.
Thanks guys.
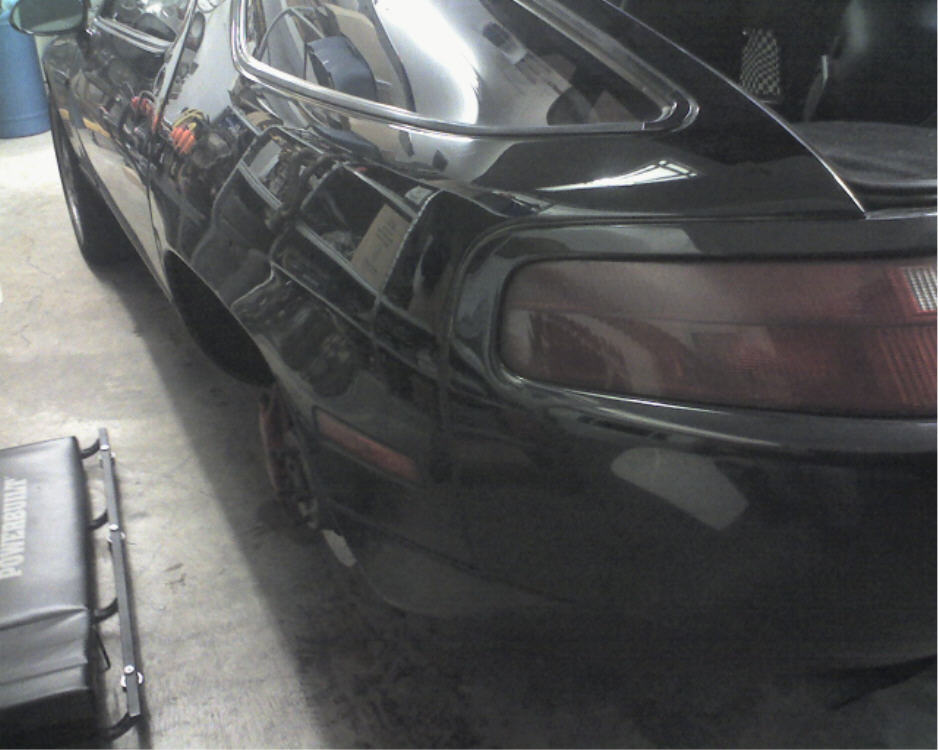
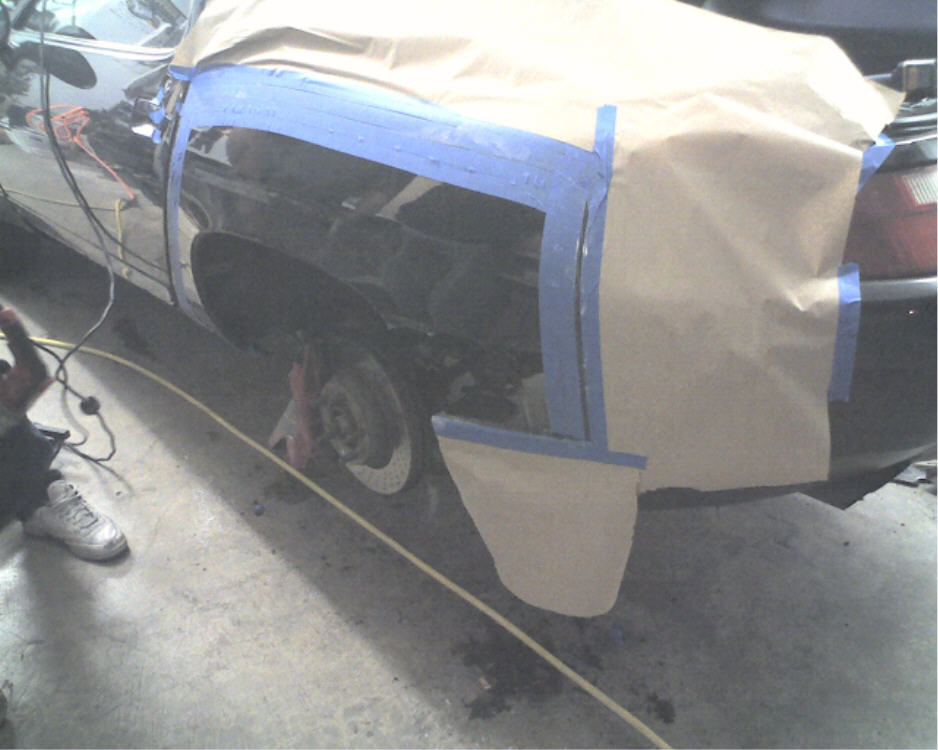
Before shot:
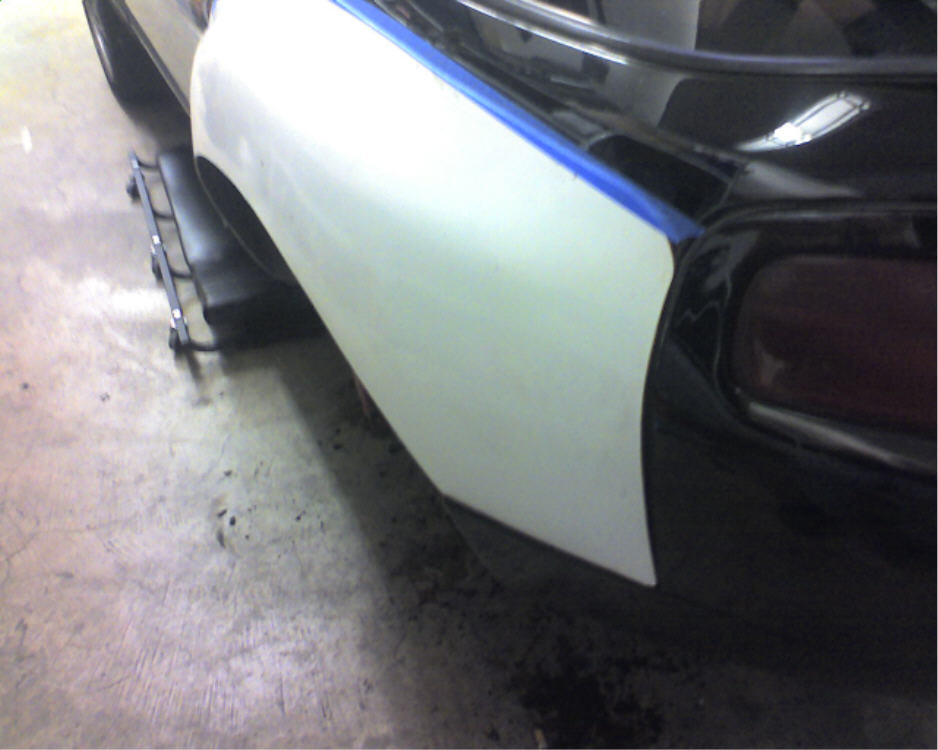
Test fit - taped on the flare:
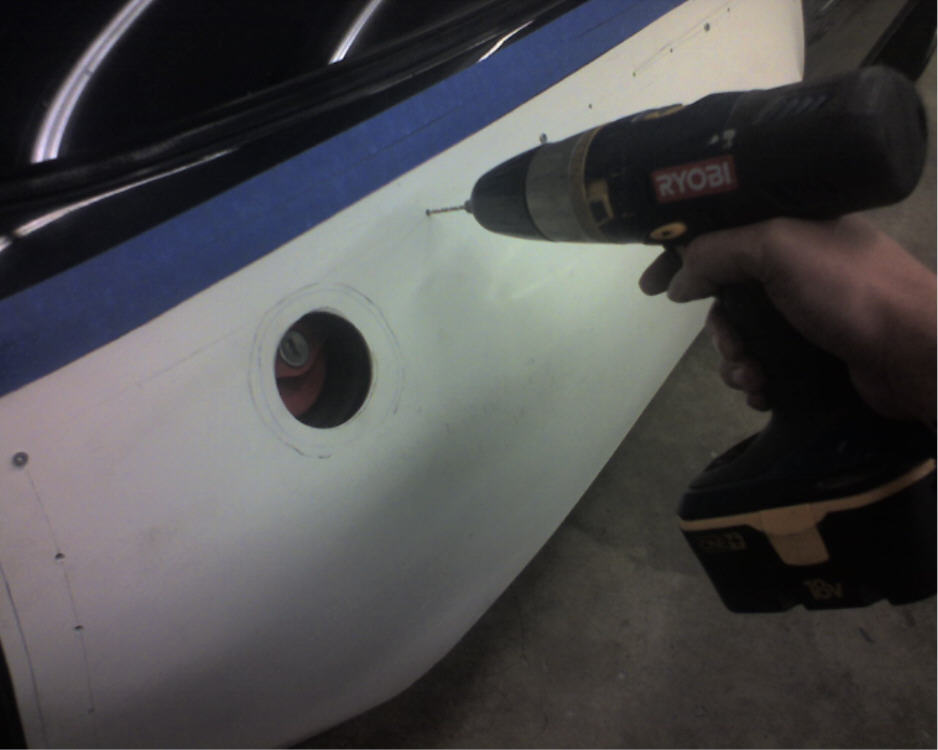
Drill pilot holes and screw in the panel (these will be used to hold the fender in place while epoxy cures) and then remove all but a couple to hold the fender up:
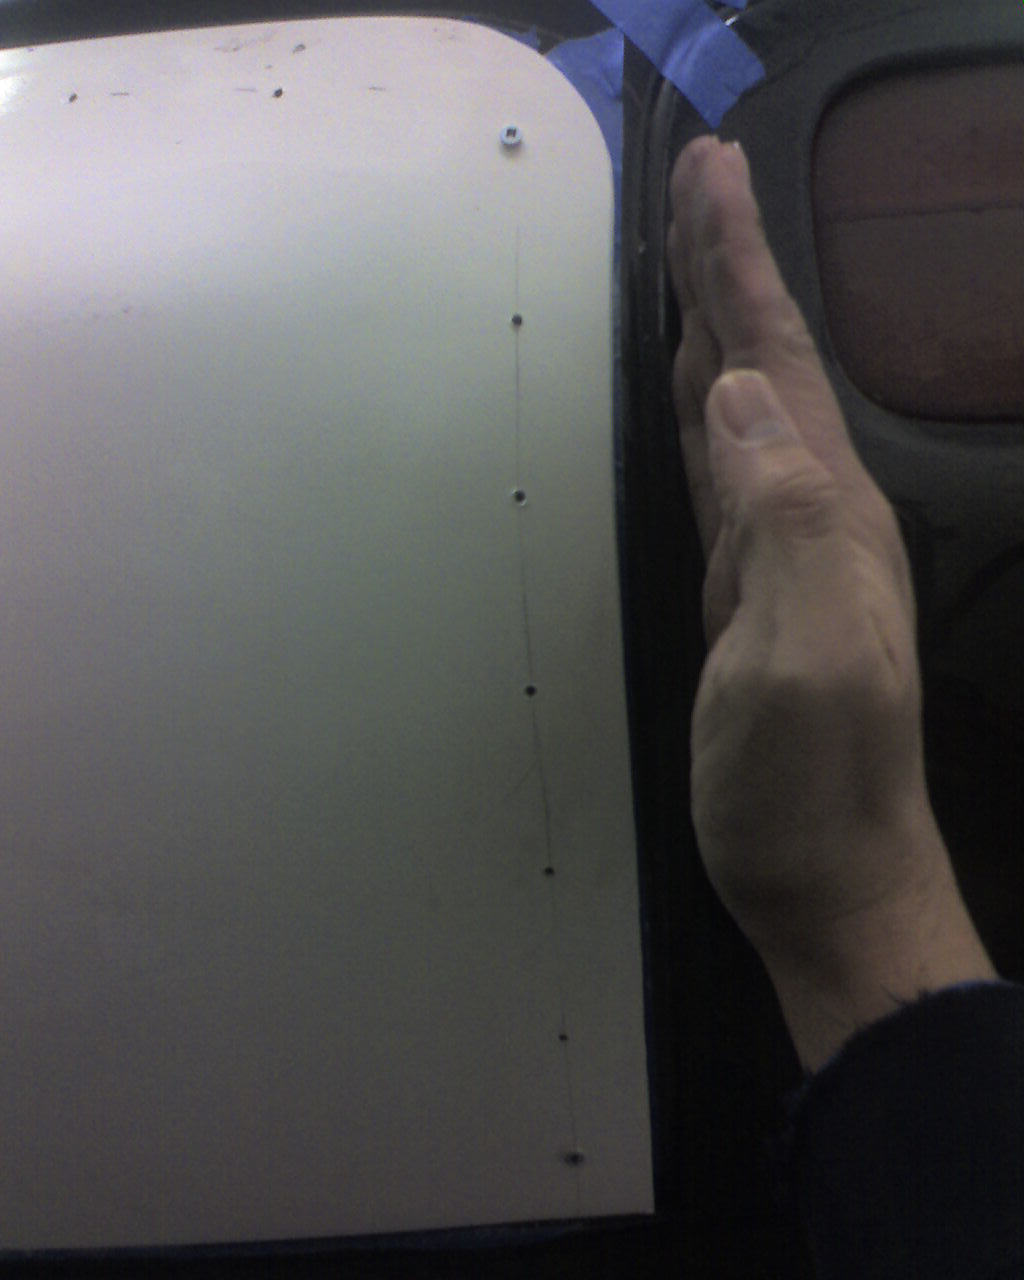
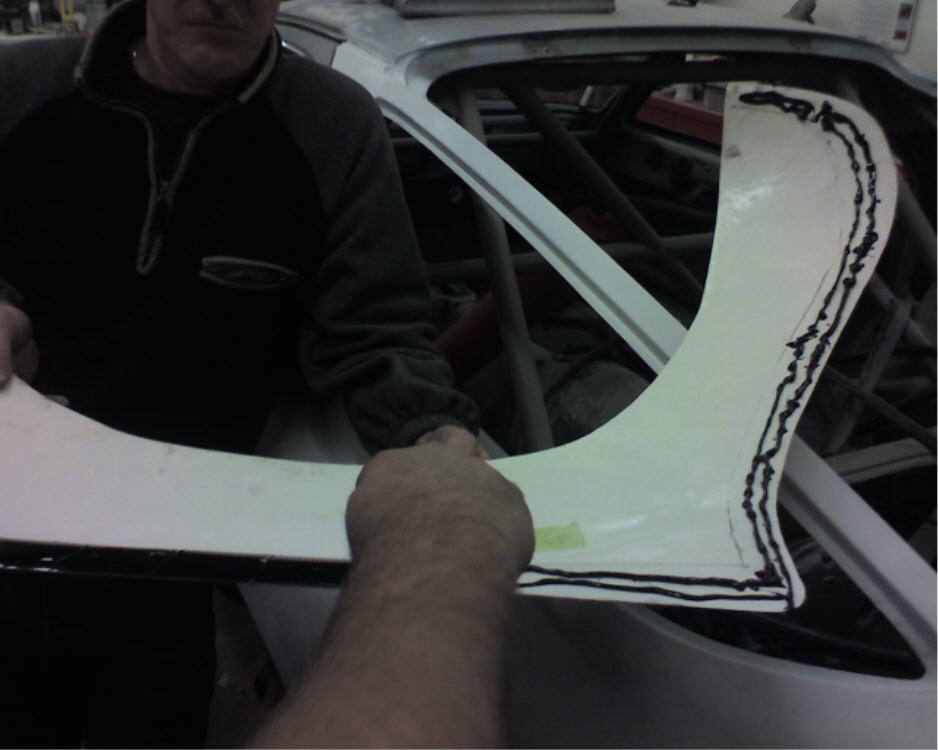
Louie makes the fenders to go all the way from the door opening to the rear bumper cover welt. Ken and John thought it best to grind the fender back about a 3/8" to allow the panel to be feathered into the original fender shape.
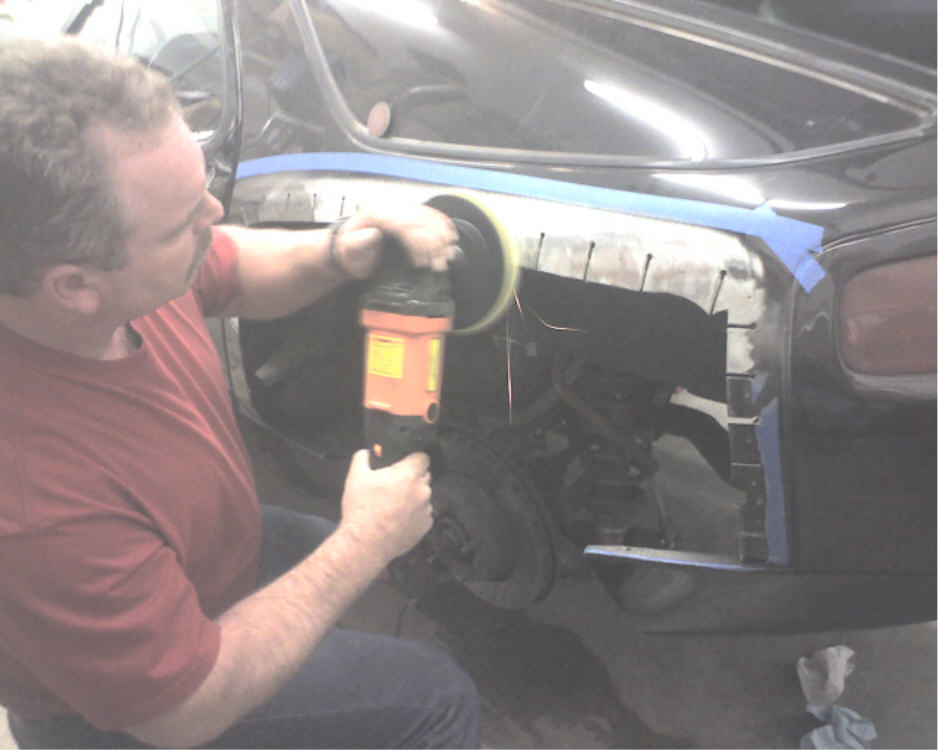
Here I'm grinding the front and rear 3/8" edge off the panel. The contact surface (about the outer 2" perimeter) is also grinded on the inner surface of the flare, so that when bonded on the edge will be as flush as possible.
The fender is re-screwed on after being grinded to shape, and the outline is taped and papered. The fender is then removed leaving our "template" of where to cut.
Here's Ken getting down to business and cutting out the native panel.

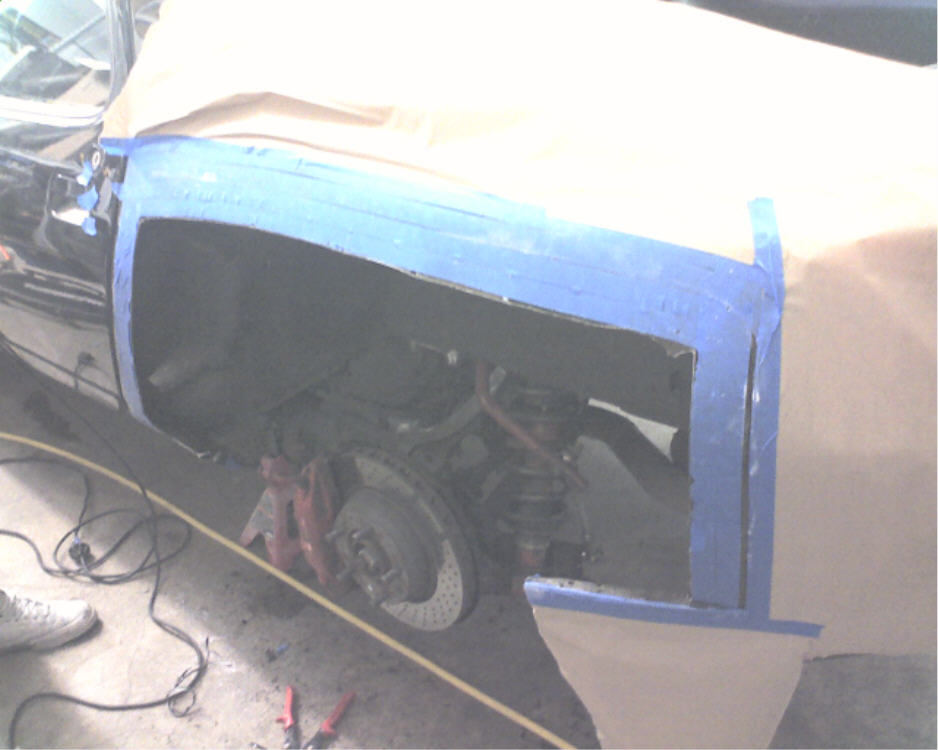
When all is said and done, you are looking at one sizable hole.
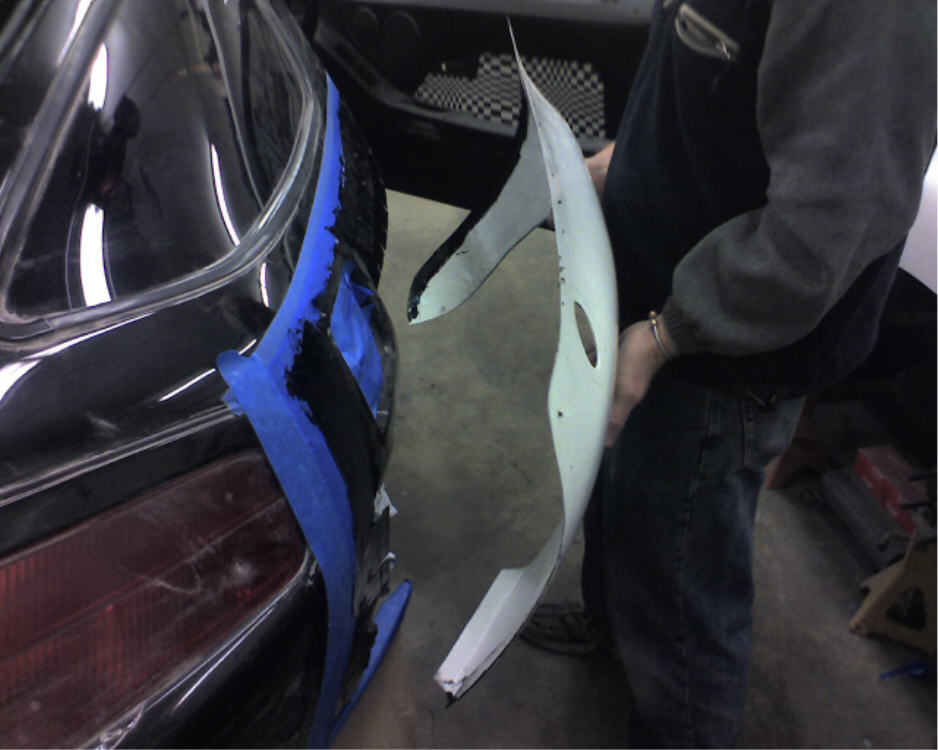
Next, Ken drilled holes 2” in from the edge and a few inches apart to serve as a guide for cutting the mounting tabs in the native panel.
After the tabs were cut, the paint was stripped off. We came to the conclusion that the area should be stripped first before the tabs are cut, as the sides of the tabs tended to shred the sanding discs.
After stripping the tabs are manipulated to bend out to meet the contours of the flare.
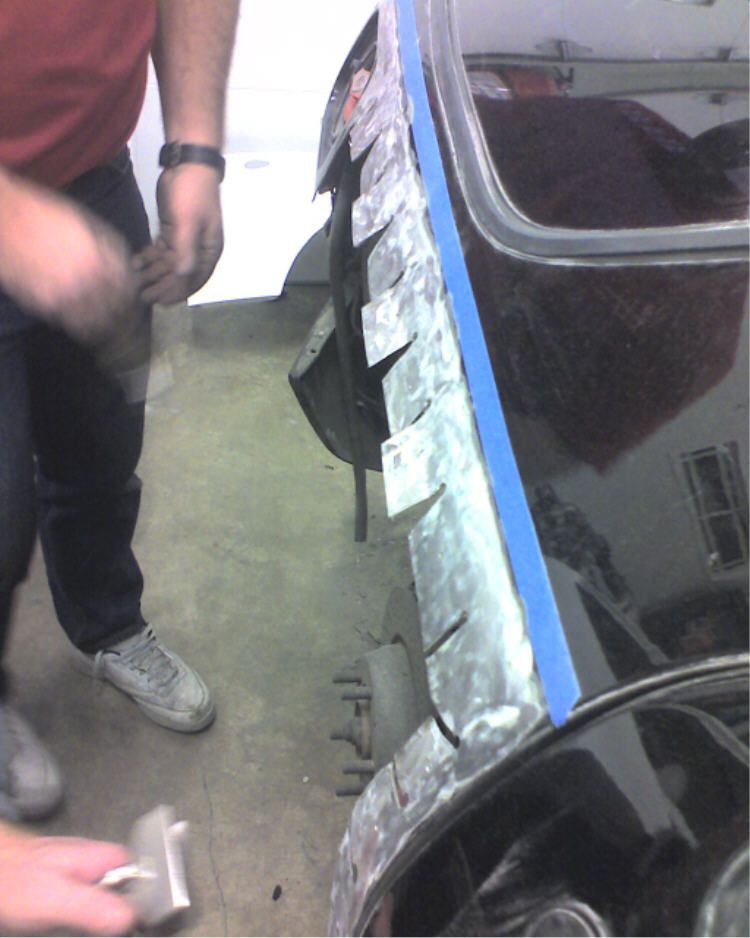
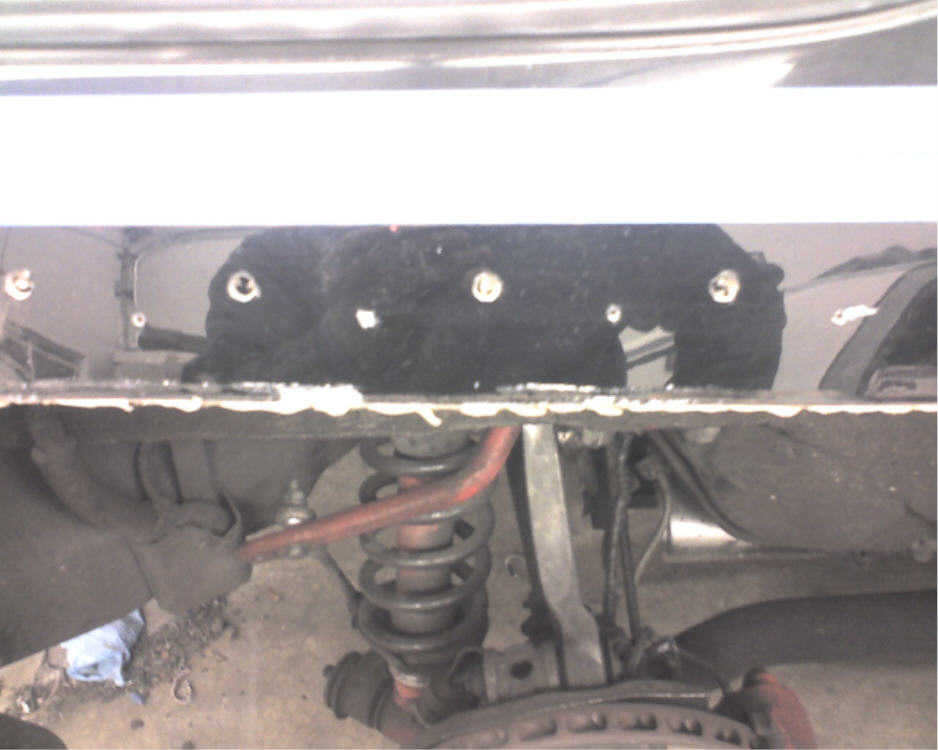
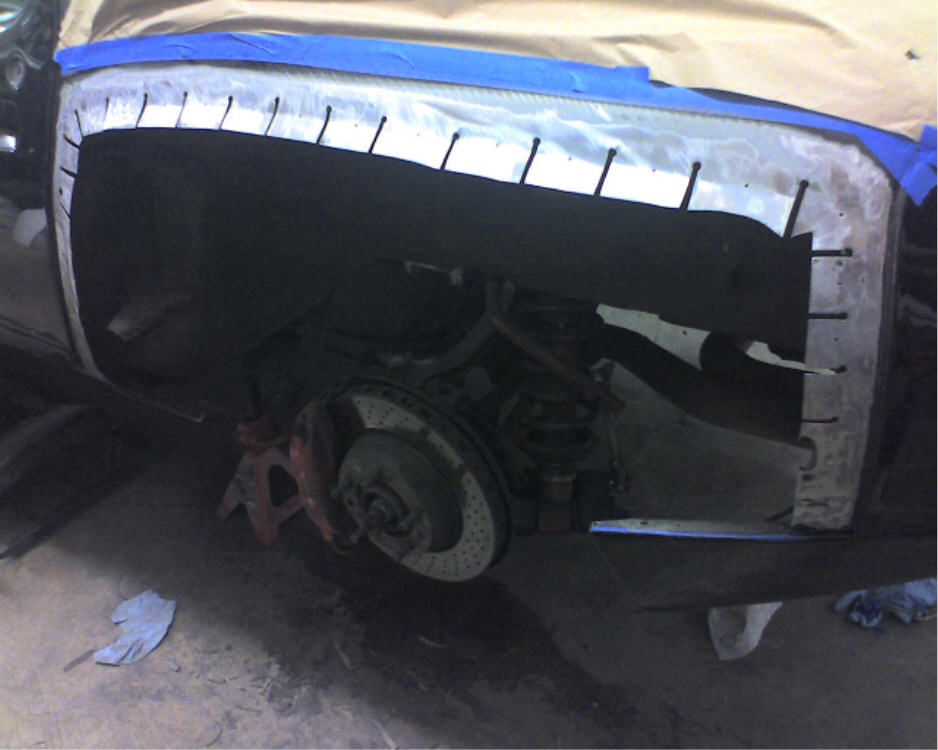
Here is the completed opening with tabs all bent to shape.
We are now ready to bond the fender on. Epoxy goes on the tabs first.
We then put the epoxy on the fender mating surface that was flared with grinder earlier.
With both panel and fender epoxied, its time to put them together. John was on the case.
Once the fenders are hung, its time to screw them into place. This holds the flares tight against the quarter panel while the epoxy sets.

The epoxy set overnight, the screws were removed, and the joint where the flare meets the quarter panel was ground flush.
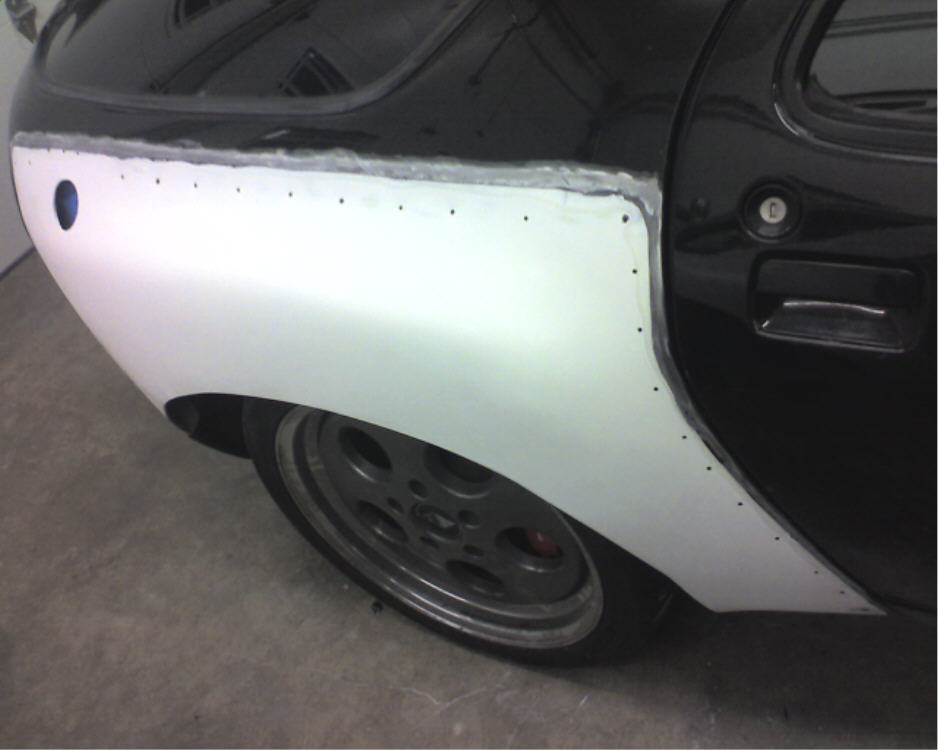
The first layer of filler is put on the joint. I’ve haven’t done body work in probably 20 years, and I’ve got to tell you filler has come a long way. This stuff had fiberglass and Kevlar in it. It spread really nicely and when it came to sanding it fell to the floor in small granules as opposed to getting airborne as dust. Very nice to work with, and fast to take down. I didn't have a respirator on, and to my suprise wasn't sneezing bondo dust for days afterward.
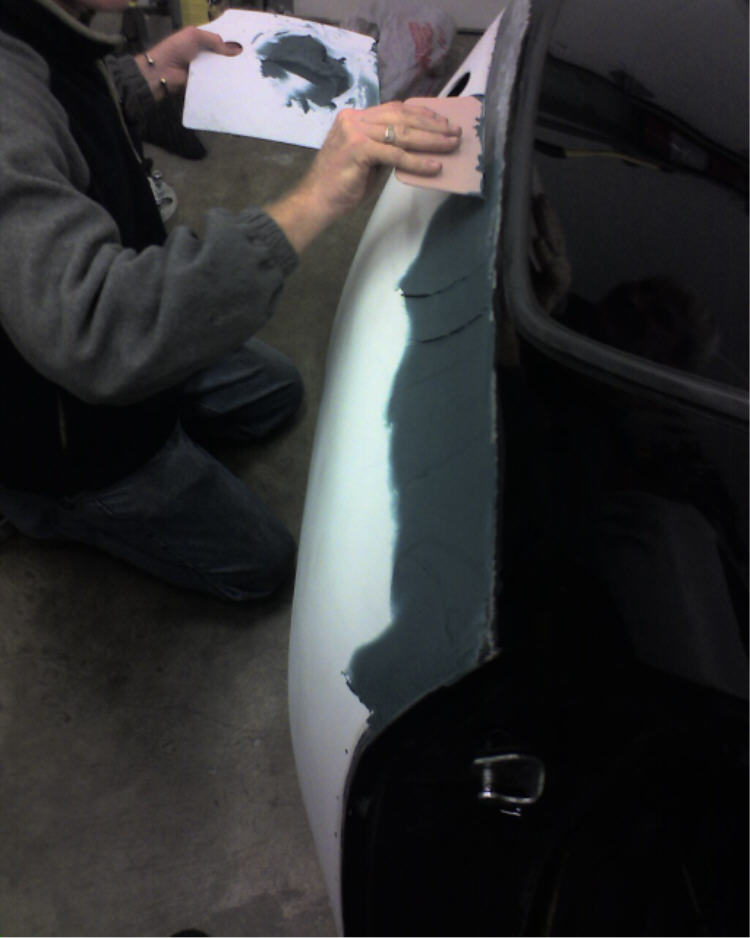
After that layer is flared flush, there really isn’t too much left on the panel.
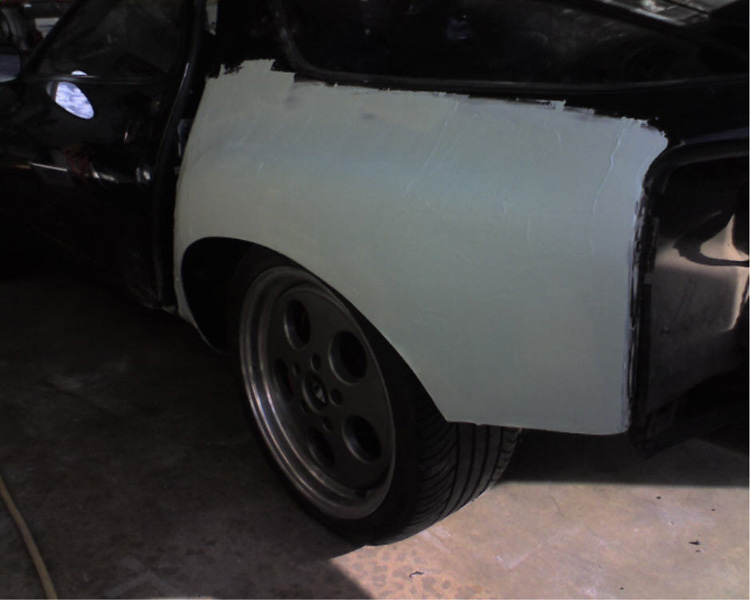
Next comes a top coat of lightweight filler. The entire flare is covered, but what I don’t have a pic of is what it looked like when sanding was complete. There really wasn’t a lot left on.
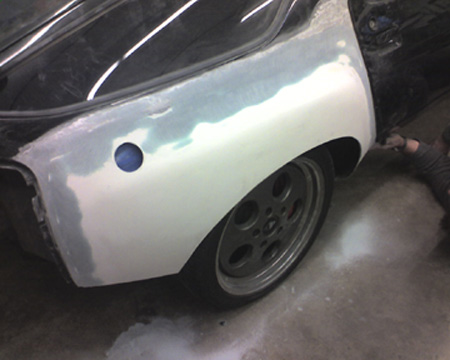
Filler/primer was sprayed on, and then a thin coat of black primer just for the sake of color matching was added. There is still some final shaping and sanding to do, but its about 95% done.

Oh and another thing. Louie provides a very nice 20+ page instruction manual on how to put these things on, but being typical men in a serious man cave, we never looked at it. So Louie if you read this, sorry if we messed up somewhere. I can say that I'm very happy with your product, and am indebted to Ken, John, and Tom for their gracious generosity of their time. It was truly a group effort, and would have taken me months to do this on my own.
Thanks guys.
Before shot:
Test fit - taped on the flare:
Drill pilot holes and screw in the panel (these will be used to hold the fender in place while epoxy cures) and then remove all but a couple to hold the fender up:
Louie makes the fenders to go all the way from the door opening to the rear bumper cover welt. Ken and John thought it best to grind the fender back about a 3/8" to allow the panel to be feathered into the original fender shape.
Here I'm grinding the front and rear 3/8" edge off the panel. The contact surface (about the outer 2" perimeter) is also grinded on the inner surface of the flare, so that when bonded on the edge will be as flush as possible.
The fender is re-screwed on after being grinded to shape, and the outline is taped and papered. The fender is then removed leaving our "template" of where to cut.
Here's Ken getting down to business and cutting out the native panel.
When all is said and done, you are looking at one sizable hole.
Next, Ken drilled holes 2” in from the edge and a few inches apart to serve as a guide for cutting the mounting tabs in the native panel.
After the tabs were cut, the paint was stripped off. We came to the conclusion that the area should be stripped first before the tabs are cut, as the sides of the tabs tended to shred the sanding discs.
After stripping the tabs are manipulated to bend out to meet the contours of the flare.
Here is the completed opening with tabs all bent to shape.
We are now ready to bond the fender on. Epoxy goes on the tabs first.
We then put the epoxy on the fender mating surface that was flared with grinder earlier.
With both panel and fender epoxied, its time to put them together. John was on the case.
Once the fenders are hung, its time to screw them into place. This holds the flares tight against the quarter panel while the epoxy sets.
The epoxy set overnight, the screws were removed, and the joint where the flare meets the quarter panel was ground flush.
The first layer of filler is put on the joint. I’ve haven’t done body work in probably 20 years, and I’ve got to tell you filler has come a long way. This stuff had fiberglass and Kevlar in it. It spread really nicely and when it came to sanding it fell to the floor in small granules as opposed to getting airborne as dust. Very nice to work with, and fast to take down. I didn't have a respirator on, and to my suprise wasn't sneezing bondo dust for days afterward.
After that layer is flared flush, there really isn’t too much left on the panel.
Next comes a top coat of lightweight filler. The entire flare is covered, but what I don’t have a pic of is what it looked like when sanding was complete. There really wasn’t a lot left on.
Filler/primer was sprayed on, and then a thin coat of black primer just for the sake of color matching was added. There is still some final shaping and sanding to do, but its about 95% done.
Last edited by atb; 11-18-2008 at 04:14 AM.
 11-18-2008, 04:28 AM
#2
Rennlist Member
Thread Starter
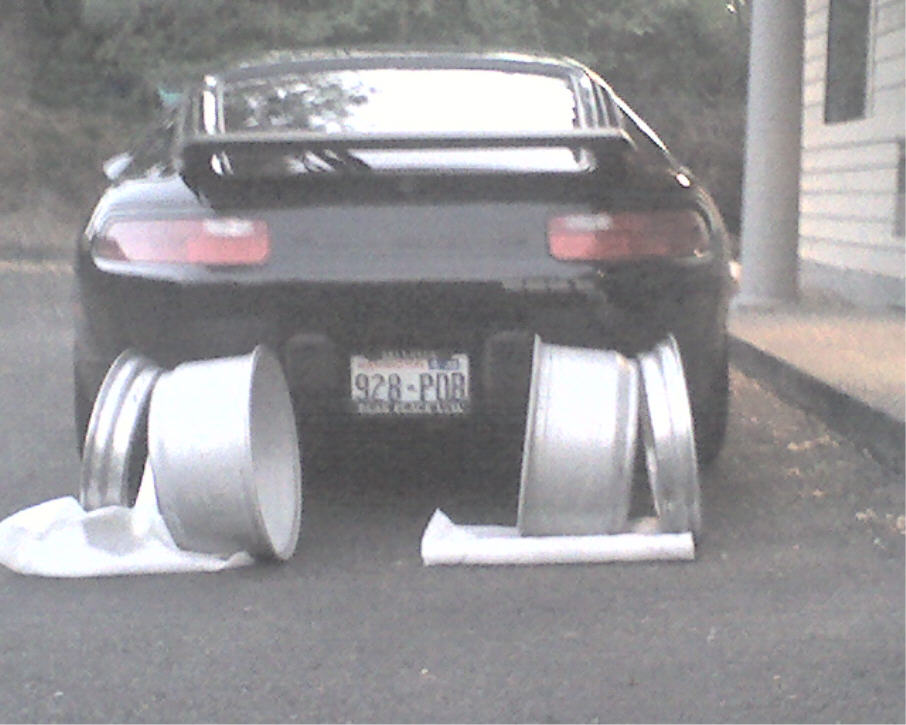
And just a quick reminder to those of you thinking about making a crack about how skinny my rear wheels look now, remember I have these waiting to go on. 
11-18-2008, 04:51 AM
#3
Cottage Industry Sponsor
Lifetime Rennlist
Member
Lifetime Rennlist
Member

That's a pretty involved process! Thanks for taking the time to document it.
One question, though: How did you seal the blank metal tabs on the inside of the fender? They look "blackened" in one of the pictures, but I can't really tell what was put on them.
Will these use the Strosek Center pieces?
One question, though: How did you seal the blank metal tabs on the inside of the fender? They look "blackened" in one of the pictures, but I can't really tell what was put on them.
Will these use the Strosek Center pieces?
11-18-2008, 05:14 AM
#4
Rennlist Member
Great pictures. Ditto on Nicole's questions.
How is rust prevention handled on surfaces that have been cut or drilled or sanded and sandwiched under the new materials? Maybe its an autobody 101 question, but thats my level.
Really nice flares.
How is rust prevention handled on surfaces that have been cut or drilled or sanded and sandwiched under the new materials? Maybe its an autobody 101 question, but thats my level.
Really nice flares.
11-18-2008, 10:09 AM
#6
Rennlist Member
Thread Starter
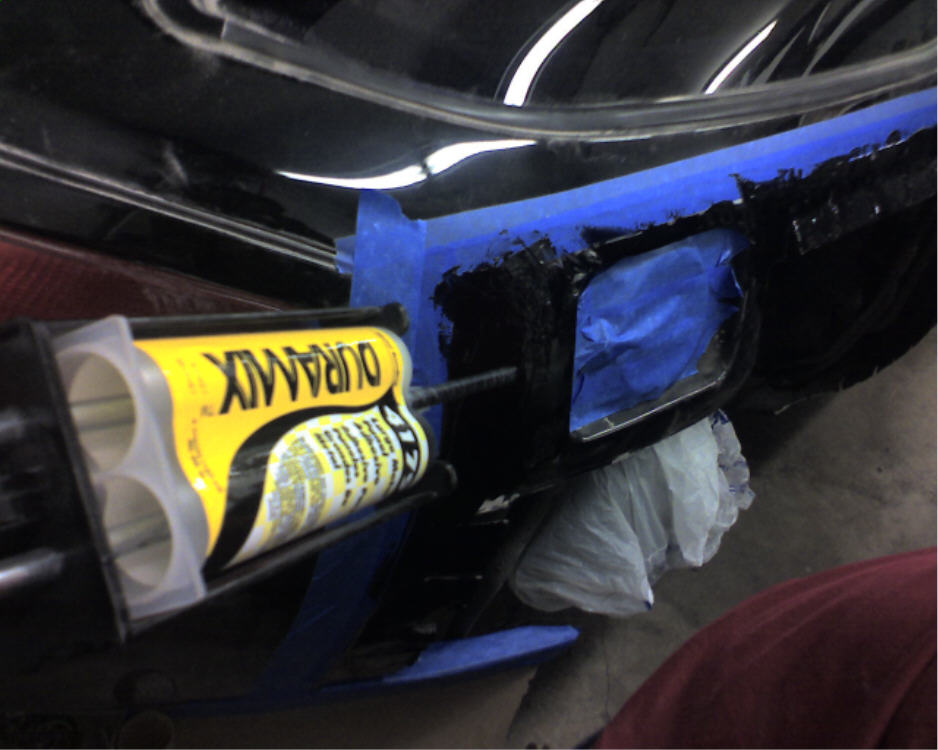
Louie recommends using the Duramix 4179 bonding agent. I know he had put a lot of time researching what to use to glue these on. I mistakenly referred to it as "epoxy" in my description above, but I believe it is actually urethane. When I helped Louie put his own fenders on, he had mentioned to spread the Duramix liberally over all the exposed metal as it would prevent any rust.
Louie if you see this maybe you could chime in with more details.
And yes Nicole, I'm sticking with the Strosek centers. I found a rennlist member who had a personal stash of various widths of OZ hoops and was kind enough to part with some of them.
Louie if you see this maybe you could chime in with more details.
And yes Nicole, I'm sticking with the Strosek centers. I found a rennlist member who had a personal stash of various widths of OZ hoops and was kind enough to part with some of them.
Trending Topics
11-18-2008, 12:14 PM
#9
Rennlist Member
Thread Starter
Ken owns a sign fabrication company, so all tools you could possibly need but would never own were right there. It also helps having a few extra pairs of hands to work both sides of the car at once.
On the gas cap work, there hasn't been any yet.
I'm deciding how to proceed with that, there's just an access hole right now. Louie fabricated an extension that takes the filler neck all the way out to the flare and uses an aviation gas cap. I'm going to maintain the stock gas cap because 1) I have emissions ****'s that do a gas cap inspection and I don't want confuse them any more then they already are; and 2) I think building an access door in the fender flare won't be too hard to do. I was initially going to install a round gas cap door that seems to be so popular on cars these days., but in looking at the situation I'm pretty sure I can massage the stock door to match the curve of the flare and maybe just change the hinge location.
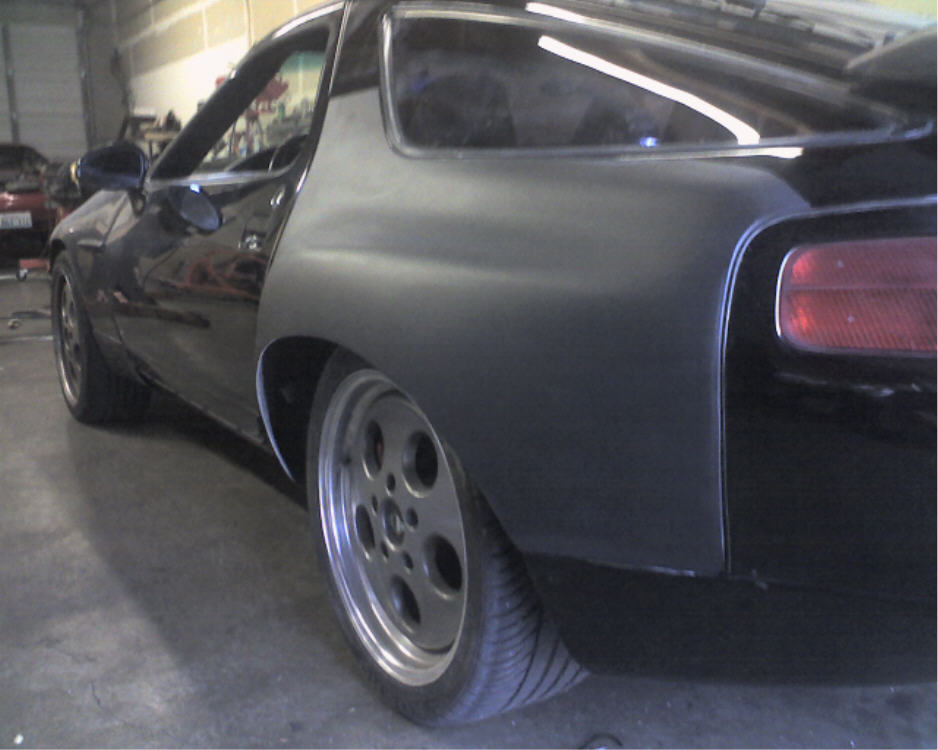
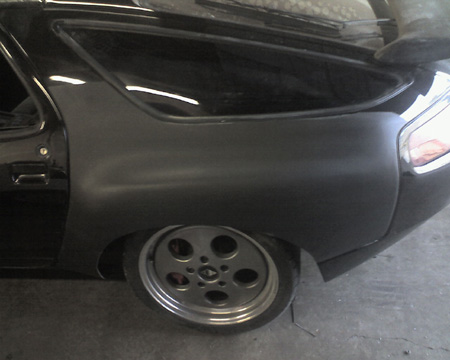
Thanks for the compliment BPG. I'm very pleased with the results. I am a little bummed in that I've only been able to admire the handywork maybe a total of ten minutes. Unfortunately I was in a rush to get to an awards banquet for my son when we finished on Sunday night. I had a few minutes to admire our work after the black primer was sprayed on and then had to drive the car back to me and Tom's shop, and then immediately had to go to the dinner. I dropped by the shop yesterday for about five minutes to snap the last three shots above. I really haven't had a chance to take in the new mods for any length of time, but as you can see from the pics, they do look nice.
Sterling, time to pull out the measuring tape. Whose shark has more back?
 11-18-2008, 02:10 PM
#12
On the Bandwagon
Rennlist Member
Rennlist Member
Looks Great!
Quick question - by drilling the mounting holes before cutting the slots and flaring, did you experience any misalignment once the tabs were bent?
Quick question - by drilling the mounting holes before cutting the slots and flaring, did you experience any misalignment once the tabs were bent?
11-18-2008, 02:19 PM
#13
Rennlist Member
Thread Starter
Thanks for the compliments guys.
No alignment issues Ken. When forming the tabs, the bend was made right at the screw hole. We used a dental tool to find the upper two corner holes because all of the holes spew expoxy when you initially fit the fender, but after driving in the top corner screws all the other holes lined up perfectly.
No alignment issues Ken. When forming the tabs, the bend was made right at the screw hole. We used a dental tool to find the upper two corner holes because all of the holes spew expoxy when you initially fit the fender, but after driving in the top corner screws all the other holes lined up perfectly.
11-18-2008, 04:59 PM
#14
Three Wheelin'
Louie recommends using the Duramix 4179 bonding agent. I know he had put a lot of time researching what to use to glue these on. I mistakenly referred to it as "epoxy" in my description above, but I believe it is actually urethane. When I helped Louie put his own fenders on, he had mentioned to spread the Duramix liberally over all the exposed metal as it would prevent any rust.
Louie if you see this maybe you could chime in with more details.
And yes Nicole, I'm sticking with the Strosek centers. I found a rennlist member who had a personal stash of various widths of OZ hoops and was kind enough to part with some of them.
Louie if you see this maybe you could chime in with more details.
And yes Nicole, I'm sticking with the Strosek centers. I found a rennlist member who had a personal stash of various widths of OZ hoops and was kind enough to part with some of them.
Great job on the install!!

Let's see, you didn't look at the instructions and did it exactly like the instructions show? So then, It's so easy I wasted my time on the instructions?

I'll try to answer some of the questions. I used Duramix for adhesive and it is urethane. The Duramix company has been bought by 3M and seems to be not so easy to find anymore. 3M appears to be closing down the product line, or not pushing it much. You can find it here. http://www.crestnetsales.com/metalbonding.htm
I'm sure other products will work as well. The reasons I chose this particular product is that it is a metal/composite panel adhesive. That's it's purpose and is what I needed. The 4179 type has a working life of 1 hour and if working by yourself you need all of that hour to get the adhesive spread and the fender on. It comes in a self mixing cartridge so no external mixing needed. It does not sag when put on a vertical surface. This no sag property is very important. One other person I know of used epoxy adhesive. That should work, but epoxy can sag and run on a vertical surface. If you can come up with a solution for that, epoxy should work. Don't use any polyester based substance as it isn't a good adhesive and shrinks during the cure.
Sealing the bond area and the edges of metal is important so rust doesn't start. The bonding adhesive squeezes out all around the edges, but it is still important to check the underside before the adhesive begins to get stiff. Smooth out the adhesive bulges between the sections and be certain there are no gaps. Use a 1" wide paint brush with half the bristle length cut off. One important point Adam didn't mention is to be sure the inside of the fender is clean. Like medically clean. Wire brush the dirt, use cleaner like 409, stiff brush, air pressure, degreaser type solvent, lacquer thinner, whatever you can find. The inside has the usual rubbery coating and that has to be clean. After the adhesive has cured and is hard, go back inside and apply undercoating. Use the flexible type. I may have used the flexible urethane pickup bed coating. It comes in spray cans. Spray on a coat and work it in with a short bristle brush. Don't depend on the spray to get it into all surface irregularities. Spray on another coat when the first brushed in coat cures a little.
Guess that's about all I can add. I made a big mistake on mine in that I did it too quickly and didn't allow enough time to pass before I had it painted. From the time of putting on the newly layed up fenders to when it was painted was no more than 6 weeks. It looked great for 6 months. The new fillers Adam mentioned are great as compared to the lacquer based fillers we used before, but they still shrink. Looking carefully, I can see some of the holes where the screws held the fenders on and the line at the top where the fender meets the body. It's not bad, but waiting 6+ months before final primer and sanding would have prevented that. A real paint shop with curing oven would help too.
I like the look of the satin finish black primer. Paint your car black with satin clear coat? Gold pearl in the clear coat?