
Building new headers
 12-21-2013, 05:46 PM
#61
Addict
Rennlist Member
Rennlist Member
Thread Starter
Thanks for your post, have you got any pics you want to post in the thread?
 12-21-2013, 05:55 PM
#62
Addict
Rennlist Member
Rennlist Member
Thread Starter
I just measured the inconel number 5 pipe (pretty carefully), I think I will do volumes when they are all welded up but I got 625 mm and I then weighed the inconel no. 5 pipe versus the stainless no. 5 pipe, remember the stainless pipe is smaller in diameter by a fair margin but it is longer 725 mm about 4" difference.
Inconel no.5 616 grams
Stainless no.5 1292 grams
Inconel no.5 616 grams
Stainless no.5 1292 grams
12-22-2013, 05:51 AM
#64
Rennlist Member
Join Date: Feb 2011
Location: Mostly in my workshop located in Sweden.
Posts: 2,226
Received 442 Likes
on
244 Posts
Referring to the two first pictures in post #57, you sure have managed to get a tight fit. Understand that is of importance for properly welding the inconel. Good job, Greg.
�ke
�ke
12-28-2013, 01:12 AM
#65
Addict
Rennlist Member
Rennlist Member
Thread Starter
Some progress pics,


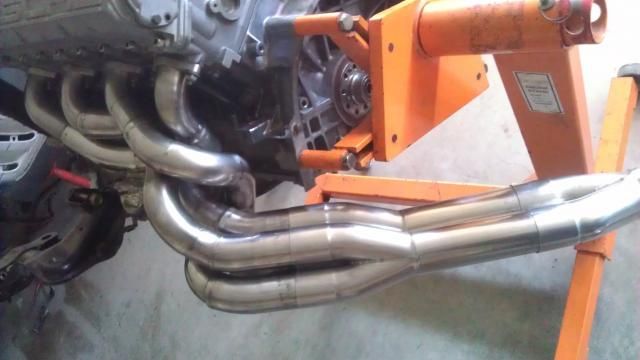
Still need to be welded, I will try to post more finished pics soon with weights and lengths.
Pipe weights;
No.5 = 618 grams
No.6 = 612 grams
No.7 = 608 grams
No.8 = 622 grams
Edit, pipe no. 5 weight changed when it was routed further in board, no real good reason for this except tighter packaging and as a result maybe this design can be used on LHD vehicles too. The approximate length of No.5 is 615 mm. I will do volumes when they are welded up.
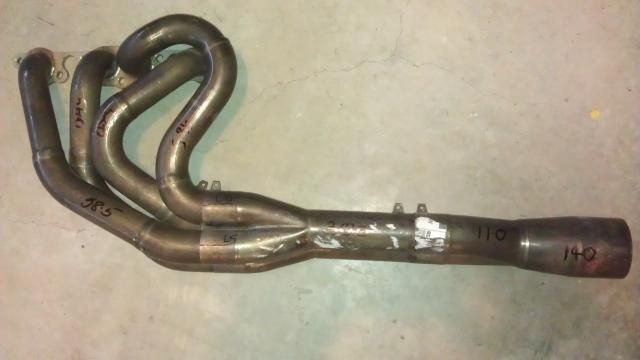
Below is the headers how I got them before they were cut up. You can see the lengths which average 560 mm. My target length is around 610 mm for the primaries.
Still need to be welded, I will try to post more finished pics soon with weights and lengths.
Pipe weights;
No.5 = 618 grams
No.6 = 612 grams
No.7 = 608 grams
No.8 = 622 grams
Edit, pipe no. 5 weight changed when it was routed further in board, no real good reason for this except tighter packaging and as a result maybe this design can be used on LHD vehicles too. The approximate length of No.5 is 615 mm. I will do volumes when they are welded up.
Below is the headers how I got them before they were cut up. You can see the lengths which average 560 mm. My target length is around 610 mm for the primaries.
Last edited by slate blue; 12-28-2013 at 05:50 AM.
 12-28-2013, 02:05 AM
#67
Archive Gatekeeper
Rennlist Member
Rennlist Member
Pretty impressive work, Greg!
For comparison, here are the weights (in grams) of Greg Brown's 1.75" SS header tubes and the 4:1 collector:
Tube #1 1416
Tube #2 1356
Tube #3 1288
Tube #4 1304
collector 682
Total: 6046
Tube #5 1400
Tube #6 1370
Tube #7 1304
Tube #8 1374
collector 682
Total: 6130
For comparison, here are the weights (in grams) of Greg Brown's 1.75" SS header tubes and the 4:1 collector:
Tube #1 1416
Tube #2 1356
Tube #3 1288
Tube #4 1304
collector 682
Total: 6046
Tube #5 1400
Tube #6 1370
Tube #7 1304
Tube #8 1374
collector 682
Total: 6130
12-28-2013, 02:32 AM
#68
Addict
Rennlist Member
Rennlist Member
Thread Starter
Pretty impressive work, Greg!
For comparison, here are the weights (in grams) of Greg Brown's 1.75" SS header tubes and the 4:1 collector:
Tube #1 1416
Tube #2 1356
Tube #3 1288
Tube #4 1304
collector 682
Total: 6046
Tube #5 1400
Tube #6 1370
Tube #7 1304
Tube #8 1374
collector 682
Total: 6130
For comparison, here are the weights (in grams) of Greg Brown's 1.75" SS header tubes and the 4:1 collector:
Tube #1 1416
Tube #2 1356
Tube #3 1288
Tube #4 1304
collector 682
Total: 6046
Tube #5 1400
Tube #6 1370
Tube #7 1304
Tube #8 1374
collector 682
Total: 6130
Thanks, I didn't overly set out to save weight but it did intrigue me and having the multiple steps was what I was after. The hard part comes when we weld them up. I will have an assistant for that. Always pays to have someone to blame!
The difference in the weights between my stainless headers and Greg's will just be the total length. My stainless set on the RHS was 5.7 kgs the left will get weighed at a later time. i suspect mine are just a bit shorter, my primaries are approx 28" long plus collectors.
The inconel set is very long at around 50 inches long from the centre of the first pipe to the end of the secondary collector. If just the primaries were weighed they would be around 2.5 kgs.
Now lets compare that to the cast iron manifold that was just removed. They weigh 5.8 kgs and as we know are not very long!
12-28-2013, 09:06 AM
#70
Nordschleife Master
Greg - badass looking headers. It's a really tight spot down there for anything, I can appreciate the real-estate being at a premium. What's your guess about the valve events and rpm ranges where these headers will work the best?
 12-28-2013, 05:25 PM
#74
Addict
Rennlist Member
Rennlist Member
Thread Starter
Colin, I'll give you a bit more info given the thread is about how to build headers. When I got the headers several years ago, I cut the primaries up with a 1 mm diamond saw blade. I didn't want to lose any material while dissecting the primaries hence the thin blade. At the time I tried using a hacksaw.... well that didn't work, you need 2 to 3 blades for every cut! However just recently, a friction saw was used.
However preparing the joints, I have a large bench sander with ceramic sanding belts which are much tougher than normal belts. The belt that came with the machine was worn away very quickly against the inconel.
Then I have ceramic 3 mmm scotchbrites both in sheets and in drill attachments. This are a flap wheel that has 40 grit paper between the scotchbrite sheets. You need these to clean the insides of the pipe back to shiny metal. I then use acetone to degrease the joints. The joints are all in a need of massaging before they are good enough to weld.
The other issue I have to contend with is the Tig I have only goes to 5 amps. This material is welded normally in pulse mode. The setting is around 7 amps main current 3 amp background current. I am stuck with straight 5 amps which makes life interesting. However the welds so far are perfect but it would be easier in pulse mode. I might post pics of the equipment later, which includes a very useful tool, a tungsten grinder.
12-28-2013, 06:28 PM
#75
Addict
Rennlist Member
Rennlist Member
Thread Starter
In the end I was using the building of these headers as a lead up to the big headers. I was hoping to route the pipes in some way that I could use the same design for the larger pipes which I have finally relented too. Just to expand on that 2" off the head, then either 2 1/8" and then to 2 1/4". 2 1/4" is the max for the area where the heat shielding is. I have the 2 1/4" collectors so I want to use them.
I will probably use the multi step system again rather than one big jump up, i.e from 2" to 2 1/4" as it is the change in diameter that can get a lot of stress and eventually crack, that is however in a racing environment. So I think by keeping the changes in diameter more progressive in nature may avoid or greatly delay this. Also this 928 system is supported where as in F1 they are not.
Here is an example of the modern type of step,

So I am contemplating picking apart the first two pipes (I am happy with pipes 7 and 8) I am not happy at all with pipe 6. It sticks out a bit near the collector. It doesn't foul on anything and they have been fitted to the car but pipe 6 just doesn't look professional enough. This design wouldn't work with the big pipes period.