944 4-Spoke Steering Wheel --- Upholstery
 01-20-2017, 11:40 AM
#1
Rennlist Member
Thread Starter
Hey guys,
Have any of you had your 4-spoke steering wheels reupholstered?
If so, I would love to know who did the work for you, at what ballpark cost, and if you could share a photo or two of the redone wheel, it would be much appreciated!
Thank you!
Have any of you had your 4-spoke steering wheels reupholstered?
If so, I would love to know who did the work for you, at what ballpark cost, and if you could share a photo or two of the redone wheel, it would be much appreciated!
Thank you!
 01-20-2017, 01:35 PM
#3
Three Wheelin'
Alan Gun (ALGA) is where I purchased the leather pre-cut for my wheel. They will do it for you, not sure about the cost haven't priced one in a while. I Sewed the wheel myself, You have to have patience, and someone to show you how to do a baseball stitch. Takes about 6 hours. I sat in the recliner, watched tv and stitched...My fingers did hurt a bit when I was done. The top and bottom center pieces are glued on with contact cement. There is no kit available for the horn though...
01-20-2017, 09:01 PM
#5
Rennlist Member
Thread Starter
01-20-2017, 09:27 PM
#6
Trending Topics
04-10-2019, 05:06 PM
#8
Rennlist Member
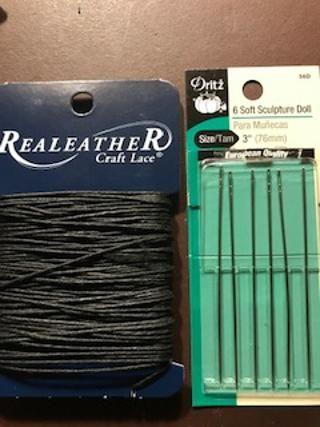
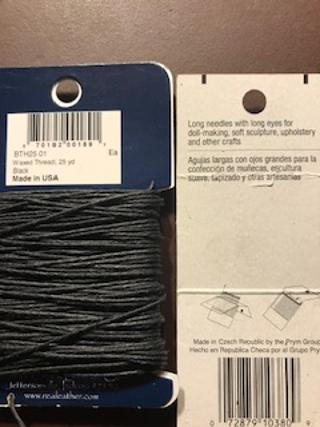
I redid mine using the existing leather and found this video to be very helpful. Satisfying job. Bought 3" blunt needles and Black wax thread at the fabric store.
04-10-2019, 06:00 PM
#9
Rennlist Member
Two thumbs up for any YouTube videos by Checaflo!!! I have learned a lot about upholstery from that guy.
04-10-2019, 09:32 PM
#10
Rennlist Member
I redid mine using the existing leather and found this video to be very helpful. Satisfying job. Bought 3" blunt needles and Black wax thread at the fabric store.
https://www.youtube.com/watch?v=kahlJ31s2I8
https://www.youtube.com/watch?v=kahlJ31s2I8
Here's a write up I did on the subject some time ago:
RECOVERING EARLY 3 SPOKE STEERING WHEEL
AGLA sends you what looks like a cut-open bicycle inner tube with 6 ears, a roll of waxed thread, and ONE needle. First off, you are going to need TWO needles, so before doing anything get yourself an inexpensive needle kit. I got one at Walgreens for $2.79 with an assortment of heavy needles that worked very well. It is very important that you use appropriate needles, or it is practically impossible to do the stitching correctly.
You will also need an Exacto knife or sharp blade, a sewing thimble, a ruler, scissors, and your car key.
The two biggest problems you can encounter are a) "coming up short" on leather after having sewn half way around the steering wheel, and b) running out of the waxed thread.
To avoid the first problem, it helps to begin sewing at the bottom spoke (6 o'clock) and work your way upwards on both sides. You can use 4 needles for this, but I found it easier to use only two and re-thread for each side. To minimize the need to stretch the leather, I was told after the fact that it also helps to moisten the entire cover before sewing it on. I wish I had known this beforehand because I think it might have made things easier and resulted in an even better finished product.
Ideally, you want to sew the full length between spokes without any interruptions in the thread, but should avoid reusing thread if you make a mistake and have to start over, so it helps to measure the length of thread beforehand with the ruler. Something like 120" for the 2 short runs of stitches between spokes should be about right, and for the long top run you can use a proportionately longer amount, or all that's left.
A. REMOVING THE OLD COVER
1) Park the car in a permanent position for the duration of the repair. People recommend to remove the steering wheel, but in my experience I found it easier to perform the stitching with the wheel on the car, turning it as I went along, because I needed a support anyway.
2) Use the blade to cut open the stitches on the old cover and separate it from the rubber foam material underneath. NOTE: DO NOT DRIVE THE CAR WITHOUT THE LEATHER COVERING, OR THE STEERING WHEEL MAY COME APART. Especially if you have an early car with manual steering... Once the old cover is off, cut or tear off 2 square inches of the leather and keep it handy.
3) AGLA makes the new cover with holes, but it's still good to take the time and run a needle through each and every hole before doing any stitching. After doing this, you may want to moisten the leather with water as it might make things easier. I did not and had to do some stretching at the third spoke which was not fun.
B. FITTING AND SEWING THE NEW COVER
1) Fit the new cover over the bare wheel and conform the leather to the circumference, matching the tabs on the cover with the spokes. These tabs will appear long, but do not trim them. This is done at the end. Sewing the cover is tedious, but with some basic dexterity and observation you will soon develop a rhythm and as the new wheel cover begins to take form you will be encouraged to persist.
2) To accomplish the classic "X" shaped stitching, the secret is to use thick needles that are NOT TOO SHARP, or they will compromise the stitching process. Put the key in the ignition and turn the steering wheel to where you have comfortable access to one side of the bottom spoke, taking care to match the "spoke turn" edges of the cover. Run a threaded needle through the two holes closest to the end of the spoke, facing the horn pad, and pull the thread all the way to where both ends are equal in length. Run the needle through the same two holes again and pull the stitch tight to anchor the thread.
3) Now you have a threaded needle out of one hole, and a bare thread out of the other, both the same length. Put a needle on the bare thread and you are ready for the X stitches. Every X stitch will have a left stroke and a right stroke. Decide which goes first and be consistent throughout the entire wheel. As the cover turns, this will require some observation, but results in a much cleaner finished look.
4) With the bottom spoke to the left (turn signal side), say the thread closest to you will be the left stroke. This needle will cross DIAGONALLY OVER the edges of the cover and enter the next available hole on the opposite side, and then cross STRAIGHT UNDER the edges of the cover to the hole DIRECTLY ACROSS. Pull out the threaded needle and and leave it where you can see it. You can use a thimble to push the needle through, but I found it easier to use that piece of leather cut off from the old cover. Now you are ready for the right stroke.
5) The other needle, farther from you, will now cross DIAGONALLY OVER the left stroke and enter THE SAME HOLE in which you left the first threaded needle last. Pulling on the first thread, you allow the second needle to enter that same hole and cross STRAIGHT UNDER the edges of the cover to the hole DIRECTLY ACROSS. Tug both threads gently and you have accomplished your first "X" stitch. The needles have basically switched sides to form the "X" shaped pattern and you are ready to create more "X" stitches by repeating the process successively throughout the cover.
C. PROGRESSING TOWARD THE OTHER SPOKES AND FINISHING TOUCHES
1) As you work your way toward the other spokes, keep track of the amount of leather you are taking up, pulling occasionally to ensure symmetry. Every time you reach a spoke, run a needle twice through the same last two holes to anchor the stitching and cut the ends off with scissors leaving a few inches.
2) When you are finished stitching the entire cover, use the blade to cut excess leather on the spoke tabs flush with the spoke ends and use super glue under leather to attach it permanently. You may have to use the excess thread to secure it, but otherwise you can simply cut it all off and cement the ends with glue. Super glue may leave a tiny white stain that is easily removed with a black marker.
Enjoy your new steering wheel! As an added bonus, the next time you get in your car you will be greeted with the alluring scent of new leather.