
Heated Sport Seat Redye Project (Warning: Lots of Pictures)
 12-09-2009, 12:21 PM
#1
Addict
Rennlist Member
Rennlist Member
Thread Starter
I recently scored a set of heated sport seats for a reasonable sum. I wasn't really shopping for seats but I'd never seen heated sport seats for sale and well, it's almost winter... Only problem was that they were the wrong color, champignon rather than champagne. They were too nice to pass up so I decided to tackle a re-dye job and thought I would share. I'm thrilled with the results but as you'll see in the pics, there were moments when I seriously wondered what I'd done to my nice seats!
Also, HUGE thanks to Rennlister Jlturpin (turpinjl@hotmail.com). I bought the dye and the other Leatherique products from him. He was an absolute pleasure to work with, went above and beyond to help me get the dye matched perfectly and his prices were the best to boot. No affiliation, just a very satisfied customer.
The Procedure
The Leatherique website has quite a bit of (somewhat disjointed) information about how to do the dye job. I did lots of reading beforehand but the short version is this: It's all in the prep.
The process itself is much like doing paint work. It turns out that leather in it's natural state is cow colored. You might have noticed that there aren't a lot of black, red, or champagne colored cows running around. Leather ends up being whatever color it is by dying it.
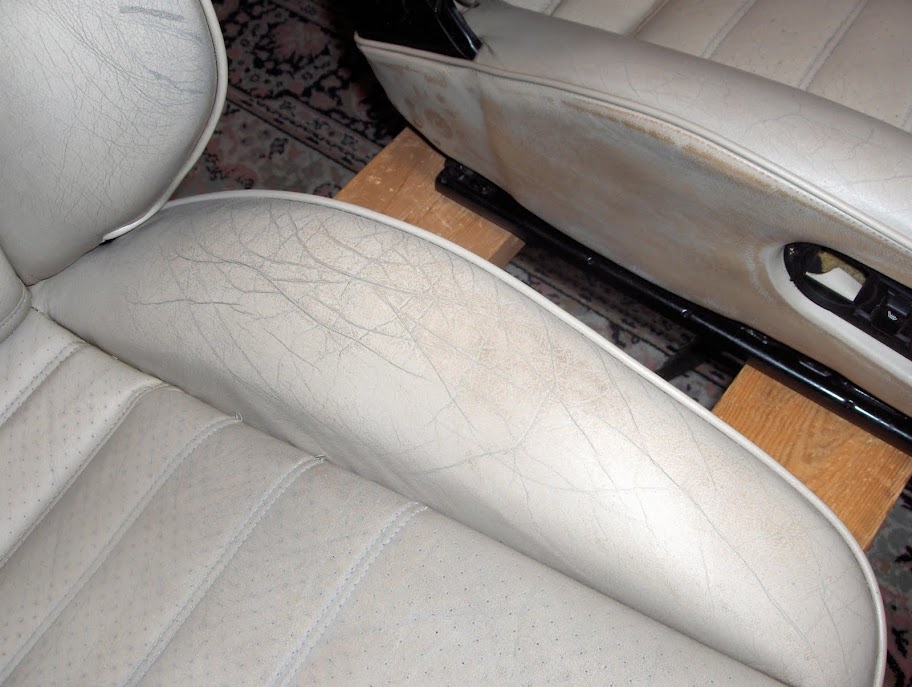
Step 1: The first step in the process is to remove as much of the old dye as you can. This is accomplished by rubbing your nice leather seats down with lacquer thinner. I started using old rags but the old dye kept loading up the rags so I ended up using paper towels (wear rubber gloves!).
Step 2: If the lacquer thinner wasn't enough fun for you, now you get to take 600 grit sandpaper to your nice leather. Again, you're trying to break up the old dye so that the new dye can penetrate the leather. You're not trying to make suede here, just getting through any dye that the lacquer thinner didn't remove. Once you've sanded it's time for another dose of lacquer thinner.
Here are a couple of pictures after the lacquer thinner/sandpaper extravaganza:

Step 3: Apply Leatherique Rejuvinator Oil to the seats, cover them in plastic bags and walk away for a day or two. The bags keep the oil from evaporating as fast and now that the old dye is gone the oil can really penetrate the leather. The results were pretty impressive, the leather comes out very soft and pliable. Wipe down with Leatherique Prestine Clean and you're ready to dye!
Step 4: The dye itself looks like colored water. It's really that thin. Make sure you mix it well to ensure even color. I used the uber sophisticated "Paper Towel" application method. Basically you wad up a Bounty paper towel, dampen it in warm water, wring it out and then dab it in the dye. Apply the dye to the seat in a circular motion to a section of the seat and then stand back and admire your handiwork.
Or not. The truth is that after the first coat it looked vaguely like someone had spilled orange juice on my nice seats and then had let it dry in the sun.


Step 5: Not to fear! Let the first coat dry for 30 minutes or so. The dye has a sort of plastic property as it dries and presto-magically smooths itself out. Apply another coat and things start looking much better.

Step 6: Go back over the seat another time or two with the dye, looking for any thin spots. Good lighting really helps here, you think you'll think you covered it perfectly until you get good light on it.

Step 7: Let the dye cure for 48 hours. Patience, Grasshopper...
Step 8: Apply another dose of Rejuvinator Oil, work it in with your hands and then cover with the garbage bags and wait another 24 hours.
Step 9: If you've read this far into the post then you're likely as **** as I am. Take a thumb tack or other poking device and clean out EVERY perforation hole. It's looks fine if you don't do this (look to the left of my hand), it looks great if you do (underneath my hand). I'd do 3 or 4 rows at a time and then walk away muttering in unintelligible German after 5 minutes or so of this.

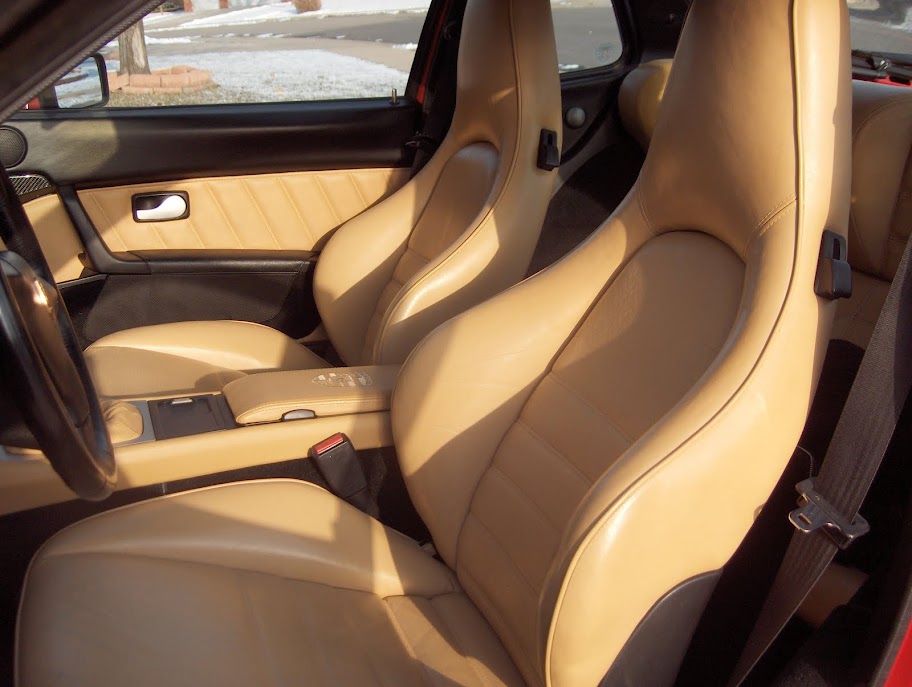
Step 10: Clean with Presitne Clean, buff with a clean cloth et voila!, you have gorgeous, soft, champagne colored, heated sport seats!


Here's a comparison between the old standard seat and the new sport seat

Step 11: Install in the car and enjoy!

A note on retrofitting heated seats: Apparently most (all?) 944's were wired for powered, heated seats, even if they weren't delivered with them. The switch for the heat control is built into the seat, there's a relay in the seat and there's already a fuse in the fuse box for heated seats. Basically this is plug and play: Disconnect your old seat's connector and connect it to the new heated seats as you install them and that's it. My old passenger seat was not powered but the wiring harness for power/heat was neatly attached to the floorboard underneath the carpet, even though it had never been used

Also, HUGE thanks to Rennlister Jlturpin (turpinjl@hotmail.com). I bought the dye and the other Leatherique products from him. He was an absolute pleasure to work with, went above and beyond to help me get the dye matched perfectly and his prices were the best to boot. No affiliation, just a very satisfied customer.
The Procedure
The Leatherique website has quite a bit of (somewhat disjointed) information about how to do the dye job. I did lots of reading beforehand but the short version is this: It's all in the prep.
The process itself is much like doing paint work. It turns out that leather in it's natural state is cow colored. You might have noticed that there aren't a lot of black, red, or champagne colored cows running around. Leather ends up being whatever color it is by dying it.
Step 1: The first step in the process is to remove as much of the old dye as you can. This is accomplished by rubbing your nice leather seats down with lacquer thinner. I started using old rags but the old dye kept loading up the rags so I ended up using paper towels (wear rubber gloves!).
Step 2: If the lacquer thinner wasn't enough fun for you, now you get to take 600 grit sandpaper to your nice leather. Again, you're trying to break up the old dye so that the new dye can penetrate the leather. You're not trying to make suede here, just getting through any dye that the lacquer thinner didn't remove. Once you've sanded it's time for another dose of lacquer thinner.
Here are a couple of pictures after the lacquer thinner/sandpaper extravaganza:
Step 3: Apply Leatherique Rejuvinator Oil to the seats, cover them in plastic bags and walk away for a day or two. The bags keep the oil from evaporating as fast and now that the old dye is gone the oil can really penetrate the leather. The results were pretty impressive, the leather comes out very soft and pliable. Wipe down with Leatherique Prestine Clean and you're ready to dye!
Step 4: The dye itself looks like colored water. It's really that thin. Make sure you mix it well to ensure even color. I used the uber sophisticated "Paper Towel" application method. Basically you wad up a Bounty paper towel, dampen it in warm water, wring it out and then dab it in the dye. Apply the dye to the seat in a circular motion to a section of the seat and then stand back and admire your handiwork.
Or not. The truth is that after the first coat it looked vaguely like someone had spilled orange juice on my nice seats and then had let it dry in the sun.
Step 5: Not to fear! Let the first coat dry for 30 minutes or so. The dye has a sort of plastic property as it dries and presto-magically smooths itself out. Apply another coat and things start looking much better.
Step 6: Go back over the seat another time or two with the dye, looking for any thin spots. Good lighting really helps here, you think you'll think you covered it perfectly until you get good light on it.
Step 7: Let the dye cure for 48 hours. Patience, Grasshopper...
Step 8: Apply another dose of Rejuvinator Oil, work it in with your hands and then cover with the garbage bags and wait another 24 hours.
Step 9: If you've read this far into the post then you're likely as **** as I am. Take a thumb tack or other poking device and clean out EVERY perforation hole. It's looks fine if you don't do this (look to the left of my hand), it looks great if you do (underneath my hand). I'd do 3 or 4 rows at a time and then walk away muttering in unintelligible German after 5 minutes or so of this.
Step 10: Clean with Presitne Clean, buff with a clean cloth et voila!, you have gorgeous, soft, champagne colored, heated sport seats!
Here's a comparison between the old standard seat and the new sport seat
Step 11: Install in the car and enjoy!
A note on retrofitting heated seats: Apparently most (all?) 944's were wired for powered, heated seats, even if they weren't delivered with them. The switch for the heat control is built into the seat, there's a relay in the seat and there's already a fuse in the fuse box for heated seats. Basically this is plug and play: Disconnect your old seat's connector and connect it to the new heated seats as you install them and that's it. My old passenger seat was not powered but the wiring harness for power/heat was neatly attached to the floorboard underneath the carpet, even though it had never been used
Last edited by gregeast; 12-09-2009 at 03:07 PM.
 12-09-2009, 12:31 PM
#3
Very nice work! Was it difficult to get the dye to adhere to the piping around the outer edge of the seats? Also, don't your seat heaters get painfully hot? Mine do. I can't even stand it.
12-09-2009, 01:19 PM
#6
Addict
Rennlist Member
Rennlist Member
Thread Starter
I was worried about the piping and so was particularly thorough with the lacquer thinner on them. I didn't sand them, was worried it would rough up the vinyl too much. All that said, I was pleasantly surprised that the dye didn't seem to have any trouble adhering to them.
And yes, the seats are HOT! It's mostly a nice problem to have as they heat up faster than any other heated seats I've experienced but they can run you out if you leave them on very long. I vaguely recall reading somewhere that there was a temperature adjustment potentiometer underneath the seat but I sure couldn't find it.

Trending Topics
12-09-2009, 01:52 PM
#9
Terrific write up and results. While my sport seats in my cab aren't heated my old 85.5 had heated 8 way sport seats. Ditto on the efficient heating, I had to cycle them to avoid overheating my behind.
 12-09-2009, 02:39 PM
#11
Rennlist Member

Join Date: May 2005
Location: Mayflower, AR
Posts: 1,075
Likes: 0
Received 0 Likes
on
0 Posts
Those turned out great, glad we got the color to be a dead on match. OCD is a real pain, especially when it comes to all those holes. I normally clean them out first, prior to Rejuvenator oil, and when you spray them with the dye, they don't clog up. I don't really recall if they clog up with the Bounty method.
12-09-2009, 03:04 PM
#12
Addict
Rennlist Member
Rennlist Member
Thread Starter
Basically they just pull straight out. The button itself mounts around a shaft and is held on by a clip. I wiggled, coaxed and cajoled with a combination of my fingers and a flat blade screwdriver. The cover behind the button just pulls off as well. If the clip breaks or falls into the seat (I was able to reuse mine) they are still available from Porsche.