Broken heater clip (hot air blowing).
 07-30-2009, 10:58 PM
#1
Drifting
Thread Starter
okay its freakin hot and I want to get my heater to stop blowing hot air atleast then try to see if my AC starts working again.
anyways looked under the drive side dash and shure enough there is a rod hanging there so the heater clip and plastic support are broken and gone.
I looked at clarks but he pic isn't very clear i'm not too sure where and how that hanging rod attaches to ?
anyone got a nice picture or tell me how it connects?
would this cause the AC to not blow cold it just blow hot all the time and can't shut it off.
 07-30-2009, 11:35 PM
#2
Hey Man
Rennlist Member
Rennlist Member

Rotate the arm the hanging lever connects to all the way towards the rear and lock it with a Ty-Rap until you get the plastic clip to do it right.
From Clarks Garage: Heater Malfunctions
Full Heat at All Temperature Settings (1985.5 and Newer 944s)
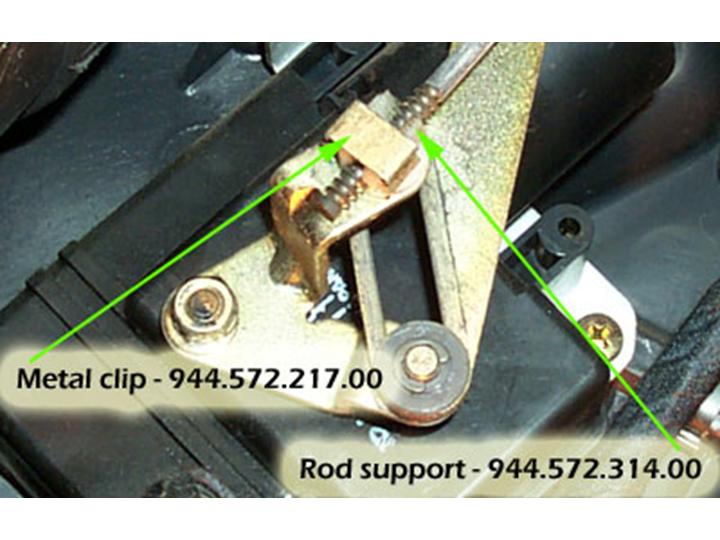
On late model 944s (1985.5 and newer), there are several problems that can cause the full heat condition. The first and most common problem is a damper linkage in the driver's side footwell (for left-hand drive cars). Stick your head in the footwell and look up and toward the center console. You should see a small diameter metal rod which rests in a white plastic support and is held in place by a metal retaining clip. On later model 944s, there are two damper linkages instead of one and they are located behind a plastic cover. One of the plastic clips on the linkage may be broken preventing the linkage from operating the damper. When the damper fails to operate, the system fails to full heat. Most German cars are designed to fail this way. It's a safety feature to keep you from freezing in winter. The first picture below shows a linkage that has come loose from the support because the metal clip is broken. The second picture show the linkage properly in place with a new support and clip along with the part numbers for the support and clip.
The second problem is with the heater control valve. The heater control valve is vacuum operated and located at the back of engine near the firewall. There is a vacuum line which goes from the valve to a vacuum connection at the firewall where the heater hose connections penetrate the firewall. Check this vacuum line to make sure it is connected and doesn't show any signs of cracking. There is another vacuum line fitting near the heater hose connections which goes to a rubber "Y" connector. One side of the "Y" goes to a small check valve attached to the large brake booster vacuum line at the back of the firewall. The other side of the "Y" goes through the firewall to a plastic vacuum retention canister next to the battery. Make sure all these lines are connected and don't show any signs of cracking. If all vacuum lines are properly connected you may wish to remove the heater control valve from the system and check it's operation with a vacuum tester. A problem with the heater control valve opening may also be caused by the vacuum solenoid valve going bad. Remove the solenoid and apply 12 VDC to valve to see if it opens and closes properly. If you look at the picture titled HVAC UNIT RIGHT SIDE above, the solenoid is component #3.
Finally, a full heat condition can be caused by a failure of the Temperature Control Unit (TCU) itself. Unfortunately, I don't have a good way to test the TCU at the moment. And, they're quite expensive unless you can find one from a car that's being parted out. So, replace the TCU as a last resort.
From Clarks Garage: Heater Malfunctions
Full Heat at All Temperature Settings (1985.5 and Newer 944s)
On late model 944s (1985.5 and newer), there are several problems that can cause the full heat condition. The first and most common problem is a damper linkage in the driver's side footwell (for left-hand drive cars). Stick your head in the footwell and look up and toward the center console. You should see a small diameter metal rod which rests in a white plastic support and is held in place by a metal retaining clip. On later model 944s, there are two damper linkages instead of one and they are located behind a plastic cover. One of the plastic clips on the linkage may be broken preventing the linkage from operating the damper. When the damper fails to operate, the system fails to full heat. Most German cars are designed to fail this way. It's a safety feature to keep you from freezing in winter. The first picture below shows a linkage that has come loose from the support because the metal clip is broken. The second picture show the linkage properly in place with a new support and clip along with the part numbers for the support and clip.
The second problem is with the heater control valve. The heater control valve is vacuum operated and located at the back of engine near the firewall. There is a vacuum line which goes from the valve to a vacuum connection at the firewall where the heater hose connections penetrate the firewall. Check this vacuum line to make sure it is connected and doesn't show any signs of cracking. There is another vacuum line fitting near the heater hose connections which goes to a rubber "Y" connector. One side of the "Y" goes to a small check valve attached to the large brake booster vacuum line at the back of the firewall. The other side of the "Y" goes through the firewall to a plastic vacuum retention canister next to the battery. Make sure all these lines are connected and don't show any signs of cracking. If all vacuum lines are properly connected you may wish to remove the heater control valve from the system and check it's operation with a vacuum tester. A problem with the heater control valve opening may also be caused by the vacuum solenoid valve going bad. Remove the solenoid and apply 12 VDC to valve to see if it opens and closes properly. If you look at the picture titled HVAC UNIT RIGHT SIDE above, the solenoid is component #3.
Finally, a full heat condition can be caused by a failure of the Temperature Control Unit (TCU) itself. Unfortunately, I don't have a good way to test the TCU at the moment. And, they're quite expensive unless you can find one from a car that's being parted out. So, replace the TCU as a last resort.
Last edited by KuHL 951; 07-31-2009 at 12:44 AM.
07-31-2009, 01:19 AM
#4
Drifting
Thread Starter
yeeehaaaaww. thanks I pushed the rod back to shut it and taped it up for now and I no more boiling hot heat blowing out. but now when I turn the temp gauge to hot its still boiling outside air in.
when I press the defrost swicth then boiling hot heat blows out.
anyways i'm happy now less sweating in my car.
temp here is 35 degrees now humidex close to 40 degrees freakin heatwave all weak killing me.
I sweat so much driving for a couple minutes it sucks.
okay one think I don't underestand if that rod is held on by a a clip how does it move to open and close? It doesn't seem to move.
whatever though no more boiling heat blowing in my face in the freakin summer.
now i need to get he airconditioning fixed.... it used to blow cold air 2 years ago and then I parked it for 2 months or so then it didn't blow cold anymore.
maybe it just needs a recharge?
07-31-2009, 02:17 AM
#5
Hey Man
Rennlist Member
Rennlist Member
Just leave the temp setting on cold like you have the AC on and you should be good. If you turn the temp settings to hot; well you get hot air, it's that simple. When the lever is pushed forward from a broken clip it's the same as having the temp setting on high all the time; pushed back is cold. You might even try your AC and see if it works now.
07-31-2009, 03:57 AM
#6
Drifting
Thread Starter
well what I was saying it that when I turn the **** to hot it doesn't blow hot. it blows hot now when I press the defrost botton.
no AC is not blowing cold any longer but its been 2 years now since I tried using it. when I first bought the car it worked.
no AC is not blowing cold any longer but its been 2 years now since I tried using it. when I first bought the car it worked.
07-31-2009, 11:19 AM
#7
Three Wheelin'
I just replaced the parts mentioned above for the same condition, all is right. Cost $2.75 from Pelican Parts. If A/C is not working, find someone who is willing to recharge with R12, the system probably just leaked refrigerant out since it hasn't been used in so long. It is a good idea to run the A/C at least once a month to maintain the system seals.
Trending Topics
07-06-2010, 01:44 PM
#9
8th Gear
Join Date: Jul 2009
Location: Mustang, Oklahoma
Posts: 8
Likes: 0
Received 0 Likes
on
0 Posts
Ok I am bringing up this old dog, I am haveing the same problem but during the winter I have no heat go figure. So my my air conditioner is fighting the hot air now and I have no heat at all during the winter any advise or will this fix the both problems.
Thanks guys
Thanks guys
06-13-2013, 03:38 PM
#10
Racer
Join Date: Feb 2003
Location: Fallbrook, CA
Posts: 297
Likes: 0
Received 0 Likes
on
0 Posts
From my observation, that clip/lever actuates the flap that switches from upper vents to footwell vents, not eater/ac. ... or is more screwed up with my climate control than I thought.
Rotate the arm the hanging lever connects to all the way towards the rear and lock it with a Ty-Rap until you get the plastic clip to do it right.
From Clarks Garage: Heater Malfunctions
Full Heat at All Temperature Settings (1985.5 and Newer 944s)
On late model 944s (1985.5 and newer), there are several problems that can cause the full heat condition. The first and most common problem is a damper linkage in the driver's side footwell (for left-hand drive cars). Stick your head in the footwell and look up and toward the center console. You should see a small diameter metal rod which rests in a white plastic support and is held in place by a metal retaining clip. On later model 944s, there are two damper linkages instead of one and they are located behind a plastic cover. One of the plastic clips on the linkage may be broken preventing the linkage from operating the damper. When the damper fails to operate, the system fails to full heat. Most German cars are designed to fail this way. It's a safety feature to keep you from freezing in winter. The first picture below shows a linkage that has come loose from the support because the metal clip is broken. The second picture show the linkage properly in place with a new support and clip along with the part numbers for the support and clip.
The second problem is with the heater control valve. The heater control valve is vacuum operated and located at the back of engine near the firewall. There is a vacuum line which goes from the valve to a vacuum connection at the firewall where the heater hose connections penetrate the firewall. Check this vacuum line to make sure it is connected and doesn't show any signs of cracking. There is another vacuum line fitting near the heater hose connections which goes to a rubber "Y" connector. One side of the "Y" goes to a small check valve attached to the large brake booster vacuum line at the back of the firewall. The other side of the "Y" goes through the firewall to a plastic vacuum retention canister next to the battery. Make sure all these lines are connected and don't show any signs of cracking. If all vacuum lines are properly connected you may wish to remove the heater control valve from the system and check it's operation with a vacuum tester. A problem with the heater control valve opening may also be caused by the vacuum solenoid valve going bad. Remove the solenoid and apply 12 VDC to valve to see if it opens and closes properly. If you look at the picture titled HVAC UNIT RIGHT SIDE above, the solenoid is component #3.
Finally, a full heat condition can be caused by a failure of the Temperature Control Unit (TCU) itself. Unfortunately, I don't have a good way to test the TCU at the moment. And, they're quite expensive unless you can find one from a car that's being parted out. So, replace the TCU as a last resort.

 03-16-2020, 10:53 PM
#12
Rennlist Member
I actually came here to thank this forum for this solution. My 968 was pouring hot air regardless of setting, even AC. Every setting, every time. I looked exactly where this tutorial above (From Clark's Garage) pointed me and lo and behold - the stupid half clip was staring me in the face.
Ordered two new clips and their metal keepers (both of mine were missing) from Pelican. So for a whole $9, I've got every HVAC function restored.
The part numbers are in the article above by the way, but here you go -
944-572-314-00-M100
944-572-217-00-OEM
This'll get you to the page on Pelican
https://www.pelicanparts.com/cgi-bin...72-314-00-M100
Hope this helps. it sure helped me!
03-17-2020, 03:02 PM
#13
Rennlist Member

Glad somebody resurrected this thread. I went through and did this repair some time ago but it seems I didn't do it quite right.
Here's my question for those that have done this: With the air flow set to zero (should be fully closed), what is the right positioning of the control rod(s)? As I still get some hot air coming through, my guess is that I didn't position it correctly during the repair.
I haven't looked at how the arm operates while the car is on, so I don't know which way to push the arm before I fix it in position with the new plastic clip. At fully closed, should the control rod be as far as possible toward the passenger compartment, or the engine? I have a '91 S2, is it the same for the other control arm?
Many thanks
 03-18-2020, 09:31 AM
#14
Rennlist Member
I wish I could be more help, but I simply pushed the lever arm �up� (against its weighted default resistance) until it stopped.
This was almost exactly halfway up the serrated portion of the arm. I clipped it there and all functions as normal.
I noticed the other lever with its clip still intact (assuming original) was also halfway up, though I replaced that clip as well for my $5 precaution.
Hope this helps you, also hoping someone with more familiarity will chime in!
The following 2 users liked this post by Adams:
Speedster_ (07-26-2021),
Zirconocene (03-18-2020)