
porsche0nut's 3.2 Carrera Engine Project
 04-10-2015, 10:14 AM
#61
Team Owner
Well looks like things are going very very well , and i must say .. you have ***** of titanium to do all that work and hop in the car and drive 700 km or so to Hershey right after as you will have zero ime for break in. 
you better not break down .. JR will NEVER let you live it down
you better not break down .. JR will NEVER let you live it down
 04-10-2015, 04:30 PM
#62
Race Car
Thread Starter
Haha Clive, I'm planning to be done by Monday so that I can drive it Ottawa next week... That will be a nice shake down!
Got the alternator installed in the new housing without issue.
The Stomski kit is amazing. So far I've drilled out and tapped two broken studs, and chased the threads on the 4 holes where the studs came out. So as of now I have 6 new studs in, and 6 old studs left to drill! It's slow going, being very patient and careful, I figure it's about an hour per stud at the pace I'm going. Will post pictures later... Not sure how to easily upload them from my phone!
04-10-2015, 05:56 PM
#63
Team Owner
Haha Clive, I'm planning to be done by Monday so that I can drive it Ottawa next week... That will be a nice shake down!
Got the alternator installed in the new housing without issue.
The Stomski kit is amazing. So far I've drilled out and tapped two broken studs, and chased the threads on the 4 holes where the studs came out. So as of now I have 6 new studs in, and 6 old studs left to drill! It's slow going, being very patient and careful, I figure it's about an hour per stud at the pace I'm going. Will post pictures later... Not sure how to easily upload them from my phone!
Got the alternator installed in the new housing without issue.
The Stomski kit is amazing. So far I've drilled out and tapped two broken studs, and chased the threads on the 4 holes where the studs came out. So as of now I have 6 new studs in, and 6 old studs left to drill! It's slow going, being very patient and careful, I figure it's about an hour per stud at the pace I'm going. Will post pictures later... Not sure how to easily upload them from my phone!
04-10-2015, 08:01 PM
#64
Race Car
Thread Starter
i had 5 of mine screw right out after i got them cherry red. the other 7 that remained .. i bailed and gave them to the machine shop. I could have got them out i think but didnt feel like it so let the machine shop do it for 45 a stud. You are saving some serious coin there.
Good thing I'm saving serious coin here... I spent it everywhere else!
I must say, on the positive side this is really rewarding doing everything in house (literally).
04-10-2015, 08:16 PM
#65
Race Car
Thread Starter
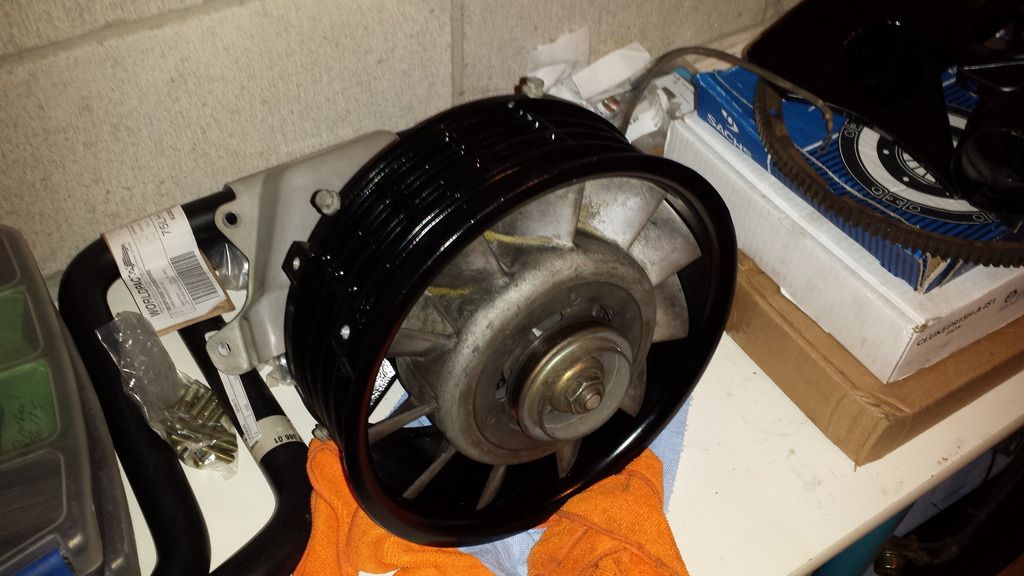
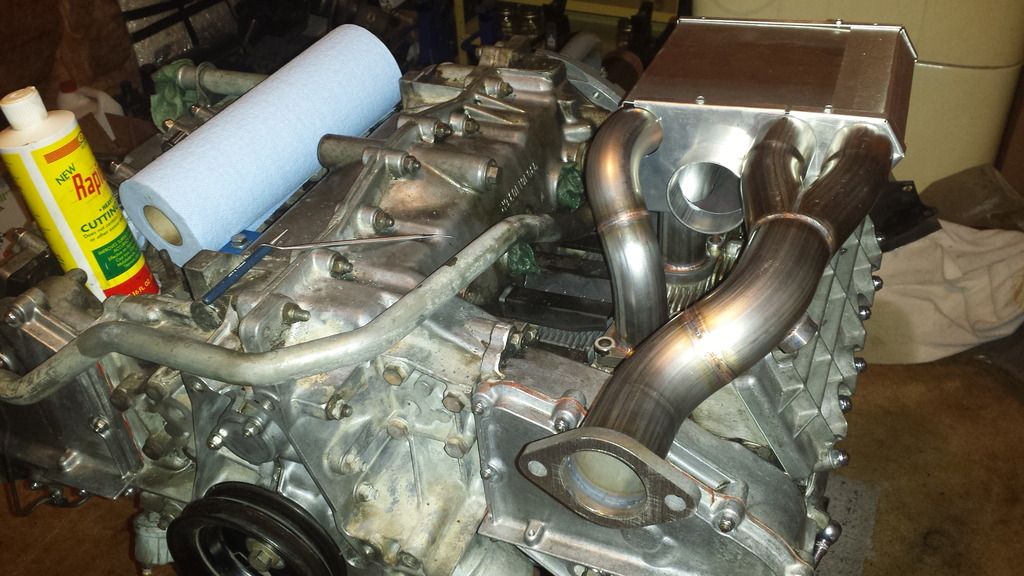
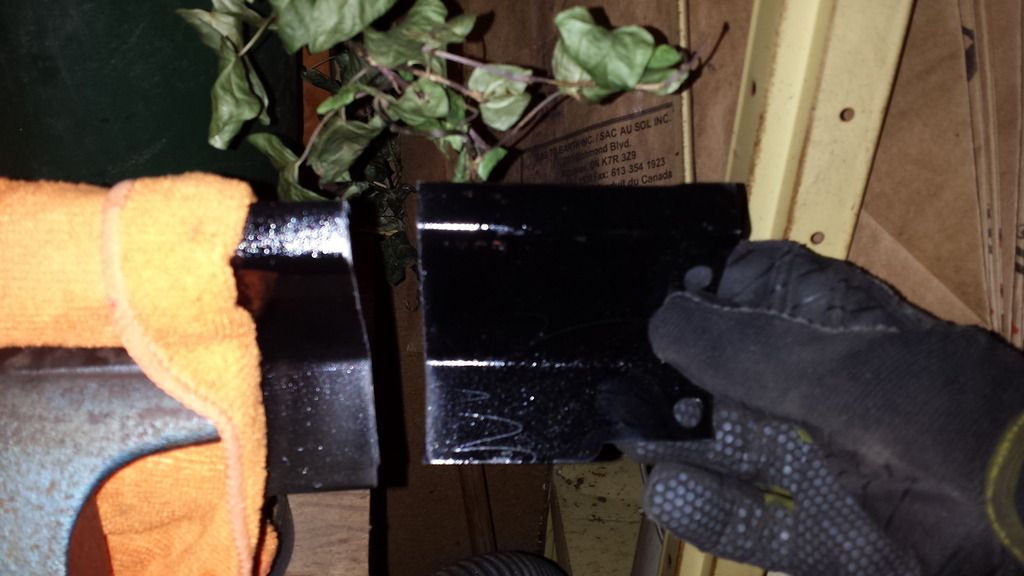
OK here are some pics from today's work. First up, the alternator/fan installed in the freshly powder coated housing! Makes me wish I took the time to remove the fan and have it done too... but the whole project has been on a very tight timeline. Advice for anyone else doing this is to start at the beginning of winter!
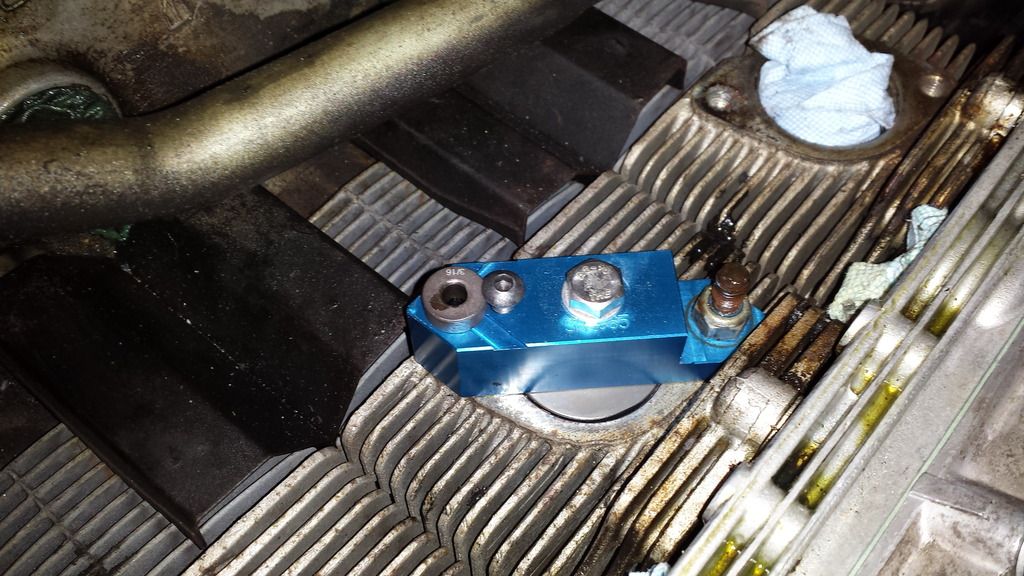
The exhaust stud drill-out process, thanks again Ian for lending me the Stomski kit!
The jig installed on cylinder 5:
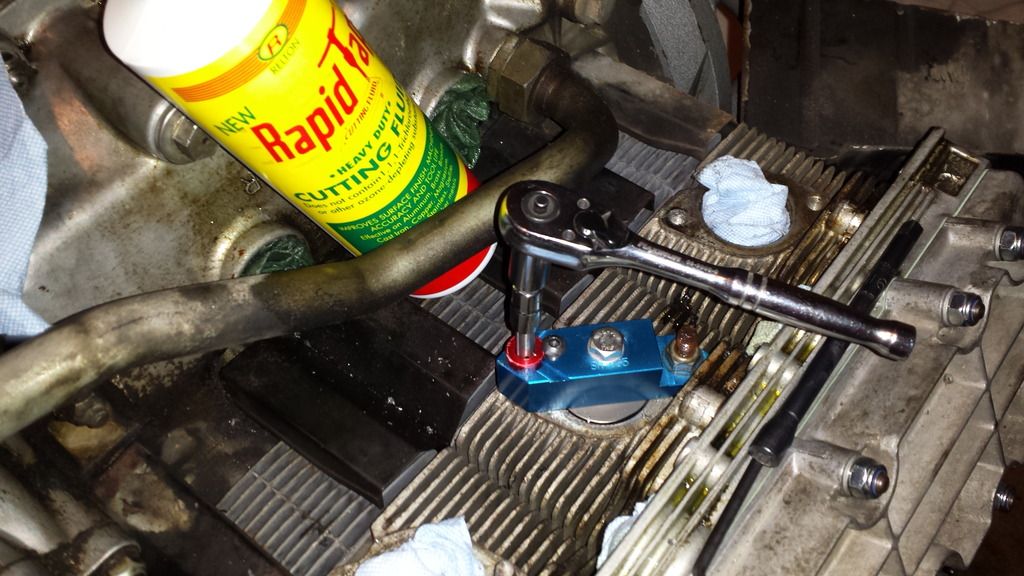
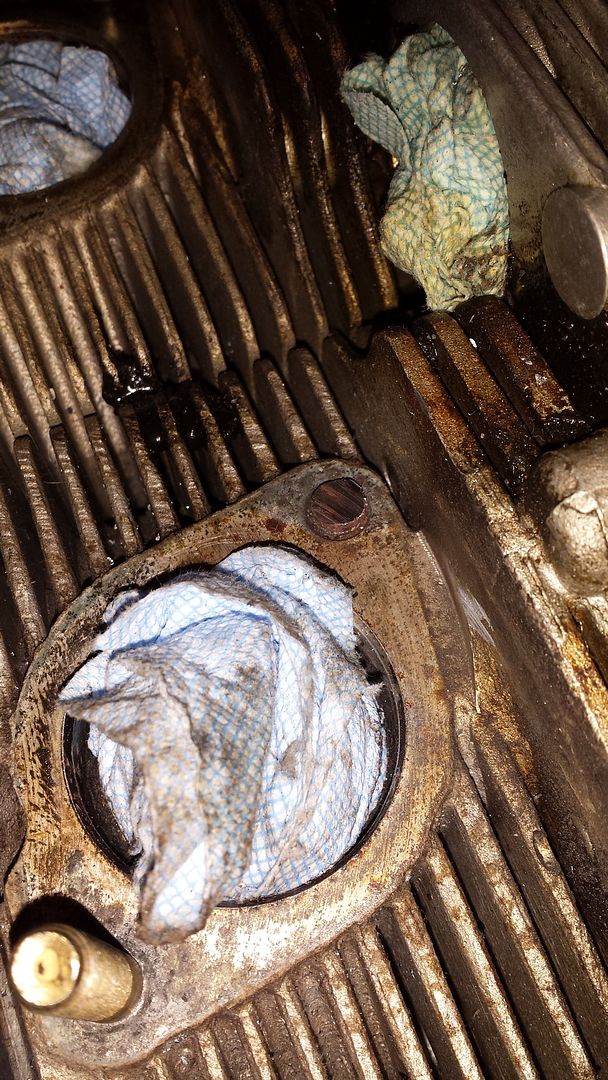
First you drill a pilot hole with the 3/16 drill bit. The jig has different inserts for the different steps. I was really afraid of drilling too far and going into the head so I measured with a calliper the depth I needed and marked off all my drill bits. When I got close to the mark, I slowed down and sure enough when you get to the end, you feel it break through the last of the stud. Surprised me the first time I got through but your initial reaction is to back off and drop the trigger. Then you drill with a LH 17/64 bit, which digs through a lot faster and if centred properly leaves just the threads. The instructions say you can sometimes pick the threads out with a dental pick... I wasn't able to on the studs I did today. The first one I got about 1 thread worth picked out and then had to resort to the tap. So you put the third jig insert in and using liberal amounts of cutting fluid, chase/cut the thread. Essentially I was cutting out the old stud and cleaning the threads. I was careful and took my time, cutting in, backing out, more fluid, repeat until the tap bottomed. So far, everything is going slowly but surely!
Tapping:
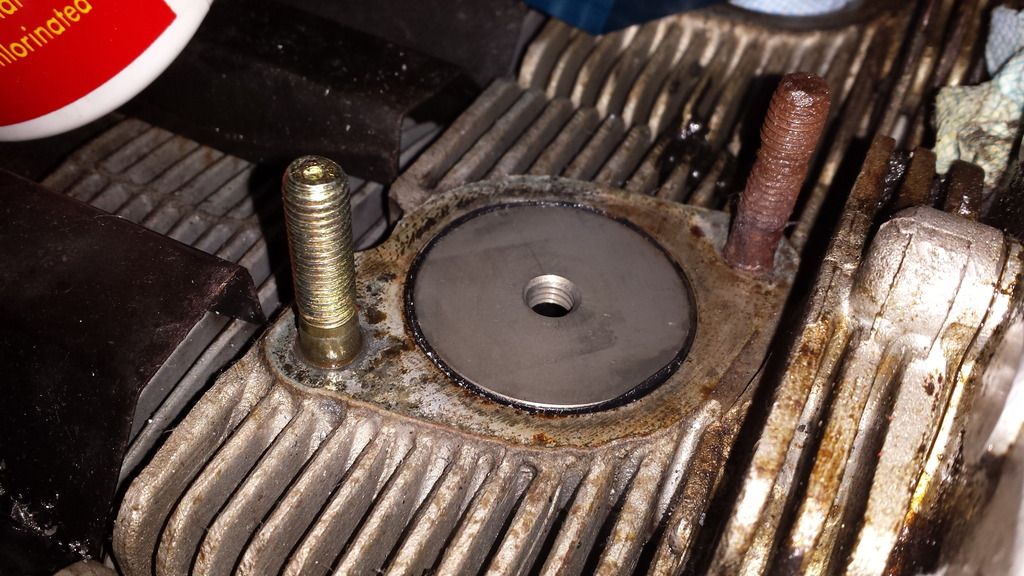
Clean new threaded hole!

New stud screwed in, doesn't that look beautiful!?
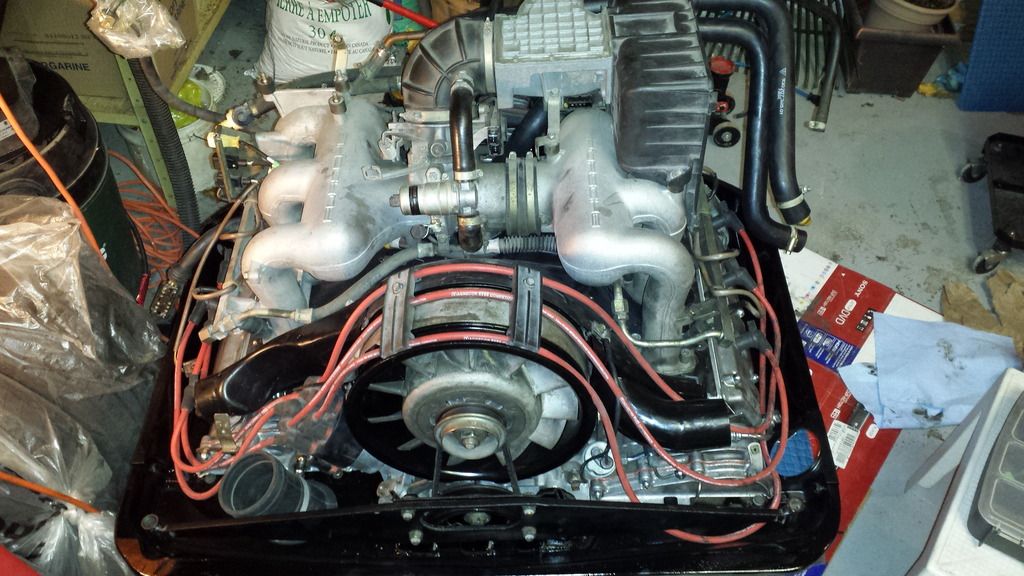
Finally, I had to test fit the headers....
So that completes all the studs that broke flush with the head... the rest stick up and I need to cut them at the base to properly use the jig. Tomorrow I will finish these off, install the oil return tubes, and start building the engine back up!
Sunday the plan is to mate to the transmission and get this baby in the car! Bold goals, but I am confident I can do it with the help of those around me!
The exhaust stud drill-out process, thanks again Ian for lending me the Stomski kit!
The jig installed on cylinder 5:
First you drill a pilot hole with the 3/16 drill bit. The jig has different inserts for the different steps. I was really afraid of drilling too far and going into the head so I measured with a calliper the depth I needed and marked off all my drill bits. When I got close to the mark, I slowed down and sure enough when you get to the end, you feel it break through the last of the stud. Surprised me the first time I got through but your initial reaction is to back off and drop the trigger. Then you drill with a LH 17/64 bit, which digs through a lot faster and if centred properly leaves just the threads. The instructions say you can sometimes pick the threads out with a dental pick... I wasn't able to on the studs I did today. The first one I got about 1 thread worth picked out and then had to resort to the tap. So you put the third jig insert in and using liberal amounts of cutting fluid, chase/cut the thread. Essentially I was cutting out the old stud and cleaning the threads. I was careful and took my time, cutting in, backing out, more fluid, repeat until the tap bottomed. So far, everything is going slowly but surely!
Tapping:
Clean new threaded hole!
New stud screwed in, doesn't that look beautiful!?
Finally, I had to test fit the headers....
So that completes all the studs that broke flush with the head... the rest stick up and I need to cut them at the base to properly use the jig. Tomorrow I will finish these off, install the oil return tubes, and start building the engine back up!
Sunday the plan is to mate to the transmission and get this baby in the car! Bold goals, but I am confident I can do it with the help of those around me!
04-10-2015, 09:27 PM
#66
Rennlist Member
Haha Clive, I'm planning to be done by Monday so that I can drive it Ottawa next week... That will be a nice shake down!
Got the alternator installed in the new housing without issue.
The Stomski kit is amazing. So far I've drilled out and tapped two broken studs, and chased the threads on the 4 holes where the studs came out. So as of now I have 6 new studs in, and 6 old studs left to drill! It's slow going, being very patient and careful, I figure it's about an hour per stud at the pace I'm going. Will post pictures later... Not sure how to easily upload them from my phone!
Got the alternator installed in the new housing without issue.
The Stomski kit is amazing. So far I've drilled out and tapped two broken studs, and chased the threads on the 4 holes where the studs came out. So as of now I have 6 new studs in, and 6 old studs left to drill! It's slow going, being very patient and careful, I figure it's about an hour per stud at the pace I'm going. Will post pictures later... Not sure how to easily upload them from my phone!
04-12-2015, 12:05 AM
#67
Race Car
Thread Starter
Today was a great day!
I successfully completed the drilling out, re-tapping, and replacement of ALL my exhaust studs! It took a lot more patience than I usually have, and it was worth it. What a rewarding feeling! Some highlights:
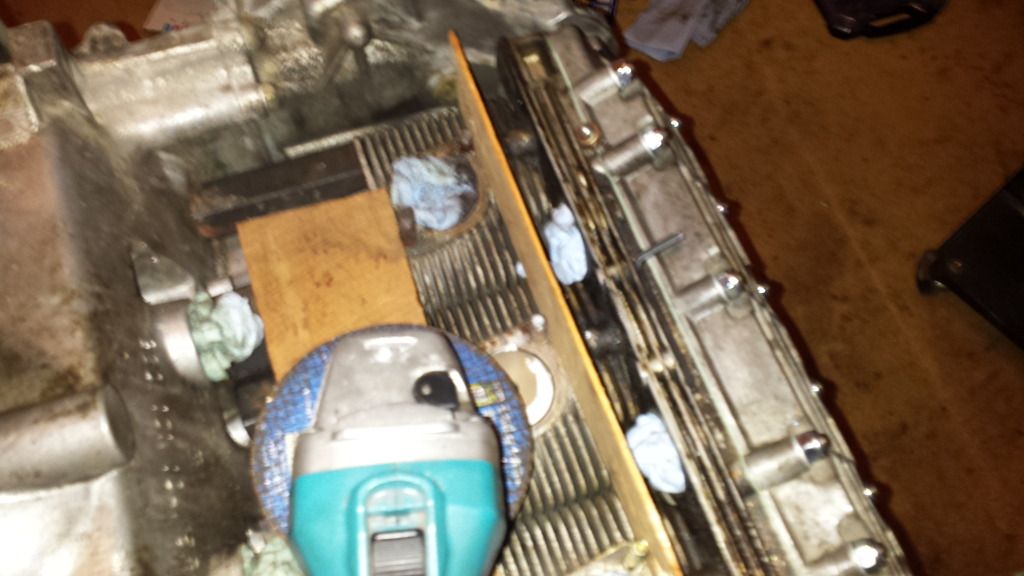
Had to use an angle grinder on some of the longer studs (either broken higher up or twisted and up against the cam tower, too tight to get a tool in to break them off). I put some wood pieces down to protect the engine, the result was a nice smooth, flat stub of a stud to work with.
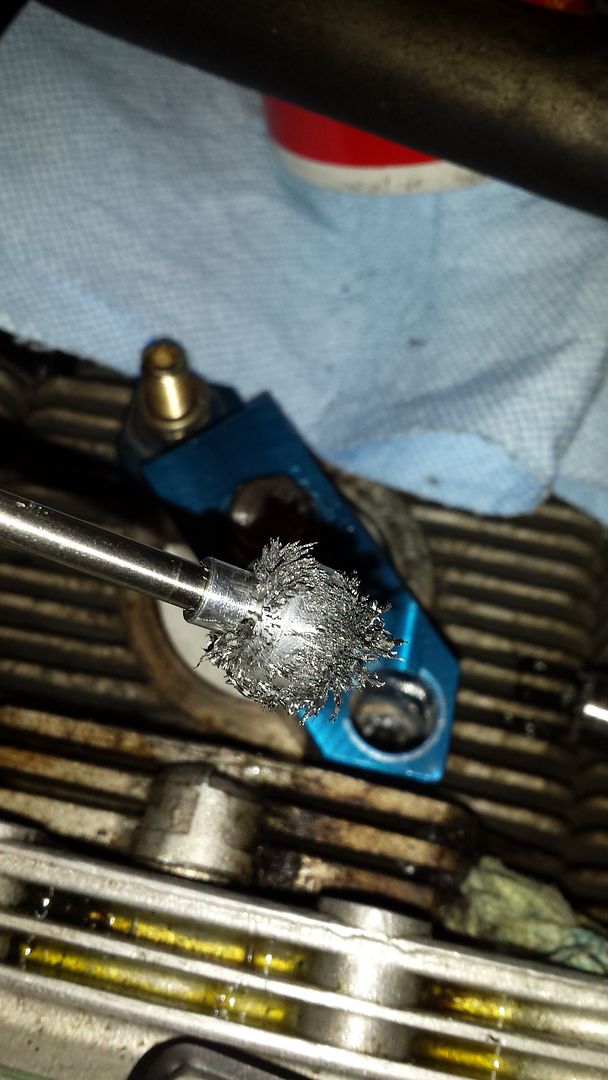
One trick I discovered was that to clean out the debris and filings from drilling/tapping, I could use my magnet, which luckily had pretty much the perfect diameter head to slip inside the stomski jig! This proved to be highly effective, not only for cleaning inside the jig while working the stud, but also cleaning around the exhaust ports to lift any little bits of metal.
My favourite picture.... 12 new exhaust studs!
Remember this?! We came a long way...
I successfully completed the drilling out, re-tapping, and replacement of ALL my exhaust studs! It took a lot more patience than I usually have, and it was worth it. What a rewarding feeling! Some highlights:
Had to use an angle grinder on some of the longer studs (either broken higher up or twisted and up against the cam tower, too tight to get a tool in to break them off). I put some wood pieces down to protect the engine, the result was a nice smooth, flat stub of a stud to work with.
One trick I discovered was that to clean out the debris and filings from drilling/tapping, I could use my magnet, which luckily had pretty much the perfect diameter head to slip inside the stomski jig! This proved to be highly effective, not only for cleaning inside the jig while working the stud, but also cleaning around the exhaust ports to lift any little bits of metal.
My favourite picture.... 12 new exhaust studs!
Remember this?! We came a long way...
04-12-2015, 12:18 AM
#68
Race Car
Thread Starter
While all that exhaust stud work was happening, I had painted and was drying some trim pieces. A trick I read about online to get the best application is to warm the paint can by placing it in warm water, so I did. My goal here wasn't to have a perfect finish, but to freshen up the tired looking trip pieces in gloss black (to match the new fan housing) and to protect them from rust/exposure.
My paint booth:
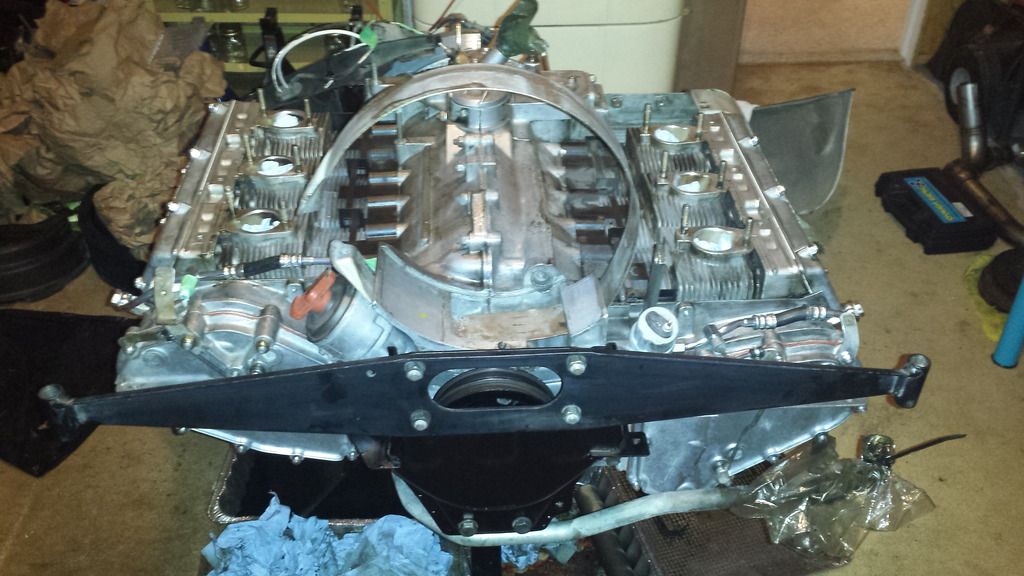
We installed the cross member and support... looking good if you ask me! (I didn't paint the cross member)
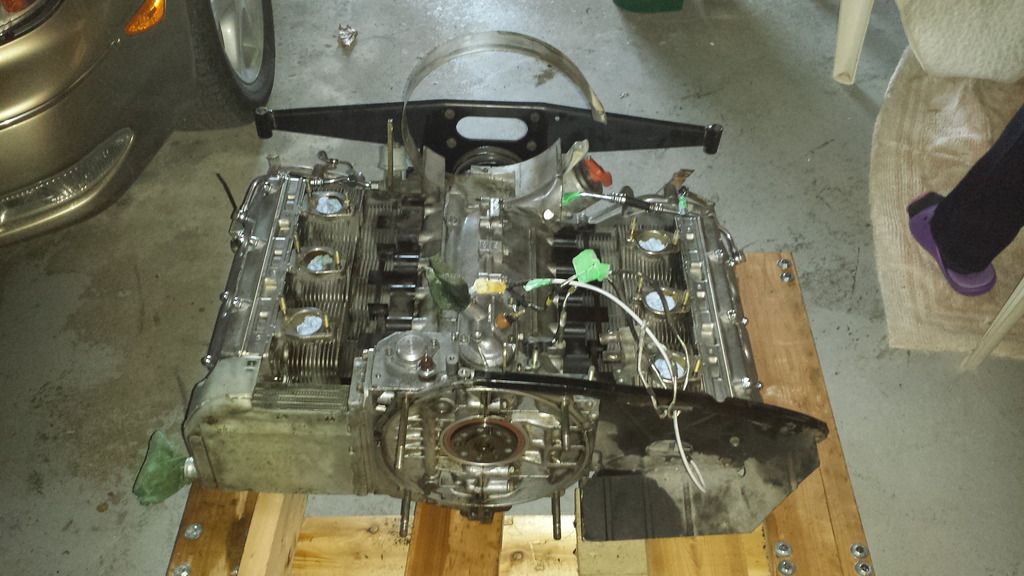
Carried the engine up to the garage, back onto the cart I built a few months ago when this all started!
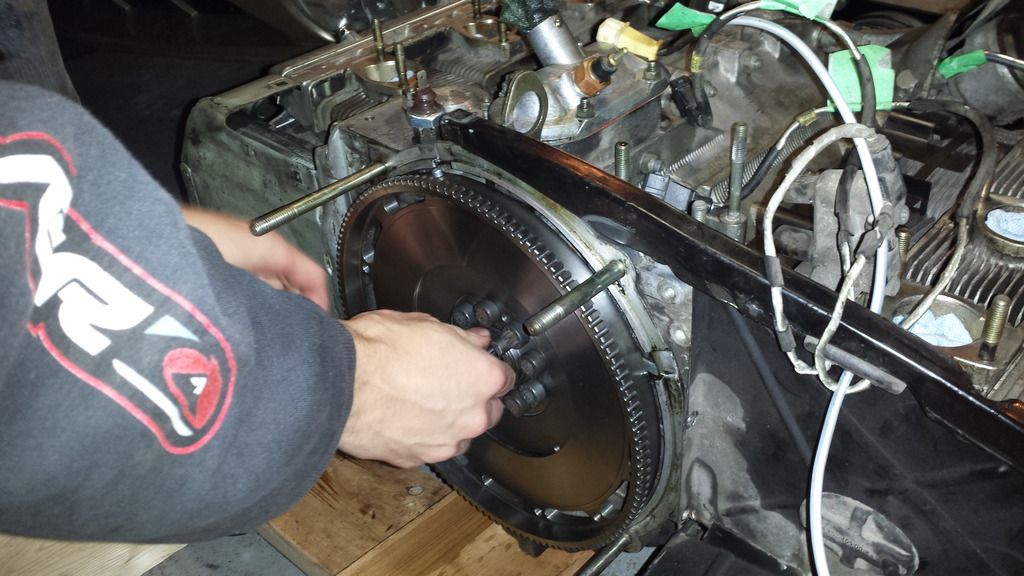
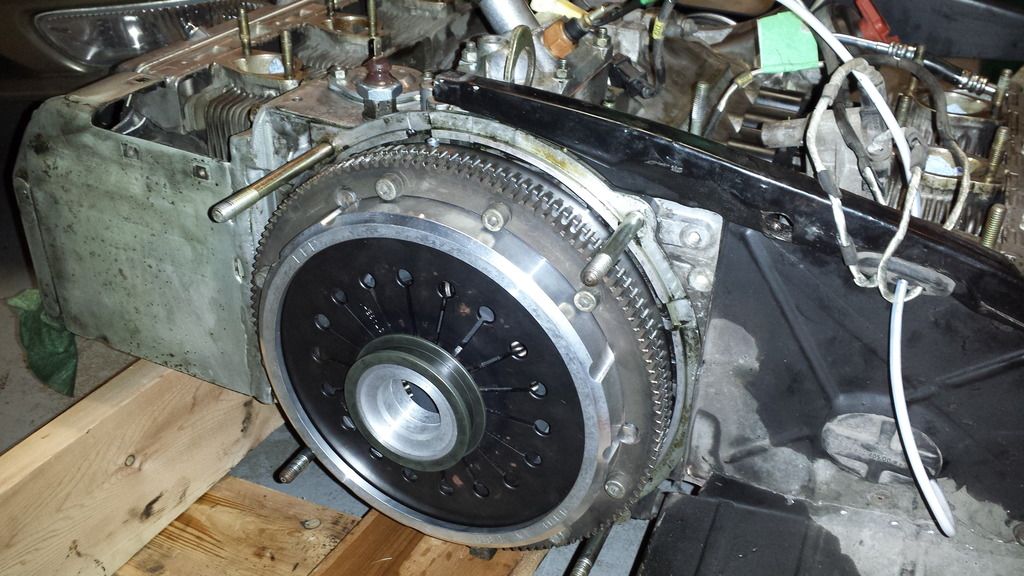
Installing the lightweight flywheel, 80Nm (66ft-lb):
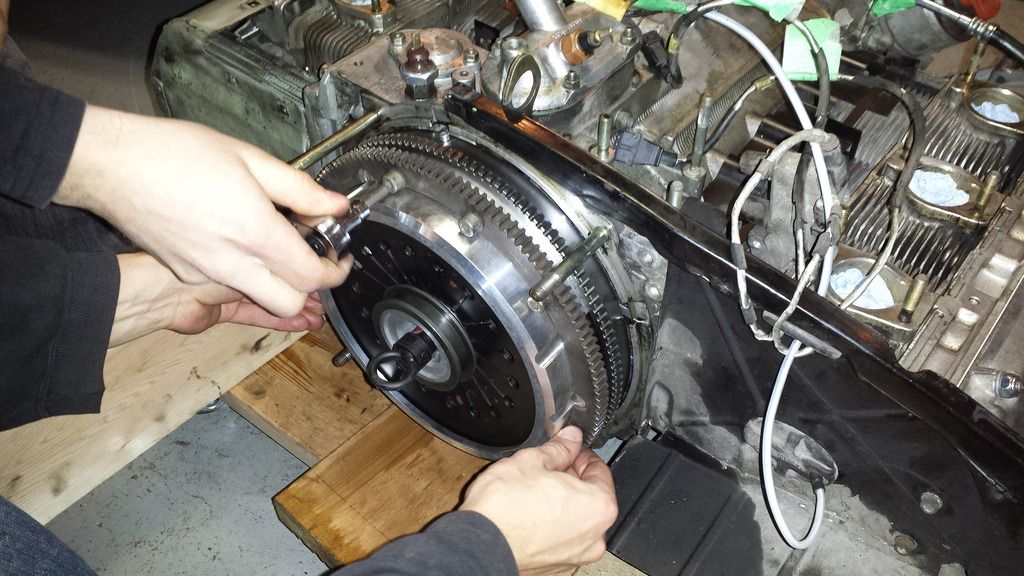
Installing the clutch and pressure plate (clutch alignment tool can be seen in the centre of the pressure plate, very useful little tool). I found the most difficult part was aligning the pressure plate bolt holes.. the pp was very tight-fit with the flywheel outer perimeter, and it took some fiddling to get lined up. Finally we put 3 bolts in and used a piece of wood and hammer to lightly tap it evenly into place to the point where the bolts would thread. From there we tightened the bolts in a cross pattern bit by bit until it all sucked into place.
Finished it all of by tightening to 25Nm (18ft-lb).
Tomorrow, we'll install the oil return tubes which I completely forgot about. Ironic, since they're the reason this entire thing started! Let's be honest though, they were just the excuse I needed to dive in.
My paint booth:
We installed the cross member and support... looking good if you ask me! (I didn't paint the cross member)
Carried the engine up to the garage, back onto the cart I built a few months ago when this all started!
Installing the lightweight flywheel, 80Nm (66ft-lb):
Installing the clutch and pressure plate (clutch alignment tool can be seen in the centre of the pressure plate, very useful little tool). I found the most difficult part was aligning the pressure plate bolt holes.. the pp was very tight-fit with the flywheel outer perimeter, and it took some fiddling to get lined up. Finally we put 3 bolts in and used a piece of wood and hammer to lightly tap it evenly into place to the point where the bolts would thread. From there we tightened the bolts in a cross pattern bit by bit until it all sucked into place.
Finished it all of by tightening to 25Nm (18ft-lb).
Tomorrow, we'll install the oil return tubes which I completely forgot about. Ironic, since they're the reason this entire thing started! Let's be honest though, they were just the excuse I needed to dive in.
04-13-2015, 01:33 PM
#70
RL Community Team
Rennlist Member
Rennlist Member
Those headers are really nice!! It will be great to hear it in person at a GTG this year...
You made the right choice given the scope of work you had. IF you had taken the heads off, then sure, you would have been much better off to leave the studs to a machine shop. But then, you would re-sealing and retiming the cams and then imagine how tempted you would be to have new valve guides, and maybe upgrade the head stud etc. etc. etc. I speak from experience!
I did remove all my studs in situ (lying on my back on a cold concrete floor!). I had to make a fixture that was essentially a copy of the Stomski tool (since I was trying to save $$), but that was all before I made the decision to do a total rebuild. Had I known it ahead of time, I would have farmed out the studs to a machine shop.
However, if you want to keep the engine together, you made the right choice, otherwise the project could easily have ballooned out.
04-14-2015, 04:47 PM
#71
Race Car
Thread Starter
You made the right choice given the scope of work you had. IF you had taken the heads off, then sure, you would have been much better off to leave the studs to a machine shop. But then, you would re-sealing and retiming the cams and then imagine how tempted you would be to have new valve guides, and maybe upgrade the head stud etc. etc. etc. I speak from experience!
I did remove all my studs in situ (lying on my back on a cold concrete floor!). I had to make a fixture that was essentially a copy of the Stomski tool (since I was trying to save $$), but that was all before I made the decision to do a total rebuild. Had I known it ahead of time, I would have farmed out the studs to a machine shop.
However, if you want to keep the engine together, you made the right choice, otherwise the project could easily have ballooned out.
I did remove all my studs in situ (lying on my back on a cold concrete floor!). I had to make a fixture that was essentially a copy of the Stomski tool (since I was trying to save $$), but that was all before I made the decision to do a total rebuild. Had I known it ahead of time, I would have farmed out the studs to a machine shop.
However, if you want to keep the engine together, you made the right choice, otherwise the project could easily have ballooned out.
04-14-2015, 05:01 PM
#72
Race Car
Thread Starter
Well, I'm in Ottawa... but not with the 911. 
I accomplished a LOT of work Sunday, just not enough to get her on the road. The engine is back together, built up, and ready to go into the car but as usual, things took longer than expected and I didn't want to cut corners, so it will have to go into the car tomorrow night when I get back. I'm getting very anxious at this point... and finding an extra set of hands on a Wednesday night is not easy.
Anyway, here's the rest of the progress from Sunday:
First off, back up on the stand to install the oil return tubes. They were actually a pleasure to install, the Aluminum kit from pelican is really good quality and comes pre-assembled. Just oil up the seals, install the fat end into the crankcase, and extend the skinny end towards the cam towers. Then I wrapped a cloth around the tube and used an adjustable wrench to wrap around the tube pressed against the edge made where the inner tube meets outer, and gently tapped with a brass punch to set the tube. Slide the circlip down into its groove and voila! All 4 done in under half an hour.
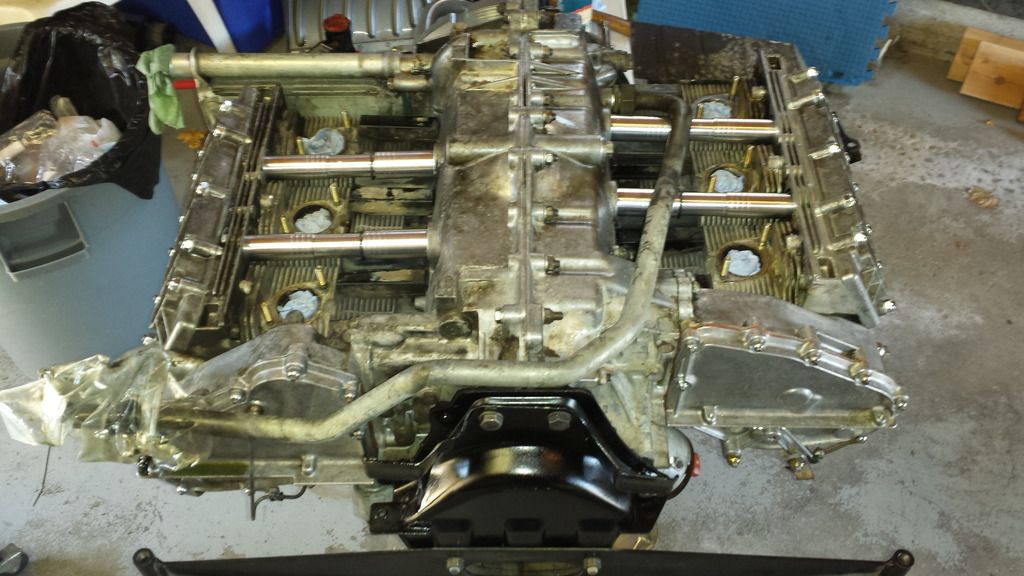
Built up the engine, mated to the transmission (tips, used 101 moly on guide tube and clutch fork/release bearing and copper paste on spline to prevent corrosion).
Since I'm backdating my heat, I had to add this duct hole on the right side trim (sorry for the poor pic):
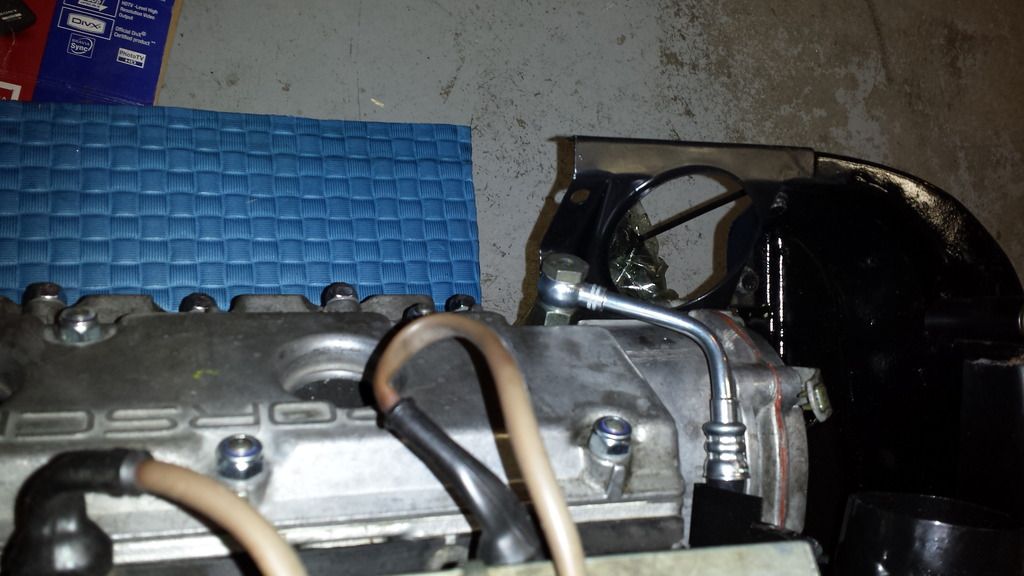
This meant modifying the stock trim piece, which I measured to allow for overlap with the new piece. Took the cutting wheel to it and held my breath... (actually, I measured twice, cut once!)
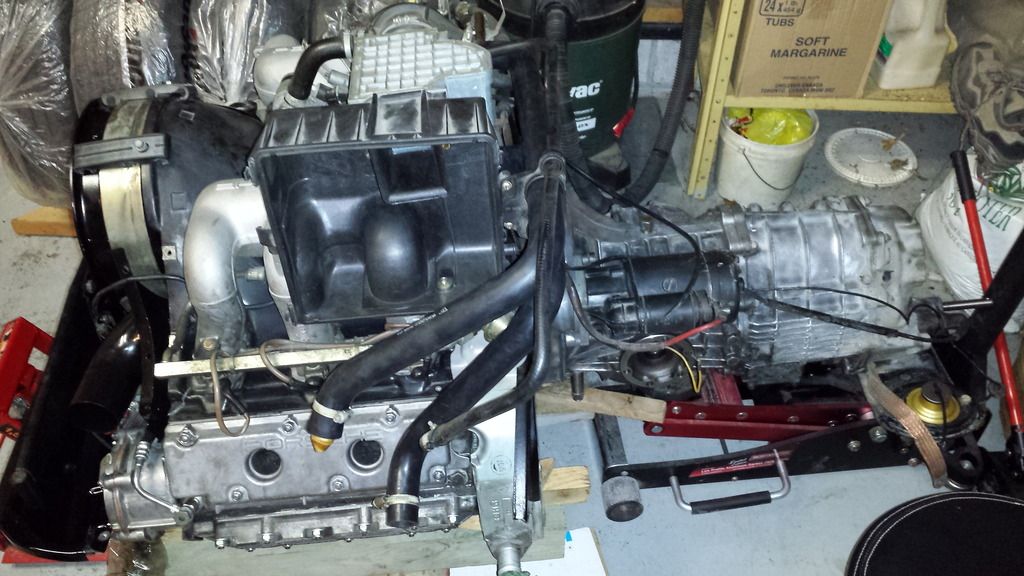
Perfect fit! Finished installing the rest of the accessories, here she sits ready to go back in the car!
Wish me luck... T-60 hours to Hershey!
I accomplished a LOT of work Sunday, just not enough to get her on the road. The engine is back together, built up, and ready to go into the car but as usual, things took longer than expected and I didn't want to cut corners, so it will have to go into the car tomorrow night when I get back. I'm getting very anxious at this point... and finding an extra set of hands on a Wednesday night is not easy.
Anyway, here's the rest of the progress from Sunday:
First off, back up on the stand to install the oil return tubes. They were actually a pleasure to install, the Aluminum kit from pelican is really good quality and comes pre-assembled. Just oil up the seals, install the fat end into the crankcase, and extend the skinny end towards the cam towers. Then I wrapped a cloth around the tube and used an adjustable wrench to wrap around the tube pressed against the edge made where the inner tube meets outer, and gently tapped with a brass punch to set the tube. Slide the circlip down into its groove and voila! All 4 done in under half an hour.
Built up the engine, mated to the transmission (tips, used 101 moly on guide tube and clutch fork/release bearing and copper paste on spline to prevent corrosion).
Since I'm backdating my heat, I had to add this duct hole on the right side trim (sorry for the poor pic):
This meant modifying the stock trim piece, which I measured to allow for overlap with the new piece. Took the cutting wheel to it and held my breath... (actually, I measured twice, cut once!)
Perfect fit! Finished installing the rest of the accessories, here she sits ready to go back in the car!
Wish me luck... T-60 hours to Hershey!
04-14-2015, 05:37 PM
#73
RL Community Team
Rennlist Member
Rennlist Member
You definitely have a good shot of getting it all set to go in time. Here are a couple of (possibly) helpful notes:
1) Check that the selector shaft on the transaxle is all the way in (1st, 3rd or 5th).
2) When you are raising the unit into position, watch the selector shaft. I had a second jack on hand (along with the motorcycle jack) in case I needed to tilt the transaxle. I ended up not needing it. If the car is flat, you can go up, then forward, then up, then forward etc. in small increments. Watch for the hoses etc. ahead of the air box, as you can pinch them. Just go slow.
3) Your engine was drained of oil and then moved around, rotated on the stand etc., so it would be best to disconnect the DME relay and then crank the motor until the oil pressure light goes out. Then reconnect the DME relay and try to start it. Disconnecting the DME relay disables the fuel pump, so you can crank all day without worrying about washing the cylinders with fuel. Actually, I do this several times through the storage season and prior to the first start up. (You will also realize if you did not put the oil in before it becomes a BAD day!!)
4) Super clean the threaded holes on the drive flanges before connecting the CV joints. It is highly recommended to use new bolts and washers. I was paranoid about this, but just followed the factory specification and all has been fine.
5) It gets exciting as things get close to done, and perhaps becomes somewhat easier to make a silly mistake (for example, leaving a paper towel in one of the exhaust ports…) Not saying you would do this, but I know I am very capable of doing such a thing and I find I need to really force myself to go slow in the final assembly stages.
6) Loosely connect ALL the exhaust component fasteners before fully tightening any of them.
If things take longer than expected, and making it for Hershey is looking doubtful, it is better in the long run to miss the deadline. However, I think there is a good chance you are going to make it.
 04-15-2015, 05:00 PM
#75
Basic Sponsor
Rennlist
Site Sponsor
Rennlist
Site Sponsor
Looking great!
__________________
Your Trusted Source For DIY and Parts
FREE SHIPPING over $99 click here
Porsche Parts | DIY Tech Articles | Facebook | Twitter | Instagram | YouTube | Promos
888.280.7799 | 6am - 5pm PST

FREE SHIPPING over $99 click here
Porsche Parts | DIY Tech Articles | Facebook | Twitter | Instagram | YouTube | Promos
888.280.7799 | 6am - 5pm PST

