
porsche0nut's 3.2 Carrera Engine Project
 03-20-2015, 12:15 PM
#46
Drifting
Awesome tear down brutha!! Been checking the thread daily for updates! Those exhaust studs would've made me cry ~ nice job getting them out!
This is precisely why I always do my own work. So cool to see how it all works.

One thing I'm enjoying about this entire process is taking it piece by piece and learning about each component individually, gaining an appreciation for how all the various parts of the engine interact and contribute to making this incredible machine perform the way it does!
 04-06-2015, 09:08 PM
#47
Race Car
Thread Starter
Miss me? I didn't get a chance to update this thread before I left the country for work/vacation. Let's start with some fun stuff. The week before I left town I received some goodies in the mail... don't you love shiny new car parts!?
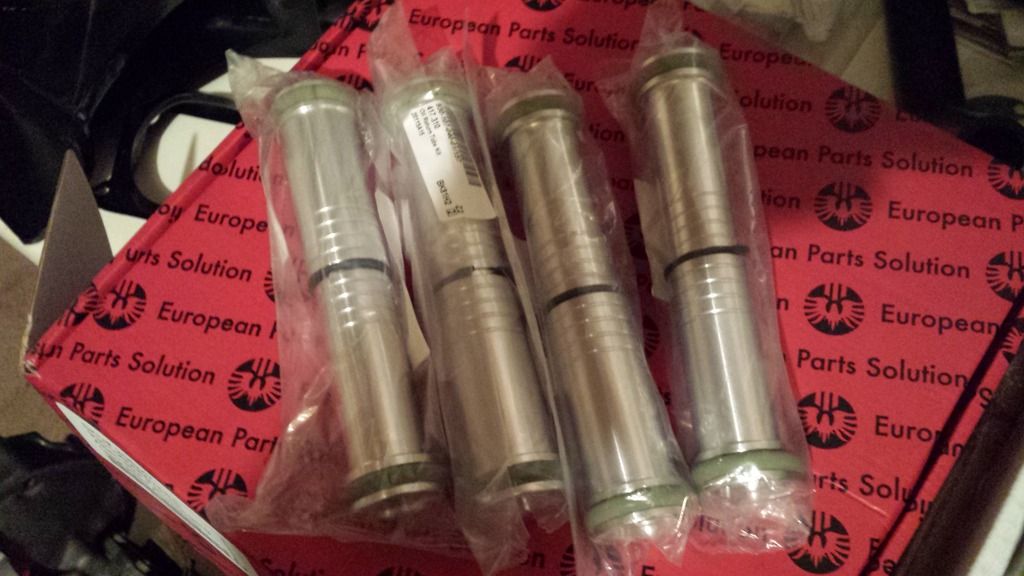
Aluminum Oil Return Tubes:
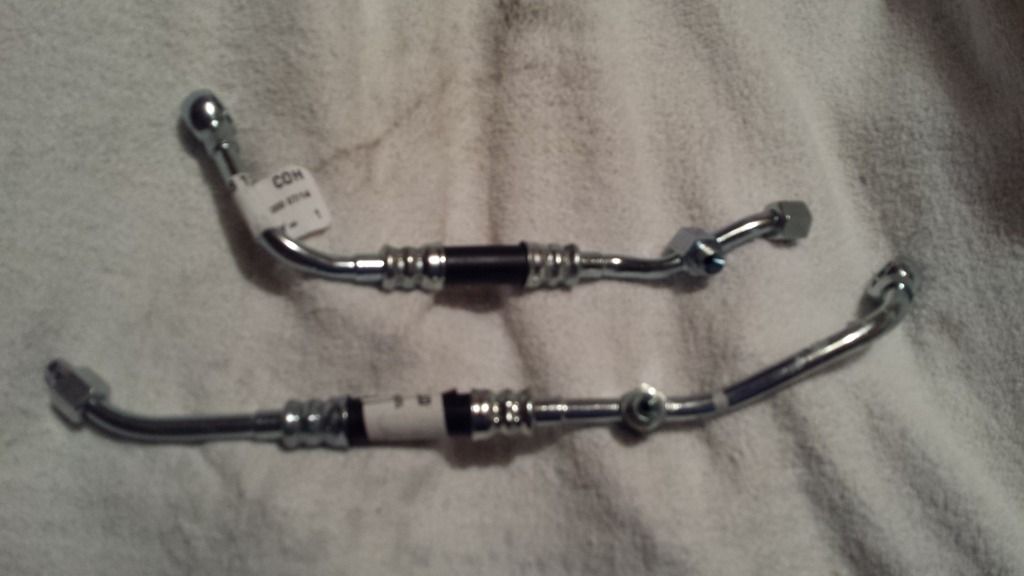
New Hydraulic Tensioner Lines (more on these later):
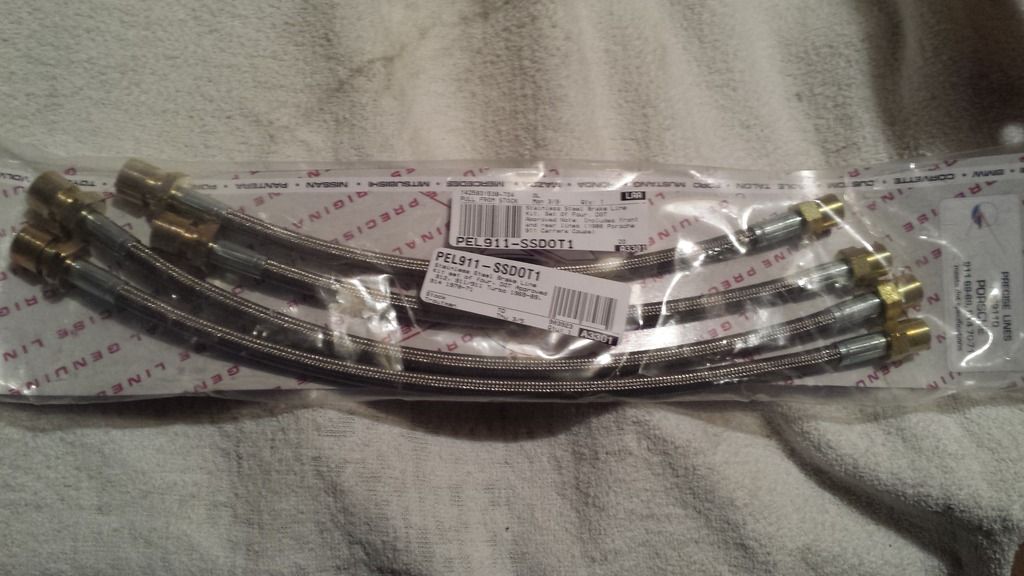
SS Brake Lines:
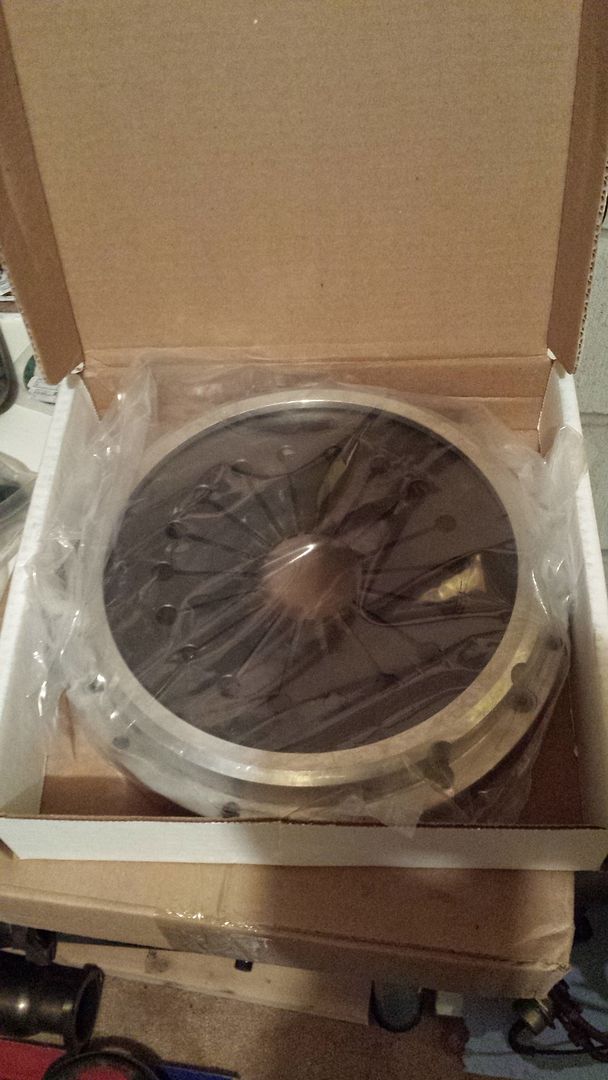
Kennedy Engineering Stage 1 Clutch Kit (Aluminum Pressure Plate):
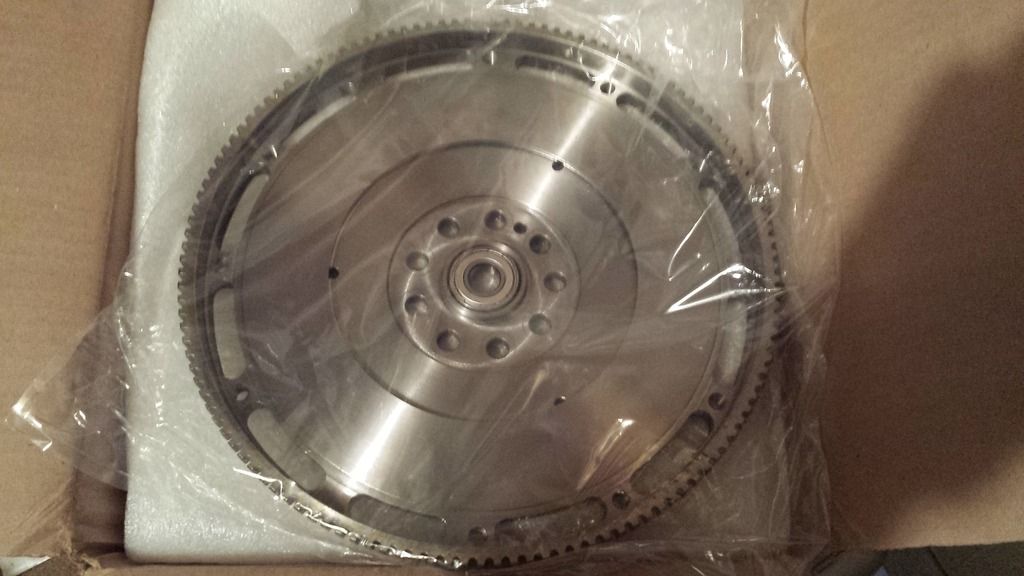
Patrick Motorsports Lightweight Flywheel:
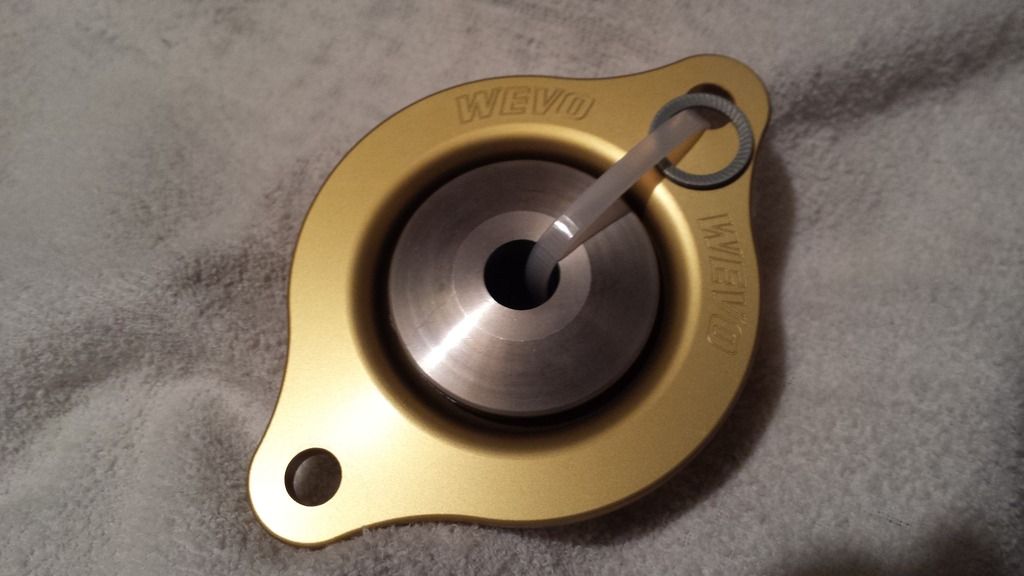
WEVO Engine/Trans Mounts (went with the black pillows):
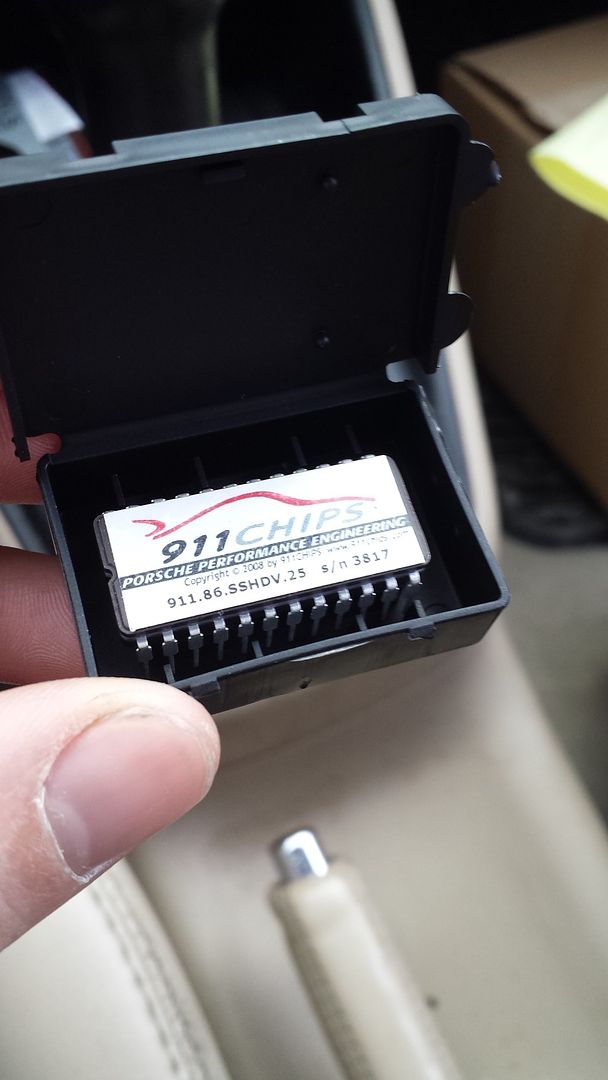
Horsepower at my fingertips (Steve Wong Chip):
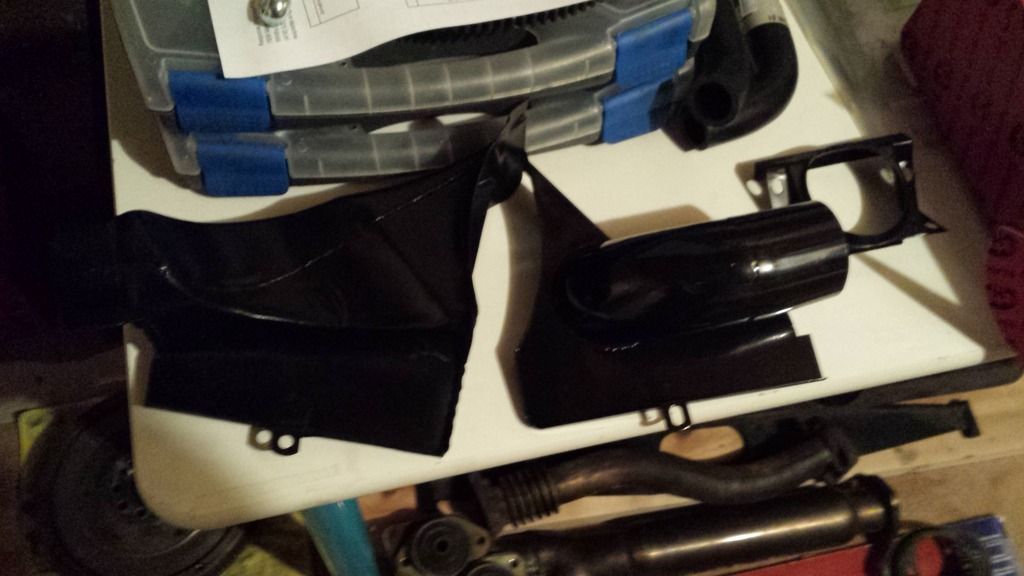
Backdate Heat Fan Shrouds:
Adding all of this to my existing pile of parts, I sat and stared at everything I had accumulated, half mesmerized by the beauty of it all, and half terrified at the work ahead of me!
Aluminum Oil Return Tubes:
New Hydraulic Tensioner Lines (more on these later):
SS Brake Lines:
Kennedy Engineering Stage 1 Clutch Kit (Aluminum Pressure Plate):
Patrick Motorsports Lightweight Flywheel:
WEVO Engine/Trans Mounts (went with the black pillows):
Horsepower at my fingertips (Steve Wong Chip):
Backdate Heat Fan Shrouds:
Adding all of this to my existing pile of parts, I sat and stared at everything I had accumulated, half mesmerized by the beauty of it all, and half terrified at the work ahead of me!
04-06-2015, 09:16 PM
#48
Race Car
Thread Starter
I started with what I like to refer to as "quick wins". Little mini projects that don't take a lot of time or effort, and leave you feeling like you made good progress! (Often my "quick wins" turn into mini terrors, but this time things went well).
The famous triangle of death was a breeze. Surfaces cleaned, old parts out/off, more cleaning, new seals on, and everything torqued properly. Nothing too exciting here.
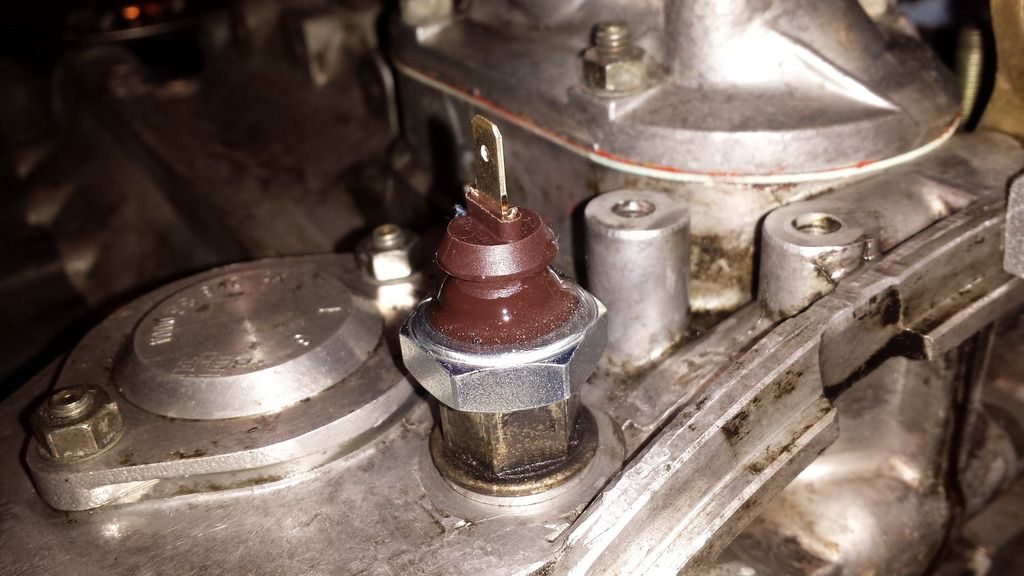
One thing to note is that I've heard of the oil pressure switch cracking at the plastic housing. An easy deterrent is to get some JB weld (I bought the clear epoxy) and coat the plastic housing in it. Can't even tell, but it's some added strength and peace of mind!
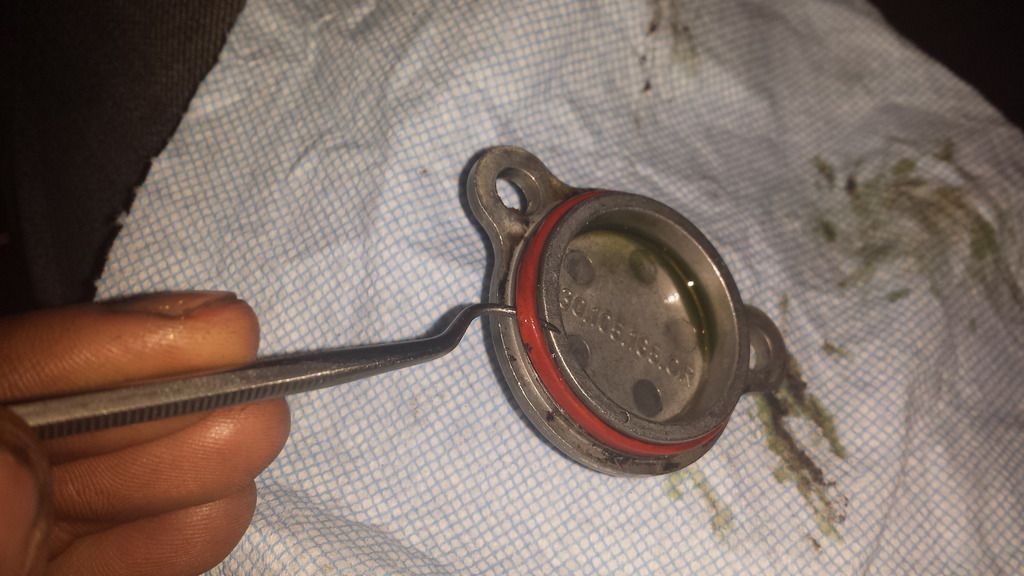
Another tip I was given was to use some gasket maker for the breather cover. I know I know... some call it the stuff of the devil... but I figured it couldn't hurt.
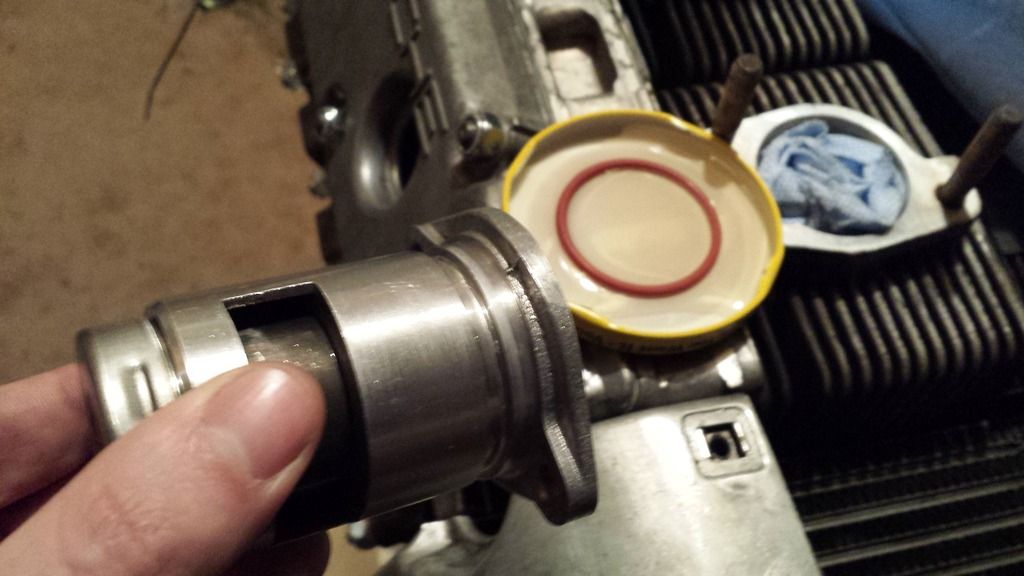
I poured some oil in a jar cap to lube up the new O-ring for the thermostat.
The famous triangle of death was a breeze. Surfaces cleaned, old parts out/off, more cleaning, new seals on, and everything torqued properly. Nothing too exciting here.
One thing to note is that I've heard of the oil pressure switch cracking at the plastic housing. An easy deterrent is to get some JB weld (I bought the clear epoxy) and coat the plastic housing in it. Can't even tell, but it's some added strength and peace of mind!
Another tip I was given was to use some gasket maker for the breather cover. I know I know... some call it the stuff of the devil... but I figured it couldn't hurt.
I poured some oil in a jar cap to lube up the new O-ring for the thermostat.
04-06-2015, 09:45 PM
#49
Race Car
Thread Starter
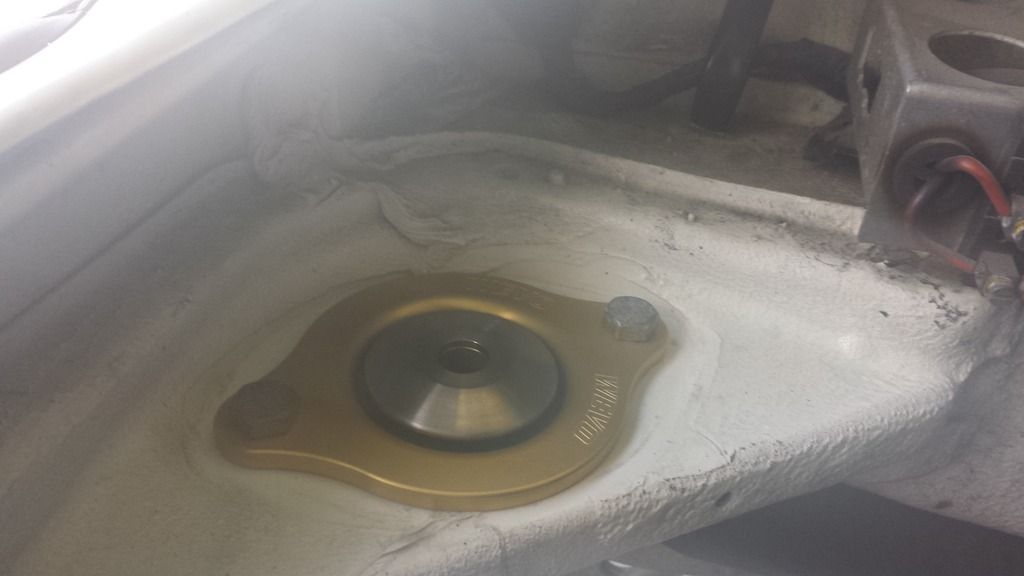
I was so excited about the WEVO mounts that I just had to install them into the car! Cleaned up the mounting surfaces first. So happy with how these look! They're really beautiful pieces of manufacturing.
My friends all know me as a "bit of" a minimalist. I have a unique obsession with getting rid of things that aren't necessary (to me), and I love to simplify things while also making them the best they can be. My apartment is a prime example of this... I don't have a lot, but what I do have is top quality and does exactly what I need it to, and I use absolutely everything I own. I don't keep anything that I might "use one day". My car is a further extension of this.... when an opportunity comes to make something better or to replace a part, I have a hard time not getting the best possible that suits my use of the car (hence WEVO/Patrick Motorsports/RarlyL8/Wong/etc...). So with that said, after installing the wevo engine mounts and sitting in my engine bay I couldn't help but to jump on the opportunity to finally get rid of the cruise control module which has bothered me since I got the car (and removed the cable).
The eyesore:
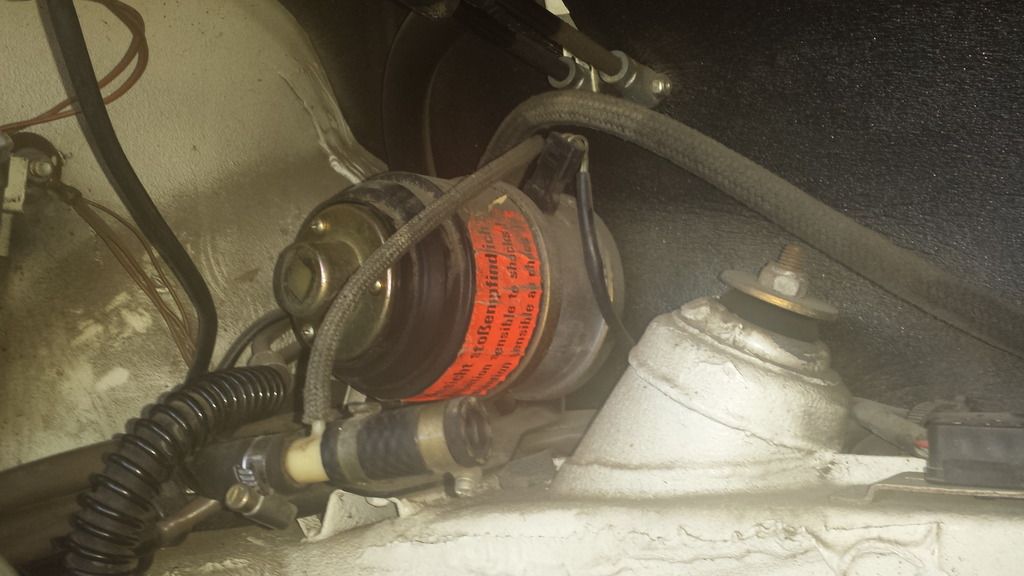
SO much better!
This minimalist theme will be continued later... and I'm sure one day in the future will be taken to the extreme.
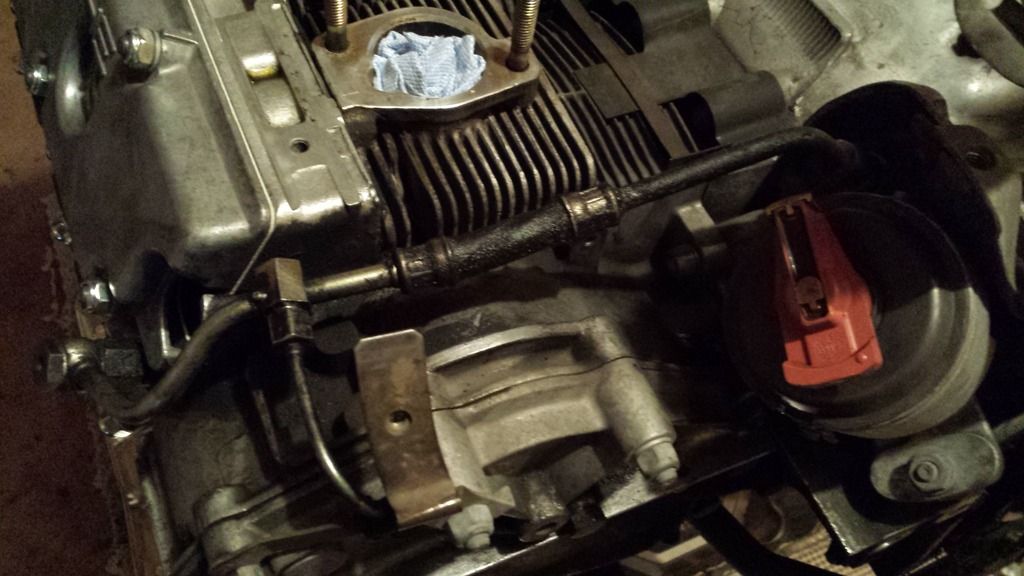
Back inside, I got to work on the hydraulic tensioner lines and chain covers. The old lines were quite grimy, and obviously ready to be replaced:
Chain covers off. Getting the left side off wasn't too difficult, it popped off with a slight pull. The right side however, was very stubborn. What I ended up doing was threading two zip ties through the holes along the ridge and using them as handles to pull the cover off. It took more force than I anticipated, and I much preferred this method over using a hammer/mallet.
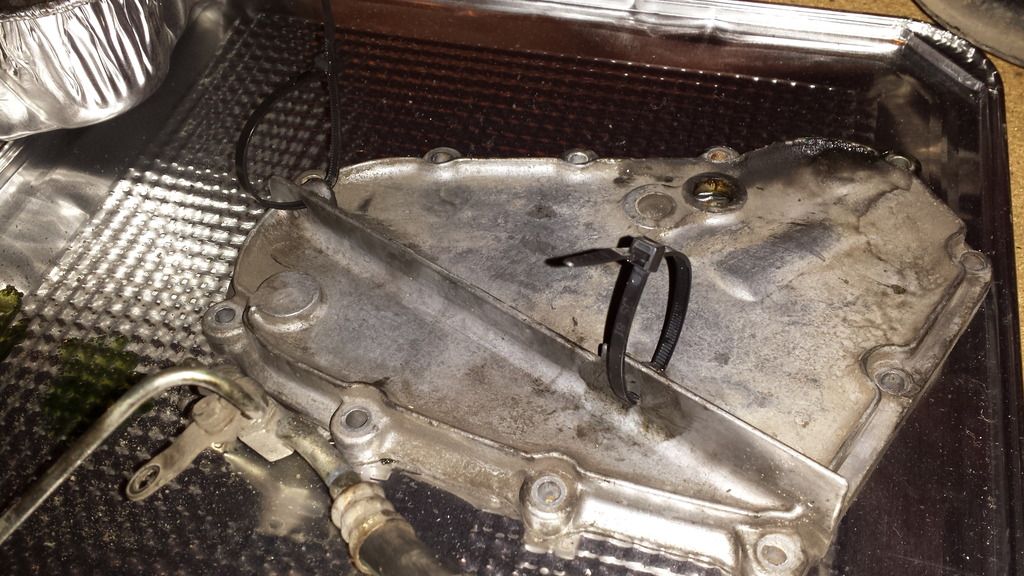
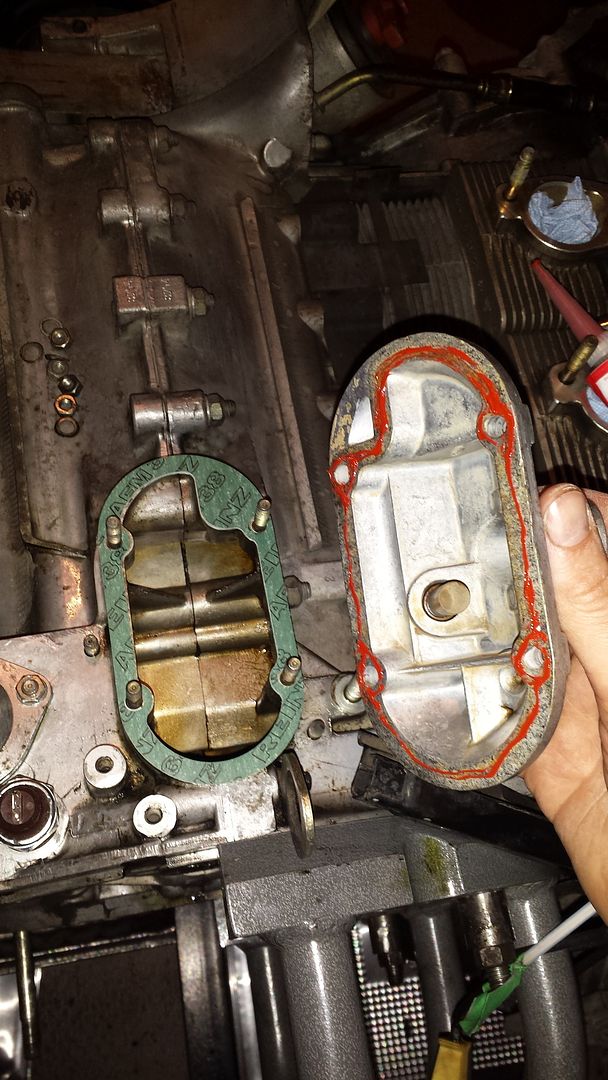
Covers off, I wonder when was the last time these gaskets were replaced!? They were pretty much embedded into the case, and it took a couple hours of careful scraping with a razor blade and cleaning the surface with brake cleaner before I was happy. Trick with the razor blade is to always keep the length of the blade flush against the surface so as to avoid marring the aluminum. Increasing the angle of the blade will apply more pressure to the surface, which I did as I got closer and closer to a smooth finish. I found that by sliding a bare finger along the surface you could easily tell when it was free of old gasket and debris. Any portion of the surface that has an increase in friction as you slide your finger along it, probably needs further cleaning.
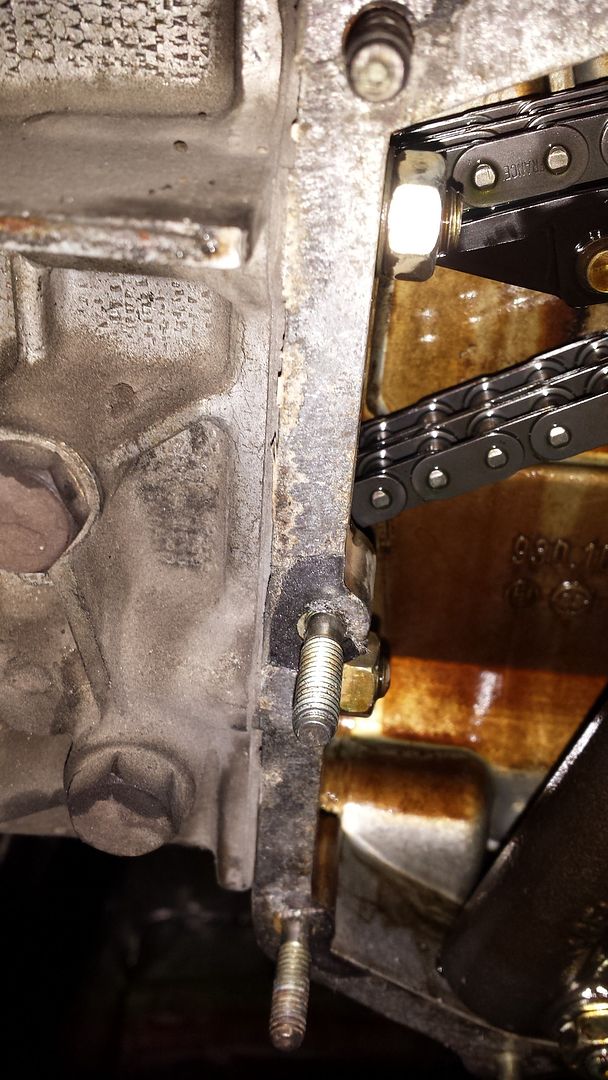
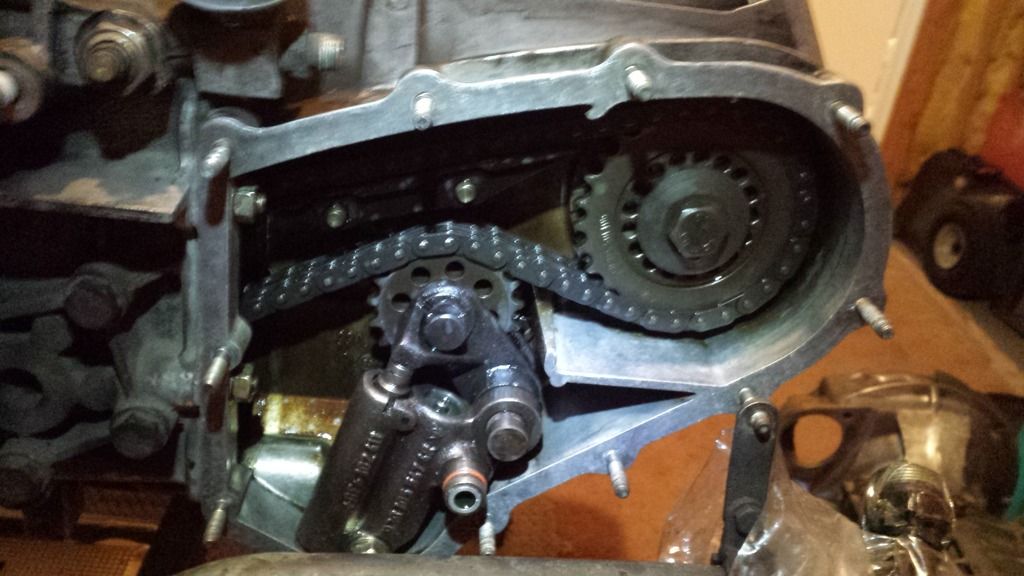
All cleaned, covers re-installed with new hardware and the new hydraulic tensioner lines installed with new crush washers:
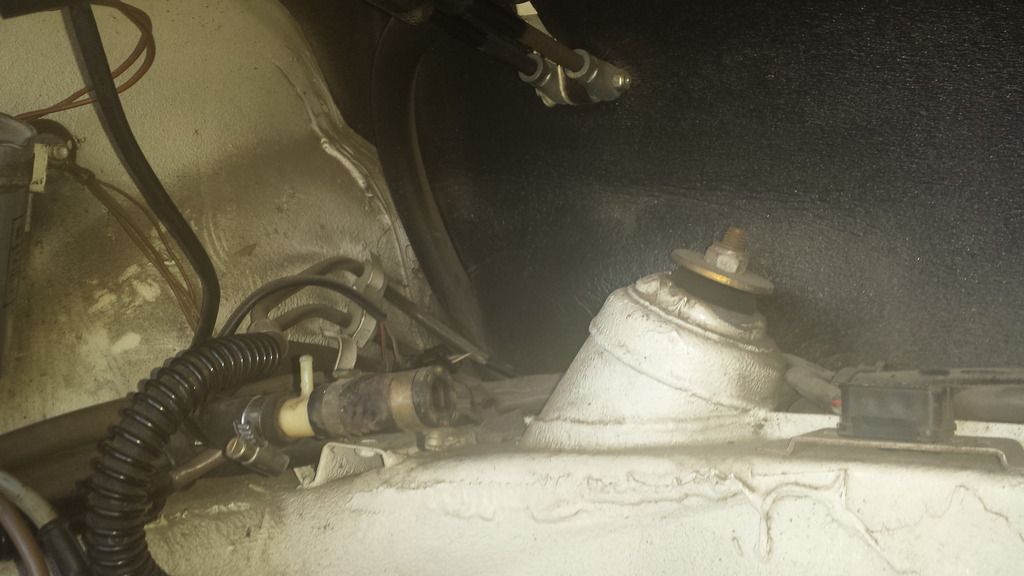
My friends all know me as a "bit of" a minimalist. I have a unique obsession with getting rid of things that aren't necessary (to me), and I love to simplify things while also making them the best they can be. My apartment is a prime example of this... I don't have a lot, but what I do have is top quality and does exactly what I need it to, and I use absolutely everything I own. I don't keep anything that I might "use one day". My car is a further extension of this.... when an opportunity comes to make something better or to replace a part, I have a hard time not getting the best possible that suits my use of the car (hence WEVO/Patrick Motorsports/RarlyL8/Wong/etc...). So with that said, after installing the wevo engine mounts and sitting in my engine bay I couldn't help but to jump on the opportunity to finally get rid of the cruise control module which has bothered me since I got the car (and removed the cable).
The eyesore:
SO much better!
This minimalist theme will be continued later... and I'm sure one day in the future will be taken to the extreme.
Back inside, I got to work on the hydraulic tensioner lines and chain covers. The old lines were quite grimy, and obviously ready to be replaced:
Chain covers off. Getting the left side off wasn't too difficult, it popped off with a slight pull. The right side however, was very stubborn. What I ended up doing was threading two zip ties through the holes along the ridge and using them as handles to pull the cover off. It took more force than I anticipated, and I much preferred this method over using a hammer/mallet.
Covers off, I wonder when was the last time these gaskets were replaced!? They were pretty much embedded into the case, and it took a couple hours of careful scraping with a razor blade and cleaning the surface with brake cleaner before I was happy. Trick with the razor blade is to always keep the length of the blade flush against the surface so as to avoid marring the aluminum. Increasing the angle of the blade will apply more pressure to the surface, which I did as I got closer and closer to a smooth finish. I found that by sliding a bare finger along the surface you could easily tell when it was free of old gasket and debris. Any portion of the surface that has an increase in friction as you slide your finger along it, probably needs further cleaning.
All cleaned, covers re-installed with new hardware and the new hydraulic tensioner lines installed with new crush washers:
04-06-2015, 09:59 PM
#50
Race Car
Thread Starter
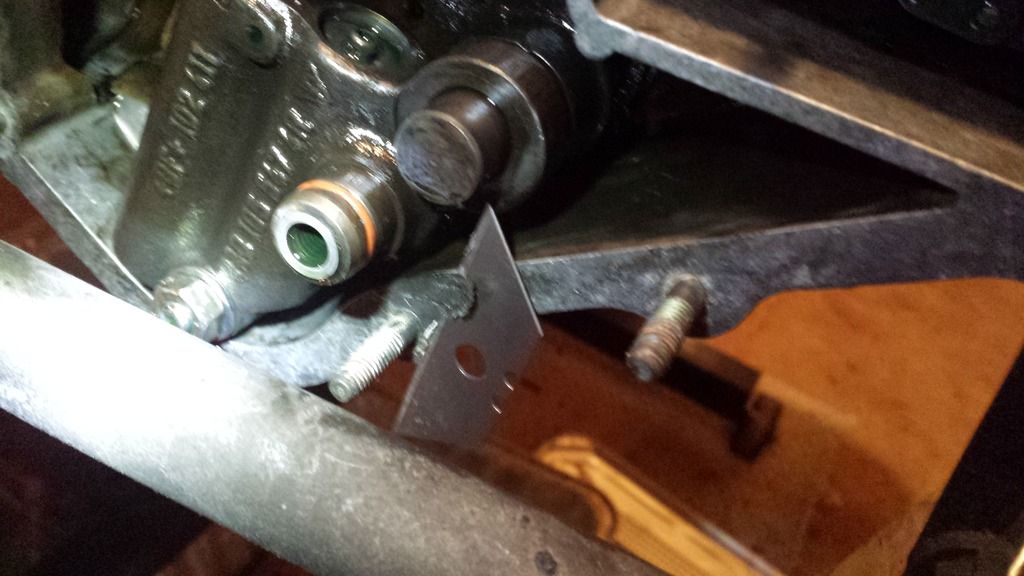
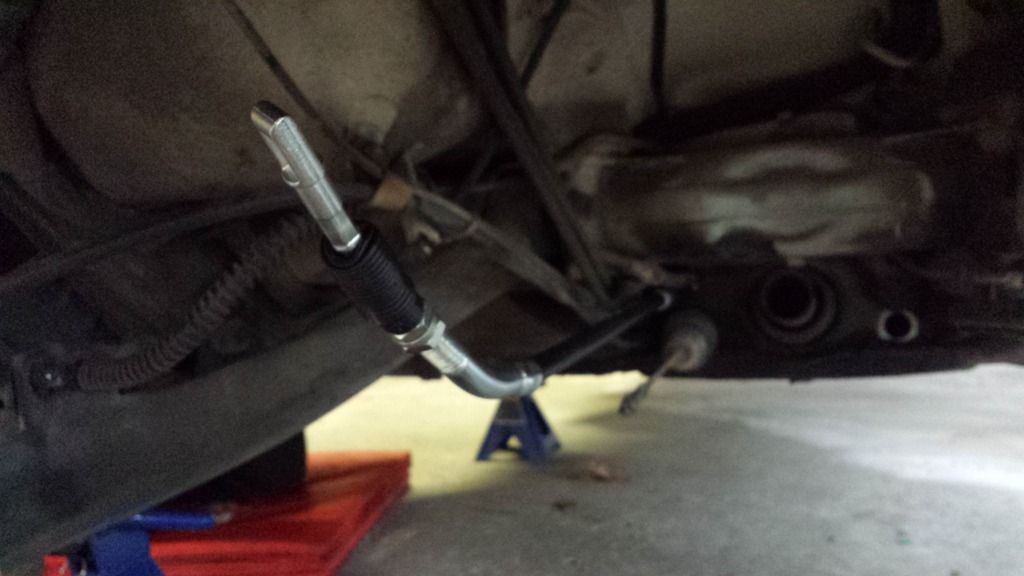
Ok, so the hydraulic tensioner lines didn't go smoothly, and are yet to be properly installed. I want to document it here in a separate post for future reference as I found it difficult to find the information I wanted in a single source. I will update this post as I complete this part of the project.
I ordered new lines from the cam box to the crankcase, but I did not order new hard lines from the chain covers up to the oil lines. When I went to re-install everything with the new oil lines, the right side went smoothly but the left side didn't line up!
Here's the issue, as you can see the hard line connecting point doesn't line up with the bung on the new oil line:
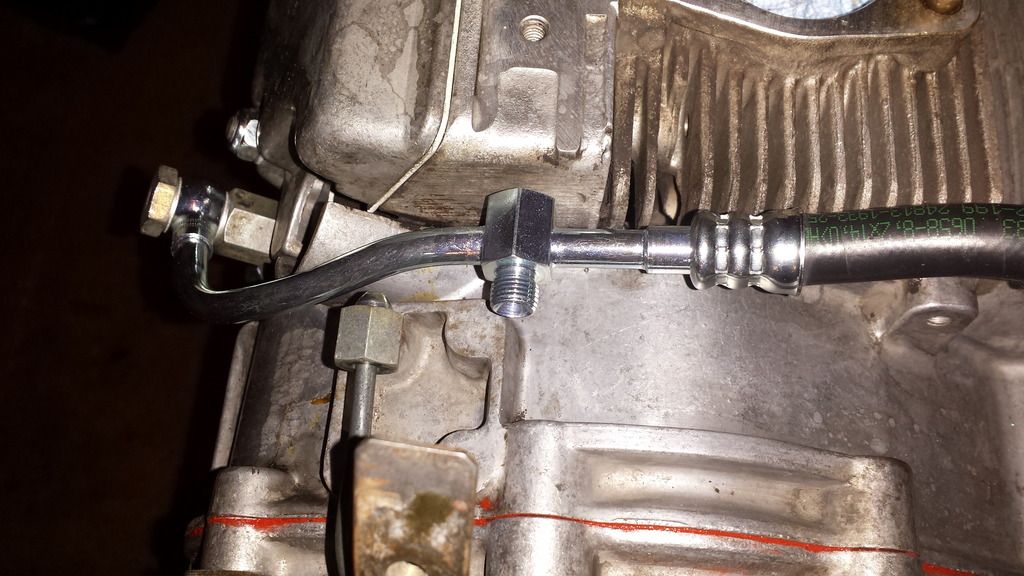
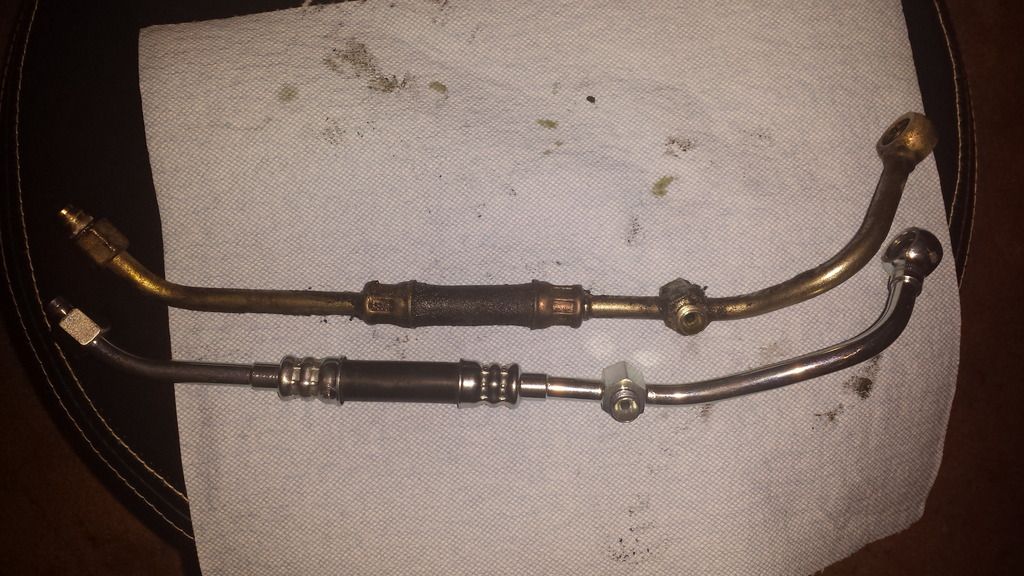
Here's why, the new oil line has the bung (or whatever the proper term is) in a different location along the length of the oil line:
So I did my research and it appears that this new oil line supersedes the original part number. For future reference, the left hand side oil line I ordered is part # 930 107 347 12
There are a couple of solutions. The first solution:
1) Massage/bend the old hard line to mate the new oil line
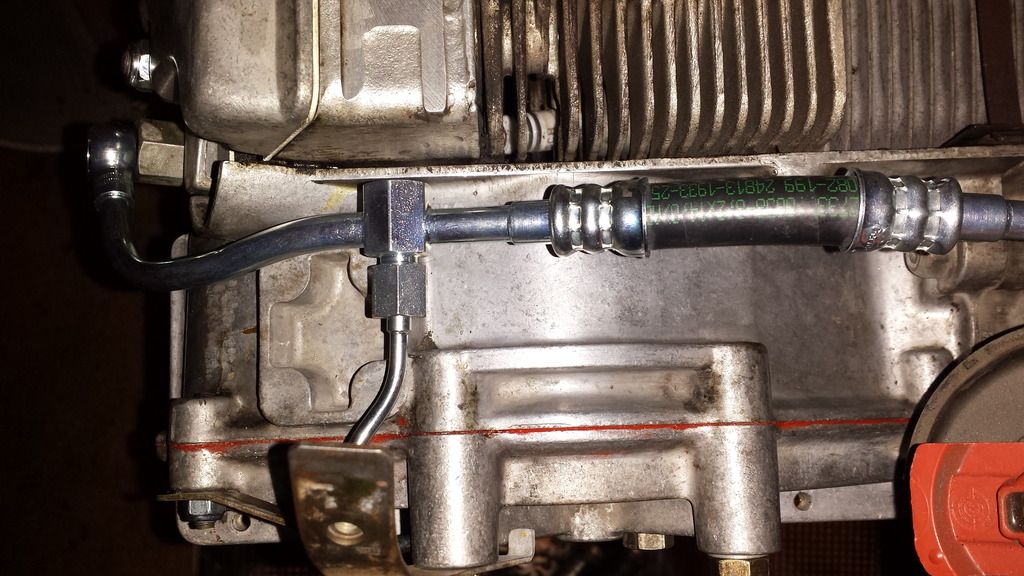
Personally, I like things to work nicely the way they are supposed to without needing to modify them. The idea of bending the old line to "make it work" didn't appeal to me, and I thought there must be a proper part to mate nicely with the new oil line. But which one? After doing my research, I found what should be the proper replacement part, giving us solution #2:
2) Replace the hard line with part # 930-107-347-09-M20 (a 964 part) ($21 from the bird)
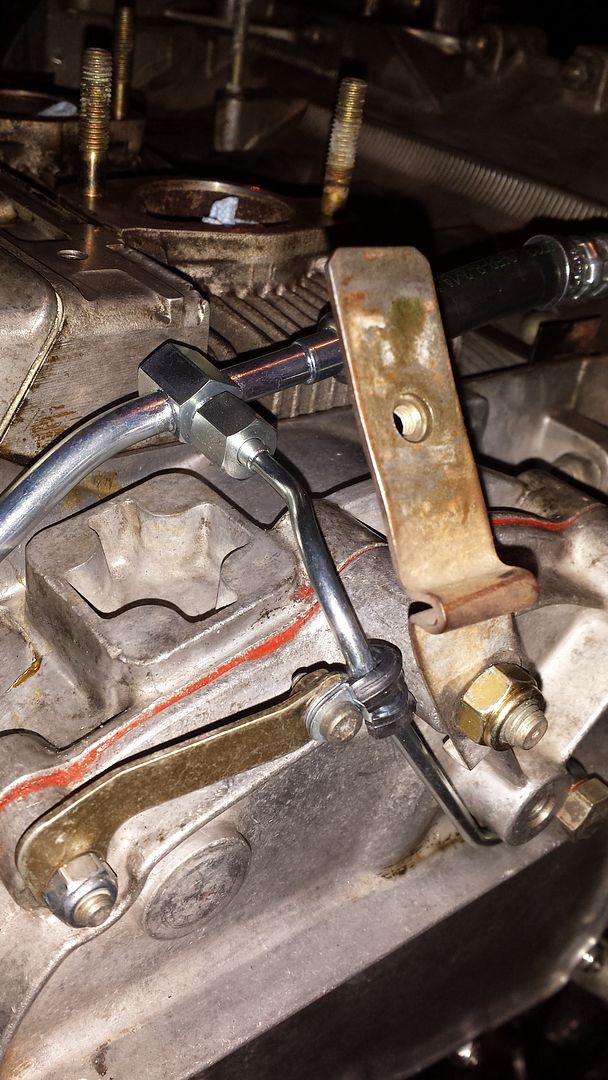
This part has the bend to the right, instead of straight out at the top where it meets the oil line, thus bringing the nipple towards the bung on the oil line. It fits very nicely without any bending! Here is this part installed:
Finally, for your reference here are the dimensions of the crush/sealing washers you need:
1) For the left and right oil line banjo bolts: 12 x 15 x 1.5 mm (require 2 per side, or 4 per side if removing the adaptor at the crankcase as well)
2) For the hard line banjo bolts: 8.5 x 11mm (require 2 per side)
The torque spec for the banjo bolts are:
1) For the left and right oil line banjo bolts: TBD
2) For the hardline banjo bolts into the chain case: TBD (I did 8 Nm to start)
I ordered new lines from the cam box to the crankcase, but I did not order new hard lines from the chain covers up to the oil lines. When I went to re-install everything with the new oil lines, the right side went smoothly but the left side didn't line up!
Here's the issue, as you can see the hard line connecting point doesn't line up with the bung on the new oil line:
Here's why, the new oil line has the bung (or whatever the proper term is) in a different location along the length of the oil line:
So I did my research and it appears that this new oil line supersedes the original part number. For future reference, the left hand side oil line I ordered is part # 930 107 347 12
There are a couple of solutions. The first solution:
1) Massage/bend the old hard line to mate the new oil line
Personally, I like things to work nicely the way they are supposed to without needing to modify them. The idea of bending the old line to "make it work" didn't appeal to me, and I thought there must be a proper part to mate nicely with the new oil line. But which one? After doing my research, I found what should be the proper replacement part, giving us solution #2:
2) Replace the hard line with part # 930-107-347-09-M20 (a 964 part) ($21 from the bird)
This part has the bend to the right, instead of straight out at the top where it meets the oil line, thus bringing the nipple towards the bung on the oil line. It fits very nicely without any bending! Here is this part installed:
Finally, for your reference here are the dimensions of the crush/sealing washers you need:
1) For the left and right oil line banjo bolts: 12 x 15 x 1.5 mm (require 2 per side, or 4 per side if removing the adaptor at the crankcase as well)
2) For the hard line banjo bolts: 8.5 x 11mm (require 2 per side)
The torque spec for the banjo bolts are:
1) For the left and right oil line banjo bolts: TBD
2) For the hardline banjo bolts into the chain case: TBD (I did 8 Nm to start)
Last edited by porsche0nut; 04-09-2015 at 08:03 PM.
04-06-2015, 10:32 PM
#51
Rennlist Member
Great job so far. Loving the Wevo mounts.
Check your distributor side backdate heating duct.
I had to get mine modified to clear the dizzy.
I also needed to get the steel right angles pieces that attach to the inlets on my heat exchangers.
Check your distributor side backdate heating duct.
I had to get mine modified to clear the dizzy.
I also needed to get the steel right angles pieces that attach to the inlets on my heat exchangers.
04-06-2015, 10:54 PM
#52
Race Car
Thread Starter
Thanks Ian! I heard stories about that left side heating duct... the metal is pretty thin (unlike the right side which is very high quality and fit) so I should be able to form it to the shape I need... if needed. I'm hoping it's minimal! Good tip on the heat exchangers, I have quite a bit of flexible hose so I'm hoping I'm ok.
What heat exchangers are you running?
What heat exchangers are you running?
04-06-2015, 11:04 PM
#53
Race Car
Thread Starter
Got the pulley off and cleaned up the front of the engine:
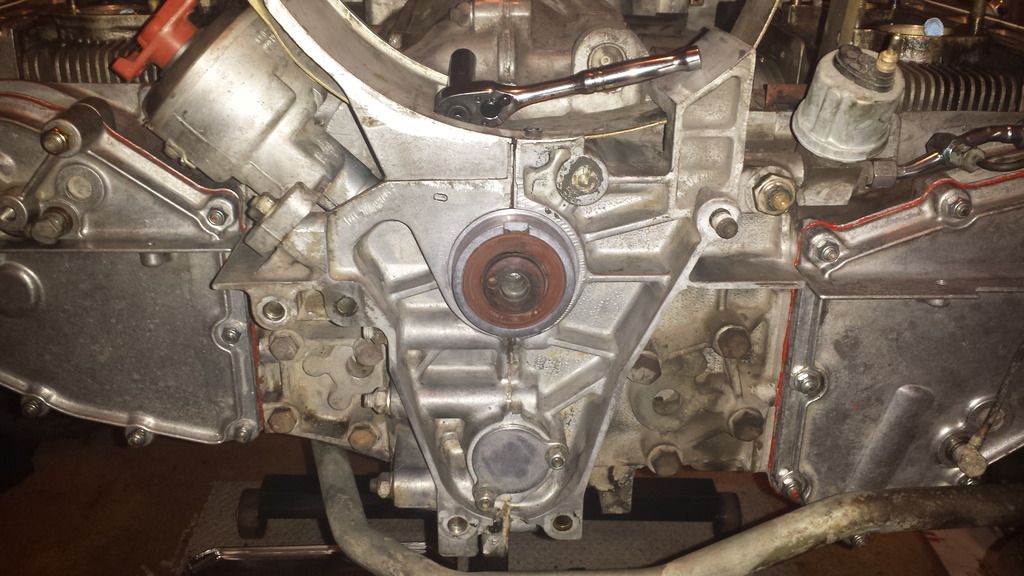
... removed crank seal:
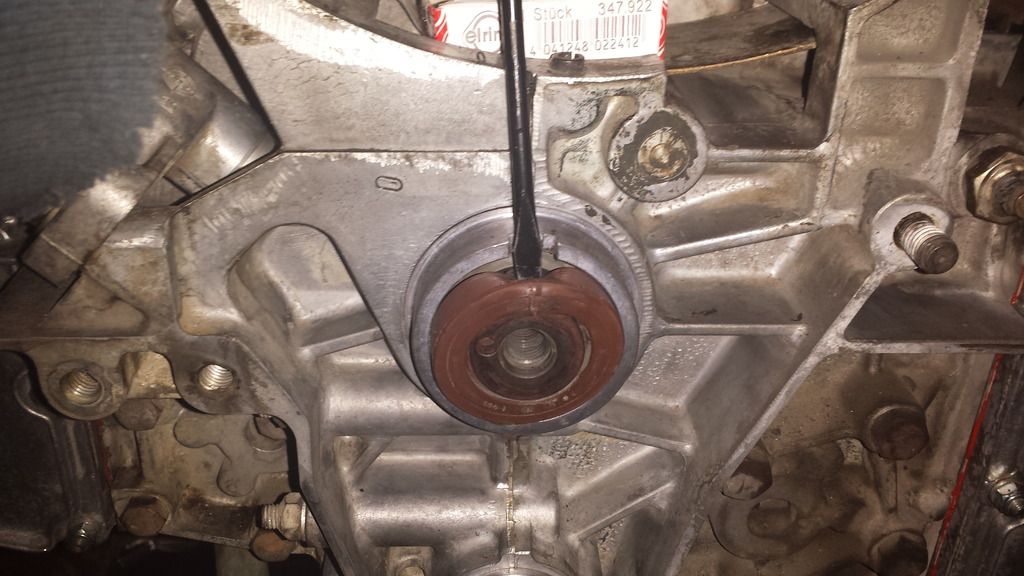
... installed new one (turns out a tool I had was the perfect diameter to press the new one into place):
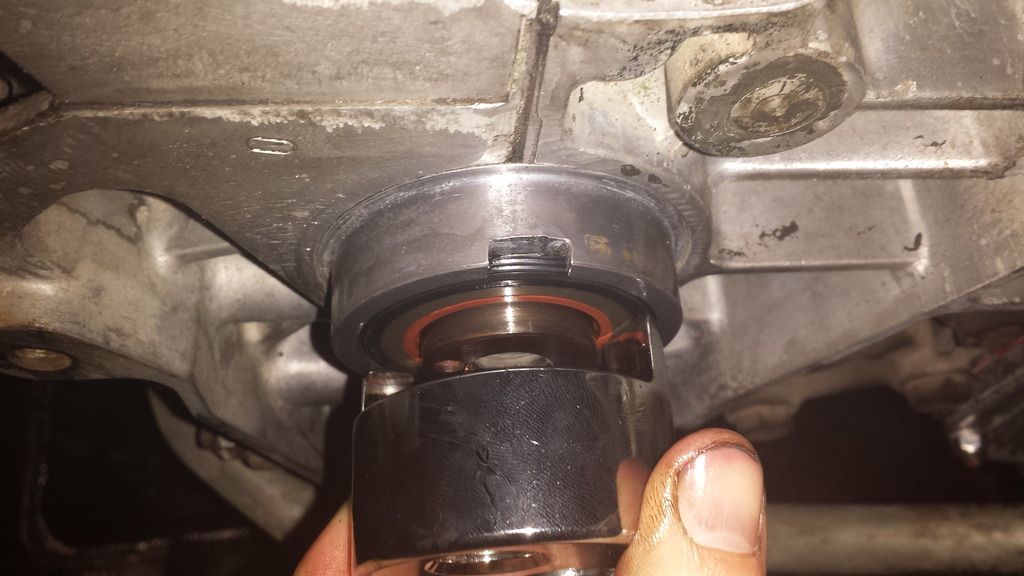
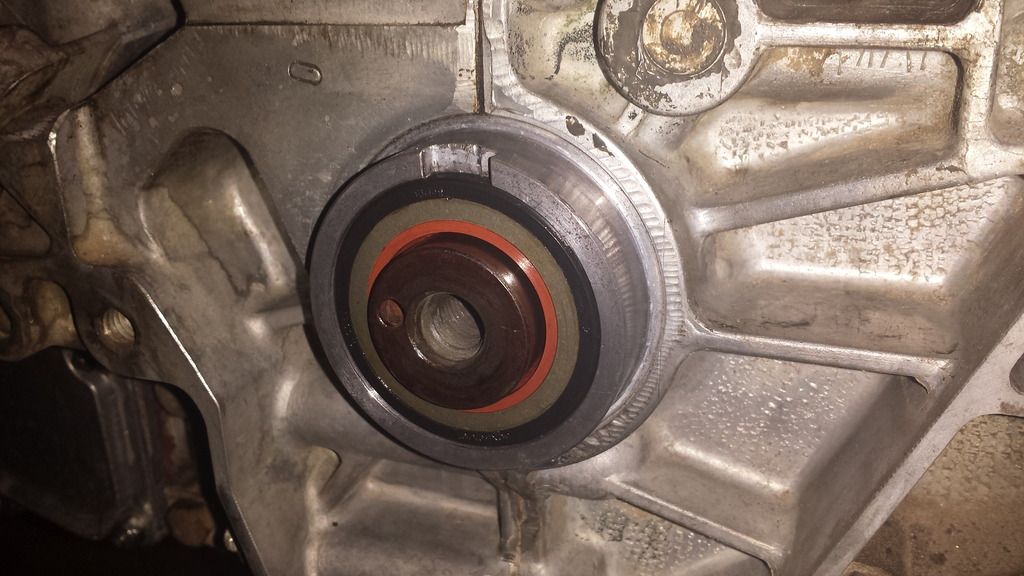
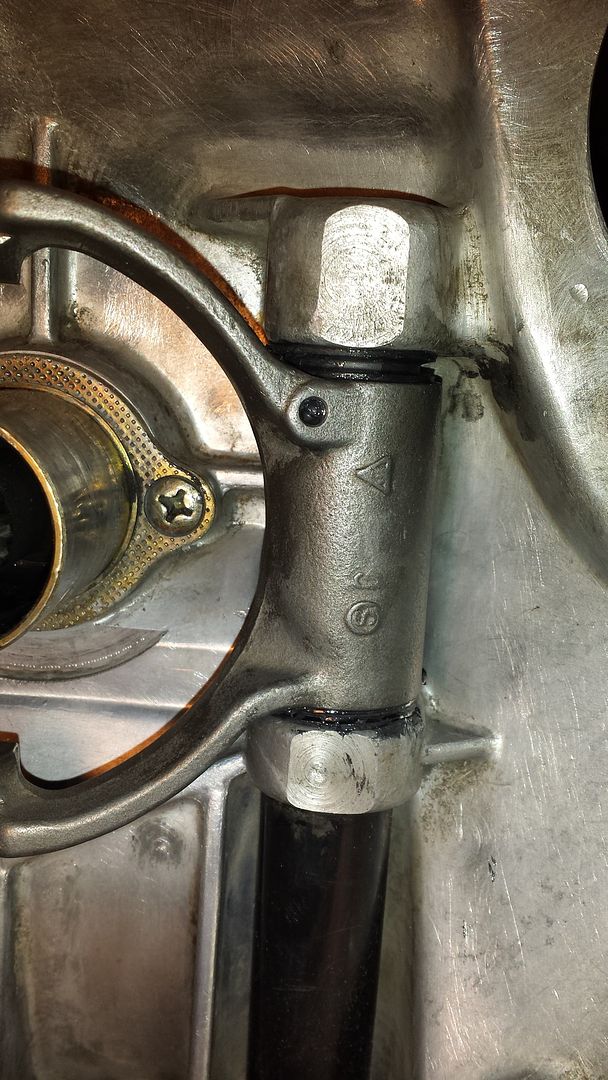
... replaced the O-ring on the lower cover, these dental pics are perfect!
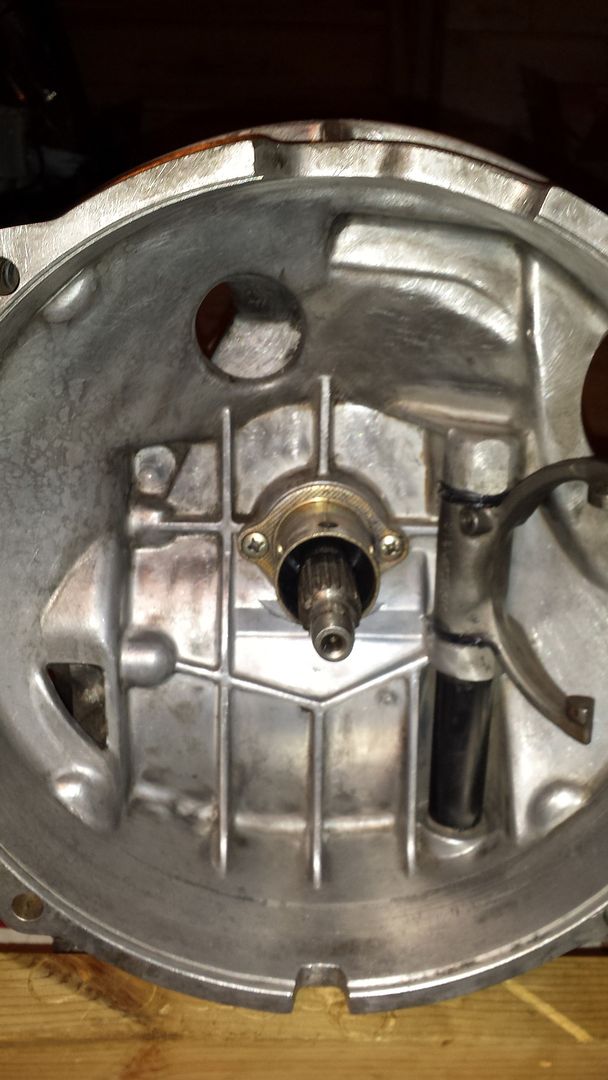
Then I cleaned, greased (Swepco 101) and re-installed my clutch fork. When I removed it, there were only 2 rubber seals, one on the underside of the bell housing and one right below the fork. I used 3 when I re-installed, adding a seal to the top of the clutch fork. There seemed to be room for it, and my thinking is that it can't hurt to help keep the grease in and dirt out.
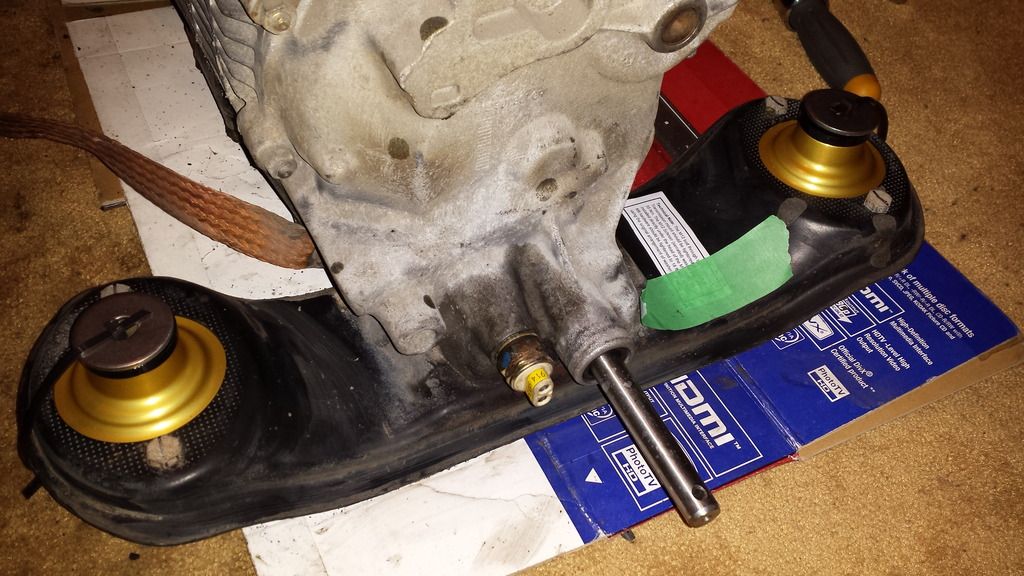
Finally, installed the WEVO mounts onto the transmission cross-member (this end of the tranny didn't get cleaned very well). Bolts are marked with a sharpee to tell me that I've torqued them already:
... removed crank seal:
... installed new one (turns out a tool I had was the perfect diameter to press the new one into place):
... replaced the O-ring on the lower cover, these dental pics are perfect!
Then I cleaned, greased (Swepco 101) and re-installed my clutch fork. When I removed it, there were only 2 rubber seals, one on the underside of the bell housing and one right below the fork. I used 3 when I re-installed, adding a seal to the top of the clutch fork. There seemed to be room for it, and my thinking is that it can't hurt to help keep the grease in and dirt out.
Finally, installed the WEVO mounts onto the transmission cross-member (this end of the tranny didn't get cleaned very well). Bolts are marked with a sharpee to tell me that I've torqued them already:
04-06-2015, 11:21 PM
#54
Race Car
Thread Starter
Final update of the evening, this should bring me up to date!
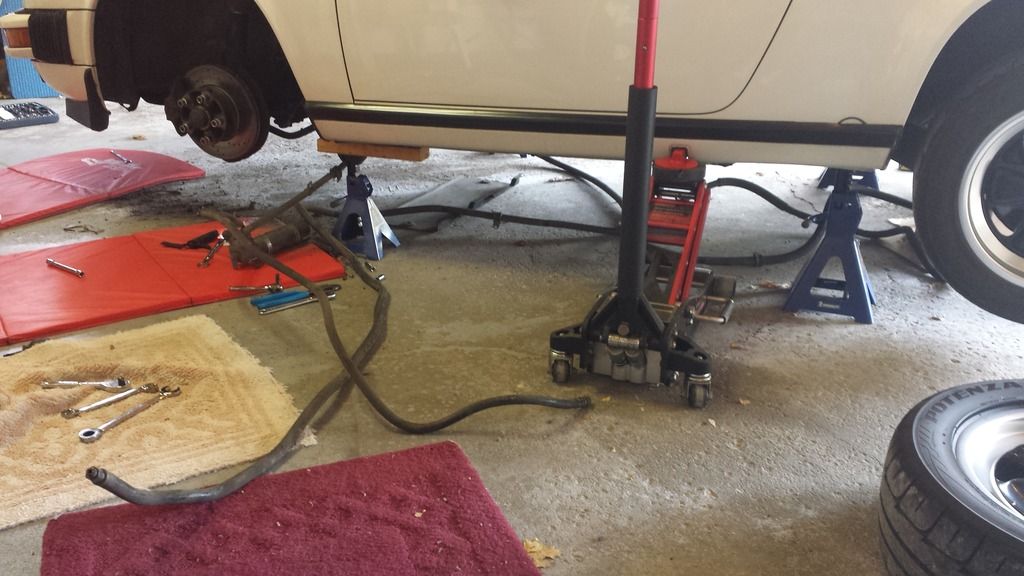
I went back to the garage to complete a few more mini projects (quick wins) which has the car itself at the point I want it for now with the engine out. I opted to hold off installing the SS brake lines, as I'm on a tight timeline (I want to drive down to Hershey on the 17th!) and they are a "want" not "need" to do right now. So they will wait until after Hershey.
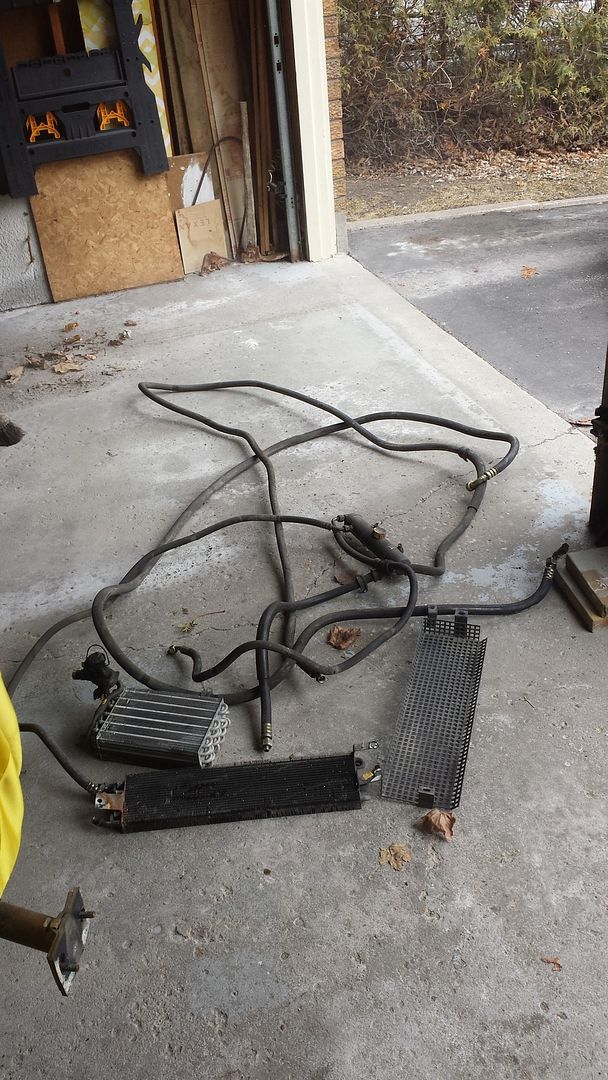
First up, removal of the AC lines! (ok, this is also a "want" thing... but remember what I said about being obsessed with getting rid of things I don't need/use/want?). Yes, this had to happen. It wasn't easy, they really jam those lines into tight places! I couldn't believe how much of it there was... but it sure felt great to get it out! Less weight, more space, cleaner look... love it.
Next up, installing the new clutch cable. It was fun fiddling with the floorboard to get it over my rennline pedals, but with some patience it slipped over them exposing my pedal tray. To my delight, the pedal tray looked to be in fantastic condition and the clutch cable was disconnected and removed extremely easily, the only difficult part being the confined space you have to work with while squished into the driver's footwell! I found myself wishing my hands were smaller (and I don't have huge hands to begin with).
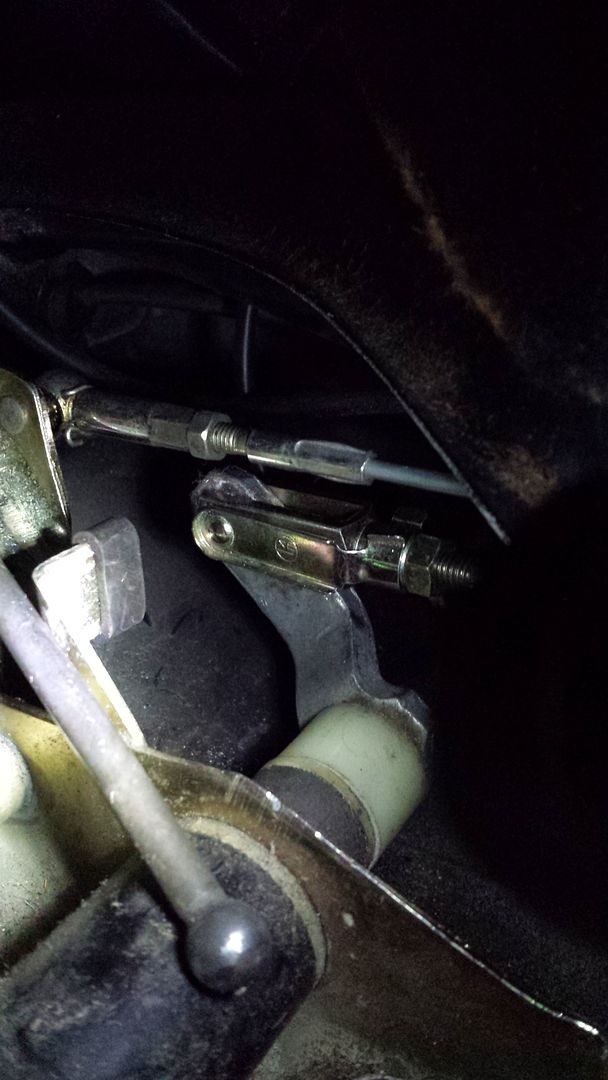
Bentley says to thread the clevice onto the new cable between 17 and 22mm. I marked the threads to show this range for an easy visual while in the car.
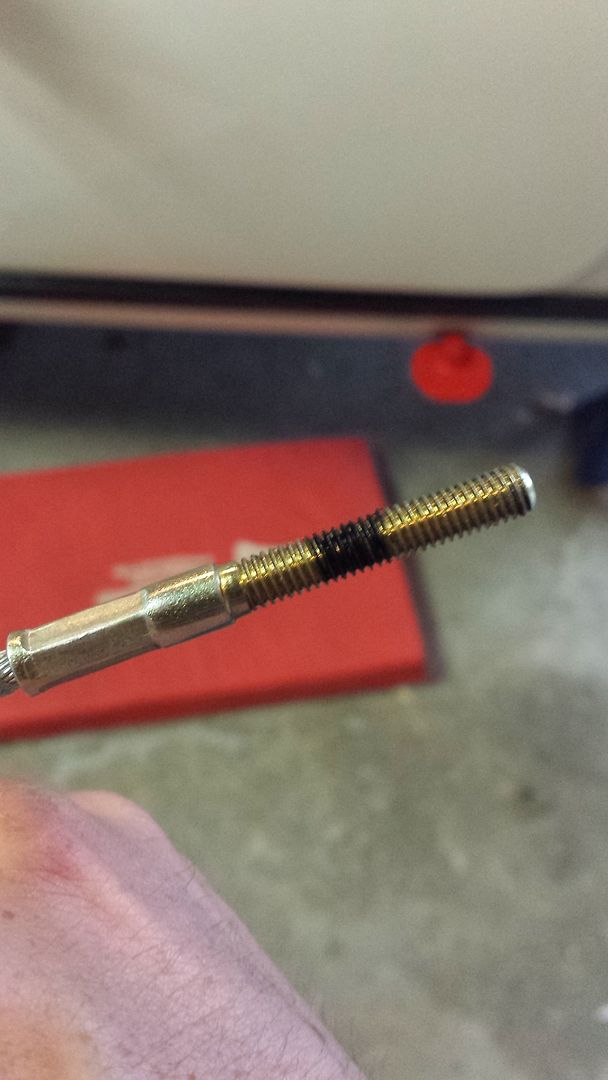
New cable looks good!
And finally... the Steve Wong chip was installed!! Working very delicately, this was a rewarding job. Steve's instructions are spectacular, going into detail so far as to describe exactly how to separate the board and the tricks to open the plastic fasteners without damaging them. 2 thumbs up to Steve, who has been fantastic throughout the entire buying process. For the following photo, I'm not dangling the ECU... it's in my lap!
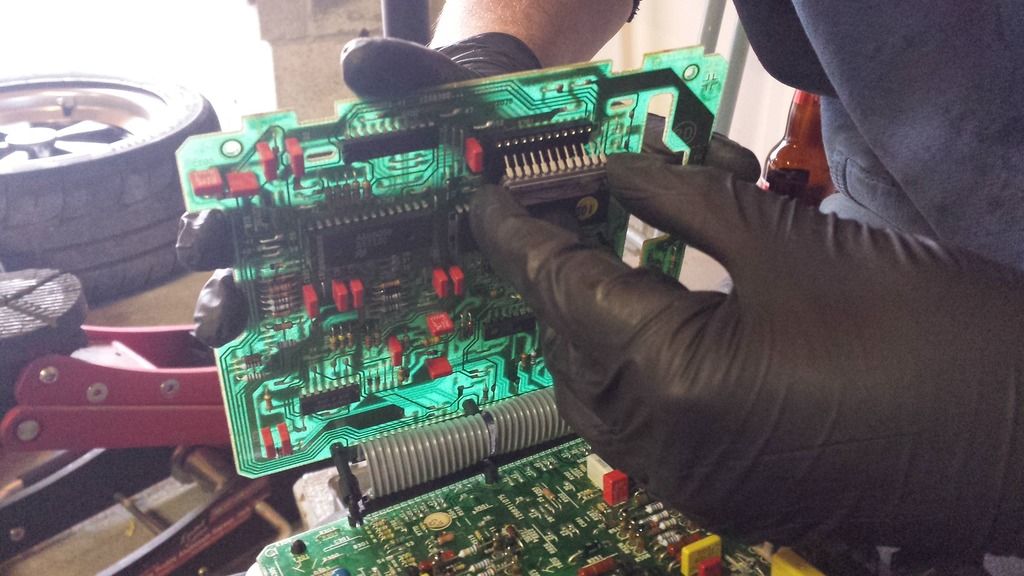
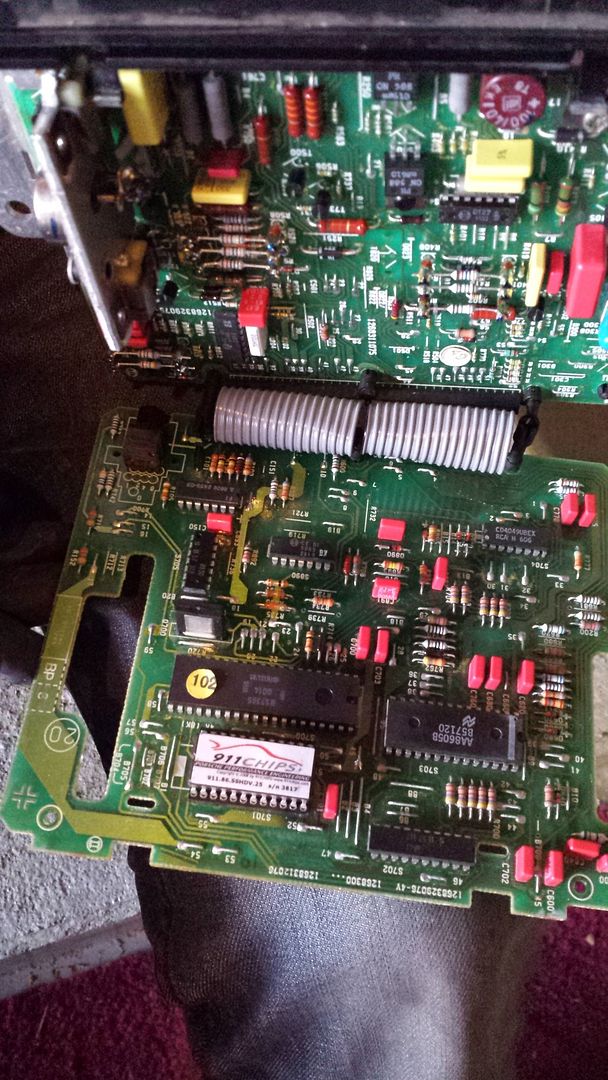
Interestingly enough, the chip I pulled out wasn't the stock chip! It was a Weltmeister chip circa 1992 (according to its label). I am happy I did the swap, as I have heard unfavourable reviews about the Weltmeister. I am anticipating my car to feel like a new machine when it's back on the road next week!
I went back to the garage to complete a few more mini projects (quick wins) which has the car itself at the point I want it for now with the engine out. I opted to hold off installing the SS brake lines, as I'm on a tight timeline (I want to drive down to Hershey on the 17th!) and they are a "want" not "need" to do right now. So they will wait until after Hershey.
First up, removal of the AC lines! (ok, this is also a "want" thing... but remember what I said about being obsessed with getting rid of things I don't need/use/want?). Yes, this had to happen. It wasn't easy, they really jam those lines into tight places! I couldn't believe how much of it there was... but it sure felt great to get it out! Less weight, more space, cleaner look... love it.
Next up, installing the new clutch cable. It was fun fiddling with the floorboard to get it over my rennline pedals, but with some patience it slipped over them exposing my pedal tray. To my delight, the pedal tray looked to be in fantastic condition and the clutch cable was disconnected and removed extremely easily, the only difficult part being the confined space you have to work with while squished into the driver's footwell! I found myself wishing my hands were smaller (and I don't have huge hands to begin with).
Bentley says to thread the clevice onto the new cable between 17 and 22mm. I marked the threads to show this range for an easy visual while in the car.
New cable looks good!
And finally... the Steve Wong chip was installed!! Working very delicately, this was a rewarding job. Steve's instructions are spectacular, going into detail so far as to describe exactly how to separate the board and the tricks to open the plastic fasteners without damaging them. 2 thumbs up to Steve, who has been fantastic throughout the entire buying process. For the following photo, I'm not dangling the ECU... it's in my lap!
Interestingly enough, the chip I pulled out wasn't the stock chip! It was a Weltmeister chip circa 1992 (according to its label). I am happy I did the swap, as I have heard unfavourable reviews about the Weltmeister. I am anticipating my car to feel like a new machine when it's back on the road next week!
Last edited by porsche0nut; 04-08-2015 at 11:55 PM.
04-06-2015, 11:31 PM
#55
Rennlist Member
Thanks Ian! I heard stories about that left side heating duct... the metal is pretty thin (unlike the right side which is very high quality and fit) so I should be able to form it to the shape I need... if needed. I'm hoping it's minimal! Good tip on the heat exchangers, I have quite a bit of flexible hose so I'm hoping I'm ok.
What heat exchangers are you running?
What heat exchangers are you running?
The elbows I needed are #27 in the diagram, p/n 911 211 025 01
04-06-2015, 11:47 PM
#56
Team Owner
Just make sure when tightening down the banjo bolts, the oil lines are configured so you can still get the intake valve cover off for Valve adjustment. It's easy to be off a few degrees and you won't be able to get the cover off due to the oil line.
04-08-2015, 02:58 PM
#57
Rennlist Member
Dude! Mind blown... I thought taking half of my exhaust apart to install some spark plugs was killer... this is MANY more levels above. Good luck and hope you don't have any more terrors on your path to assembly.
04-09-2015, 03:41 PM
#58
Race Car
Thread Starter
Took a vacation day tomorrow... thanks to Ian for sending me his Stomski exhaust stud repair kit! With any luck I'll have all of them out and the threads cleaned by the end of the day tomorrow, and the engine back together and in the car by the end of the weekend!
Did I say a "little" luck?
Oh, pics on their way later for some exciting shiny tubes that arrived yesterday.....
EDIT: OH BOY OH BOY OH BOY!!!
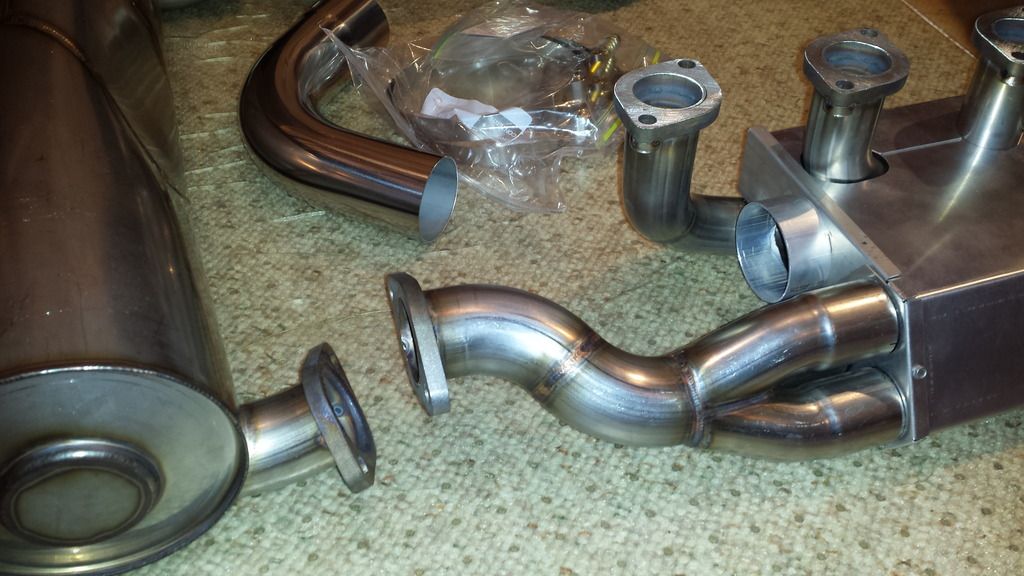
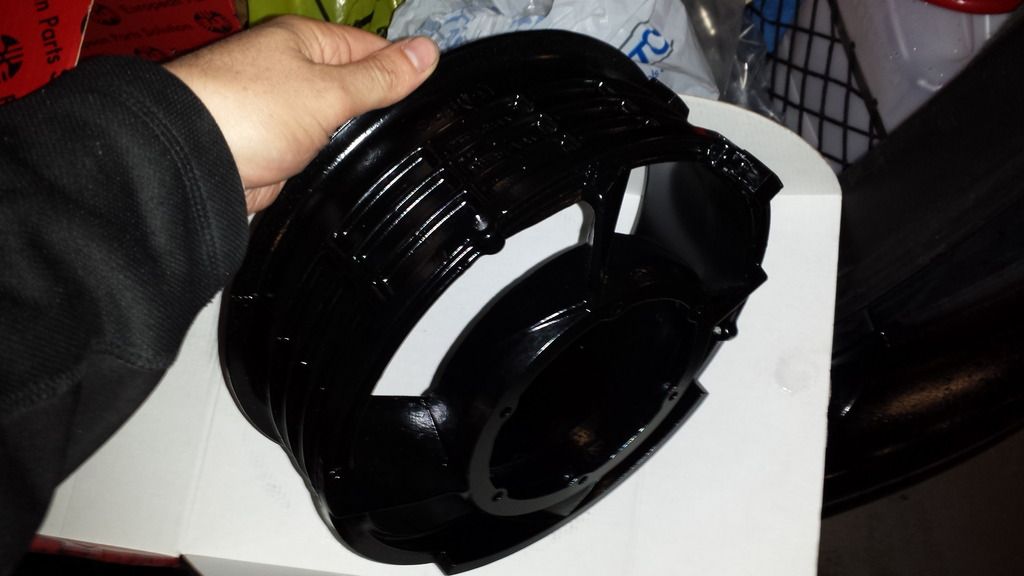
So that was exciting! Then today I got to go pick up my fan housing from the powder coaters.... it looks mighty fine!! They put silicon plugs in the threaded holes to protect them from the painting process.

Did I say a "little" luck?
Oh, pics on their way later for some exciting shiny tubes that arrived yesterday.....
EDIT: OH BOY OH BOY OH BOY!!!
So that was exciting! Then today I got to go pick up my fan housing from the powder coaters.... it looks mighty fine!! They put silicon plugs in the threaded holes to protect them from the painting process.
Last edited by porsche0nut; 04-09-2015 at 07:59 PM.
04-10-2015, 12:35 AM
#59
Rennlist Member
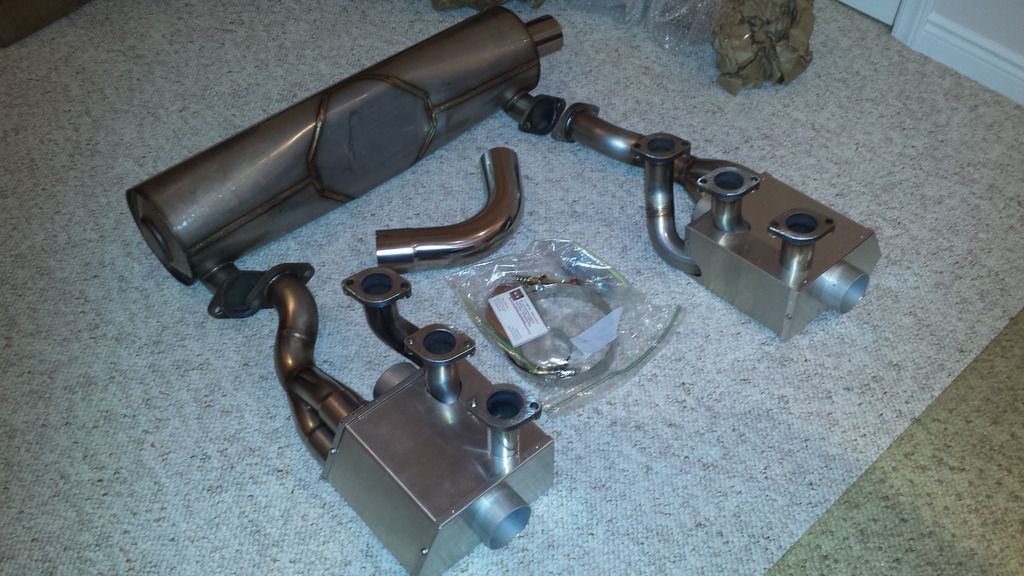
Hey Jonathan, I can hardly wait to get the lowdown on (and hear) those headers. When I found out you could get them with heat, I was stoked! That is exactly what I want to get for my car, with an M&K GT3 style muffler with the two outlets in the centre.
-edit-
Just noticed that the inner part of your fan housing where the alternator mounts is coated as well. When I had mine done I had them mask that area off. I hope the thickness of the coat doesn't interfere with inserting your alternator.
-edit-
Just noticed that the inner part of your fan housing where the alternator mounts is coated as well. When I had mine done I had them mask that area off. I hope the thickness of the coat doesn't interfere with inserting your alternator.
04-10-2015, 01:34 AM
#60
Race Car
Thread Starter
Hey Jonathan, I can hardly wait to get the lowdown on (and hear) those headers. When I found out you could get them with heat, I was stoked! That is exactly what I want to get for my car, with an M&K GT3 style muffler with the two outlets in the centre.
-edit-
Just noticed that the inner part of your fan housing where the alternator mounts is coated as well. When I had mine done I had them mask that area off. I hope the thickness of the coat doesn't interfere with inserting your alternator.
-edit-
Just noticed that the inner part of your fan housing where the alternator mounts is coated as well. When I had mine done I had them mask that area off. I hope the thickness of the coat doesn't interfere with inserting your alternator.
I'm very excited to hear the headers! Hopefully the progress goes well this weekend and you can hear it on the way to Hershey. The GT3 centre style was definitely considered... but in the end I opted for the stock outlet so that I avoid needing to cut into the valence. Wachuko just got the GT3 style, has pics in his thread! Looks fantastic...