
A recent thread...
 07-22-2008, 12:50 PM
#1
Rennlist Member
Thread Starter
...inspired this post. Hopefully this tech guide for clutch cable replacement will help some of you get through the job!
Clutch cable removal – 1977-1986
1. Place the car in the garage so that you have room to open your driver's door, if not all the way at least most of the way.
2. Jack up the rear of the car until the bottom of the tires clear the floor by a few inches (you want enough room so that you can get under the front transmission mount plate). Set the car firmly on axle stands and then put your jack under the belly of the car for extra protection. I use a 1' x 2' piece of 3/4" ply between the jack and car, and place the wood so that it's under where the horizontal part of the floor changes to vertical (the rear "firewall" just forward of the trans mount). Now the car won't fall! Of course, if you have a lift, use that!
3. Remove the pedal board carpet, driver's floor carpet, and the pedal board. To release the gas pedal simply grip it firmly at the top and pull straight back - it'll pop off its rod. Pull the board away from the pedals. FYI: Do not attempt to remove the center console for this repair.
4. Go under the car with two 15mm open end wrenches, 2x flat-bladed medium screwdrivers, 1x large flat-bladed screwdriver or medium pry bar, and a snap ring pliers that works on retaining rings with small holes in the ends. Locate the omega spring under the diff housing, along with the long arm that it attaches to, and a short arm whose end seats against the end of an adjustment bolt. Remove the snap ring holding the short arm, pull the arm straight down and set it aside (you might need a couple of flat-bladed screwdrivers for this).
5. Use your 2 wrenches to loosen the cable nuts on the back end of the clutch cable bowden tube (at a small aluminum anchor that’s attached to the differential housing side cover); pull the bowden tube away from the mount.
6. Use your large screwdriver (pry bar) to release the tension on the big cable arm by pushing the arm toward the front of the car. It will happen quickly because of the omega spring tension, keep your fingers out of the way.
7. Unhook the cable from the long arm (you can pull the arm down or just leave it there, but if you leave it be careful, it might fall off and hit you on the head – early arms have a locking pin, later cars don’t). FYI: The short arm fits onto splines, the larger arm floats on a smooth part of the throw out bearing fork shaft. If you remove the long arm clean it before installation and put a thin coat of moly or lithium-based grease on the shaft. If the omega spring requires replacement the long arm must be removed. On long arms with a securing pin, the pin must be driven out using a punch and hammer (difficulty factor can range from medium to very hard depending on rust/debris).
8. Go back inside the car (head first under the steering wheel/column), push the clutch pedal to the floor (it might already be there), and locate the clutch cable clevis pin and fork. Rotate the pin until you can remove it (it might be a real pain to take out depending on wear – you might have to use a small punch and hammer, different types of pliers, etc., or it might just come out easily). Once it's out pull the end of the cable, with clevis fork, out of the tunnel far enough so that you can use 12mm and 10mm open end wrenches to loosen the jamb nut. Unscrew the fork and nut all the way and set them aside for cleaning.
9. Go back under the car and look up between the forward side of your front transmission mount plate and the firewall forward of the nose of the transmission (you might have to move your jack and safety board a little). Locate where the clutch cable bowden tube connects to the firewall, put a flat-bladed screwdriver under its edge and gently pry it loose toward the rear of the car.
10. Grab the cable and pull it out of the car from under the back of the car; have a couple rags handy, it'll be greasy.
What you need to know:
A. With the cable on the workbench hold the bowden tube with one hand and pull the cable through it toward what would be the back of the car. Does it move smoothly? Any broken strands?
B. What is the condition of the arm and bushing where the clevis fork attaches?
C. Is the black helper spring on the left side of the pedal cluster, for the clutch pedal, intact?
Tech tip:
After market clutch cables are available, and identified by the words "Made in West(ern) Germany" in white letters on the bowden tube. Do not use one of those cables! An o.e. cable will cost about $85, an after market one about $30. Trust me, don't cut a corner on this one.
 07-22-2008, 11:15 PM
#2
Addict
Rennlist Member
Rennlist Member
Oh, come on Pete! You left out the fun part! The installation part with the 25mm+/-0.5mm adjustment. And when you cover THAT topic, please remind those of us who are too dumb to remember which way to "adjust" the jamb nuts to get more clutch pedal or less! (You can guess who the dummard is above!  )
)
)
07-23-2008, 10:29 AM
#4
Burning Brakes
Join Date: Oct 2003
Location: Tampa, Florida
Posts: 1,239
Likes: 0
Received 0 Likes
on
0 Posts
I am happy to know I was able to inspire someone. 
One thing that is driving me nuts is the way I routed my cable. I found two pitures that will show what I mean. (not of my car)
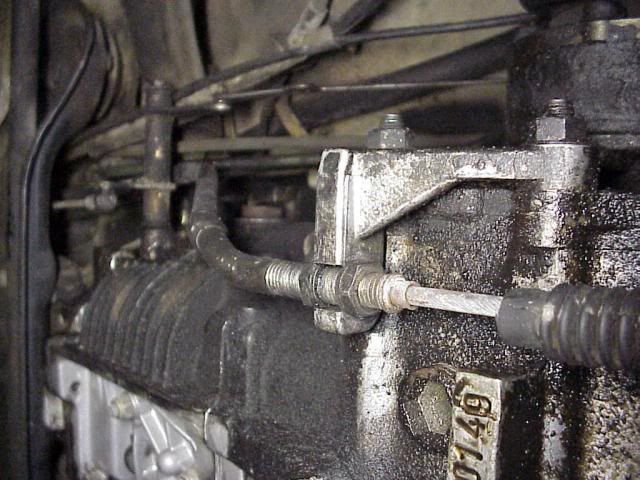
This is a picture of the cable routed over the "shift lever". (not sure what to call it becuase there is no identifying name in Bentley.
This is one with it ran under it.
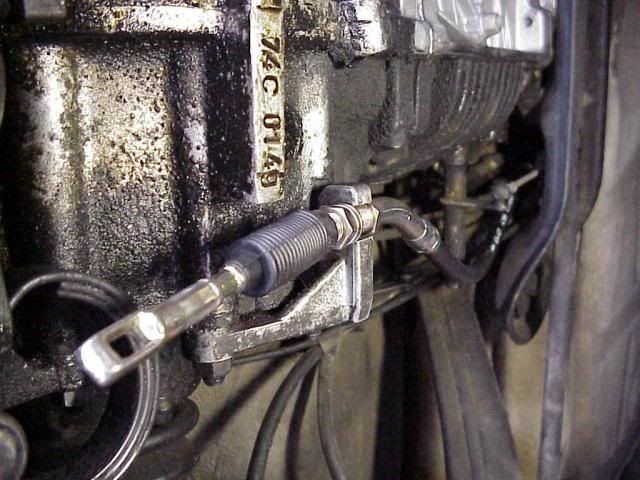
You can see when it runs over top it is much neater (and the way it was when I took it out). When I put mine back in I put it under. From the pictures it appears I am not the only one who did it that way...but it is driving me nuts.
One thing that is driving me nuts is the way I routed my cable. I found two pitures that will show what I mean. (not of my car)
This is a picture of the cable routed over the "shift lever". (not sure what to call it becuase there is no identifying name in Bentley.
This is one with it ran under it.
You can see when it runs over top it is much neater (and the way it was when I took it out). When I put mine back in I put it under. From the pictures it appears I am not the only one who did it that way...but it is driving me nuts.
07-23-2008, 08:25 PM
#5
Rennlist Member
Thread Starter
Michael: Uh, oh ! It's supposed to go over the throttle lever (aka bell crank), and the bowden tube should rest about an inch away from the side of the trans in its final tightened position.
Toby, Toby, Toby... what are we going to do with you ?
?
I do want to write a piece on the install, but I had to drive down to WLA today to have a tooth extracted (not too bad, really). As a result, I don't feel much like writing right now!
! It's supposed to go over the throttle lever (aka bell crank), and the bowden tube should rest about an inch away from the side of the trans in its final tightened position.Toby, Toby, Toby... what are we going to do with you
?I do want to write a piece on the install, but I had to drive down to WLA today to have a tooth extracted (not too bad, really). As a result, I don't feel much like writing right now!
07-23-2008, 11:21 PM
#6
Addict
Rennlist Member
Rennlist Member
 07-24-2008, 11:34 AM
#7
Burning Brakes
Join Date: Oct 2003
Location: Tampa, Florida
Posts: 1,239
Likes: 0
Received 0 Likes
on
0 Posts
Its no biggie though. I plan on re-routing it soon enough. While I was hooking it up I kept saying to myself...why the heck isnt this thing fitting perfectly? Wish I did not have to dissconect from the pedal cluster to get it done though.
Trending Topics
07-24-2008, 12:55 PM
#8
Rennlist Member
Thread Starter
I just thought of something. If your old cable passed through a small anchor fastened to the side of the trans (above the throttle lever), do not reuse that anchor. Remove the nut from the trans, remove and discard the anchor, and put the nut back on with a wavy washer (17-18 lb/ft torque).
07-24-2008, 02:59 PM
#9
Rennlist Member
Thread Starter