
My AC is broke, what would you do?
 09-04-2007, 12:44 PM
#16
Three Wheelin'
Join Date: Aug 2005
Posts: 1,980
Likes: 0
Received 0 Likes
on
0 Posts
DC I live in Florida, Orlando to be precise so it gets as hot and humid here as it does up in your neck of the woods. When I purchased my car the AC system wasn't working worth a flip. I did all of the research like you and went with a R-134 conversion and all it entails. New barrier hoses and etc. I took my old hoses after pulling them to a hydraulics shop that builds lines. They built me a complete set of barrier hoses bent to shape to match the stock ones and the right ends for like $300. I bought a new front condenser, receiver/dryer, compressor, and added a center venter in the "console." I didn't change the rear condenser though. Charged her all up and had much better air than I had, but it certainly isn't great.
One trick I do is to not put the temp controller all the way over to the max for long. I find that the condenser will actually get frost on it on those really hot and humid days, so I let it "cycle" some and turn it just off max for awhile and then turn it back down after a few minutes. Seems to put out consistently cooler air that way.
So good luck with it. It'll never be like a really cold system, but it can keep you from sweating to death on those realy hot days.
 09-04-2007, 12:56 PM
#17
Burning Brakes
DC: If you decide you want to fabricate your own rear condenser, this thread on Pelican might be helpful: http://66.236.61.177/showthread.php?t=176468.
I agree with you about the heat near the cat. That's why I put mine in the front left fender and relocated my water bottle and vapor recovery tank.
I agree with you about the heat near the cat. That's why I put mine in the front left fender and relocated my water bottle and vapor recovery tank.
09-04-2007, 12:59 PM
#18
Burning Brakes
09-04-2007, 03:51 PM
#19
Instructor
Join Date: Sep 2005
Location: Greensboro, NC
Posts: 189
Likes: 0
Received 0 Likes
on
0 Posts
D.C.,
Re. your concern about catalytic converter heat and a fender mounted condenser - since you have a 1986 are you still having to pass emissions tests? If not perhaps you could reduce the heat on the left side by replacing the cat with a euro pre-muffler like the Fabspeed unit. You can still use a O2 sensor, reduce the heat, maybe get a few additional horsepower and make the car sound a bit better at the same time.
Re. the Pro-Cooler - all my research indicated it would make an improvement so I did go in this direction.
Regards,
David
10-23-2007, 05:01 PM
#20
Instructor
Thread Starter

Join Date: Aug 2006
Location: Fairfax Virginia
Posts: 165
Likes: 0
Received 0 Likes
on
0 Posts
Everyone, thanks for all the terrific advise.
I have made my decision and will proceed as follows.
I ordered the Rennaire replacement system for my 86 Carrerra. This system consists of the following.
New compressor. I really needed this as the seal was leaking badly.
New barrier hoses. Complete set. Replacing these should be interesting!!!!
New evaporator. I am pulling the old one out tonight and will report.
New expansion valve.
Pro Cooler. I agonized over the Pro Cooler decision, but based on the input here decided to go with it.
This kit also includes some refridgerent oil, new foam, insulation, and other various bit and pieces. It seems to be a really nice kit. I talked to the Rennaire guy on the phone, I dont recall his name (Jim?). He was really nice and extremely helpful, and most of all honest. When we discussed my situation and location, he said he did not think I needed the desert duty front cooler. You got to respect a guy who is willing to tell you the truth, and forgo the sale of some extras that you dont need. I asked a bunch of questions and he had good solid answers. He said if I had any issues or questions with the install, to give him a call. I felt real comfortable doing business with him.
I plan to pull the old evaportor out tonight, The Bently manual made it sound fairly straight forward. The only thing I am worried about is my back, leaning over that smugglers box for a long period could be a problem.
10-23-2007, 08:33 PM
#21
Rennlist Member
Before you remove anything be sure to have any refrigerant remaining in the system removed professionally using equipment designed to not let it escape into the atmosphere.
10-24-2007, 07:08 AM
#22
Instructor
Thread Starter
Join Date: Aug 2006
Location: Fairfax Virginia
Posts: 165
Likes: 0
Received 0 Likes
on
0 Posts
Excellent point Pete!
In this case there is no pressure in the system, so I have assumed there is nothing to remove.
When I bought the car last year the system had a bit of pressure, but since then everything has leaked out.
In this case there is no pressure in the system, so I have assumed there is nothing to remove.
When I bought the car last year the system had a bit of pressure, but since then everything has leaked out.
10-24-2007, 01:27 PM
#23
Rennlist Member
If your hell bent on keeping the A/C then I would go w/option #1 (cheaper...then move on from there) But why not remove it and let the modifications begin
10-26-2007, 08:54 PM
#24
Instructor
Thread Starter
Join Date: Aug 2006
Location: Fairfax Virginia
Posts: 165
Likes: 0
Received 0 Likes
on
0 Posts
Let the fun begin !!!!
I am going to replace a bunch of things to get my AC working again.
You have to start somewhere... so I decided to start with the evaporator.
I opened the smugglers box to check out the evaporator.
There is a 30 amp fuse in the top of the picture, blue fuse.
Working down you can see the plastic housing that contains the evaporator. On top of the housing is a blower motor, that sucks fresh air across the cold coils of the evaporator, then deposits that cold air directly into the cabin on hot days.
Moving down the frame you see the two lines. I believe the line on the right is the high side of the system. This high side line goes to the expansion valve, which by way of some magical process, knows exactly how much freon to allow into the evaporator for maximum coldness.
Last edited by D.C.; 11-11-2007 at 08:20 AM.
10-26-2007, 09:13 PM
#25
Instructor
Thread Starter
Join Date: Aug 2006
Location: Fairfax Virginia
Posts: 165
Likes: 0
Received 0 Likes
on
0 Posts
Here is the evaporator box. There are 2 L brackets that hold it in place, with 10mm nuts. You see the 2 lines on the right have been disconected, When I took the high side line off, the top one in this pic, a bunch of dust, or powder type stuff came out of the connection. My first thought was that it needed a bit of oil in the system. If there was enough oil in the system, there certanly would not be any dust!!
Last edited by D.C.; 11-11-2007 at 08:23 AM.
10-27-2007, 09:08 AM
#27
Instructor
Thread Starter
Join Date: Aug 2006
Location: Fairfax Virginia
Posts: 165
Likes: 0
Received 0 Likes
on
0 Posts
So I am following the instructions in the Bently manual.
Bently says:
Dave says:
Bently: Disconnect negative battery cable.
Dave: I bypass this step and deem it unnessary, I like listening to the radio
Bently: Remove expansion valve as described earlier.
Dave: This is the magic valve that I talked about earlier.
Bently: Loosen hose clamp and and detach large air duct at top of evaporater housing.
Dave: This is the big hose that directs cold air into the cabin. The Renaire kit is supposed to contain an aircraft quality replacement. I hope it does because this one does not look very good.
Bently: Disconnect evaporator blower harness connector.
Dave: Unplugged the blower
Bently: Remove both support brackets.
Dave: 4 - 10mm nuts
Bently: Gently pull evaporator temperature probe out of the base of evaporator and lay aside without damaging duct.
Dave: You do need to be careful removing this probe. The probe slides into a tube that is burried into the evaporator core. It looks like the other end is connected to one of the controls in the cabin, but I am not sure)
Bently: Remove evaporator assembly from well.
Dave: Sounds easy enough, but I just can't seem to remove the assembly. The assembly is slightly loose; I can move it around a small amount. It appears to be caught on something but I really can�t tell what it is caught on. I decide that I will need to take the top half of the assembly off, then perhaps I can see what it is caught on. The assembly is held together with some spring clips. These spring clips are specially designed by Porsche to fly across the room with amazing speed when you try to remove them. I got lucky, I was able to remove all 4 clips and not loose any of them. The top cover comes off easily, and the evaporator comes out as well. In the picture below you can see that the box is caught on some mysterious triangular black thing, with a funny looking silver spring inside. Well apparently this mysterious triangular black thing is a vent into the cabin. From the cabin that vent is accessed in the passenger foot well, behind the plywood footrest. The round vent (right side of picture) connects the evaporator box to the cabin via the tunnel that runs down the middle of the car. I was able to get the bottom half of the evaporator box out with some gentle persuasion, but I did break the little black drip tube off the bottom off the bottom of the housing.
Bently says:
Dave says:
Bently: Disconnect negative battery cable.
Dave: I bypass this step and deem it unnessary, I like listening to the radio
Bently: Remove expansion valve as described earlier.
Dave: This is the magic valve that I talked about earlier.
Bently: Loosen hose clamp and and detach large air duct at top of evaporater housing.
Dave: This is the big hose that directs cold air into the cabin. The Renaire kit is supposed to contain an aircraft quality replacement. I hope it does because this one does not look very good.
Bently: Disconnect evaporator blower harness connector.
Dave: Unplugged the blower
Bently: Remove both support brackets.
Dave: 4 - 10mm nuts
Bently: Gently pull evaporator temperature probe out of the base of evaporator and lay aside without damaging duct.
Dave: You do need to be careful removing this probe. The probe slides into a tube that is burried into the evaporator core. It looks like the other end is connected to one of the controls in the cabin, but I am not sure)
Bently: Remove evaporator assembly from well.
Dave: Sounds easy enough, but I just can't seem to remove the assembly. The assembly is slightly loose; I can move it around a small amount. It appears to be caught on something but I really can�t tell what it is caught on.
I decide that I will need to take the top half of the assembly off, then perhaps I can see what it is caught on. The assembly is held together with some spring clips. These spring clips are specially designed by Porsche to fly across the room with amazing speed when you try to remove them. I got lucky, I was able to remove all 4 clips and not loose any of them. The top cover comes off easily, and the evaporator comes out as well. In the picture below you can see that the box is caught on some mysterious triangular black thing, with a funny looking silver spring inside. Well apparently this mysterious triangular black thing is a vent into the cabin. From the cabin that vent is accessed in the passenger foot well, behind the plywood footrest. The round vent (right side of picture) connects the evaporator box to the cabin via the tunnel that runs down the middle of the car. I was able to get the bottom half of the evaporator box out with some gentle persuasion, but I did break the little black drip tube off the bottom off the bottom of the housing.
Last edited by D.C.; 11-11-2007 at 08:24 AM. Reason: clarify, spelling
 10-29-2007, 05:55 PM
#29
Instructor
Join Date: Oct 2004
Location: North Dakota
Posts: 161
Likes: 0
Received 0 Likes
on
0 Posts
I wish I could say this is my "winter" project, but I don't have heated storage. But I'd love to see a "step by step" account of the parts replacement I plan to tackle in the spring.
So keep posting. And pictures...we like pictures!
So keep posting. And pictures...we like pictures!
10-29-2007, 07:07 PM
#30
Instructor
Thread Starter
Join Date: Aug 2006
Location: Fairfax Virginia
Posts: 165
Likes: 0
Received 0 Likes
on
0 Posts
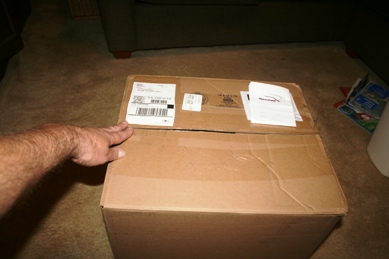
Good news ! I received a package from Rennaire today! They are based in Houston and the shipping to Virginia was much less than I had expected. The Box is pretty heavy. Lets open it up see what we got.
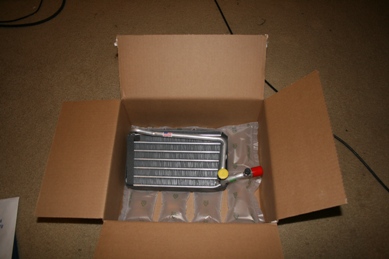
Here is the new evaporater, It actually has a made in the USA sticker on it. I like that. It looks like a quality piece, and it has new foam stuff around the edges to seal up all the leaks around the housing.
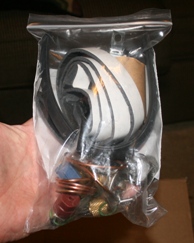
This bag contains a bunch of parts that go with the evaporator.
The expansion valve, some foam sealing tape, several new o-rings, a bunch of that real sticky cork tape to seal up the expansion valve.
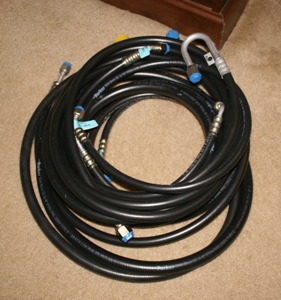
Here is the complete hose kit. This kit replaces every AC hose on the car, and these cars with a front condenser have a lot of hose. I am not sure how to tell which one goes where yet, but there appear to be some markings on them. I will need to develop some sort of strategy for hose replacement. I might try to do them one at a time, so I don't get confused, and screw it up. I noticed when I removed the hoses from the evaporator, that there were two different size fittings. I guess it would be impossible to hook up the evaporator backwards. Perhaps the rest of the system has different size fittings as well.
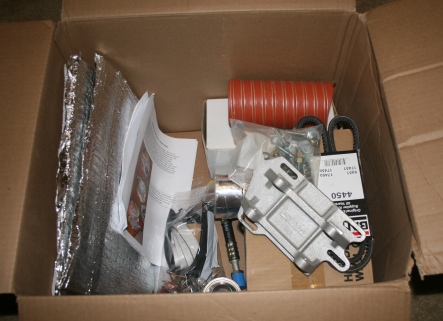
Here is a pic of the rest of the stuff still in the box. Top right is a piece of orange aircraft quality hose that fits between the blower and the vent distribution system in the smugglers box. below the hose is a white box that contains the Pro-Cooler that everyone recommended. On the right you can see a new belt, and a really cool looking aluminum adapter plate for the compressor. Far left you can see a large piece of insulating blanket that is used to wrap tightly around the evaporator housing. This insulates the evaporator from the heat that radiates from road, and into the smugglers box during the summer. In the middle of the box you can see the all important instructions, some aluminum type tape for the thermal blanket, a special hose for the Pro-Cooler, and another bag packed full of misc small parts. The new compressor is in there too.
Here is the new evaporater, It actually has a made in the USA sticker on it. I like that. It looks like a quality piece, and it has new foam stuff around the edges to seal up all the leaks around the housing.
This bag contains a bunch of parts that go with the evaporator.
The expansion valve, some foam sealing tape, several new o-rings, a bunch of that real sticky cork tape to seal up the expansion valve.
Here is the complete hose kit. This kit replaces every AC hose on the car, and these cars with a front condenser have a lot of hose. I am not sure how to tell which one goes where yet, but there appear to be some markings on them. I will need to develop some sort of strategy for hose replacement. I might try to do them one at a time, so I don't get confused, and screw it up. I noticed when I removed the hoses from the evaporator, that there were two different size fittings. I guess it would be impossible to hook up the evaporator backwards. Perhaps the rest of the system has different size fittings as well.
Here is a pic of the rest of the stuff still in the box. Top right is a piece of orange aircraft quality hose that fits between the blower and the vent distribution system in the smugglers box. below the hose is a white box that contains the Pro-Cooler that everyone recommended. On the right you can see a new belt, and a really cool looking aluminum adapter plate for the compressor. Far left you can see a large piece of insulating blanket that is used to wrap tightly around the evaporator housing. This insulates the evaporator from the heat that radiates from road, and into the smugglers box during the summer. In the middle of the box you can see the all important instructions, some aluminum type tape for the thermal blanket, a special hose for the Pro-Cooler, and another bag packed full of misc small parts. The new compressor is in there too.