

The World’s Coolest Way To Prevent Tire Flat Spots
 06-06-2011, 01:16 PM
#1
Instructor
Thread Starter
Okay, I admit this is a bit over the top. There are cheaper ways to prevent flat spots like over inflating, moving the car and parking on carpet scraps. Over the years I’ve tried these with varying success and have occasionally (when I wasn’t as diligent) had flat spots form that were permanent. There’s also a plastic product (not so cheap) that I guess conforms somewhat to the tire and claims to prevent flat spots. But now that I’ve got a new garage and a nice 993 with brand new expensive tires, I couldn’t see parking it on carpet scraps. So what would you do if you wanted the absolute coolest, and, I cheerfully admit, most expensive, way to prevent flat spots?
You’d start with this. It’s a four axis machining center I happen to have laying around. It costs a little more than a Carrera GT. It doesn’t corner as well, but it revs higher (15,000 rpm) and it wins in a head-on collision as it weighs around 20,000 lbs.

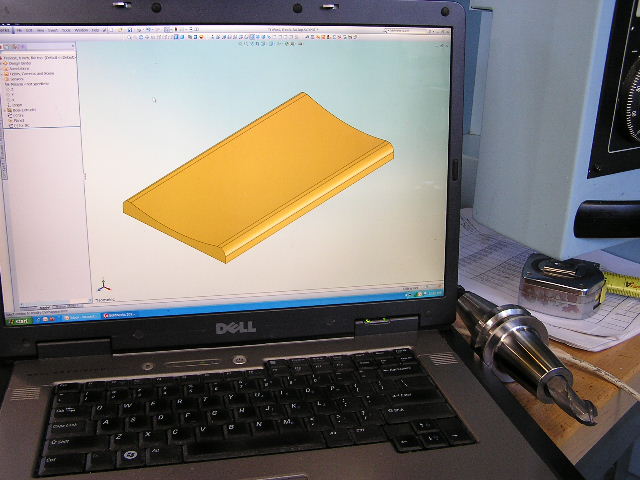
The idea was to mill an aluminum shape that the tire could rest in. It would have a radius that matched the tire, thereby supporting it perfectly and making flat spots impossible to form since no portion of the tire would be flat at all. First I created a 3D model in SolidWorks. Then I imported in into our CAM system.
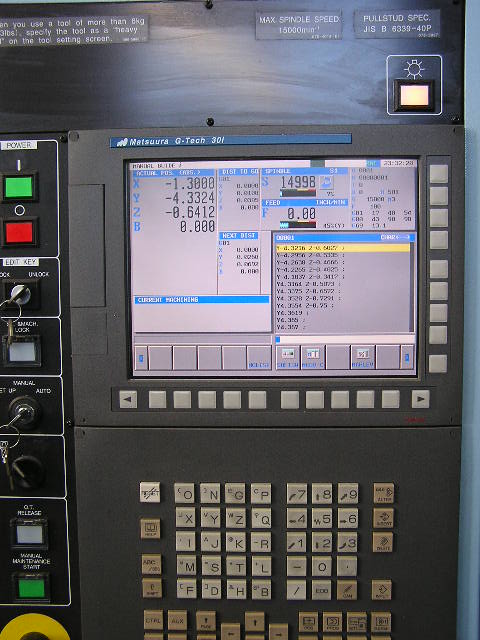
Now Real Men can program manually and I do that for simple shapes. But this would be a 3D form and we’d use a ball end mill to interpolate the curved shape. Back in the day when I was starting I’d even program stuff like that by hand, but the CAM system is much faster and quickly generates the thousands of lines of code needed. Here’s the CNC control with the program in:
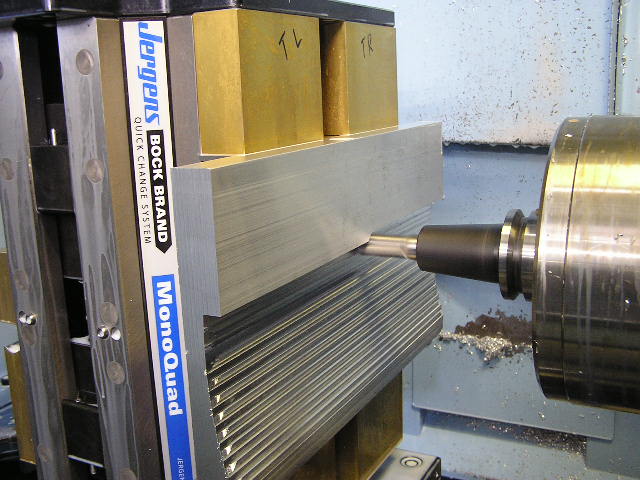
Once you’re ready you just clamp up nice big chunk of 6061-T6. I first did a coarse roughing pass to mill off most of the excess material.
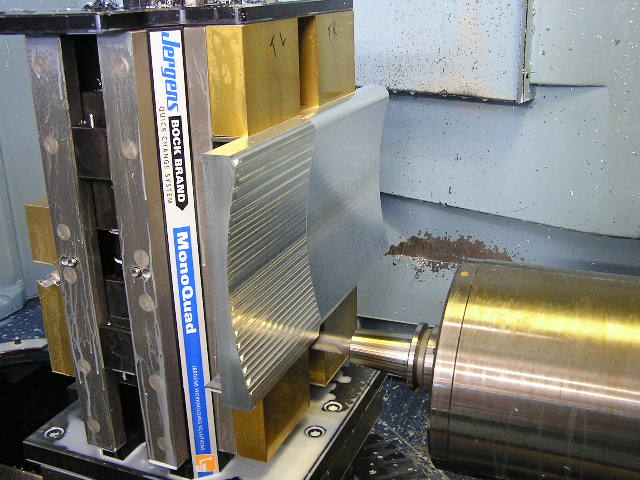
Then we made the finishing pass with a ball end mill. I elected to make the passes the short way for no particular reason, which turned out to be a mistake (see below). The way I programmed the finishing leaves ridges between the passes of only about .003” high, so I didn’t think the tire would mind.
Trying It Out
The first version supported the tires perfectly, but had a couple of problems. They were high enough that is was too much of a bump to easily drive onto. And the curved area was too big, so it was hard to get out of them, exacerbated by the machining grooves going the wrong way which didn’t add any traction for driving out. So, back to the drawing board (or really the computer).
I reduced the size of the curved area to about equal the length of the tire’s contact patch on flat ground. This allowed me to reduce the overall height and change the edges to a more gentle ramp. Then I changed the machining to make the grooves go the long way, which added a little traction so the tires wouldn’t slip in driving out of them.
The result? Perfection.
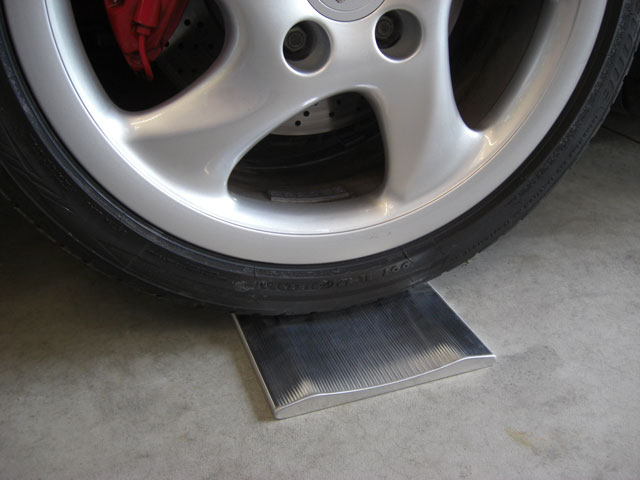
They are easy to drive on and off and give full support, keeping the tire nice and round. Originally I was going to use these only when I wouldn’t be driving for awhile. But I really like them and don’t see any reason not to just park on them routinely. I'm going to stick some rubber on the bottom and draw a rectangle on the floor where they go so I can move them if needed and easily put them back. If I decide to leave them in place, I'll use double stick tape, which should hold them just fine, yet allow removal if needed. Or eventually I might install those rubber garage tiles where I park the car. If I do, I could cut out the tiles to fit the tire rests and then just drop them in, which would be pretty slick.
You’d start with this. It’s a four axis machining center I happen to have laying around. It costs a little more than a Carrera GT. It doesn’t corner as well, but it revs higher (15,000 rpm) and it wins in a head-on collision as it weighs around 20,000 lbs.
The idea was to mill an aluminum shape that the tire could rest in. It would have a radius that matched the tire, thereby supporting it perfectly and making flat spots impossible to form since no portion of the tire would be flat at all. First I created a 3D model in SolidWorks. Then I imported in into our CAM system.
Now Real Men can program manually and I do that for simple shapes. But this would be a 3D form and we’d use a ball end mill to interpolate the curved shape. Back in the day when I was starting I’d even program stuff like that by hand, but the CAM system is much faster and quickly generates the thousands of lines of code needed. Here’s the CNC control with the program in:
Once you’re ready you just clamp up nice big chunk of 6061-T6. I first did a coarse roughing pass to mill off most of the excess material.
Then we made the finishing pass with a ball end mill. I elected to make the passes the short way for no particular reason, which turned out to be a mistake (see below). The way I programmed the finishing leaves ridges between the passes of only about .003” high, so I didn’t think the tire would mind.
Trying It Out
The first version supported the tires perfectly, but had a couple of problems. They were high enough that is was too much of a bump to easily drive onto. And the curved area was too big, so it was hard to get out of them, exacerbated by the machining grooves going the wrong way which didn’t add any traction for driving out. So, back to the drawing board (or really the computer).
I reduced the size of the curved area to about equal the length of the tire’s contact patch on flat ground. This allowed me to reduce the overall height and change the edges to a more gentle ramp. Then I changed the machining to make the grooves go the long way, which added a little traction so the tires wouldn’t slip in driving out of them.
The result? Perfection.
They are easy to drive on and off and give full support, keeping the tire nice and round. Originally I was going to use these only when I wouldn’t be driving for awhile. But I really like them and don’t see any reason not to just park on them routinely. I'm going to stick some rubber on the bottom and draw a rectangle on the floor where they go so I can move them if needed and easily put them back. If I decide to leave them in place, I'll use double stick tape, which should hold them just fine, yet allow removal if needed. Or eventually I might install those rubber garage tiles where I park the car. If I do, I could cut out the tiles to fit the tire rests and then just drop them in, which would be pretty slick.

 06-06-2011, 05:19 PM
#7
Burning Brakes

Couldn't you use a 3D printer to produce these in ABS? Seems like a good relatively inexpensive add-on for your CNC. We could probably spend more of your money if you'd like.
Trending Topics
06-06-2011, 05:39 PM
#8
Instructor
Thread Starter
Actually we do have a 3D printer that makes rapid prototypes from ABS. It's wonderful, but it's quite expensive to make a big part, far more than milling aluminum. It uses small diameter ABS wire and melts and deposits it with a resolution of .01". But the wire is expensive and would have cost about $250 just for one tire rest. Considering cost, durability, the coolness of machining it from billet and the fact that I needed four, I went with the aluminum.
06-06-2011, 05:40 PM
#9
Instructor
Thread Starter
06-06-2011, 05:48 PM
#10
Banned

Join Date: May 2008
Location: Arlington Heights, IL
Posts: 7,299
Likes: 0
Received 12 Likes
on
10 Posts
Very nice.
I think people pay over $400 for the tire cradles:
http://www.tirecradle.com/Home_Page.html
I've never had any flat spoting issues with the cars during winter hibernation. Tires are over inflated (about 58 PSI) with nitrogen. The first Saturday of each month, I slightly hand roll the car. The last month of storage I do this weekly. The Boxster sits for 6-7 months and the Turbo sits for about 4-5 months. The cars are smooth as glass the first drive of the season.
06-06-2011, 06:07 PM
#11
Three Wheelin'
Where did I leave my H.Plus-300? Damn...must be at my neighbors house.
Neat stuff, very cool and simple idea, and looks fantastic
...I just don't hibernate mine down here.
Neat stuff, very cool and simple idea, and looks fantastic
...I just don't hibernate mine down here.
06-06-2011, 07:04 PM
#12
Burning Brakes
Very very cool. Overkill, Yes, but if I had a CNC mill laying around I think my entire garage would be billet. I actually liked the way it looked "roughed out" with the deeper ball-mill marks. It's a beautiful piece of work.
06-06-2011, 07:14 PM
#13
Drifting
You know, if you drive it often enough, the tires will not flat spot...
As well, your smile will not flat spot either, because you will look like this -->
You shouldn't have a flatspotting problem since yours lives on jackstands with the wheels off as part of a perpetual detail job...

As well, your smile will not flat spot either, because you will look like this -->
You shouldn't have a flatspotting problem since yours lives on jackstands with the wheels off as part of a perpetual detail job...
06-06-2011, 07:53 PM
#14
Instructor
Thread Starter
But I wouldn't be smiling when someone slid into me during an icy Utah winter. And Utah is famous for the salt they put on the roads. I live 1,000 feet above the valley floor and it's like a different world up there. I have a Chevy Avalanche and a Land Rover Defender 90 and there's usually a couple of days that, even with them, I have to wait until the snowplow goes by and then follow it to get home. So the sports cars get shelved and we have to be content with ice climbing, skiing/snowboarding, snowshoeing and taking the dirtbikes to Moab.
06-06-2011, 08:00 PM
#15
Instructor
Thread Starter