Brake Pad Change
 03-28-2009, 07:06 PM
#1
Addict
Rennlist Member
Rennlist Member
Thread Starter
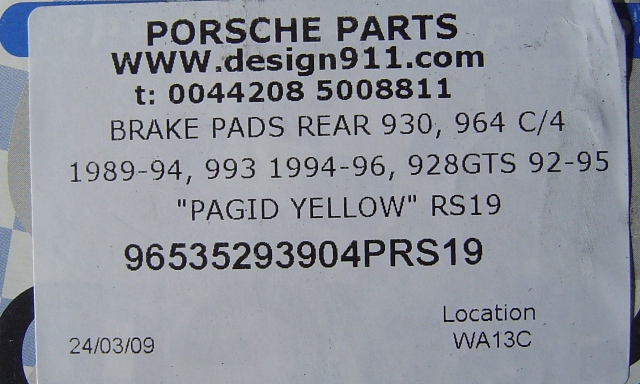
Changed my brake pads for the first time and wated to contribute the DIY instructions as I could not find them elsewhere. Parts needed ( if you decide to keep your wear indicators - which I decided not to use)

Decided on Pagid Yellows
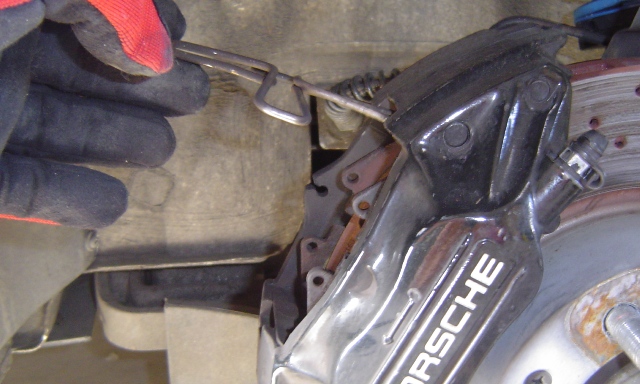
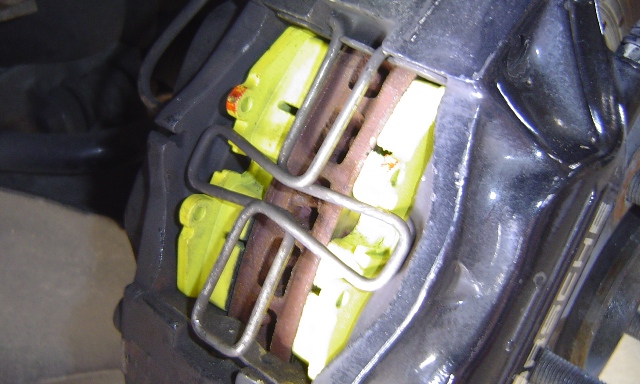
Compressing the spider spring with some pliers allows it to slip out of the bottom retainer:

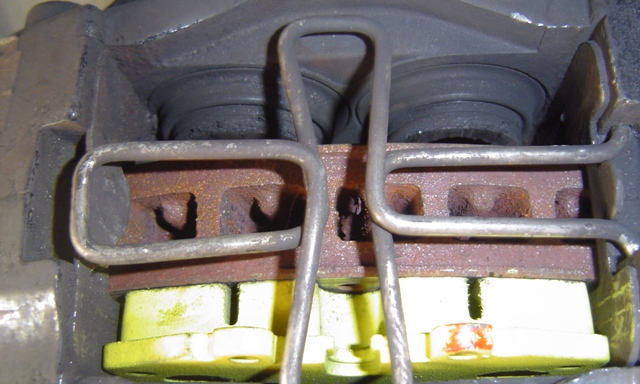
Lift the spring and you can pull out the old pads with pliers or a screw driver
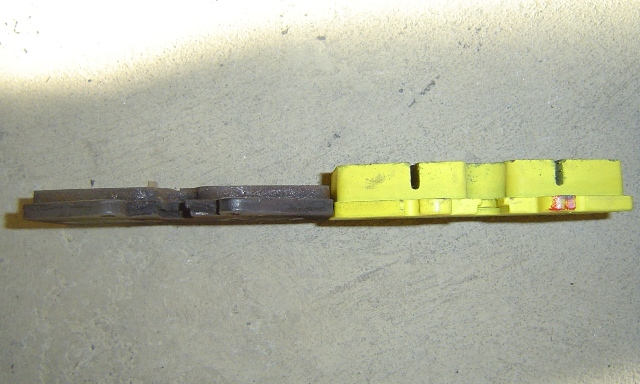
I would have had a bit more to go - (minimum is 2 mm) bit there is always the danger of uneven pad wear as you can't easily see the inside ones
You will have to push back the two pods on each side with screw drivers in order to fit the new (thicker) pads
Squeeze the spider spring as before and hook it back into the bottom retainer
Done - this should not take you more than 10 minutes a wheel (which includes raising the car and taking the wheel off). I did not install the wear indicators as my car did not have them. I would not trust them anyway. Better to check with the eye.
I know this is somewhat of a lame post, however it's really that easy.
Decided on Pagid Yellows
Compressing the spider spring with some pliers allows it to slip out of the bottom retainer:
Lift the spring and you can pull out the old pads with pliers or a screw driver
I would have had a bit more to go - (minimum is 2 mm) bit there is always the danger of uneven pad wear as you can't easily see the inside ones
You will have to push back the two pods on each side with screw drivers in order to fit the new (thicker) pads
Squeeze the spider spring as before and hook it back into the bottom retainer
Done - this should not take you more than 10 minutes a wheel (which includes raising the car and taking the wheel off). I did not install the wear indicators as my car did not have them. I would not trust them anyway. Better to check with the eye.
I know this is somewhat of a lame post, however it's really that easy.

 03-29-2009, 07:35 AM
#3
Addict
Rennlist Member
Rennlist Member
Thread Starter
Steve,
I left them off altogether as they were already shortened out at the connector by a prior owner of the car. There were no BWI indicators on the car when I took the old pads out.
I left them off altogether as they were already shortened out at the connector by a prior owner of the car. There were no BWI indicators on the car when I took the old pads out.
03-29-2009, 11:26 AM
#4
Addict
Rennlist Member
Rennlist Member
Thread Starter
it's really that simple. I did not bleed the brakes. It's not a requirement when you change pads, however I plan to do it every 3-4 months since the car sees primary track use.
The fronts are the same as the rears. The wear sensors just clip into the space between the two humps in the pad. Theoretically, you don't need to replace them if you have them unless you've run the pads down to where they have activated.
The fronts are the same as the rears. The wear sensors just clip into the space between the two humps in the pad. Theoretically, you don't need to replace them if you have them unless you've run the pads down to where they have activated.
03-29-2009, 12:02 PM
#5
Burgled
Rennlist Member
Rennlist Member
Be sure your brake reservoir isnt to full if your old pads are worn down real low because when you squeeze the calipers back it might overflow. Use a turkey baster or something to suck some out and refill after a short test drive to get the pistons and pads reset. Oh yea be carefull when you first take off. You might not have any brakes for a moment until things settle in.

The following users liked this post:
kos11-12 (10-19-2021)
03-29-2009, 12:29 PM
#6
What about bed-in procedures. Is that different for every kind of brake pad?
Last time I changed the pads I had read about a process of doing several runs (in a safe place!!) from 60mph to 20, or 10mph, back to 60, hard, near ABS down to 20, back up, back down six or eight or ten times; I forget. I do recall that these brakes are so good that I started to feel a bit like I had just stepped off a roller coaster!
Last time I changed the pads I had read about a process of doing several runs (in a safe place!!) from 60mph to 20, or 10mph, back to 60, hard, near ABS down to 20, back up, back down six or eight or ten times; I forget. I do recall that these brakes are so good that I started to feel a bit like I had just stepped off a roller coaster!
03-29-2009, 12:34 PM
#7
Trial Rennlist
Member
Member
Join Date: Mar 2009
Posts: 220
Likes: 0
Received 0 Likes
on
0 Posts
thanks for the info gents. Whats considered worn low? At my recent service they said my pads had 40% left in them and suggested changing them. I didnt see why they needed changing yet with that much wear left in them !
Mind you, and not sure if this was the normal service dealers ruse as ive heard it from so many people ripped off with it with other cars, they also said i should get the disks changed. Now im no mechanic but when i had the wheels off recently to tidy up my callipers the disks looked mighty fine to me. No scratches, pitting or other marks on the disk surface. There was mild surface rust around the top vented edge (not the disk surface) but that brushed off easily with a wire brush. So why would they apparently need changing? Should i now be suspicous of said garage?
At any rate, it sounds like i can change the pads myself rather than paying them to do it, so this thread has been very useful to me
Trending Topics
03-29-2009, 01:23 PM
#8
Addict
Rennlist Member
Rennlist Member
Thread Starter
Mark, you're fine. The minimum pad thickness is 2 mm so anything above would not need replacing. Just keep in mind that my right side wheel was 4 mm and the left wheel 2 mm so they did not wear evenly in my case.
With respect to bedding in, here is an excerpt of what I found. Not sure how to do this on a public road:
With respect to bedding in, here is an excerpt of what I found. Not sure how to do this on a public road:
Generally you should bed all pads before any hard use.
If so, do 5 or so stops from 70 to 30 with medium pedal pressure, (make sure you have no one behind you) let cool for 1/4 mile between applications.'
If you can do a full bedding in on the highway i would recommend that, as follows, this is the pagid procedure that i have used for years and has always worked well for me.
Basic bedding in
5-8 stops with light to medium brake pressure from approximately 90 MPH to 65 MPH. Distance between each brake stop approximately 300 to 400 yards. The pads should not reach temperatures above 300 - 400�C (550 - 750�F) during bedding in. No dragging!
Immediately after basic bedding in at high speed
One stop with medium to heavy brake pressure, without allowing brakes to lock from approximately 110 MPH to approximately 65 MPH. Recovery stops with light brake pressure 3-4 times. Repeat the high speed stops, including recovery stops, 2-3 times. Allow a cooling-off distance of approximately 500 yards between high speed stops.
03-29-2009, 04:12 PM
#9
Addict
Rennlist Member
Rennlist Member
FYI, the 2 pot calipers (rears on MY1991) are slightly different and require you push out the pins on either side. Pelican parts has a good writeup on this however so you're well covered:
http://www.pelicanparts.com/techarti...brake_pads.htm
Frank, I don't think you can have too many write-ups on anything DIY related. Great thread!
http://www.pelicanparts.com/techarti...brake_pads.htm
Frank, I don't think you can have too many write-ups on anything DIY related. Great thread!

